
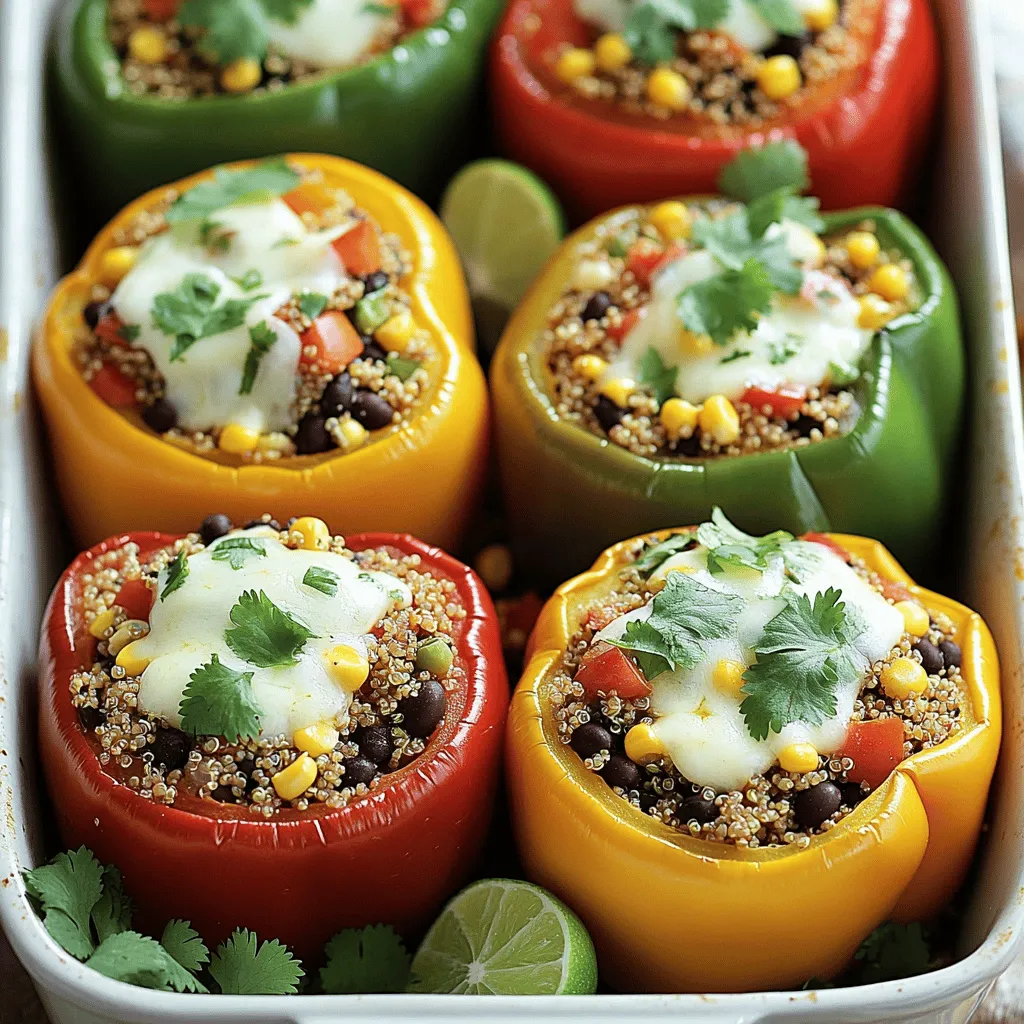
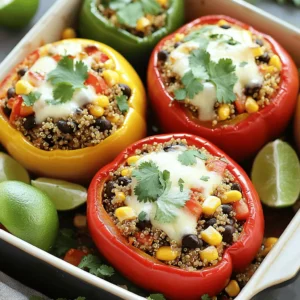
Mexican Quinoa Stuffed Peppers Flavorful and Healthy

Craving a dish that’s both flavorful and healthy? Dive into my recipe for Mexican Quinoa Stuffed Peppers! These vibrant peppers are packed with protein-rich quinoa, black beans, and fresh veggies. You’ll learn how to create a delicious meal that is not only colorful but also full of nutrients. Let’s explore this simple, tasty, and satisfying recipe that will make your taste buds dance!
Ingredients
List of main ingredients
- 4 large bell peppers (your choice of color)
- 1 cup quinoa, thoroughly rinsed
- 2 cups vegetable broth or water
Additional ingredients
- 1 can (15 oz) black beans, drained and rinsed
- 1 cup corn kernels (fresh, frozen, or canned)
- 1 cup diced tomatoes (fresh or canned)
Seasoning and cheese
- 1 teaspoon ground cumin
- 1 teaspoon chili powder
- ½ teaspoon smoked paprika
- Salt and freshly cracked pepper to taste
- 1 cup shredded cheese (cheddar or Mexican blend)
- Fresh cilantro and lime wedges for serving
Gathering these ingredients is simple and fun. I recommend using fresh bell peppers for the best taste. You can choose any color: red, yellow, or green. They all work great and make your dish colorful.
Quinoa is the star of this show. It is gluten-free, high in protein, and very filling. Rinsing it helps remove the bitter coating called saponin.
You can use canned black beans for convenience. They add protein and fiber, making this dish more satisfying. Corn adds sweetness and texture, while diced tomatoes bring juiciness and flavor.
For spices, cumin and chili powder give a nice kick. Smoked paprika adds depth. Don’t forget to add salt and pepper! They help balance all the flavors.
Top your stuffed peppers with shredded cheese for a melty finish. I like using cheddar or a Mexican blend. They pair perfectly with these flavors. Fresh cilantro and lime wedges are great for serving. They add a bright touch to the dish and enhance the flavors.
This collection of ingredients makes the perfect base for your Mexican quinoa stuffed peppers.
Step-by-Step Instructions
Pre-Preparation
- Prepare your oven by preheating to 375°F (190°C).
- Prep the peppers by cutting off tops and removing seeds.
Cooking the Quinoa
- Combine rinsed quinoa with vegetable broth or water in a medium saucepan.
- Bring to a rolling boil, then simmer until fluffy. This usually takes about 15 minutes.
Filling and Baking
- Mix cooked quinoa with black beans, corn, diced tomatoes, cumin, chili powder, smoked paprika, and salt.
- Stuff peppers with this tasty mixture. Don’t be shy; pack it in!
- Sprinkle cheese on top of each stuffed pepper for a cheesy finish.
- Bake covered for 25 minutes, then uncovered for an additional 10-15 minutes. This helps the cheese melt perfectly and the peppers become tender.Enjoy the vibrant flavors and health benefits of this dish!
Tips & Tricks
Ingredient selection
Choosing the best bell peppers for stuffing is key. Look for large, firm peppers. They should feel heavy for their size. Bright colors like red, yellow, and orange add beauty. Each color has its own unique flavor.
When selecting quinoa, quality matters. Always choose organic quinoa if you can. Rinse it well before cooking. This removes the bitter coating called saponin. It helps the quinoa taste light and fresh.
Cooking tips
To ensure quinoa is perfectly fluffy, use a proper water-to-quinoa ratio. A 2:1 ratio works best. Bring the liquid to a boil before adding quinoa. Once it simmers, cover and cook on low. This method makes sure it cooks evenly.
To prevent peppers from burning while baking, cover them with foil at first. This keeps moisture in and helps them cook through. Remove the foil later to let the cheese brown.
Presentation ideas
For creative serving suggestions, think about garnishes. Fresh cilantro adds color and flavor. A sprinkle of lime juice brightens the dish. You can also serve lime wedges on the side for guests.
Plating tips can enhance the meal’s appeal. Use a colorful platter for your stuffed peppers. Arrange them neatly for a beautiful display. Add extra cilantro around the edges for a fresh look.
Variations
Dietary substitutions
You can easily make this dish vegan-friendly. Simply swap out the cheese for a plant-based alternative. Many brands offer tasty vegan cheese that melts well. You can also use nutritional yeast for a cheesy flavor without dairy. For gluten-free swaps, quinoa is already a great choice. It’s free from gluten and packed with protein. Just make sure any other ingredients, like broth, are gluten-free too.
Flavor enhancements
Want to spice things up? You can add jalapeños or a splash of hot sauce. This will give your peppers a nice kick. You can also mix in different herbs and spices. Consider using fresh cilantro, oregano, or even a touch of cayenne pepper for added warmth. These simple tweaks can take your stuffed peppers to the next level.
Vegetable alternatives
If you want to change the flavor, consider using zucchini or mushrooms. Both of these veggies add unique tastes and textures. You can chop them up and mix them into the filling. Additionally, feel free to experiment with other beans or legumes. Chickpeas or pinto beans can work well here. These swaps allow you to customize your dish and keep it exciting.
Storage Info
Storing leftovers
To store your stuffed peppers, let them cool to room temperature. Then, place them in an airtight container. Keep them in the fridge for up to four days. This way, you can enjoy your tasty meal again soon!
Freezing instructions
You can freeze fully prepared stuffed peppers for up to three months. Wrap each pepper in plastic wrap and then in foil. This protects them from freezer burn. When you’re ready to eat, thaw them in the fridge overnight. To reheat, place them in a preheated oven at 375°F (190°C) for about 25 minutes. This warms them through and keeps them moist.
Using up ingredients
If you have leftover quinoa or filling, don’t throw it away! Use the quinoa in salads or as a side dish. Mix it with veggies and dressings for a fresh meal. You can also make a quinoa stir-fry or add it to soups. If you have extra peppers, chop them and toss them into your next omelet or frittata for extra flavor. These ideas help you reduce waste and enjoy your ingredients fully.
FAQs
Common questions about the recipe
Can I use other grains instead of quinoa?
Yes, you can! Brown rice, farro, or barley work well too. Choose a grain that fits your taste. Each grain adds different textures and flavors to the dish. Just remember to adjust the cooking time based on the grain you use.
How do I know when the peppers are done baking?
Your peppers are done when they are soft and slightly wrinkled. The cheese should be golden and bubbly. A fork should easily pierce the peppers. Keep an eye on them, as overcooking can make them mushy.
Serving suggestions
What sides pair well with stuffed peppers?
You can serve these stuffed peppers with a fresh salad or some avocado slices. Cornbread or rice goes well too. A side of guacamole adds creaminess and flavor. You can also enjoy them with tortilla chips for a crunchy bite.
Can I make these ahead of time?
Absolutely! You can prepare the filling a day before and store it in the fridge. You can stuff the peppers and bake them when you’re ready. This saves time and makes a quick meal for busy days.
Nutritional considerations
Caloric and nutritional breakdown of the recipe
Each serving of Mexican quinoa stuffed peppers has about 400 calories. They provide protein from quinoa and beans. You also get fiber and vitamins from the peppers and corn.
Health benefits of main ingredients included in the dish
Quinoa is a complete protein, which means it has all nine essential amino acids. Black beans are great for heart health and digestion. Bell peppers are high in vitamins A and C, boosting your immune system. This dish is not just tasty but also packed with nutrition.
This recipe for stuffed peppers combines fresh ingredients, easy preparation, and great taste. You learned how to choose the best peppers, cook fluffy quinoa, and mix in tasty ingredients like black beans and corn. Remember, you can customize the flavors with spices and herbs. Enjoy the flexibility in this dish, whether you’re vegan or love heat. Store leftovers or freeze for later. With this guide, you can create delicious meals that everyone will enjoy. Get cooking, and make these stuffed peppers your new favorite dish!

![To make your chocolate chip banana bread, you need these key ingredients: - 2 ripe bananas, thoroughly mashed - 1/3 cup coconut oil, melted - 1 teaspoon pure vanilla extract - 1/2 cup packed brown sugar - 1/4 cup granulated sugar - 2 large eggs at room temperature - 1 teaspoon baking soda - 1/4 teaspoon fine salt - 1 1/2 cups all-purpose flour - 1/2 cup semi-sweet or dark chocolate chips - 1/4 cup walnuts or pecans, chopped (optional) Each ingredient plays a vital role in crafting a moist and tasty loaf. Ripe bananas add sweetness and moisture. Coconut oil gives a rich flavor and a soft texture. The sugars create that perfect crust while the eggs help bind everything together. You can personalize your chocolate chip banana bread with fun add-ins. Here are some ideas: - Chopped nuts for crunch - Dried fruits like cranberries or raisins - A sprinkle of cinnamon for warmth - Peanut butter or nutella swirls for extra richness Feel free to mix and match! These add-ins can bring new flavors and textures to your bread. Using high-quality ingredients makes a big difference. Choose ripe bananas; they should be spotty and soft. Fresh eggs bring richness and flavor. Use pure vanilla extract for the best taste. For the oils, opt for organic coconut oil if possible. Quality flour helps create the right texture. Remember, great ingredients lead to great results! For the full recipe, check out the [Full Recipe]. Start by preheating your oven to 350°F (175°C). This step is crucial for even baking. Next, grab a 9x5 inch loaf pan. Lightly grease it with cooking spray or butter. You can also use parchment paper to line the pan. This makes removing the banana bread easier. In a large mixing bowl, take 2 ripe bananas and mash them well. You want them smooth with no lumps. Then, add 1/3 cup of melted coconut oil. Mix them together until they blend into a creamy base. This combination gives your bread moisture and flavor. Add 1 teaspoon of pure vanilla extract, 1/2 cup of packed brown sugar, and 1/4 cup of granulated sugar to the banana mix. Stir until it’s smooth. Now, crack in 2 large eggs. Mix well after each egg. Then, sprinkle 1 teaspoon of baking soda and 1/4 teaspoon of fine salt over the mix. Stir gently. Next, sift in 1 1/2 cups of all-purpose flour. Fold it in carefully. Don’t overmix; this keeps your loaf tender. Finally, gently fold in 1/2 cup of semi-sweet or dark chocolate chips. If you like, add 1/4 cup of chopped nuts too. Pour the batter into your prepared loaf pan. Smooth the top with a spatula. Place it in the oven and bake for 55-65 minutes. It’s done when a toothpick comes out clean or with a few crumbs. Let the bread cool in the pan for 10 minutes. Then, carefully move it to a wire rack to cool completely. This cooling step helps set the flavors. For the full recipe, refer to the section above. To get the best texture, use ripe bananas. The riper, the better! They must be soft and spotty. This way, you get a sweet and moist bread. Mash them well to avoid lumps. Mix ingredients gently after adding the flour. Over-mixing can make your bread tough. Aim for a light, fluffy loaf. Keep your banana bread fresh by wrapping it tightly. You can use plastic wrap or foil. Store it at room temperature for up to four days. If you want it to last longer, place it in the fridge for about a week. To keep it even longer, freeze it. Slice it before freezing for easy serving. Just make sure to wrap each slice well. Serve your chocolate chip banana bread warm. It tastes best right out of the oven! Add some butter on top for richness. You can also sprinkle powdered sugar for a sweet touch. For extra fun, top with fresh banana slices or more chocolate chips. This makes it look pretty and taste even better! For the complete recipe, check out the Full Recipe section in this article. {{image_4}} You can enjoy chocolate chip banana bread without gluten. Use a gluten-free flour blend. This blend works well as a one-to-one substitute. Make sure it has xanthan gum. This helps bind the ingredients. The flavor stays rich and delicious. Just follow the same steps as in the Full Recipe. You will love the texture and taste. For a vegan version, swap eggs for flax eggs. To make a flax egg, mix one tablespoon of flaxseed meal with three tablespoons of water. Let it sit for a few minutes to thicken. Use non-dairy milk and coconut oil as well. This keeps the bread moist and soft. You can still add chocolate chips, just choose dairy-free ones. You can add your favorite spices for extra flavor. Cinnamon and nutmeg pair well with bananas. A pinch of each can make a big difference. You can also try almond or coconut extract. These extracts add depth. Experiment to find your favorite combo. Each twist makes the bread unique and fun. To keep your chocolate chip banana bread fresh, store it at room temperature. Wrap it tightly in plastic wrap or foil. This helps keep moisture in. Place it in a cool, dry spot, away from direct sunlight. If you prefer, you can also use an airtight container. This will help maintain its soft texture and rich flavor. Freezing is a great option if you want to save some for later. First, let the banana bread cool completely. Then, wrap it tightly in plastic wrap, followed by aluminum foil. This extra layer prevents freezer burn. You can freeze it for up to three months. When you're ready to enjoy it, simply thaw it in the fridge overnight. Reheating banana bread can bring back its lovely warmth. You can use a toaster oven or a conventional oven. Preheat your oven to 350°F (175°C). Slice the bread and place it on a baking sheet. Heat for about 5-10 minutes. If you want a softer texture, cover it with foil. You can also pop a slice in the microwave for about 10-15 seconds. Enjoy it warm for a cozy treat! Your chocolate chip banana bread is done when a toothpick comes out clean. Insert it in the center. If it has a few crumbs, that is fine too. The bread usually bakes for 55-65 minutes. The top should look golden brown. Yes, you can substitute some ingredients. For example, use olive oil instead of coconut oil. You can also swap brown sugar for maple syrup. Make sure to adjust the amounts as needed for the best results. Chocolate chip banana bread lasts about 3-4 days at room temperature. Store it in an airtight container. For longer storage, keep it in the fridge for a week. You can also freeze it for up to 3 months. You can use applesauce or mashed bananas as egg substitutes. Use 1/4 cup of applesauce or 1/2 banana for each egg. Both options keep the bread moist and flavorful. This chocolate chip banana bread stands out because of its rich flavors. The combination of ripe bananas and chocolate chips creates a sweet treat. Using coconut oil adds a subtle depth to the taste. The option to add nuts gives extra texture. You can find the complete recipe in the Full Recipe section. This blog post covered how to make delicious chocolate chip banana bread. We discussed key ingredients, optional add-ins, and the importance of ingredient quality. I shared step-by-step instructions to guide you through the baking process. We explored tips for the perfect texture, storage methods, and fun variations like gluten-free and vegan options. With these insights, you can easily bake this treat and impress everyone. Enjoy your baking journey!](https://dishtreats.com/wp-content/uploads/2025/06/ff2d306f-7b8f-4bb2-a8a5-5e2882fba681-768x768.webp)