
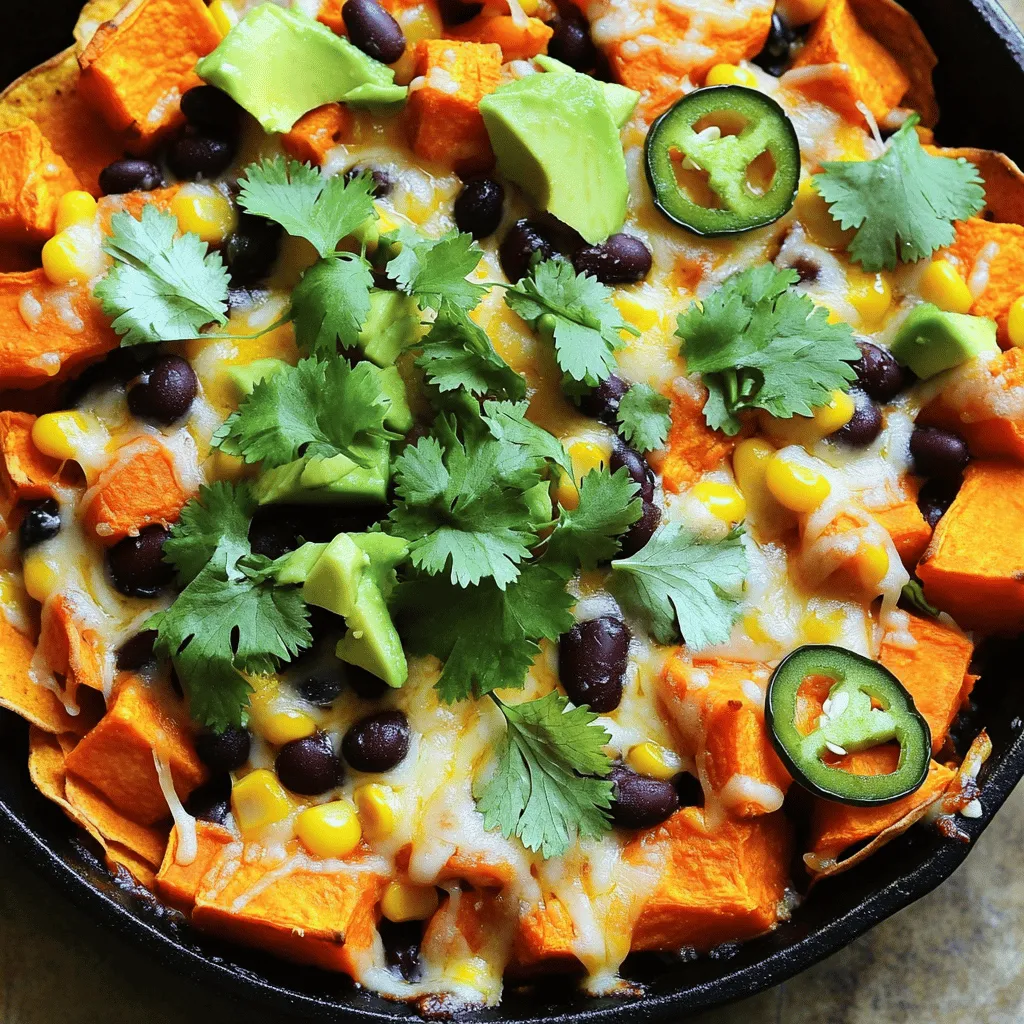
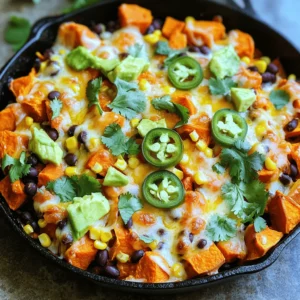
Loaded Sweet Potato Nacho Skillet Flavorful and Fun

If you’re craving a fun twist on nachos, look no further! My Loaded Sweet Potato Nacho Skillet is bursting with flavor and perfect for sharing. Packed with sweet potatoes, black beans, and all your favorite toppings, it’s a meal that’s both hearty and healthy. Whether you want to spice it up or keep it simple, this dish is easy to make and even easier to enjoy. Let’s dive into the ingredients and get cooking!
Ingredients
List of Required Ingredients
- 2 large sweet potatoes, peeled and diced into 1-inch cubes
- 1 tablespoon olive oil
- 1 teaspoon smoked paprika
- 1/2 teaspoon ground cumin
- Sea salt and freshly ground pepper to taste
- 1 can (15 oz) black beans, rinsed and drained well
- 1 cup canned corn, drained
- 1 cup cherry tomatoes, halved
- 1 ripe avocado, diced
- 1/2 cup shredded cheese (cheddar or a vegan cheese alternative)
- 2 tablespoons fresh cilantro, finely chopped
Optional Ingredients for Extra Flavor
- 1 jalapeño, thinly sliced (optional, for heat)
- Lime wedges for serving
Recommended Ingredient Substitutions
- Vegan cheese alternative for a dairy-free option
- Different beans like pinto or kidney beans
- Seasonal vegetables such as zucchini or bell peppers
Loaded Sweet Potato Nacho Skillet is fun and easy to make with these ingredients. Sweet potatoes offer a sweet base that pairs well with savory toppings. You can mix and match ingredients as you like. For spice, add jalapeños. Lime wedges brighten the dish and balance the flavors. If you want to go vegan, swap cheese for a plant-based option. You can also use different beans or fresh veggies based on what you have. With all these choices, your nacho skillet will be unique every time!
Step-by-Step Instructions
Preparation Steps
1. Preheat the Oven: Start by preheating your oven to 400°F (200°C). A hot oven will help roast the sweet potatoes perfectly.
2. Prepare Sweet Potatoes: In a large bowl, add the diced sweet potatoes. Drizzle with olive oil. Then sprinkle in smoked paprika, cumin, sea salt, and black pepper. Toss everything together until the sweet potatoes are evenly coated.
Cooking Process
3. Roast Sweet Potatoes: Spread the seasoned sweet potatoes on a baking sheet in one layer. Roast them in the oven for about 25-30 minutes. Flip them halfway through for even cooking. This ensures a crispy outside and tender inside.
4. Lower Oven Temperature: Once the sweet potatoes are tender and a bit crispy, reduce the oven temperature to 350°F (175°C). This prepares the oven for the next step.
5. Layer Ingredients: In a large, oven-safe skillet, layer the roasted sweet potatoes on the bottom. Next, add the rinsed black beans, drained corn, and halved cherry tomatoes. Make sure to spread them evenly over the sweet potatoes.
6. Add Cheese: Generously sprinkle shredded cheese on top of the layered ingredients. This will melt beautifully and add richness to your dish.
Baking and Serving Instructions
7. Bake Until Bubbly: Place the skillet back in the oven. Bake for about 10-15 minutes, or until the cheese is melted and bubbly. Keep an eye on it to avoid over-browning.
8. Finish and Cool: Carefully remove the skillet from the oven. Let it cool for a minute. Top with diced avocado, jalapeños (if you want heat), and chopped fresh cilantro.
9. Serve With Style: Serve with lime wedges on the side. Squeeze lime juice over the nachos for a fresh burst of flavor. This adds a nice contrast to the rich ingredients.Enjoy your colorful and tasty Loaded Sweet Potato Nacho Skillet!
Tips & Tricks
Perfecting the Roasting of Sweet Potatoes
To get crispy sweet potatoes, cut them into even cubes. This helps them cook evenly. Toss them with olive oil and spices for the best flavor. Roast at 400°F for 25-30 minutes. Flip them halfway for crispiness on all sides. Don’t overcrowd the pan; give them space to roast well.
Layering Techniques for Optimal Flavor
Layer your ingredients wisely. Start with the crispy sweet potatoes at the bottom. Add black beans, corn, and tomatoes next. This way, the flavors mix perfectly. When you sprinkle cheese on top, it melts into the layers. This creates a gooey, flavorful dish.
Serving Suggestions
Serve your nacho skillet with lime wedges. The lime adds a fresh taste that brightens the dish. You can also top it with diced avocado and fresh cilantro. For extra heat, add sliced jalapeños. This makes each bite fun and flavorful. Enjoy the colors and textures when you serve it!
Variations
Vegetarian and Vegan Adaptations
You can easily make this dish plant-based. Swap cheese for vegan cheese. Use lentils or chickpeas instead of black beans. Both add protein and flavor. You can also add spinach or kale for more greens. These choices keep the dish tasty and healthy.
Flavor Enhancements
To change up the flavor, add spices or sauces. Try taco seasoning for a bold taste. Hot sauce can add heat if you like spice. You can also mix in some salsa or guacamole for a fresh twist. These simple changes can create a new experience each time you make it.
Seasonal Variations
Seasonal veggies can make this dish even better. In summer, replace tomatoes with fresh bell peppers. In fall, use butternut squash or zucchini. These changes not only add fun colors but also boost flavor. You can also top with fresh herbs like basil or parsley based on what’s in season.
Storage Info
Proper Storage Techniques
To keep your loaded sweet potato nacho skillet fresh, store it in an airtight container. Make sure it cools to room temperature first. Keep it in the fridge for up to three days. If you want to save it for later, this dish stores well. Just layer it carefully to avoid mushy ingredients.
Reheating Instructions
When you’re ready to enjoy your leftovers, preheat your oven to 350°F (175°C). Place the skillet in the oven for about 10-15 minutes. This method helps keep the cheese melty and the sweet potatoes warm. You can also use a microwave for a quick reheat. Just cover it to prevent drying out. Heat for 1-2 minutes, stirring halfway through.
Freezing Guidance
Freezing your nacho skillet is easy and effective. Portion it into freezer-safe containers. It lasts well for up to three months. To thaw, place it in the fridge overnight or use the microwave on defrost. When ready to eat, reheat it in the oven for the best flavor. This way, you will keep that delicious taste without losing any quality.
FAQs
Can I prepare this dish ahead of time?
Yes, you can prepare it ahead. Start by roasting the sweet potatoes. Once they cool, store them in the fridge. You can layer the other ingredients in the skillet later. This makes it easy to bake right before serving. If you want, you can even bake the whole dish ahead. Just reheat it in the oven before serving.
What can I substitute if I don’t have sweet potatoes?
If you don’t have sweet potatoes, use regular potatoes or butternut squash. Both work well and have a nice texture. You can also try other root veggies like parsnips or carrots. These will give you a slightly different taste but still be delicious.
How can I make this recipe spicier?
To kick up the heat, add more jalapeños. You can also mix in some hot sauce. Another option is to use pepper jack cheese instead of regular cheese. If you love spice, try adding diced green chilies or a sprinkle of cayenne pepper. Adjust the heat to fit your taste!
This blog post shows how to make a delicious loaded sweet potato nacho skillet. It covers all the key ingredients, step-by-step cooking, and helpful tips. I provided variations for different diets, plus smart storage methods. You can easily adapt the recipe to fit your tastes. Remember, great food starts with fresh ingredients and simple steps. Enjoy making this dish that everyone will love! It’s fun to mix flavors and get creative while cooking.
![- 1 cup all-purpose flour - 2 tablespoons granulated sugar - 2 teaspoons baking powder - ½ teaspoon baking soda - ¼ teaspoon salt - 1 cup buttermilk - 1 large egg, lightly beaten - 2 tablespoons unsalted butter, melted - 2 teaspoons pure vanilla extract - 1 tablespoon ground cinnamon - 3 tablespoons brown sugar, packed - 1 cup powdered sugar - 3 tablespoons cream cheese, softened to room temperature - 2-3 tablespoons milk (to achieve desired icing consistency) When I make these pancakes, I always start with the dry ingredients. This step is key. I mix the flour, sugar, baking powder, baking soda, and salt in a bowl. It’s important to whisk these well. This ensures even rising and sweetness. Next, I move to the wet ingredients. I pour the buttermilk into a separate bowl. Then, I add the beaten egg, melted butter, and vanilla extract. Whisk until smooth. This mixture is crucial for the pancake’s fluffiness. Now, let's talk about the cinnamon filling. In a small bowl, I combine ground cinnamon and brown sugar. This mix gives the pancakes their sweet, spicy swirl. Finally, for the icing, I beat together powdered sugar and softened cream cheese. I add milk slowly until I reach the right consistency. Drizzling this icing over the warm pancakes is pure bliss. For the full recipe, check out the complete guide. Enjoy your cooking adventure! 1. In a mixing bowl, combine the all-purpose flour, granulated sugar, baking powder, baking soda, and salt. Mix well until the dry ingredients are blended. 2. Take another bowl and whisk together the buttermilk, the lightly beaten egg, melted butter, and vanilla extract. Make sure this mixture is smooth. 1. Gradually pour the wet ingredients into the bowl with the dry ingredients. Stir gently until just combined. It’s okay if there are a few lumps; this helps keep your pancakes fluffy. 2. Be careful not to overmix. Overmixing can make the pancakes tough. 1. In a small bowl, combine the ground cinnamon and packed brown sugar. Mix them well to combine. This mixture will create a sweet swirl in your pancakes. 1. Preheat a non-stick skillet or griddle over medium heat. Pour about ¼ cup of pancake batter onto the skillet for each pancake. 2. When the batter starts bubbling on the surface (about 1-2 minutes), sprinkle about a teaspoon of the cinnamon filling mixture onto the pancake before flipping it. 3. Flip the pancake carefully and cook for another 1-2 minutes, until golden brown. Repeat this process with the remaining batter and filling. 1. In a small bowl, mix the powdered sugar, softened cream cheese, and enough milk to reach your desired icing consistency. Blend until the mixture is smooth. Now you're ready to enjoy your delicious cinnamon roll pancakes! For precise measurements and more tips, check the Full Recipe. To make fluffy pancakes, avoid overmixing the batter. When you mix too much, the pancakes can turn tough. You want a few lumps in the batter; that is okay! Use fresh baking powder and baking soda. Old leavening agents may not make your pancakes rise well. Check the expiration date on the package to be sure. Heat is key when cooking pancakes. Adjust the heat as needed to prevent burning. If your skillet is too hot, the pancakes may burn on the outside and stay raw inside. A non-stick skillet helps with easy flipping. It also allows you to use less oil. Always preheat the skillet before pouring your batter. The icing makes these pancakes special. To achieve your desired thickness, adjust the milk quantity. Start with 2 tablespoons and add more if needed. Drizzle icing over warm pancakes for best results. The warmth helps the icing melt into the pancakes, making each bite delightful. {{image_4}} Cinnamon roll pancakes are fun! You can change them up in many ways. Let’s explore some tasty options. You can add chopped walnuts or pecans to the batter. This nutty addition gives a lovely crunch. It also adds healthy fats and protein. Just mix in about ½ cup of nuts before cooking. You will love the extra texture and flavor. Want a fruity twist? Add diced apples or berries to the batter. They add sweetness and freshness. Try using about 1 cup of fruit. Blueberries or chopped strawberries work great. Apples give a nice cinnamon flavor when cooked. Your pancakes will be more colorful and tasty! Feel free to experiment with spices. Adding nutmeg or cardamom can change the taste. Start with ¼ teaspoon of each spice. You will enjoy the new flavors. These spices pair well with cinnamon and make your pancakes special. For the complete recipe, check out the [Full Recipe]. Enjoy your cooking adventure! You can store leftover cinnamon roll pancakes in an airtight container. They will stay fresh in the refrigerator for up to 3 days. This keeps them moist and ready for a quick breakfast or snack. To freeze your pancakes, lay them in a single layer on a baking sheet. Once frozen, transfer them to a freezer-safe bag. This method keeps them from sticking together. You can pull out as many as you need later. When you are ready to enjoy your pancakes again, simply microwave or toast them. If you want to make them even better, add extra icing on top while they warm up. This gives them a fresh taste and makes them feel special again. Yes, you can use whole wheat or gluten-free flour. However, this may change the texture of your pancakes. Whole wheat flour adds a nutty flavor and denser texture. Gluten-free flour can make them lighter but may need extra moisture. To make these pancakes dairy-free, swap buttermilk for almond milk. Use a dairy-free butter alternative in the recipe. This ensures you keep the great taste while avoiding dairy. Cinnamon roll pancakes are delicious on their own. However, they pair well with fresh fruits, like strawberries or bananas. Whipped cream can add a light and fluffy touch. You can also drizzle on more maple syrup for added sweetness. For the full recipe, check out the details above. Cinnamon Roll Pancakes are simple and fun to make. We combined dry and wet ingredients with cinnamon filling for a tasty treat. Use tips for fluffiness, cooking, and icing to ensure success. You can customize these pancakes by adding nuts or fruits. Remember to store leftovers well for future enjoyment. Try new variations each time for a delightful twist. These pancakes can impress anyone and become a family favorite. Enjoy your cooking adventure!](https://dishtreats.com/wp-content/uploads/2025/06/80f0c7ad-2155-4787-b1f4-2bdd3b819c66-768x768.webp)
![- 2 cups cooked chicken, shredded - 1/2 cup dill pickles, finely chopped - 1/2 cup ranch dressing - 4 large eggs - 1/4 cup milk - 1 cup shredded cheddar cheese - 4 large flour tortillas - 1/2 teaspoon garlic powder - 1/2 teaspoon onion powder - Salt and pepper to taste - Fresh chives, chopped (for garnish) The main ingredients bring the best flavors to our burritos. First, we use cooked chicken. You can use leftovers from dinner or rotisserie chicken for ease. Shredded chicken mixes well with the tangy dill pickles. You get a nice crunch and zest. The ranch dressing adds creaminess and ties everything together. Next, we add eggs for protein. They make the burritos filling and tasty. Mixing them with milk keeps them soft and fluffy. Garlic and onion powders give the eggs extra flavor. Don’t forget salt and pepper! They enhance all the other tastes. The additional ingredients round out the meal. Cheddar cheese melts beautifully, adding richness. Flour tortillas wrap it all up nicely. Chives make the dish look fresh and bright. You can find the complete recipe in the [Full Recipe] section. With these ingredients, your Pickle Ranch Chicken Breakfast Burritos will be a hit! To start, grab a medium mixing bowl. Combine 2 cups of shredded chicken, 1/2 cup of finely chopped dill pickles, and 1/2 cup of ranch dressing in the bowl. Stir this mixture well until the chicken is coated with the ranch. This flavorful filling is key to our burrito. Set it aside for later use. Next, we need to make our scrambled eggs. In a separate bowl, crack 4 large eggs. Add 1/4 cup of milk, 1/2 teaspoon of garlic powder, 1/2 teaspoon of onion powder, and some salt and pepper. Whisk everything until smooth. Heat a non-stick skillet over medium heat and gently pour the egg mixture into the hot skillet. Stir the eggs softly with a spatula until they are creamy and just set. Remove the skillet from heat once they look perfect. Now, let’s put the burritos together! Lay out 4 large flour tortillas on a clean surface. In the center of each tortilla, place a generous amount of the chicken and pickle mixture. Top this with a scoop of the fluffy scrambled eggs and a sprinkle of 1 cup of shredded cheddar cheese. To form the burritos, fold the sides of each tortilla inward, and then roll them up tightly from the bottom. Make sure the filling stays secure. Return the same skillet to medium heat. Place the rolled burritos seam-side down in the skillet. Cook them for 2-3 minutes on each side until they are golden brown and crispy. After cooking, let the burritos cool a bit before slicing them in half for easier serving. You can find the Full Recipe for more details! - Use low heat for creamy eggs. - Stir gently for fluffy texture. When making scrambled eggs, low heat is key. High heat can make eggs dry. Cooking slowly helps keep them soft and creamy. Stirring gently lets air in, making them light and fluffy. - Ensure an even fill to secure the burritos. - Tuck in sides to prevent spillage. Rolling burritos can be tricky, but practice makes perfect. Start with an even fill of chicken and eggs in the center. This helps secure the filling. Tuck in the sides before rolling. This way, you keep everything snug inside. - Use fresh chives for a pop of color. - Serve with extra pickles or hot sauce for added flavor. A great garnish makes your dish shine. Fresh chives add color and a mild flavor. Extra pickles bring crunch and tang. If you like spice, drizzle hot sauce on top. It adds a kick everyone will love. For the full recipe, check out the Pickle Ranch Chicken Breakfast Burritos. {{image_4}} You can switch the chicken for shredded turkey if you like. Turkey gives a nice flavor too. If you want a vegetarian option, use tofu instead. Tofu absorbs spices well and will keep your burrito filling tasty. Want to spice things up? Add diced jalapeños to the filling. They give a nice kick without being too hot. You can also change the cheese. Try pepper jack for a creamy heat or feta for a tangy twist. Both options will make your burritos even more delicious. Tortillas are not just for flour. You can use whole wheat or corn tortillas for a healthier choice. If you want color, try spinach or tomato-based tortillas. These will add a fun look to your dish. You can mix and match to find your favorite combination. For the full recipe, check out the complete guide. Refrigerate leftover burritos for up to 3 days. Place them in an airtight container. This keeps them fresh and tasty. When you are ready to eat, enjoy them cold or reheated. You can freeze uncooked burritos for up to 1 month. Wrap each burrito tightly in plastic wrap. Then place them in a freezer bag to prevent freezer burn. When you want to eat them, you can reheat them directly from the freezer or thaw them in the fridge overnight. To keep the texture nice, use an oven or skillet. For the oven, preheat it to 350°F (175°C). Place the burritos on a baking sheet and heat for about 15-20 minutes. For the skillet, warm it over medium heat. Cook the burritos for about 3-4 minutes on each side until they are hot and crispy. Yes, you can prepare and refrigerate the filling or entire burritos to save time. I often make the filling a day in advance. This lets the flavors meld together. You can store it in an airtight container. If you want to make the whole burrito, wrap them well in foil or plastic wrap before refrigerating. When you’re ready to eat, just heat them up in the skillet or microwave. Add hot sauce to the chicken mixture or include spicy pickles. I love using pickles with a kick for extra flavor. You can also mix in some diced jalapeños. This gives a nice heat that pairs well with the ranch dressing. Just remember to taste as you go. You want the spice to enhance, not overpower. Pair with fresh fruit, a side salad, or crispy potato wedges for a complete meal. I enjoy adding a fruit salad for a sweet touch. A simple green salad with a light dressing also works well. Crispy potato wedges bring a satisfying crunch. You can even sprinkle some extra chives on top for a fresh finish. If you like, serve with your favorite hot sauce for dipping. These Pickle Ranch Chicken Breakfast Burritos pack flavor in every bite. We combined shredded chicken, dill pickles, and ranch for a tasty filling. Scrambled eggs bring creaminess, while tips for soft eggs and proper rolling help achieve perfect burritos. You can even switch ingredients to fit your taste. Whether you pick turkey or a spicy twist, the options are endless. With proper storage, you can enjoy them later, too. Don't hesitate to try this fun, delicious recipe that makes mornings brighter!](https://dishtreats.com/wp-content/uploads/2025/07/caeedbb3-1f25-4c27-bd1d-713cf7cd2d52-768x768.webp)
![To make Chicken Pesto Pasta Salad, you need fresh and tasty ingredients. Here’s what you will use: - 2 cups penne pasta - 1 cup cooked chicken breast, shredded - 1/2 cup cherry tomatoes, halved - 1/2 cup mozzarella balls, drained - 1/4 cup fresh basil leaves, chopped - 1/4 cup pesto sauce - 2 tablespoons extra virgin olive oil - Juice of 1 fresh lemon - Salt and black pepper to taste - Optional: 1/4 cup pine nuts, toasted Each ingredient brings its own flavor. The penne pasta serves as a great base. The chicken adds protein. Tomatoes give freshness, while mozzarella adds creaminess. You can change things up with add-ins. Here are some great options: - Spinach or arugula for extra greens - Bell peppers for crunch - Grated Parmesan cheese for a salty kick - Cooked bacon for a smoky flavor - Quinoa instead of pasta for a healthier twist Feel free to mix and match. Your salad can be unique each time you make it. When it comes to pesto, you have choices. You can use fresh homemade pesto or store-bought pesto. Fresh pesto tastes bright and bold. You can make it with basil, garlic, pine nuts, cheese, and olive oil. Store-bought pesto saves time but may have preservatives. Both options work well in your salad. I recommend trying fresh pesto if you have the time. It elevates the dish and adds a personal touch. For the full recipe, check out the [Full Recipe]. 1. Cook the Pasta: Start by boiling water in a large pot. Add salt for flavor. When it boils, add 2 cups of penne pasta. Cook until al dente, about 8-10 minutes. Drain the pasta and rinse it with cold water to cool it down. 2. Mix the Ingredients: In a big mixing bowl, add 1 cup of shredded cooked chicken, 1/2 cup of halved cherry tomatoes, and 1/2 cup of drained mozzarella balls. Use a spatula to mix them well. 3. Combine with Pasta: Add the cooled penne pasta to the bowl. Gently mix to combine everything. Be careful not to break the mozzarella balls. 4. Make the Dressing: In a small bowl, whisk together 1/4 cup of pesto sauce, 2 tablespoons of extra virgin olive oil, and the juice from 1 fresh lemon. Add a pinch of salt and black pepper. 5. Dress the Salad: Pour the dressing over the pasta salad. Use a spoon or tongs to toss everything gently. Make sure all the ingredients are coated. 6. Fold in Fresh Herbs: Add 1/4 cup of chopped fresh basil and optional 1/4 cup of toasted pine nuts. Gently fold them into the salad without bruising the basil. 7. Taste and Adjust: Taste your salad. If it needs more flavor, add more salt, pepper, or lemon juice. 8. Chill Before Serving: Cover the salad with plastic wrap. Let it chill in the fridge for at least 30 minutes. This helps the flavors mix well. - Use a large pot to give the pasta room to move. - Salt the water before adding pasta. This makes it taste better. - Stir the pasta often while it cooks to prevent sticking. - Always taste the pasta a minute before the time is up. It should be firm but not hard. Making the dressing is quick and easy. In just a few steps, you can create a burst of flavor. Start with fresh pesto sauce. If you like a creamier dressing, mix in some yogurt or sour cream. Always taste your dressing before adding it to the salad. Adjust the flavors based on your taste. This simple dressing brings the whole dish together and makes it shine. For the full recipe, check out the details above. Mixing ingredients well is key to flavor. Start with the pasta. Make sure it is cold before adding other items. This keeps everything fresh. Next, add the chicken, tomatoes, and mozzarella. Use a spatula to fold gently. This ensures the mozzarella stays whole. It adds nice pops of flavor to each bite. Taste your dish as you cook. Start with a pinch of salt and pepper. The lemon juice adds brightness, so taste it first. If it needs more zing, add another squeeze. Always remember that you can add more, but you can't take it out. This rule helps you control the flavors. For a great look, serve the salad in a big bowl. Layer the salad for a beautiful view. Add extra basil leaves on top. A sprinkle of toasted pine nuts adds crunch. This makes your dish eye-catching and fun. Enjoy serving this colorful salad at any gathering! You can find the full recipe in the main article. {{image_4}} You can boost your Chicken Pesto Pasta Salad with more veggies and proteins. Adding fresh spinach or arugula gives a nice crunch. Bell peppers add color and sweetness. Toss in some peas or zucchini for a nutritious kick. You can also swap chicken for shrimp, tofu, or chickpeas. This way, you can cater to different tastes and dietary needs. When it comes to ingredients, you have choices. Using homemade pesto elevates your dish. It tastes fresh and bright. You can easily make pesto with basil, nuts, olive oil, and garlic. If you’re short on time, store-bought pesto works too. Just pick a brand with simple, quality ingredients. This saves time without losing flavor. You can adjust this recipe for various diets. For a gluten-free option, use gluten-free pasta. Many brands offer great alternatives. If you want a vegan version, replace the chicken with chickpeas or roasted vegetables. Use a vegan pesto made from nuts and nutritional yeast instead of cheese. These swaps keep the dish tasty and satisfying for everyone. To store leftover chicken pesto pasta salad, place it in an airtight container. Make sure the lid seals tightly to keep the salad fresh. You can keep it in the fridge for up to three days. If you notice the salad looking dry, add a splash of olive oil or lemon juice before serving. This will help restore some moisture. Freezing pasta salad is not the best choice since the texture can change. If you do want to freeze it, separate the chicken and pasta from the veggies and dressing. Store each part in a freezer-safe bag or container. You can freeze it for up to one month. When ready, thaw it in the fridge overnight before serving. Reheating chicken pesto pasta salad is simple. If you have stored it in the fridge, serve it cold or at room temperature. If you prefer it warm, place it in a microwave-safe dish. Heat it for about 30 seconds at a time until it reaches your desired warmth. Be careful not to overheat, as it can make the pasta mushy. Always check the seasoning again after reheating and adjust as needed. You can use tofu, shrimp, or chickpeas as great chicken alternatives. Tofu gives a nice texture. Shrimp adds a seafood twist. Chickpeas provide protein and a hearty feel. You can also try cooked turkey or beef for a different taste. The key is to use a protein you enjoy. This salad stays fresh in the fridge for three to five days. Make sure to store it in an airtight container. The flavors will blend nicely as it sits. However, the longer it sits, the softer the pasta becomes. Yes, you can prepare this salad a day in advance. It tastes even better after the flavors meld overnight. Just keep it covered in the fridge. If you use fresh basil, add it right before serving to keep it vibrant. Check out the Full Recipe for complete details! This article covered how to make a tasty Chicken Pesto Pasta Salad. You learned about key ingredients, and how to cook pasta just right. I shared some helpful tips for mixing and serving. Remember, you can add veggies or change spices to fit your taste. Store leftovers well for future meals. This salad is great for lunch or a gathering. Enjoy your cooking and happy eating!](https://dishtreats.com/wp-content/uploads/2025/06/0440c548-7b14-481e-8658-8224512ec7fd-768x768.webp)