Easy Teriyaki Salmon Quick and Tasty Dinner Recipe
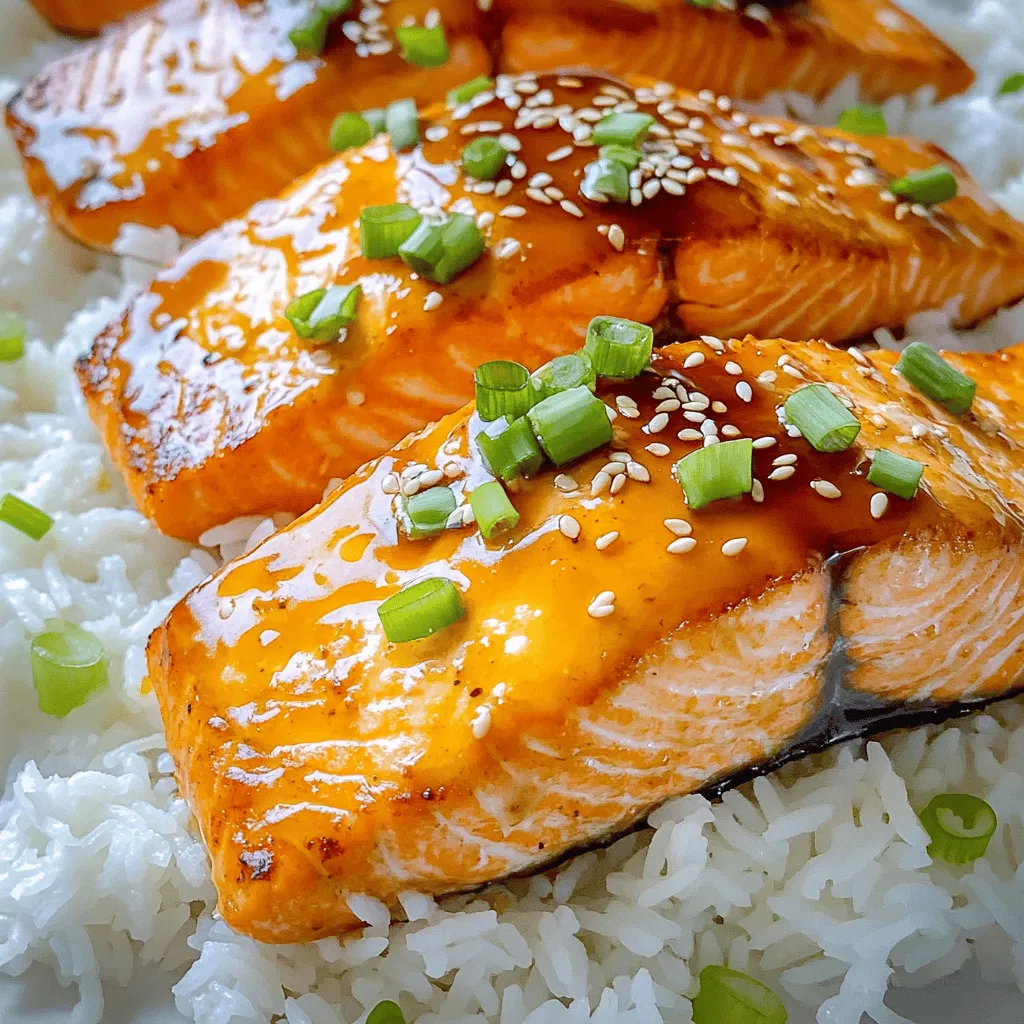
Looking for a quick and tasty dinner? This Easy Teriyaki Salmon recipe is just what you need! With just a few simple ingredients and steps, you can create a flavorful meal that impresses everyone. I’ll take you through the process, from making the teriyaki marinade to baking the salmon to perfection. Let’s dive in and make dinner a breeze with this delightful recipe!
Ingredients
Main ingredients for Easy Teriyaki Salmon
- 4 salmon fillets (approximately 6 ounces each)
- 1/4 cup low-sodium soy sauce
- 1/4 cup honey
- 2 tablespoons rice vinegar
- 1 tablespoon freshly grated ginger
- 2 cloves garlic, minced
- 1 teaspoon sesame oil
These ingredients come together to create a rich, sweet, and savory flavor. The salmon fillets are the star of this dish. The soy sauce adds umami, while honey gives a nice sweetness. Rice vinegar adds a bit of tang, and ginger and garlic bring warmth.
Optional garnishes and sides
- 2 green onions, finely chopped (for garnish)
- 1 tablespoon sesame seeds (for garnish)
- Cooked jasmine rice, for serving
Using green onions and sesame seeds makes the dish look great. They also add fresh flavor. Jasmine rice pairs well with the teriyaki salmon. It soaks up the sauce and balances the meal.
Ingredient substitutions and alternatives
- You can use maple syrup instead of honey for a vegan option.
- If you don’t have rice vinegar, apple cider vinegar works too.
- For a gluten-free version, use tamari instead of soy sauce.
These swaps keep the dish tasty while catering to different diets. Feel free to get creative with the ingredients you have on hand. You can still make a delicious meal that everyone will enjoy.
Step-by-Step Instructions
How to prepare the teriyaki marinade
To make the teriyaki marinade, gather your ingredients first. You need low-sodium soy sauce, honey, rice vinegar, ginger, garlic, and sesame oil. In a medium bowl, mix the soy sauce, honey, and rice vinegar. Stir well until the honey dissolves. Then add freshly grated ginger, minced garlic, and sesame oil. Whisk it all together until smooth. This marinade gives your salmon a sweet and savory taste.
Marinating the salmon
Now, let’s marinate the salmon. Place your salmon fillets in a shallow dish. Pour the teriyaki marinade over the fillets. Make sure each piece is coated well. Cover the dish with plastic wrap. Let the salmon marinate in the fridge for at least 30 minutes. If you want more flavor, you can marinate it for up to 2 hours. This step is key for infusing flavor.
Baking the salmon to perfection
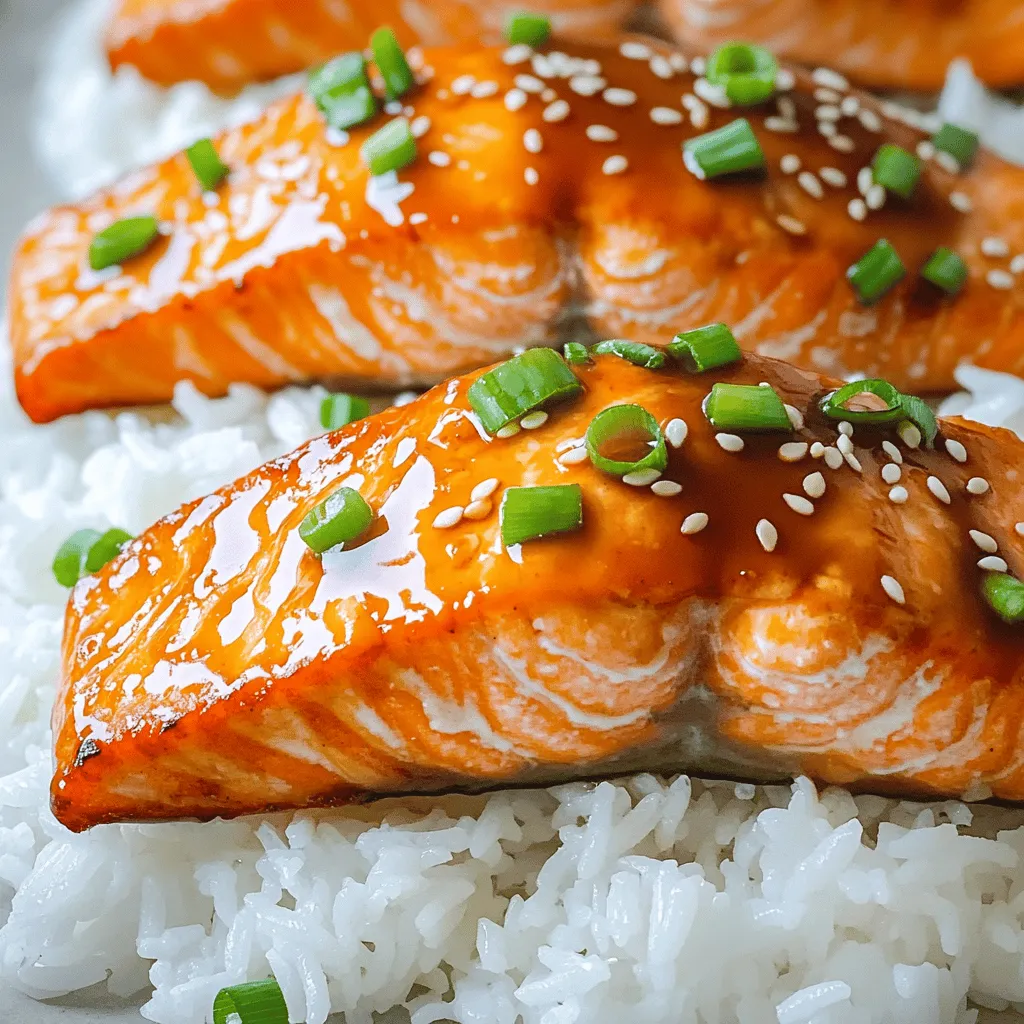
Preheat your oven to 400°F (200°C). Line a baking sheet with parchment paper for easy cleanup. After marinating, take the salmon out of the dish. Reserve the leftover marinade for later. Place the salmon skin-side down on the baking sheet. Bake for 12 to 15 minutes. The salmon is done when it flakes easily with a fork. While the salmon bakes, take the reserved marinade and heat it in a small saucepan. Bring it to a gentle boil and let it simmer for 3 to 5 minutes until it thickens a bit. Drizzle this thickened sauce over the baked salmon. Garnish with green onions and sesame seeds before serving. Enjoy your Easy Teriyaki Salmon with jasmine rice for a complete meal.
Tips & Tricks
Best practices for achieving a perfect glaze
To get a shiny glaze on your teriyaki salmon, follow these steps:
- Use low-sodium soy sauce: This helps balance sweet and salty flavors.
- Marinate longer: Aim for at least 30 minutes. For deeper flavor, go up to 2 hours.
- Reserve some marinade: You can thicken it later for a richer top coat.
- Bake at the right temperature: 400°F gives a nice caramelization.
- Finish with a drizzle: Add thickened sauce right before serving for extra flavor.
Time-saving cooking hacks
Want to save time while cooking? Try these tips:
- Prep everything first: Chop ginger and garlic before you start.
- Use pre-cooked rice: Microwaveable jasmine rice makes a quick side dish.
- Sheet pan method: Cook salmon and veggies together on one tray.
- One-bowl meal: Serve salmon over rice with veggies for easy cleanup.
- Batch cook: Make extra salmon for quick meals later in the week.
Serving suggestions for a complete meal
For a balanced meal, pair your teriyaki salmon with:
- Steamed broccoli: Bright green and packed with vitamins.
- Sautéed bok choy: Adds a nice crunch and flavor.
- Cucumber salad: Fresh and light, it complements the dish well.
- Pickled ginger: A tangy bite that enhances the meal.
Variations
Teriyaki salmon with different proteins
You can swap salmon for other fish. Try using cod or tilapia. Both cook well and soak up the teriyaki flavor. Chicken is another great option. Just adjust the cooking time to ensure it cooks through. For beef lovers, thin slices of flank steak work nicely. The marinade brings out a rich taste in all these proteins.
Vegetarian options using tofu or vegetables
For a veggie twist, use firm tofu. Cut it into cubes and marinate just like the salmon. Grill or bake it until golden. You can also use vegetables like bell peppers, zucchini, or eggplant. Toss them in the marinade and roast them until tender. This makes a colorful and tasty meal.
Flavor enhancements (spices or additional ingredients)
Boost your teriyaki sauce with spices. A pinch of red pepper flakes adds heat. You can also mix in a touch of sesame seeds for crunch. If you want a fruity flair, add pineapple juice to the marinade. This gives a sweet and tangy taste. Experiment with these options to find your perfect flavor.
Storage Info
How to store leftovers properly
To keep your teriyaki salmon fresh, place leftovers in an airtight container. Make sure the salmon has cooled down before sealing it. Store it in the fridge for up to three days. This way, you can enjoy the great taste again.
Freezing teriyaki salmon
If you want to keep your teriyaki salmon longer, freezing is a good option. Wrap each fillet tightly in plastic wrap, then place them in a freezer bag. Squeeze out any air to avoid freezer burn. You can freeze the salmon for up to three months.
Reheating tips for optimal texture
When you’re ready to enjoy your frozen salmon, thaw it overnight in the fridge. To reheat, place the salmon in a preheated oven at 350°F (175°C) for about 10 minutes. This helps keep it moist. You can also use a microwave, but be careful not to overcook it. Enjoy your meal!
FAQs
What can I serve with Easy Teriyaki Salmon?
You can serve Easy Teriyaki Salmon with many tasty sides. Here are some ideas:
- Steamed broccoli
- Sautéed green beans
- Pickled vegetables
- A fresh salad
- Cooked jasmine rice
These sides add color and balance to your meal. They also enhance the flavors of the sweet teriyaki sauce.
How long does it take to marinate salmon?
Marinating salmon takes at least 30 minutes. For best results, leave it for up to 2 hours. This lets the flavors soak into the fish. If you marinate too long, the fish might get too soft.
Can I use fresh salmon instead of frozen?
Yes, you can use fresh salmon instead of frozen. Fresh salmon often has better flavor and texture. Just be sure to check for any bones before cooking.You’ll find clear steps to make this dish easy and fun. Enjoy cooking!
This post covered everything you need for easy teriyaki salmon. You learned about key ingredients, cooking steps, and tips to enhance flavor. I shared ways to store leftovers and answered common questions about serving and marinating. Remember, enjoy the meal with sides you love. You can also try new proteins or veggies for variety. This dish is easy to make, fun to enjoy, and teams well with many flavors. You have what you need to create a tasty, eye-catching meal. Get started and impress your family or friends!


![- 1 cup all-purpose flour - 2 tablespoons granulated sugar - 2 teaspoons baking powder - ½ teaspoon baking soda - ¼ teaspoon salt - 1 cup buttermilk - 1 large egg, lightly beaten - 2 tablespoons unsalted butter, melted - 2 teaspoons pure vanilla extract - 1 tablespoon ground cinnamon - 3 tablespoons brown sugar, packed - 1 cup powdered sugar - 3 tablespoons cream cheese, softened to room temperature - 2-3 tablespoons milk (to achieve desired icing consistency) When I make these pancakes, I always start with the dry ingredients. This step is key. I mix the flour, sugar, baking powder, baking soda, and salt in a bowl. It’s important to whisk these well. This ensures even rising and sweetness. Next, I move to the wet ingredients. I pour the buttermilk into a separate bowl. Then, I add the beaten egg, melted butter, and vanilla extract. Whisk until smooth. This mixture is crucial for the pancake’s fluffiness. Now, let's talk about the cinnamon filling. In a small bowl, I combine ground cinnamon and brown sugar. This mix gives the pancakes their sweet, spicy swirl. Finally, for the icing, I beat together powdered sugar and softened cream cheese. I add milk slowly until I reach the right consistency. Drizzling this icing over the warm pancakes is pure bliss. For the full recipe, check out the complete guide. Enjoy your cooking adventure! 1. In a mixing bowl, combine the all-purpose flour, granulated sugar, baking powder, baking soda, and salt. Mix well until the dry ingredients are blended. 2. Take another bowl and whisk together the buttermilk, the lightly beaten egg, melted butter, and vanilla extract. Make sure this mixture is smooth. 1. Gradually pour the wet ingredients into the bowl with the dry ingredients. Stir gently until just combined. It’s okay if there are a few lumps; this helps keep your pancakes fluffy. 2. Be careful not to overmix. Overmixing can make the pancakes tough. 1. In a small bowl, combine the ground cinnamon and packed brown sugar. Mix them well to combine. This mixture will create a sweet swirl in your pancakes. 1. Preheat a non-stick skillet or griddle over medium heat. Pour about ¼ cup of pancake batter onto the skillet for each pancake. 2. When the batter starts bubbling on the surface (about 1-2 minutes), sprinkle about a teaspoon of the cinnamon filling mixture onto the pancake before flipping it. 3. Flip the pancake carefully and cook for another 1-2 minutes, until golden brown. Repeat this process with the remaining batter and filling. 1. In a small bowl, mix the powdered sugar, softened cream cheese, and enough milk to reach your desired icing consistency. Blend until the mixture is smooth. Now you're ready to enjoy your delicious cinnamon roll pancakes! For precise measurements and more tips, check the Full Recipe. To make fluffy pancakes, avoid overmixing the batter. When you mix too much, the pancakes can turn tough. You want a few lumps in the batter; that is okay! Use fresh baking powder and baking soda. Old leavening agents may not make your pancakes rise well. Check the expiration date on the package to be sure. Heat is key when cooking pancakes. Adjust the heat as needed to prevent burning. If your skillet is too hot, the pancakes may burn on the outside and stay raw inside. A non-stick skillet helps with easy flipping. It also allows you to use less oil. Always preheat the skillet before pouring your batter. The icing makes these pancakes special. To achieve your desired thickness, adjust the milk quantity. Start with 2 tablespoons and add more if needed. Drizzle icing over warm pancakes for best results. The warmth helps the icing melt into the pancakes, making each bite delightful. {{image_4}} Cinnamon roll pancakes are fun! You can change them up in many ways. Let’s explore some tasty options. You can add chopped walnuts or pecans to the batter. This nutty addition gives a lovely crunch. It also adds healthy fats and protein. Just mix in about ½ cup of nuts before cooking. You will love the extra texture and flavor. Want a fruity twist? Add diced apples or berries to the batter. They add sweetness and freshness. Try using about 1 cup of fruit. Blueberries or chopped strawberries work great. Apples give a nice cinnamon flavor when cooked. Your pancakes will be more colorful and tasty! Feel free to experiment with spices. Adding nutmeg or cardamom can change the taste. Start with ¼ teaspoon of each spice. You will enjoy the new flavors. These spices pair well with cinnamon and make your pancakes special. For the complete recipe, check out the [Full Recipe]. Enjoy your cooking adventure! You can store leftover cinnamon roll pancakes in an airtight container. They will stay fresh in the refrigerator for up to 3 days. This keeps them moist and ready for a quick breakfast or snack. To freeze your pancakes, lay them in a single layer on a baking sheet. Once frozen, transfer them to a freezer-safe bag. This method keeps them from sticking together. You can pull out as many as you need later. When you are ready to enjoy your pancakes again, simply microwave or toast them. If you want to make them even better, add extra icing on top while they warm up. This gives them a fresh taste and makes them feel special again. Yes, you can use whole wheat or gluten-free flour. However, this may change the texture of your pancakes. Whole wheat flour adds a nutty flavor and denser texture. Gluten-free flour can make them lighter but may need extra moisture. To make these pancakes dairy-free, swap buttermilk for almond milk. Use a dairy-free butter alternative in the recipe. This ensures you keep the great taste while avoiding dairy. Cinnamon roll pancakes are delicious on their own. However, they pair well with fresh fruits, like strawberries or bananas. Whipped cream can add a light and fluffy touch. You can also drizzle on more maple syrup for added sweetness. For the full recipe, check out the details above. Cinnamon Roll Pancakes are simple and fun to make. We combined dry and wet ingredients with cinnamon filling for a tasty treat. Use tips for fluffiness, cooking, and icing to ensure success. You can customize these pancakes by adding nuts or fruits. Remember to store leftovers well for future enjoyment. Try new variations each time for a delightful twist. These pancakes can impress anyone and become a family favorite. Enjoy your cooking adventure!](https://dishtreats.com/wp-content/uploads/2025/06/80f0c7ad-2155-4787-b1f4-2bdd3b819c66-768x768.webp)
![For these herb crusted zucchini sticks, you need a few simple yet tasty ingredients. Each one plays a key role in creating the perfect crunch and flavor. - Zucchini and Bread Crumb Base - 2 medium zucchinis, cut into uniform sticks - 1 cup whole wheat breadcrumbs - Seasonings and Cheese - 1/2 cup finely grated Parmesan cheese - 2 tablespoons fresh parsley, finely chopped - 1 tablespoon fresh basil, finely chopped - 1 teaspoon garlic powder - 1/2 teaspoon onion powder - Salt and black pepper, to taste - Egg Wash - 2 large eggs, beaten - Olive oil spray or 2 tablespoons extra virgin olive oil Each ingredient adds a layer of flavor. The zucchini brings a fresh crunch, while the breadcrumbs create that satisfying crisp. The herbs and cheese elevate the taste, making these sticks hard to resist. Don't forget the egg wash! It helps the coating stick, ensuring every bite is packed with flavor. For the full recipe, check out the detailed instructions. Prepping the Oven and Baking Sheet First, preheat your oven to 425°F (220°C). This step ensures the zucchini sticks cook evenly. Next, line a baking sheet with parchment paper. This helps prevent sticking and makes cleanup easy. Making the Breadcrumb Mixture In a shallow dish, combine the following: - 1 cup whole wheat breadcrumbs - 1/2 cup finely grated Parmesan cheese - 2 tablespoons fresh parsley, finely chopped - 1 tablespoon fresh basil, finely chopped - 1 teaspoon garlic powder - 1/2 teaspoon onion powder - Salt and black pepper, to taste Stir these ingredients together until they mix well. This mixture adds flavor and crunch to your zucchini sticks. Coating the Zucchini Sticks In a separate bowl, beat 2 large eggs until they are well mixed. This egg wash helps the coating stick. Take each zucchini stick and dip it in the egg wash. Let any excess egg drip off. Then, roll the stick in the breadcrumb mixture. Press gently to coat all sides evenly. Baking Process Place the coated zucchini sticks on your prepared baking sheet. Make sure to leave space between them. This allows them to cook and crisp up nicely. For extra crunch, spray the tops with olive oil or drizzle some over them. Bake the sticks in the oven for 20-25 minutes. Flip them halfway through to ensure even browning. When they are golden brown and crispy, take them out and let them cool for a few moments before serving. Enjoy your crunchy and flavorful snack! For detailed instructions, check the Full Recipe. To get that perfect crunch, the egg wash is key. The egg helps the coating stick well. Without it, the crumbs may fall off. Dip each zucchini stick fully in the egg, then let the extra drip off. This step makes a big difference. Choosing the right olive oil can also help. You can use extra virgin olive oil or an olive oil spray. Both options add flavor and help the zucchini crisp up in the oven. If you use a spray, make sure to coat the sticks lightly. Baking tips are important for even browning. Make sure to leave space between each zucchini stick on the baking sheet. This allows hot air to circulate. Halfway through baking, flip the sticks for a nice, even brown on both sides. For the full recipe, check out the detailed instructions above. Enjoy your crispy zucchini sticks! {{image_4}} You can switch up the recipe to fit your needs. Here are some ideas: - Alternative Breadcrumbs: If you want a gluten-free option, use crushed cornflakes or almond flour. Both give a nice crunch. Try panko breadcrumbs for a lighter, airier texture. - Vegan Option: Replace eggs with a flaxseed mixture. Mix 1 tablespoon of flaxseed meal with 3 tablespoons of water. Let it sit for five minutes until it thickens. This works well to stick the coating. - Additional Seasoning Ideas: You can add a kick with spices like paprika or cayenne. A sprinkle of Italian seasoning can give it a nice herby flavor. Crushed red pepper flakes can add some heat, too. These substitutes keep your herb crusted zucchini sticks tasty and fun. You can play with flavors to make them your own! If you’re looking for the full recipe, check the detailed instructions. Refrigeration Instructions After enjoying the herb-crusted zucchini sticks, let them cool. Place any leftovers in an airtight container. Store them in the fridge for up to three days. This keeps them fresh and tasty for later snacking. Reheating Tips To get that crunch back, reheat the zucchini sticks in the oven. Set your oven to 375°F (190°C). Bake them for about 10 minutes. This will warm them up and restore their crispiness. Avoid using the microwave, as it can make them soggy. Freezing Zucchini Sticks You can freeze the zucchini sticks for longer storage. First, bake them as directed in the Full Recipe. Let them cool completely. Then, place them in a single layer on a baking sheet and freeze for a few hours until firm. After that, transfer them to a freezer bag. They will keep well for up to two months. When ready to eat, bake from frozen, adding a few extra minutes to the cooking time. To keep your zucchini sticks crispy, follow a few key steps. First, cut the zucchini into even sticks. This helps them cook at the same rate. Second, make sure to pat the zucchini dry before coating. Removing excess moisture is very important. Lastly, use the egg wash to help the crumbs stick well. This will create a nice crispy layer while baking. Yes, you can use other vegetables! Carrots, eggplant, and sweet potatoes work great. Just remember to cut them into similar shapes and sizes. This helps them cook evenly. You might need to adjust the cooking time based on the vegetable you choose. Herb-crusted zucchini sticks taste great with many dips. Marinara sauce gives a nice tangy flavor. You can also try ranch dressing for a cool, creamy taste. If you want something lighter, a yogurt dip with herbs is a good choice. It adds freshness and complements the zucchini well. For the full recipe, check out the [Full Recipe]. You learned how to make crispy zucchini sticks using simple ingredients. I shared tips for perfecting your baking process and variations to suit your taste. Storing leftovers or substituting ingredients can keep things fresh. Remember, the right egg wash and oil play key roles in crispiness. Enjoy experimenting with your flavors. Try new dips and veggies next time to keep things exciting. Now, you have the tools to make this dish your own!](https://dishtreats.com/wp-content/uploads/2025/07/e6e4c2e6-85fe-4d28-829b-ce9ad5e19088-768x768.webp)

