
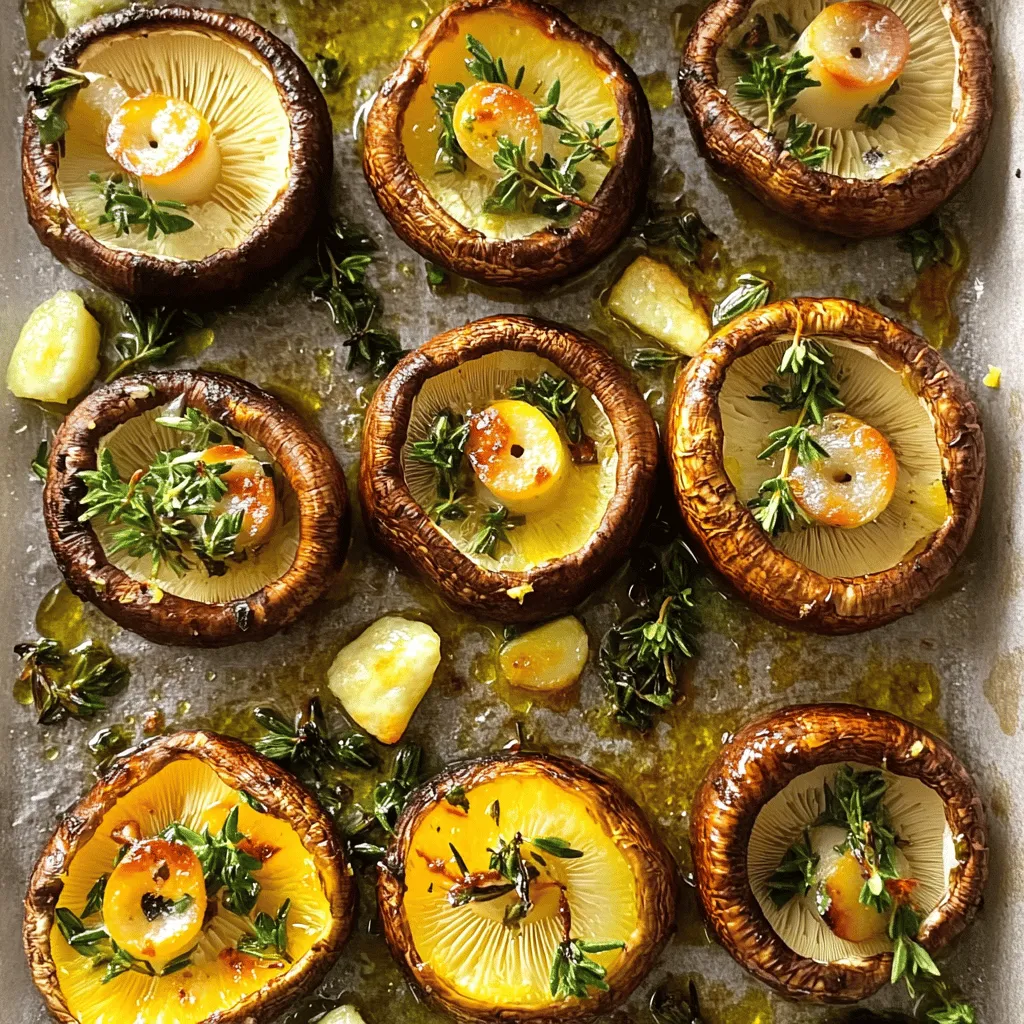
Simple Roasted Mushrooms Flavorful Side Dish Recipe

Do you want to elevate your meals with a simple yet delicious side? My recipe for Simple Roasted Mushrooms is the perfect solution. These mushrooms shine with just a few quality ingredients, like garlic and fresh herbs. You’ll discover how easy it is to create a flavorful dish that pairs well with almost anything. Ready to impress your guests or just enjoy a cozy dinner? Let’s dive into this savory delight!
Ingredients
Main Ingredients for Simple Roasted Mushrooms
- 500g mixed mushrooms (button, cremini, shiitake)
- 4 tablespoons high-quality olive oil
- 4 cloves of garlic, finely minced
Seasoning and Flavor Enhancements
- 2 tablespoons fresh thyme leaves, chopped
- 1 tablespoon fresh rosemary leaves, chopped
- Sea salt and freshly ground black pepper to taste
- Zest of 1 medium lemon
Optional Additions
- 2 tablespoons freshly grated Parmesan cheese
- Additional herbs for garnishing
To make simple roasted mushrooms, focus on quality. Choose fresh, firm mushrooms for the best taste. Mix the mushrooms with olive oil and minced garlic in a bowl. This step is key for flavor.
For seasoning, fresh thyme and rosemary add depth. Use sea salt and black pepper to enhance the natural taste. Zest a lemon for a bright finish. This adds a fresh twist to the dish.
You can add Parmesan cheese for a rich flavor. It melts slightly and complements the mushrooms. You can also garnish with extra herbs for presentation.
This recipe provides a wonderful side dish or topping. You’ll find it pairs well with many meals.
Step-by-Step Instructions
Preheat the Oven
Set your oven temperature to 200°C (400°F). This step is key for perfect roasting.
Prepare the Mushroom Mixture
In a big bowl, combine the halved mushrooms with olive oil and seasonings. Add:
- 500g mixed mushrooms (button, cremini, shiitake)
- 4 tablespoons high-quality olive oil
- 4 cloves of garlic, finely minced
- 2 tablespoons fresh thyme leaves, chopped
- 1 tablespoon fresh rosemary leaves, chopped
- Sea salt and freshly ground black pepper to taste
Mix everything well. Make sure each mushroom piece gets coated with the oil and herbs.
Arrange for Roasting
Line a baking sheet with parchment paper. This makes cleanup easy. Spread the mushrooms evenly in a single layer. Give them space to roast well.
Roast the Mushrooms
Put the baking sheet in the preheated oven. Roast the mushrooms for 20-25 minutes. Stir them halfway through. This helps them cook evenly. They should be golden brown and smell amazing.
Finishing Touches
When you take them out, sprinkle lemon zest on top. This adds a fresh flavor. If you want, add freshly grated Parmesan cheese for a rich finish.
Serve and Enjoy
Serve the roasted mushrooms hot. They are great as a side dish. You can also use them on salads or pastas. They enhance the flavor of any meal. For a nice touch, garnish with fresh herbs before serving. Enjoy!
Tips & Tricks
Selecting the Best Mushrooms
When you pick mushrooms, look for fresh and firm ones. Avoid any that feel slimy or have dark spots. Button, cremini, and shiitake mushrooms all add great flavor. Each type brings its own taste. For a mix, choose equal parts of each type. This blend gives depth to your dish.
Enhancing Flavor Profiles
To make your roasted mushrooms even tastier, try adding other herbs. Oregano and parsley work well. You might also enjoy some crushed red pepper for heat. Experimenting with these flavors can change the dish. Just remember to keep the balance. Too much can overpower the mushrooms.
Achieving Optimal Texture
One common issue is soggy mushrooms. To prevent this, make sure the mushrooms are dry before cooking. Toss them gently with oil and spices, but don’t overdo it. Spread them out on the baking sheet. If they touch, they will steam instead of roast. This simple step ensures they stay crispy.
Variations
Different Mushroom Combinations
You can use many types of mushrooms for roasting. Each type brings its own taste. Here are some great options:
- Button mushrooms: Mild flavor, easy to find.
- Cremini mushrooms: A bit more earthy than button.
- Shiitake mushrooms: Rich and meaty texture.
- Portobello mushrooms: Great for a hearty feel.
- Oyster mushrooms: Delicate and slightly sweet flavor.
Try a mix for a colorful dish. Different textures and tastes make it fun.
Bowl Variants
Roasted mushrooms work well in grain bowls or salads. They add depth and flavor. Here are a few ideas:
- Use them over brown rice or quinoa for a filling base.
- Top a fresh green salad with mushrooms for extra taste.
- Mix them into a pasta dish for a hearty meal.
Experiment with your favorite grains and greens.
Flavor Punch with Sauces
Adding sauces can really boost the taste of your mushrooms. Here are some sauces to try:
- Balsamic glaze: Adds sweetness and tang.
- Soy sauce: Gives an umami kick.
- Pesto: Brings a fresh herb flavor.
- Tahini dressing: Creamy and rich.
Drizzle these sauces over the mushrooms before serving. They add a lovely touch to your dish.
Storage Info
Storing Leftovers
After you enjoy your roasted mushrooms, let them cool down. Place them in an airtight container. Store them in the fridge. They stay fresh for up to three days. When you are ready to eat them again, reheat in a pan. You can also use the microwave. Just heat until warm. This keeps their flavor and texture.
Freezing Roasted Mushrooms
You can freeze roasted mushrooms, too! First, let them cool completely. Then, spread them out on a baking sheet. Freeze them for about an hour. This step keeps them from sticking together. After they are frozen, transfer them to a freezer bag. They can last up to three months in the freezer.
Shelf Life
Roasted mushrooms have different shelf lives based on storage. In the fridge, they last three days. If frozen, they stay good for three months. Always check for any off smells or changes in color when you take them out. If they look or smell strange, it’s best to toss them.
FAQs
How do I know when the mushrooms are done roasting?
You will know the mushrooms are done when they turn golden brown. They should feel soft to the touch but not mushy. The edges may crisp up a bit, adding a nice texture. The aroma will also be rich and savory, filling your kitchen with warmth.
Can I use dried herbs instead of fresh?
Yes, you can use dried herbs. They are more concentrated in flavor. Use one-third of the amount you would use for fresh herbs. For example, if the recipe calls for 2 tablespoons of fresh thyme, use about 2 teaspoons of dried thyme. This swap can still give you tasty results!
What dishes pair well with roasted mushrooms?
Roasted mushrooms make a great side dish. They pair well with grilled meats like chicken or steak. You can add them to pasta dishes or stir them into risottos. They also work well in grain bowls or as a topping on pizza. Don’t forget to try them in salads for added flavor!
Is it possible to make this recipe vegan?
Yes, this recipe can easily be made vegan. Simply skip the Parmesan cheese, or use a vegan cheese alternative. The rest of the recipe is already dairy-free. You will still enjoy a delicious and savory dish! For added creaminess, consider blending in some cashew cream or nutritional yeast.
In this blog post, you learned how to make simple roasted mushrooms. We covered the main ingredients, step-by-step instructions, and tips for the best flavor. You can use various mushrooms and add your favorite herbs. Remember to use lemon zest for a fresh taste. Roasted mushrooms can serve as a great side or base for many dishes. With the right storage, you can enjoy them later too. Experiment with the recipe and share your tasty results! Enjoy your cooking journey!

![To make roasted garlic hummus, gather these essential ingredients: - 1 cup canned chickpeas, rinsed and drained - 1/4 cup tahini - 1/4 cup extra virgin olive oil - 1 whole head of garlic - 2 tablespoons freshly squeezed lemon juice - 1/2 teaspoon ground cumin - Sea salt, to taste - Water, as needed These ingredients work together to create a creamy and delicious hummus. The chickpeas provide a smooth base, while tahini adds richness. Roasted garlic brings a sweet, mellow flavor that transforms the dish. To elevate your hummus, consider these optional garnishes: - Chopped fresh parsley - Smoked paprika Adding these garnishes gives your hummus a pop of color. Fresh parsley adds a touch of brightness, while smoked paprika contributes a subtle warmth. You will need a few key tools to prepare your hummus: - Food processor - Aluminum foil - Baking sheet A food processor is essential for achieving a smooth texture. Aluminum foil helps roast the garlic evenly, while a baking sheet supports the garlic in the oven. For the full recipe, check out the complete guide to making roasted garlic hummus. Enjoy the process and get ready for a tasty treat! To start, I preheat my oven to 400°F (200°C). This heat helps the garlic roast well. Next, I take a whole head of garlic and cut off the top. I make sure to expose the tops of the cloves. Then, I drizzle a little olive oil over the cloves. This step helps the garlic stay moist. I wrap the garlic in aluminum foil tightly and place it in the oven. I roast it for about 30-35 minutes. The cloves should turn soft and golden brown. After roasting, I let it cool for a few minutes. In my food processor, I add 1 cup of rinsed chickpeas and 1/4 cup of tahini. Then, I squeeze in 2 tablespoons of lemon juice and add 1/2 teaspoon of ground cumin. I also sprinkle in some sea salt. Next, I squeeze the roasted garlic cloves from their skins into the bowl. I usually use three to four cloves for a great flavor. I blend everything until it becomes smooth and creamy. While blending, I slowly drizzle in 1/4 cup of extra virgin olive oil. If the hummus feels too thick, I add water by the tablespoon until I like the texture. Once my hummus is smooth, I taste it to check if it needs more salt or lemon juice. This step is key for flavor balance. I then transfer the hummus to a serving bowl. I drizzle a bit of olive oil on top to add richness. For a pop of color, I garnish it with chopped parsley and a sprinkle of smoked paprika. To serve, I love pairing the hummus with fresh pita bread or sliced veggies. This makes for a great snack or appetizer. You can find the Full Recipe [here]. To get the right texture, start with good chickpeas. Use canned chickpeas for ease. Rinse and drain them well to remove excess salt. When blending, add olive oil slowly. If your hummus is too thick, add water a bit at a time. This makes it smooth and creamy. Roasted garlic is the star here, but you can add more flavor. Try adding herbs like fresh parsley or basil. A pinch of smoked paprika gives a nice kick. For a zestier taste, add more lemon juice. Taste as you go—this is key! One big mistake is not roasting the garlic enough. Soft, golden cloves bring the best flavor. Another common error is adding too much water at once. This can make your hummus runny. Lastly, don’t forget to taste your blend. Adjusting salt and lemon juice helps create a balanced dip. For the full recipe, refer to the main article. {{image_4}} You can change the flavor of your hummus easily. Adding herbs like basil or cilantro gives a fresh taste. For a warm twist, try adding spices like smoked paprika or chili powder. Just a pinch can turn your dip into a flavor explosion. Mix in fresh herbs or spices after blending for the best taste. While chickpeas are classic, other beans work well too. White beans, like cannellini, add creaminess. Black beans offer a rich, earthy flavor. You can even use lentils for a different texture. Each bean brings its own taste. Feel free to swap them out and explore new flavors. If you love heat, this spicy hummus is for you. Start with the full recipe and add heat! After blending, mix in chopped jalapeños or a splash of hot sauce. You can also use crushed red pepper for a milder kick. This spicy version pairs well with crunchy veggies or pita chips, making your snack time exciting. To keep your roasted garlic hummus fresh, store it in an airtight container. This helps prevent exposure to air, which can lead to spoilage. Always let the hummus cool completely if you just made it. Once cooled, cover it tightly and place it in the fridge. You can freeze hummus for later use. Portion it into smaller containers. This makes it easy to thaw only what you need. Leave a little space at the top of the container. Hummus expands when frozen. When you’re ready to eat it, thaw it in the fridge overnight. Stir well before serving. Homemade roasted garlic hummus lasts about five to seven days in the fridge. Check for any off smells or changes in color. If you see any mold, it’s best to throw it away. Fresh hummus should have a smooth texture and rich aroma. Keeping these tips in mind helps you enjoy your hummus at its best. Don't forget to check the [Full Recipe] for the perfect hummus experience! Roasted garlic can last about one week in the fridge. Store it in a sealed container. If you want to keep it longer, you can freeze it. Roasted garlic freezes well and can last up to three months. Yes, you can use fresh garlic, but the flavor will be different. Fresh garlic is sharp and strong, while roasted garlic is sweet and mild. If you want a more intense garlic taste, add a small amount of fresh garlic to your hummus. Start with one clove and adjust to your taste. Roasted garlic offers many health benefits. It can help boost your immune system. It also may lower blood pressure and improve heart health. Roasted garlic is rich in antioxidants, which fight free radicals. Plus, it can aid digestion and add flavor to meals without extra fat or salt. Enjoying roasted garlic in hummus gives you these benefits in a tasty way. This blog covered all you need for tasty roasted garlic hummus. We explored key ingredients, helpful tools, and the easy steps for making hummus. You learned tips to get the right texture and boost flavor. We shared fun variations to try, plus essential storage advice. Roasted garlic hummus is simple and fun to make. Enjoy the process and don't hesitate to get creative with your flavors! Remember, practice makes perfect.](https://dishtreats.com/wp-content/uploads/2025/06/4ccbc263-5457-4179-8ada-bd86b908b6b9-768x768.webp)


![To make this delightful chilled peach soup, gather these main ingredients: - 4 ripe peaches, peeled and pitted - 1 cup plain Greek yogurt - 1 cup almond milk - 2 tablespoons honey (or maple syrup for a vegan option) - Juice of 1 lemon - 1 teaspoon vanilla extract - A pinch of salt These ingredients create a creamy and fruity flavor. The ripe peaches give sweetness and vibrancy. Greek yogurt adds creaminess and protein. Almond milk keeps it light and smooth. Honey or maple syrup sweetens it naturally. Lemon juice brightens the taste, while vanilla adds warmth. For an extra touch, consider these garnishes: - Fresh mint leaves for garnish - Crushed pistachios for topping (optional) Mint leaves add a fresh burst of flavor and color. Crushed pistachios give a nice crunch and a nutty taste. You can easily swap out some ingredients if needed: - Use coconut yogurt instead of Greek yogurt for a dairy-free version. - Substitute regular milk for almond milk if you prefer. - Adjust the sweetener; agave nectar works well too. - Try adding a splash of orange juice for a different citrus note. These substitutions help you customize the soup to your taste or dietary needs. You still get a refreshing and delicious chilled peach soup with any of these changes. For the full recipe, visit the [Full Recipe]. Start by washing the peaches well. Peeling them is next. Use a sharp knife to cut the peaches into small, even chunks. This helps them blend smoothly. Remove the pits and add the chopped peaches to your blender. Now, it’s time to mix everything. Add the Greek yogurt, almond milk, honey, lemon juice, vanilla extract, and a pinch of salt to the blender with the peaches. Each ingredient enhances the flavor and texture of the soup. Blend the mixture on high speed. You want it to be smooth and creamy. If you like a little texture, pulse the blender a few times instead of blending non-stop. This gives you control over the final consistency. Taste the soup. If it needs more sweetness or tang, add more honey or lemon juice. Once blended, pour the soup into a bowl or pitcher. Cover it tightly and place it in the fridge for at least two hours. This chilling time allows flavors to mix well. When ready to serve, stir the soup again. Pour it into bowls and garnish with fresh mint leaves and crushed pistachios. For a fancy touch, use chilled bowls. This chilled peach soup is perfect for a light dessert or starter. For the full recipe, check out the details above! To select the best peaches, look for ripe, fragrant fruit. They should have a slight give when you gently press them. Avoid peaches with bruises or soft spots. Choosing freestone peaches makes your prep easier. These peaches separate cleanly from the pit. You can tweak the flavor of your chilled peach soup. If you want it sweeter, add more honey or maple syrup. For more tartness, squeeze in more lemon juice. Always taste as you go. This way, you find the perfect balance for your palate. When blending, start on low speed, then increase. This helps break down the peaches evenly. If you like some texture, pulse the blender a few times instead of blending fully. For a creamier soup, blend longer. Always check the consistency before serving. You want it smooth but not too thin. For more detailed steps, check the Full Recipe. {{image_4}} You can easily make this soup vegan. Just swap Greek yogurt for coconut yogurt. It adds a nice creaminess. Use maple syrup instead of honey for sweetness. You can also try different plant-based milk. Almond, oat, or soy milk work well too. This way, everyone can enjoy a tasty bowl of chilled peach soup. Want to spice it up? Add a pinch of cinnamon or ginger for warmth. These spices can add depth to the sweet peaches. Fresh herbs can make it even better. Try basil or rosemary for a unique twist. Just a small amount can change the flavor profile completely. To change the texture, consider using different fruits. Add diced mango or berries for a fruity crunch. You can also mix in some chia seeds for a fun texture. Blending in some silken tofu can make the soup creamier. Each variation brings a new taste and feel to your chilled peach soup. For the full recipe, check out the details above. Store leftover chilled peach soup in an airtight container. This keeps the soup fresh. Make sure to cool it first before sealing. If you don’t have a container, you can use plastic wrap. Just cover the bowl tightly. Chilled peach soup lasts about 3 to 5 days in the fridge. After that, it may lose its flavor and freshness. Always check for signs of spoilage before eating. If it smells sour or changes color, it's best to toss it. You can freeze chilled peach soup for up to 3 months. Pour it into freezer-safe containers, leaving some space at the top. This allows for expansion when frozen. To enjoy later, thaw it in the fridge overnight. Stir well before serving to restore its smooth texture. For the full recipe, see the section above. Serve chilled peach soup in a bowl or a small glass. I love using chilled bowls for that extra touch. You can drizzle a bit of almond milk on top. A mint leaf adds a great pop of color. This soup works well as a light starter or a refreshing dessert. Yes, you can use frozen peaches. Just make sure they are thawed first. This keeps the soup smooth and creamy. Frozen peaches may change the taste slightly, but they still taste great. Chilled peach soup is quite healthy. It has ripe peaches, Greek yogurt, and almond milk. These ingredients offer vitamins, protein, and healthy fats. The honey adds natural sweetness, making it a tasty and nutritious choice. Enjoy it without guilt! You can mix in other fruits like berries or mangoes. Simply chop them up and blend them with peaches. Adjust the sweetness to match the fruit you choose. This gives you a unique flavor every time. Enjoy experimenting with seasonal fruits for variety! Chilled peach soup is a refreshing treat. We covered the main ingredients, like fresh peaches, and how to blend them for the best flavor. I shared tips on choosing, storing, and even varying the recipe for vegan options. Remember, this soup is easy to make and fun to try. Enjoy exploring different flavors or garnishes to suit your taste. Now, it’s time to make your own chilled peach soup and savor each bite!](https://dishtreats.com/wp-content/uploads/2025/07/cde2237f-ab80-4fd7-9ae6-23109d9f52c0-768x768.webp)