Lemon Dill Grilled Salmon Savory and Simple Delight
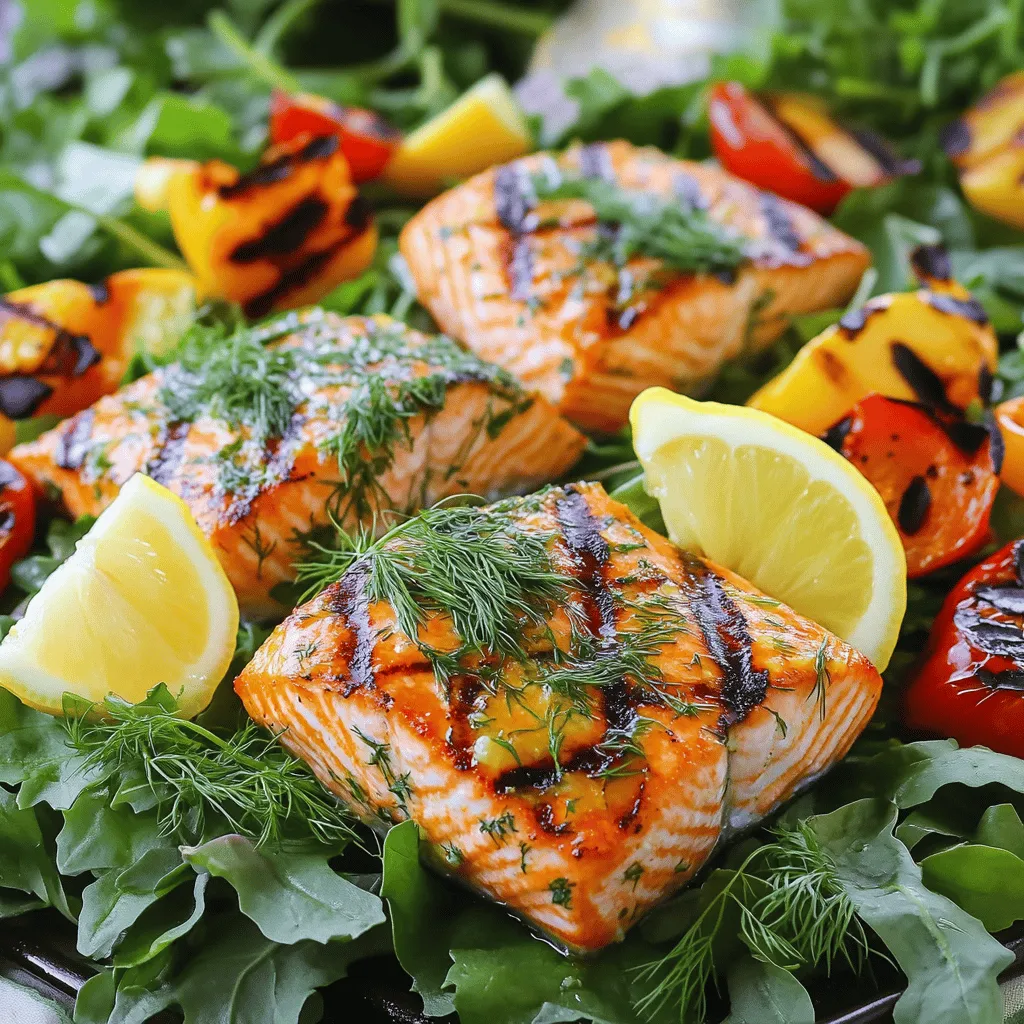
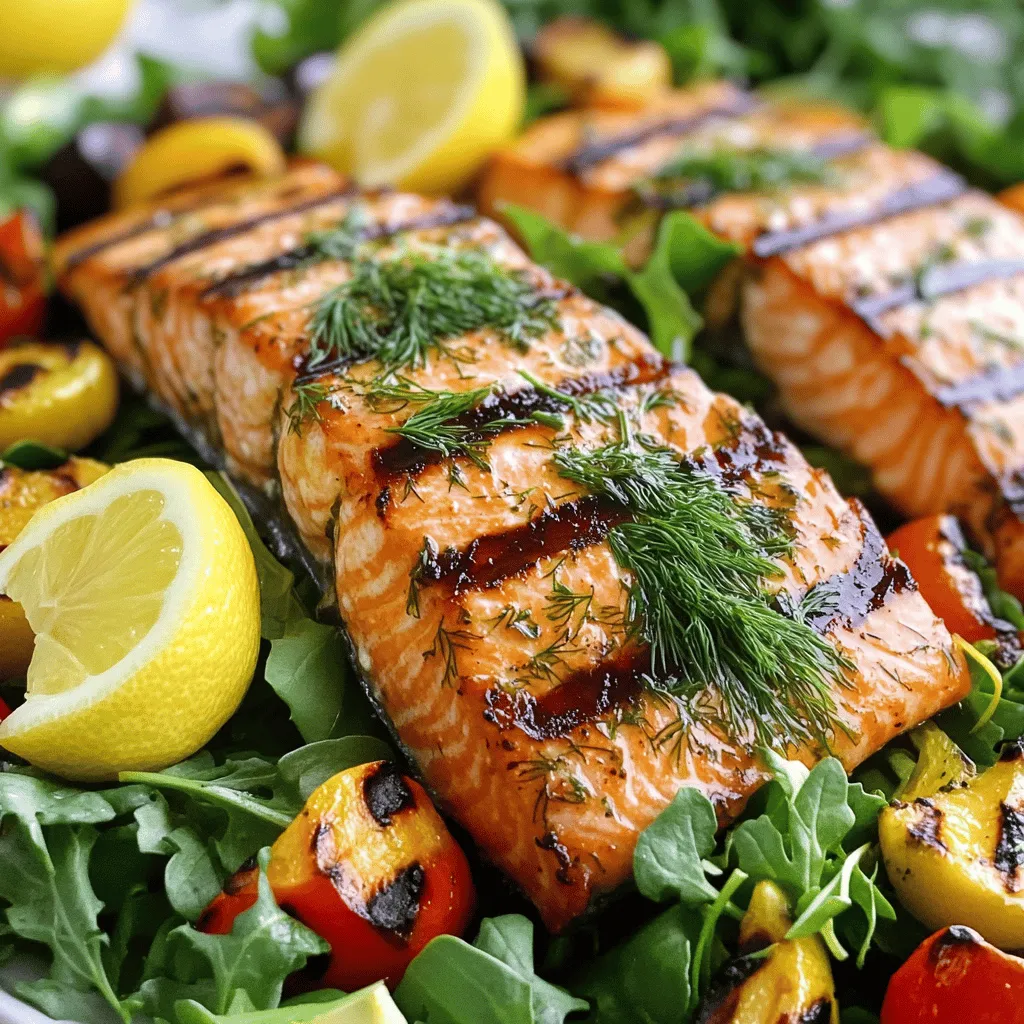
If you’re craving a meal that’s both tasty and quick, Lemon Dill Grilled Salmon is your answer. This dish features fresh salmon, zesty lemon, and fragrant dill—perfect for those busy weeknights or leisurely weekend dinners. I’ll guide you step-by-step through the cooking process, share tips for grilling perfection, and offer serving suggestions that will impress anyone at your table. Let’s dive into this savory and simple delight!
Ingredients
Main Ingredients
- 4 salmon fillets (approximately 6 ounces each)
- 3 tablespoons extra-virgin olive oil
- 2 tablespoons fresh dill, finely chopped
- 2 garlic cloves, minced
The main ingredients shine in this dish. The salmon fillets are the star, with their rich flavor and tender texture. I use extra-virgin olive oil for its fruity taste. Fresh dill adds a bright touch, while garlic brings depth. These simple ingredients combine to make a delightful meal.
Seasoning and Garnishes
- Salt and freshly cracked black pepper, to taste
- Lemon wedges, for serving
Seasoning enhances the natural flavors of the salmon. I recommend using salt and black pepper to taste. These simple spices work wonders. Lemon wedges add a fresh burst of flavor when served. You can squeeze them over the salmon for a zesty kick.
Serving Suggestions
- Ideal accompaniments: grilled vegetables or a fresh salad
- Pairing with side dishes: quinoa, rice, or roasted potatoes
When serving, I love pairing the grilled salmon with colorful grilled vegetables. A fresh salad also complements the dish well. For heartier options, consider serving with quinoa, rice, or roasted potatoes. These sides balance the meal and create a satisfying plate.
Step-by-Step Instructions
Preparing the Marinade
To start, you need to mix some simple ingredients. In a medium bowl, combine:
- 3 tablespoons extra-virgin olive oil
- Zest and juice from 2 large lemons
- 2 tablespoons fresh dill, finely chopped
- 2 minced garlic cloves
- Salt and freshly cracked black pepper to taste
Whisk these ingredients together until they blend well. This marinade adds great flavor to the salmon.
Marinating is key. Let the salmon soak up these flavors for at least 30 minutes in the fridge. This time allows the marinade to infuse the salmon deeply.
Grilling the Salmon
Now it’s time to grill. First, preheat your grill to medium-high heat. Brush the grates lightly with olive oil. This step helps to stop the salmon from sticking.
Once the grill is ready, take the salmon out of the fridge. Let any extra marinade drip off. Place the salmon skin-side down on the grill. Cook for about 4-5 minutes without moving it. This gives you nice grill marks.
Carefully flip the fillets using a spatula. Grill for another 3-4 minutes. You know the salmon is done when it looks opaque and flakes easily with a fork.
Finishing Touches
After grilling, it’s important to let the salmon rest for a couple of minutes. This helps keep it juicy.
When you are ready to serve, plate the grilled salmon warm. Add fresh lemon wedges for extra flavor. A squeeze of lemon brightens each bite.Enjoy your Lemon Dill Grilled Salmon!
Tips & Tricks
Perfecting the Grill Marks
To get those perfect grill marks, you need heat. Preheat your grill to medium-high. Brush the grates with olive oil to keep the salmon from sticking. Place the salmon skin-side down and avoid moving it for a few minutes. This helps the fish sear and form those beautiful char marks. Cook for about 4-5 minutes before flipping. Flip carefully with a spatula and cook for another 3-4 minutes. This method ensures you get those nice lines and a great taste.
Ensuring Moisture
Keeping your salmon juicy is key. Marinate the fish for at least 30 minutes. This lets the flavors soak in. Use a good amount of olive oil in your marinade. It helps lock in moisture while grilling. If your salmon is thick, you may need to grill it a bit longer. Just make sure it’s opaque and flakes easily. Let the salmon rest after grilling. This step helps keep it moist when you serve it.
Adjusting Flavor Profiles
Feel free to make the marinade your own. If you want a strong lemon flavor, add more lemon juice or zest. For a different twist, try adding some honey for sweetness. You can also switch out the dill for other herbs like parsley or thyme. This way, you can adjust the taste to fit your mood. Experimenting with the marinade allows you to create a dish that feels personal and unique.
Variations
Alternative Marinades
Switching up your marinade can make a big difference. You can try using different herbs. Basil or parsley can add fresh notes. Adding mustard or honey can also change the taste. For a smoky flavor, try adding smoked paprika. Mix and match to create a new dish every time.
Cooking Methods
While grilling is my favorite way to cook salmon, you can also bake it. To bake, set your oven to 375°F. Place the marinated salmon on a baking sheet. Bake for about 15-20 minutes, or until it flakes easily. Another method is pan-searing. Heat olive oil in a skillet over medium heat. Sear the salmon for 4-5 minutes on each side. This gives a lovely crust.
Serving Style Variations
How you serve your salmon can change the meal’s vibe. For a cozy dinner, place the salmon on a plate with rice and steamed veggies. For a fancy touch, serve on a bed of arugula with lemon slices. You can also add a drizzle of balsamic glaze for style. Don’t forget to sprinkle more fresh dill on top for color and flavor.
Storage Info
Refrigeration Guidelines
To store leftover grilled salmon, let it cool first. Place the salmon in an airtight container. Make sure to seal it well to keep out air. Store it in the fridge for up to three days. This keeps the salmon fresh and safe to eat.
Freezing Instructions
If you want to keep grilled salmon longer, freezing is a great option. Wrap each piece in plastic wrap, then place it in a freezer bag. Squeeze out as much air as you can before sealing. You can freeze it for up to three months. When you’re ready to eat, move the salmon to the fridge. Let it defrost overnight for the best texture.
Reheating Methods
Reheating grilled salmon can be tricky. You don’t want it to dry out. I recommend using the oven. Preheat it to 275°F (135°C). Place the salmon on a baking sheet and cover it with foil. Heat it for about 15 minutes. This keeps it moist and tasty. You can also use the microwave, but do it carefully. Heat in short bursts, checking often to avoid overcooking. Enjoy your leftover Lemon Dill Grilled Salmon just as much as the first time!
FAQs
How long should I marinate the salmon?
I recommend marinating the salmon for at least 30 minutes. This time allows the flavors of the marinade to seep into the fish. If you have longer, up to 2 hours works well too. Just avoid marinating for too long, as the acid from the lemon can change the texture.
Can I use frozen salmon for this recipe?
Yes, you can use frozen salmon. Just ensure it is fully thawed before marinating. Thaw it in the fridge overnight or place it in cold water for quicker results. This helps maintain the fish’s texture and flavor.
What are good side dishes to serve with Lemon Dill Grilled Salmon?
Some great side dishes include:
- Steamed asparagus
- Garlic mashed potatoes
- Quinoa salad
- Grilled zucchini
- Roasted Brussels sprouts
These sides complement the salmon’s bright flavors and create a balanced meal.
Can I make a non-grilled version of this recipe?
Absolutely! You can bake or pan-sear the salmon. To bake, set your oven to 400°F (200°C) and cook for about 12-15 minutes. For pan-searing, heat a skillet over medium-high heat, cook for about 4-5 minutes on each side. Both methods work well, just adjust your cooking time.
This blog post covered everything you need for making Lemon Dill Grilled Salmon. We discussed the key ingredients, step-by-step instructions, and tips for grilling. I shared variations, storage info, and answered common questions.
Grilling salmon at home can be fun and rewarding. With the right steps and ingredients, you can impress everyone. Enjoy this dish with your favorite sides for a delicious meal. Happy cooking!

![- 2 cups cooked chicken, shredded - 1 can (10 oz) red enchilada sauce - 1 can (15 oz) black beans, rinsed and drained - 1 cup corn kernels (fresh, frozen, or canned) - 1 small onion, finely chopped - 2 cloves garlic, minced - 2 cups shredded Mexican cheese blend - 8 small corn tortillas, cut into quarters - 1 teaspoon ground cumin - 1 teaspoon chili powder - ½ teaspoon salt - ¼ teaspoon black pepper - 1 cup sour cream (for serving) - Fresh cilantro, chopped (for garnish) When I make Chicken Enchilada Casserole, I love using fresh, simple ingredients. Each item adds flavor and texture. You can use rotisserie chicken for a quick option. It saves time and keeps the dish tasty. The red enchilada sauce gives it that signature kick. I prefer black beans for added protein. They blend well with the other flavors. Corn adds sweetness and a nice crunch. I often choose fresh corn when it's in season, but frozen works great too. Onions and garlic bring an aromatic base. They make the kitchen smell amazing while cooking. The cheese is essential. I like a Mexican cheese blend because it melts beautifully. Corn tortillas are the heart of this dish, creating layers of goodness. The spices, like cumin and chili powder, enhance the flavors without overwhelming them. Finally, a dollop of sour cream and fresh cilantro on top makes it perfect. This combination of ingredients creates a hearty meal your family will love. For the complete recipe, check the Full Recipe section. 1. Preheat the oven to 350°F (175°C). This helps cook the casserole just right. 2. In a large skillet, heat a little oil over medium heat. Add the chopped onion. Sauté for 3-4 minutes. Wait until the onion turns soft and clear. 3. Next, add minced garlic to the skillet. Cook for 1 more minute. This will fill your kitchen with a lovely smell. 4. Stir in the shredded chicken and red enchilada sauce. Add the rinsed black beans, corn, cumin, chili powder, salt, and pepper. Mix well and cook for 5-7 minutes. Make sure everything is hot and well combined. 1. Grease a 9x13 inch baking dish with a little oil or butter. This prevents sticking. 2. Take half of the tortilla quarters and place them at the bottom of the dish. Overlap them slightly to cover the bottom. 3. Spoon half of the chicken mixture over the tortillas. Spread it out evenly. Then, sprinkle 1 cup of shredded cheese on top. 4. Repeat with the remaining tortilla quarters and chicken mixture. Top with the rest of the cheese for a cheesy crust. 1. Cover the casserole tightly with aluminum foil. Bake for 20 minutes. This allows the flavors to mix well. 2. After 20 minutes, remove the foil. Bake uncovered for an extra 10-15 minutes. Wait until the cheese is bubbly and golden. 3. When done, take the casserole out of the oven. Let it cool for about 5 minutes before serving. This makes it easier to cut and serve. Enjoy this savory chicken enchilada casserole with your family! For the full recipe, check out the details above. - Use rotisserie chicken for time-saving: Rotisserie chicken is great for busy days. It saves time and adds flavor. Just shred it and mix it into your casserole. You get tasty results without a lot of work. - How to properly layer for even cooking: Start with tortilla quarters at the bottom. This helps soak up the sauce and keeps the bottom from getting soggy. Spread the chicken mixture evenly over the tortillas. Repeat this process. Finish with cheese on top for a bubbly crust. - Adjusting spice levels: If you like heat, add more chili powder or some diced jalapeños. For milder flavors, reduce the chili powder. Taste as you go to find your perfect balance. - Additional toppings and garnishes ideas: Try adding sliced avocado, diced tomatoes, or pickled red onions. These bright toppings add color and flavor. A sprinkle of fresh cilantro also makes your dish pop! - Best side dishes to serve with casserole: Serve with a simple green salad or Mexican rice. These sides add freshness and balance the rich casserole. You can also offer tortilla chips for crunch. - How to present for a family meal: Cut the casserole into squares for easy serving. Use a large spoon to add a dollop of sour cream on top. Finish with a sprinkle of cilantro for a beautiful presentation. Enjoy this meal around the table! {{image_4}} You can easily swap ingredients in your Chicken Enchilada Casserole. If you want a different meat, use turkey or beef instead of chicken. Both options taste great and keep the dish hearty. For a vegetarian version, try using black beans and colorful veggies like bell peppers or zucchini. These swaps keep the casserole flavorful and filling. If you need gluten-free options, use corn tortillas instead of flour ones. They work perfectly in this casserole and add a nice flavor. For those who want a dairy-free meal, look for plant-based cheese and sour cream. These substitutes will still give you the creamy texture you love without the dairy. To change the flavor profile, add some spice! For a Mexican-inspired twist, mix in jalapeños or your favorite salsa. This will add a kick and extra layers of flavor. If you prefer a Southwestern style, try adding more spices like smoked paprika or cayenne pepper. This will give the casserole a warm, smoky taste that everyone will enjoy. For the full recipe, check out [Full Recipe]. Store leftover Chicken Enchilada Casserole in an airtight container. This keeps it fresh. Make sure it cools down before sealing. It lasts about 3-4 days in the fridge. If you notice any odd smell or color, it's best to toss it. You can freeze the casserole both before and after baking. If you freeze it before baking, wrap it tightly in plastic wrap. Bake it straight from the freezer. This usually takes about 45-60 minutes at 350°F. If you freeze it after baking, let it cool first. Cover it with foil or plastic wrap. To reheat, bake at 350°F for about 30 minutes, or until hot. You can make this casserole ahead for busy weeknights. Simply prepare it a day in advance and store it in the fridge. Portion it into individual servings for quick meals. This way, you can just grab and heat it when needed. It makes weeknight dinners simple and stress-free. Can I make Chicken Enchilada Casserole in advance? Yes, you can make this dish ahead of time. Prepare it up to the baking step. Cover it and store it in the fridge. When ready, bake it straight from the fridge. This saves time on busy nights. What can I substitute for black beans? You can use pinto beans, kidney beans, or chickpeas. Each option adds a unique flavor. Just rinse and drain them before adding. How do I reheat leftovers without drying out the dish? To reheat, cover the casserole with foil. Heat it in a 350°F oven for about 20 minutes. This keeps it moist and warm. You can also microwave individual portions with a damp paper towel. What size baking dish should I use? I recommend a 9x13 inch baking dish. This size holds all the layers well. It helps the casserole cook evenly. How do I know when the casserole is completely done? The casserole is done when the cheese is golden and bubbly. Insert a knife in the center; it should be hot. The layers should look set and not runny. Can I adjust the spice level of the casserole? Yes, you can make it spicier or milder. Add more chili powder for heat. For milder flavor, reduce the spices or choose mild enchilada sauce. What are the best toppings to add for extra flavor? You can add sliced jalapeños, diced avocado, or fresh lime juice. Chopped green onions and extra cilantro also give a nice touch. These toppings enhance the dish's taste and look. This Chicken Enchilada Casserole is easy and fun to make, with great flavors. You learned about ingredients, step-by-step instructions, and tips for better cooking. Don’t forget to try different variations, depending on your taste or needs. Storing leftovers is simple, making this dish great for meal prep. This recipe is perfect for family meals or gatherings. Enjoy the warmth and comfort it brings to your table. Now, grab your ingredients and start cooking!](https://dishtreats.com/wp-content/uploads/2025/07/f6c231a9-1b86-4c94-be4f-d7e13d8c3061-768x768.webp)