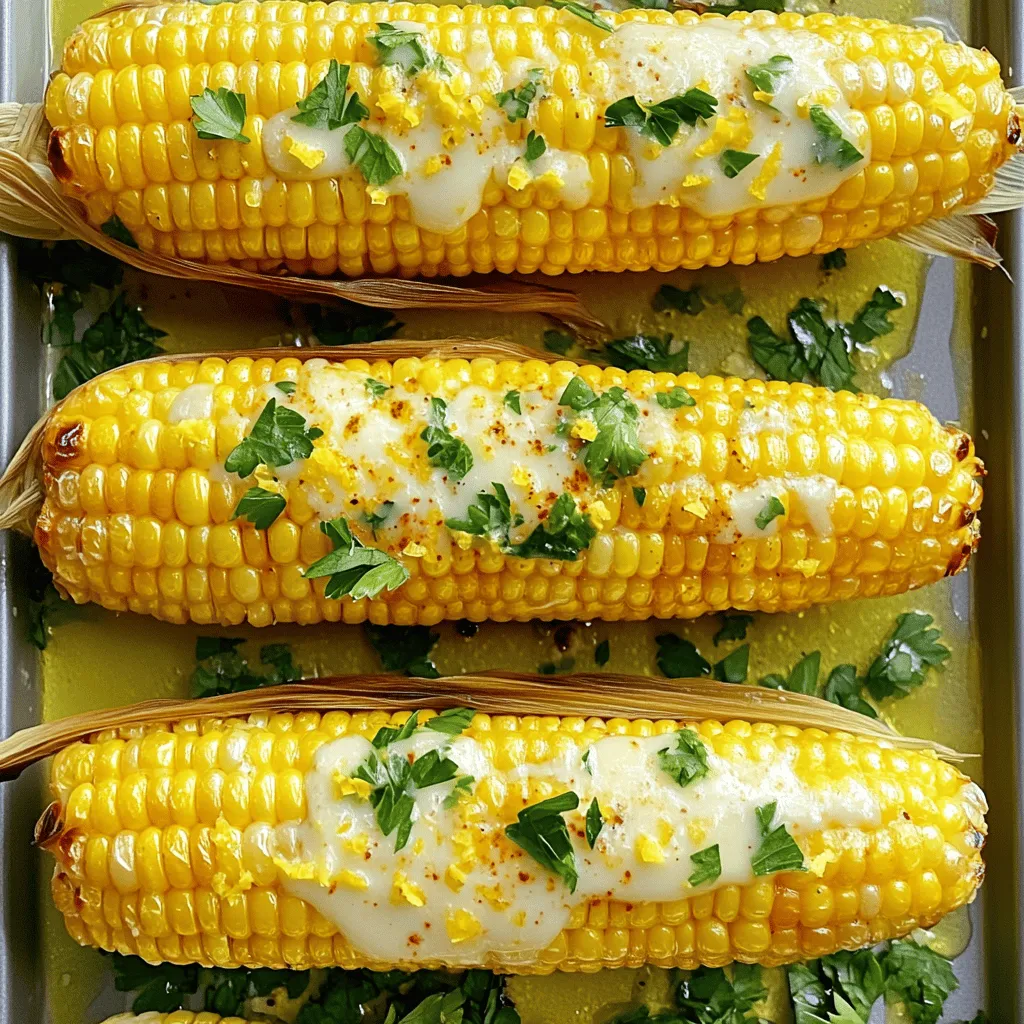
Lemon Garlic Roasted Corn Flavorful and Simple Dish
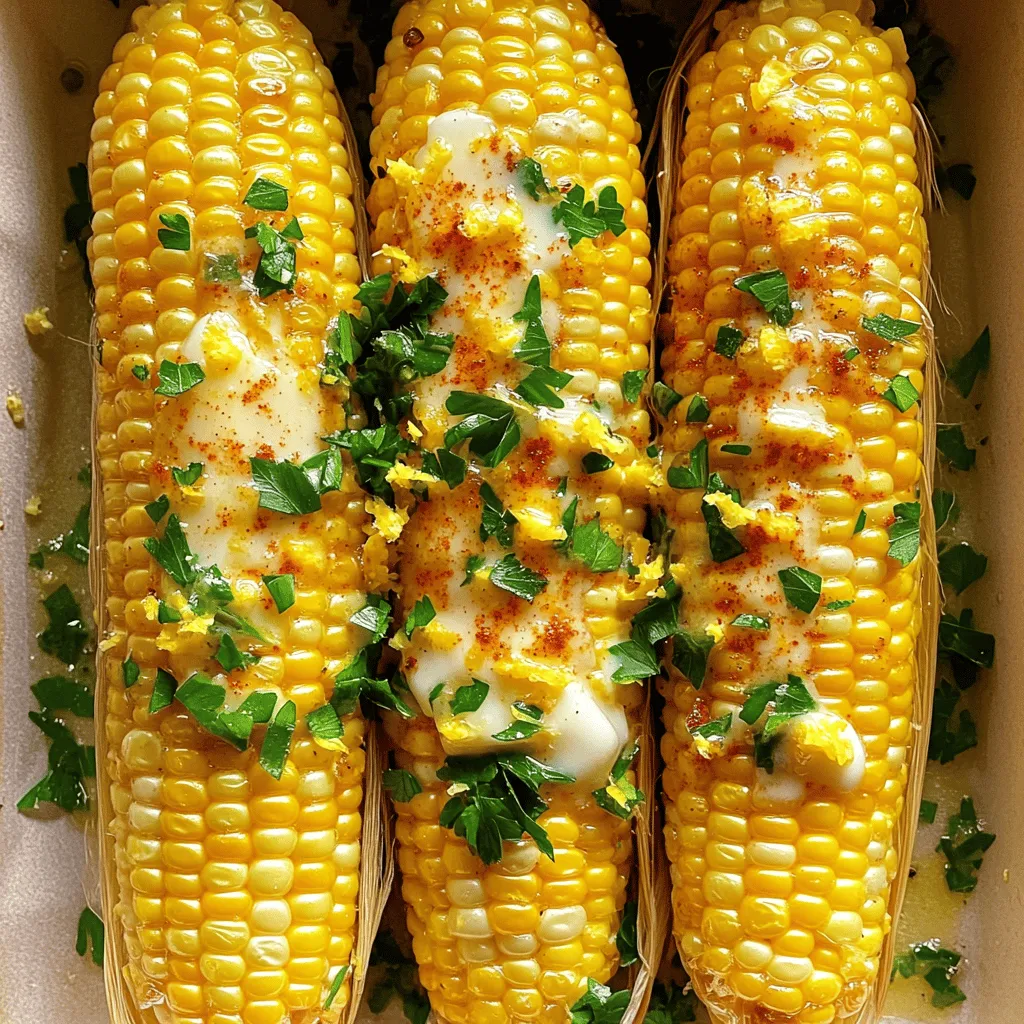
If you’re craving a tasty side dish that’s easy to make, Lemon Garlic Roasted Corn is your answer. This delightful recipe combines fresh corn, zesty lemon, and rich garlic butter for an explosion of flavor in every bite. Whether you’re hosting a barbecue or just enjoying a quiet dinner, this dish will impress your guests and satisfy your taste buds. Let’s dig into the simple steps and tips to make this dish shine!
Ingredients
Main Ingredients for Lemon Garlic Roasted Corn
- 4 ears of fresh corn
- 4 tablespoons unsalted butter
- 3 cloves garlic
- Zest and juice of 1 lemon
The main ingredients create a burst of flavor. Fresh corn gives a sweet crunch. Butter adds richness. Garlic brings a savory punch. Lemon zest and juice bring bright, tangy notes. Together, they make each bite pop.
Seasoning and Garnishes
- 1 teaspoon smoked paprika
- Sea salt and black pepper
- Fresh parsley
The seasoning is key to the dish’s depth. Smoked paprika adds warmth. Sea salt and black pepper enhance the natural flavors. Fresh parsley gives a lovely green touch. It also brightens the dish, making it more appealing.
These ingredients work together to create a delightful roasted corn that everyone will love.
Step-by-Step Instructions
Prepping the Oven and Ingredients
- Preheat the oven to 400°F (200°C).
- Prepare the corn by husking it. Remove all the silk and leaves.
Making the Lemon Garlic Butter
- In a small bowl, combine:
- 4 tablespoons unsalted butter, melted
- 3 cloves garlic, finely minced
- Zest of 1 medium lemon
- 2 tablespoons freshly squeezed lemon juice
- 1 teaspoon smoked paprika (optional)
- Sea salt and freshly cracked black pepper to taste
- Whisk these ingredients until smooth. This lemon garlic butter adds great flavor.
Roasting the Corn
- Place the husked corn on a large baking sheet.
- Use a pastry brush to apply the lemon garlic mixture to each ear of corn. Make sure to coat all sides for maximum flavor.
- Roast in the oven for 25-30 minutes. Turn the corn every 10 minutes. This helps it cook evenly and gets a nice char.
- Once roasted, let the corn cool for 2-3 minutes. Then, sprinkle it with fresh parsley before serving. For extra flavor, drizzle any leftover lemon garlic butter over the corn.
This dish is simple but packed with flavor.
Tips & Tricks
Achieving the Best Flavor
Fresh ingredients make all the difference. Always choose bright, crisp corn. The taste of fresh corn shines through. Use good butter and fresh garlic for a rich flavor. Adjust the seasoning to match your taste. You can add more lemon juice or salt if needed. Don’t be afraid to experiment!
Cooking Techniques for Perfect Roasted Corn
To get even roasting, turn the corn often. Every ten minutes, give it a good spin. This helps it brown nicely. Check for doneness by looking for a golden color. If it smells sweet and looks charred, it’s ready!
Serving Suggestions
For plating, arrange the corn in a circle on a big platter. Add lemon wedges for a pop of color. Sprinkle more parsley for a fresh look. Pair this dish with a light salad or grilled chicken for a balanced meal.
Variations
You can easily change up the lemon garlic roasted corn to suit your taste. Here are three fun ideas.
Vegan Version Substitution
To make this dish vegan, swap out the unsalted butter for vegan butter. This keeps it creamy and rich while staying plant-based. Just melt the vegan butter and mix it with the garlic, lemon zest, and juice as you would with regular butter. You won’t miss the dairy at all!
Spicy Lemon Garlic Roasted Corn
If you enjoy heat, add chili flakes or cayenne pepper to the lemon garlic butter. Just a pinch can make a big difference. Mix it in with the other ingredients. This will give your roasted corn a nice kick that pairs well with the lemony flavor.
Herb-Infused Variation
For a fresh twist, try adding different herbs like cilantro or basil. Chop them finely and mix them into the lemon garlic butter. This adds a burst of flavor and a lovely aroma. Experimenting with herbs can make each batch unique and delicious.
Storage Info
Storing Leftover Roasted Corn
After roasting, let the corn cool down. Wrap it tightly in foil or plastic wrap. This helps keep it fresh. You can also store it in an airtight container. Place it in the fridge for up to three days.
Reheating Tips
To reheat, you can use the oven or the microwave. If using the oven, preheat it to 350°F (175°C). Place the corn on a baking sheet and cover it with foil. Heat for about 10 minutes. This method keeps the corn’s flavor and texture.
For the microwave, simply place the corn on a plate. Cover it with a damp paper towel. Heat for 1-2 minutes, checking frequently. This method is quick but may not keep the corn as crisp.
Experiment with both methods to find what you like best!
FAQs
Can I use frozen corn, and what adjustments should I make?
Yes, you can use frozen corn. First, thaw the corn completely. Drain any excess water. Next, you should adjust the cooking time. Frozen corn may need only 20 minutes in the oven. Check for a nice golden color.
How can I enhance the flavor of the lemon garlic butter?
To boost the flavor, add more garlic or lemon juice. You can also try fresh herbs like thyme or oregano. A pinch of red pepper flakes will add a nice kick. Experiment with your favorite spices to find the perfect mix.
Is this recipe gluten-free?
Yes, this recipe is gluten-free. All the ingredients are safe for gluten-free diets. Just ensure that any butter or spices you use are labeled gluten-free. Enjoy this dish worry-free with your loved ones!
This blog post covered how to make Lemon Garlic Roasted Corn. We discussed the main ingredients, like fresh corn and garlic, plus the step-by-step process. I shared tips to boost flavor and variations, such as vegan options. Remember, using fresh ingredients and adjusting seasoning to your taste is key. Enjoy your delicious, roasted corn as a side dish or a snack. Happy cooking!

![- 4 bone-in, skin-on chicken thighs - 1/4 cup honey - 4 cloves garlic, finely minced - 2 tablespoons soy sauce - 1 tablespoon apple cider vinegar - 1 tablespoon extra virgin olive oil - 1 teaspoon freshly grated ginger - 1/2 teaspoon ground black pepper - Salt, to taste - Chopped green onions and toasted sesame seeds For this recipe, I focus on fresh ingredients. The chicken thighs give a rich flavor. Honey and garlic bring sweetness and zest. Soy sauce adds depth, while apple cider vinegar provides a nice tang. Extra virgin olive oil keeps everything moist and tasty. I love the hint of ginger in this dish. It adds a warm note that enhances the glaze. The black pepper gives a slight kick, balancing the sweetness. For the finishing touch, green onions and sesame seeds add color and crunch. These ingredients work together to create a delightful meal. You can find the full recipe for Honey Garlic Glazed Chicken Thighs at the end of this article. Enjoy cooking! In a medium bowl, whisk together the honey, minced garlic, soy sauce, apple cider vinegar, olive oil, grated ginger, black pepper, and a pinch of salt. Make sure the mixture is smooth and well-blended. This marinade is the key to great flavor. Next, place the chicken thighs in a large zip-lock bag or a shallow dish. Pour the marinade over the chicken. Ensure each piece is well coated. Seal the bag or cover the dish tightly. Refrigerate for at least 1 hour, though overnight is best for deep flavor. Preheat your oven to 400°F (200°C). This heat ensures a crispy skin. Remove the chicken from the marinade, saving some for later. Place the chicken skin-side up on a baking tray lined with parchment paper. Bake for 30-35 minutes. The chicken is ready when its internal temperature hits 165°F (74°C) and the skin is golden and crispy. To get that perfect crispy skin, you need to start with dry chicken. Pat the chicken thighs dry with paper towels. This helps remove excess moisture. Also, make sure your oven is hot before baking. Preheat it to 400°F (200°C). Place the chicken skin-side up on a lined baking tray. This position allows the skin to crisp up nicely. Finally, don't cover the chicken while it bakes. This keeps the skin exposed to the heat for better crispiness. Marinating time is key for flavor. I recommend at least one hour for good taste. If you have time, let the chicken marinate overnight. This allows the flavors to soak in deeply. Use a zip-lock bag for easy marinating. Just remember to seal it well, so the marinade doesn’t leak. A longer marinating time helps tenderize the meat, making it juicy and flavorful. For the glaze, you want a syrupy texture. After baking, take the leftover marinade and heat it in a saucepan. Simmer it over medium heat for about 5-7 minutes. Stir it occasionally to prevent sticking. The goal is to reduce the liquid until it thickens. This will create a lovely glaze that clings to the chicken. If it’s too thick, add a splash of water to loosen it. {{image_4}} You can easily boost flavor with fresh herbs. Use rosemary, thyme, or parsley. Chop them finely and mix them into the marinade. This adds a vibrant taste that pairs well with the honey and garlic. Fresh herbs also add a nice pop of color to your dish. Just remember to adjust the amount based on your taste. For a kick, add red pepper flakes into your marinade. Start with a pinch and taste as you go. This small change can take your dish from sweet to spicy. The heat balances well with the honey's sweetness. Serve with a side of cooling yogurt or sour cream to tame the spice. It creates a fun contrast. Grilling gives this dish a smoky flavor that is hard to beat. Before grilling, marinate the chicken as usual. Preheat your grill to medium heat. Cook the thighs skin-side down for the first few minutes. Flip them for an even char. Use the reserved marinade to baste while grilling. This method ensures a tasty glaze that sticks to the chicken. Enjoy the delicious, crispy skin with that smoky flavor! For the complete recipe, check the [Full Recipe]. To keep your honey garlic glazed chicken thighs fresh, store them promptly. Place the cooled chicken in an airtight container. This will help keep the flavors intact. Be sure to eat the leftovers within three to four days for the best taste and safety. To freeze your chicken thighs, first let them cool completely. Wrap each thigh tightly in plastic wrap, then place them in a freezer-safe bag. This method helps avoid freezer burn. You can keep them frozen for up to three months. When ready to eat, thaw the chicken in the fridge overnight for best results. To reheat chicken thighs, use the oven to keep them juicy. Preheat your oven to 350°F (175°C). Place the chicken on a baking sheet and cover it with foil. This will trap steam and keep the meat moist. Heat for about 15 to 20 minutes, or until the chicken is warm. Enjoy the great taste all over again! For more details, check the Full Recipe. For the best flavor, you should marinate chicken thighs for at least 1 hour. But if you can, marinate them overnight. This allows the flavors to soak deep into the meat. A longer marination time helps the chicken become tender and full of taste. Yes, you can use other cuts of chicken. Chicken breasts work well, but they may dry out faster. If you prefer, you can also use bone-in chicken legs. These alternatives will still absorb the honey garlic flavor, making your dish just as tasty. You can pair this dish with many sides. Here are some great options: - Steamed rice or jasmine rice - Roasted vegetables, like broccoli or carrots - A fresh garden salad with a light vinaigrette - Mashed potatoes for a creamy side - Quinoa for a healthy grain option These sides will complement the savory taste of the chicken and make your meal more satisfying. For the full recipe, check out the [Full Recipe] section. This blog post covered how to make delicious Honey Garlic Glazed Chicken Thighs. You learned about the key ingredients, step-by-step cooking methods, and helpful tips for the best results. We also explored tasty variations and safe storage advice. Enjoying this dish can add flavor to your meals. Whether you choose to grill it or try a spicy twist, these chicken thighs will impress. Keep experimenting, and make this recipe your own!](https://dishtreats.com/wp-content/uploads/2025/07/b9cba3e0-ee7f-4dbf-9eac-9b8411a1c4fd-768x768.webp)

![To make a Zesty Fiesta Taco Salad, gather these key ingredients: - 1 lb ground turkey (or beef) - 1 packet taco seasoning - 1 can (15 oz) black beans, rinsed and drained - 1 can (15 oz) sweet corn, drained - 1 large bell pepper, diced (choose your favorite color) - 1 cup cherry tomatoes, halved - 1 ripe avocado, diced - 1 cup shredded lettuce (romaine or iceberg) These fresh ingredients form the base of your salad. The ground meat adds protein, while the beans and corn bring fiber and sweetness. Colorful veggies like bell pepper and tomatoes not only add taste but also make the dish appealing. For a fabulous finish, don’t forget these toppings: - 1/2 cup shredded cheese (cheddar or Mexican blend) - 1/4 cup sour cream - 1/4 cup salsa - 1/4 cup fresh cilantro, chopped - Tortilla chips for garnish These toppings add layers of flavor and texture. The cheese melts slightly over the warm meat. Sour cream and salsa provide creaminess and zest. Fresh cilantro brightens the dish, while tortilla chips offer a delightful crunch. To take your salad to the next level, consider these flavor elements: - Lime wedges for serving - Other optional toppings Lime wedges give a zesty kick that enhances all the flavors. You can also mix in other toppings like jalapeños for heat or olives for brininess. Feel free to customize to fit your taste! For the full recipe, check out the [Full Recipe]. 1. Cooking ground turkey (or beef): Heat a large skillet over medium heat. Add 1 pound of ground turkey or beef. Cook until the meat is brown. Use a spatula to break it apart. This ensures even cooking. 2. Adding taco seasoning and simmering: Once the meat is browned, stir in one packet of taco seasoning. Add 1/2 cup of water. Mix well and bring to a simmer. Let it cook for 5 minutes to thicken. Remove the skillet from heat and let it cool for a bit. 1. Combining salad base ingredients: In a large mixing bowl, add the following: - 1 can (15 oz) black beans, rinsed and drained - 1 can (15 oz) sweet corn, drained - 1 large bell pepper, diced - 1 cup cherry tomatoes, halved - 1 ripe avocado, diced - 1 cup shredded lettuce (romaine or iceberg) Toss these ingredients gently. This helps mix the flavors well. 2. Mixing in the taco meat: After the taco meat cools, add it to the salad bowl. Gently toss everything together. Ensure all ingredients are mixed evenly. 1. Plating the salad: Divide the salad among individual bowls. This makes it easy to serve. 2. Adding garnishes and accompaniments: Top each bowl with: - 1/2 cup shredded cheese (cheddar or Mexican blend) - 1/4 cup sour cream - 1/4 cup salsa For extra flavor, garnish with 1/4 cup freshly chopped cilantro. Add a handful of tortilla chips for crunch. Don’t forget lime wedges on the side for a zesty squeeze! For the full recipe, check out the details above. Enjoy your vibrant Zesty Fiesta Taco Salad! To get the best flavor, you can adjust the taco seasoning. Add more if you want it spicy. Try fresh lime juice to brighten the taste. Use fresh herbs, like cilantro, for a burst of flavor. Combine ingredients wisely by mixing textures and colors. For example, creamy avocado pairs nicely with crunchy veggies. For a beautiful salad, think about how you serve it. Use clear bowls to show off the colors. Layer the ingredients for a feast for the eyes. You can serve it family-style on a big platter or in individual bowls. Individual servings let guests customize their toppings. For perfect meat, cook the turkey or beef until it's browned. Use a wooden spoon to break it up as it cooks. This keeps the meat tender and juicy. For fresh veggies, choose ripe ingredients. Wash them well and chop them right before serving. This keeps them crisp and tasty. For the full recipe, check out the Zesty Fiesta Taco Salad. {{image_4}} You can change the ground turkey or beef in this recipe. Try using ground chicken or pork for a new flavor. If you want a vegetarian dish, replace the meat with lentils or quinoa. These options keep it hearty while adding plant-based protein. You can control the spice in your salad. If you like heat, add diced jalapeños or a pinch of cayenne pepper. For less spice, use mild taco seasoning or skip the hot sauce. You can also switch up the dressings. Try ranch or a creamy avocado dressing for a different taste. Think about how you want to serve your salad. A layered salad looks pretty in a clear bowl. Just stack the ingredients on top of each other. If you want a mixed salad, toss everything in one big bowl. You could also make taco bowls. Serve the salad in taco shells for a fun twist. For the full recipe, check out the [Full Recipe]. To keep your Zesty Fiesta Taco Salad fresh, use these best practices. First, place the salad in an airtight container. This helps maintain texture and flavor. You can use glass or plastic containers with tight-fitting lids. Store it in the fridge right after serving. This keeps it safe to eat later. If you want to reheat the meat, do it gently. Place it in a skillet over low heat. Stir often to heat it evenly. Do not reheat the salad itself. It tastes best fresh. If you have leftover salad, keep the toppings separate to avoid sogginess. Add toppings right before serving to keep everything fresh. Your Zesty Fiesta Taco Salad stays fresh in the fridge for about three days. After that, it may lose taste and texture. Check for signs of spoilage before eating. Look for changes in color or smell. If it smells off or looks different, it’s best to throw it away. Zesty Fiesta Taco Salad stays fresh for about three days in the fridge. Make sure to store it in an airtight container. This helps keep the flavors alive and the veggies crisp. If you see any signs of spoilage, like a funky smell or slimy texture, toss it right away. Yes, you can make this salad ahead. I suggest cooking the meat and prepping the salad base separately. This keeps everything fresh and tasty. You can store the taco meat and salad ingredients in the fridge. When you're ready to eat, just combine them. This salad pairs well with many sides. You can serve tortilla chips for crunch. A side of guacamole adds a creamy touch. For drinks, try a cold lemonade or some iced tea. These options complement the zesty flavors of the salad. Yes, this recipe is great for meal prep. Store the salad and meat in separate containers. When you want to eat, just heat the meat. Mix it into the salad right before serving. This keeps the salad fresh and delicious. Zesty Fiesta Taco Salad combines fresh ingredients, great flavors, and fun options. You learned about the main ingredients, toppings, and how to prepare the perfect salad. Remember, you can easily adjust flavors or swap ingredients to suit your taste. Store leftovers properly to keep them fresh. This salad is not only tasty but also versatile for meal prep. With these tips, you can create a delicious meal your family will love. Try it out and make it your own!](https://dishtreats.com/wp-content/uploads/2025/07/d30f25fa-2b02-4bda-bacb-6859b51385b6-768x768.webp)
![- 1 can (15 oz) black beans, rinsed and well-drained - 1 cup corn kernels (fresh, frozen, or canned) - 1 red bell pepper, diced - 1/2 cup red onion, finely chopped - 1 jalapeño pepper, deseeded and minced - 1 ripe avocado, diced - 1/4 cup fresh cilantro, chopped - Juice of 2 limes - 3 tablespoons extra-virgin olive oil - 1 teaspoon ground cumin - 1 teaspoon smoked paprika - Salt and freshly ground pepper to taste I love using black beans in this salad. They add protein and fiber. They also make the dish filling. Corn brings a sweet crunch. It pairs well with the beans. The red bell pepper adds color and a slight sweetness. Red onion gives a sharp taste that balances the flavors. For spice, I use jalapeño. It adds heat without being too strong. If you want less spice, remove the seeds or skip the jalapeño. The ripe avocado adds creaminess. It makes every bite smooth and rich. Fresh cilantro brings a bright, fresh taste. The lime juice adds acidity. It brightens the salad and keeps it fresh. Olive oil adds healthy fats. The ground cumin and smoked paprika give depth. These spices add warmth and a hint of smokiness. This salad is not just tasty; it's also nutritious. The black beans are high in protein and fiber. They support digestion and keep you full longer. The corn, bell pepper, and avocado provide key vitamins. They help keep your body healthy. You can find the Full Recipe for this salad at the end. Enjoy making this colorful dish and feel good about what you eat! Start by mixing the base ingredients in a large bowl. Add the black beans, corn, diced red bell pepper, chopped red onion, and minced jalapeño. Stir gently to combine everything without mashing the beans. This keeps the texture nice. Next, gently fold in the diced avocado and chopped cilantro. Be careful here! You want those avocado pieces to stay whole. They add a creamy texture to the salad, which is delightful. Now, let’s make the dressing. In a small bowl, whisk together the lime juice, olive oil, ground cumin, and smoked paprika. Add salt and pepper to taste. This dressing adds zing and flavor to the salad. To achieve the ideal consistency, ensure that you mix well. You want it to be smooth but not too runny. If it seems thick, add a bit more olive oil or lime juice. Drizzle the dressing over your salad mixture. Gently toss everything together until it’s evenly coated. This step is important! It ensures every bite is full of flavor. Allow the salad to rest for about 10-15 minutes at room temperature. This helps the flavors meld beautifully. Trust me, the wait is worth it! You can check the [Full Recipe] for more details. To make your Southwest Black Bean Salad pop, add more spices or herbs. You can try adding a pinch of cayenne pepper or a dash of chili powder for heat. Fresh herbs like parsley or oregano can also bring a nice twist. If you want to switch things up, use different beans, like pinto or kidney beans. Each type adds its own flavor and texture, making your salad unique. When serving this salad, think about how it looks. A large, colorful bowl makes for a great centerpiece. You can also layer the salad in clear jars for a fun and stylish option. This way, guests can see all the vibrant colors. It’s perfect for parties or picnics. Plus, it’s easy for guests to grab their own jar! One mistake to watch out for is overmixing the salad. This can mash the beans and ruin the texture. Gently fold the ingredients instead. Another common issue is using overly ripe ingredients, especially the avocado. If the avocado is too soft, it can break apart and make the salad mushy. Pick firm, ripe avocados for the best results. {{image_4}} You can change the base of your Southwest black bean salad. Adding grilled chicken or tofu makes it heartier. Both protein options give you energy. You can also include more veggies. Cucumbers add crunch, while tomatoes bring sweetness. These changes keep the salad fresh and exciting. The dressing can change the whole taste of your salad. You can try different vinaigrettes, like balsamic or honey mustard. Each adds its own twist. If you prefer a creamier texture, go for a yogurt-based dressing. This will make the salad rich and smooth. This salad pairs well with many dishes. You can serve it with tacos or burritos for a complete meal. It also works great as a side with grilled meats. The bright flavors complement spicy foods nicely. For a fun touch, scoop the salad into taco shells. It’s a delicious way to enjoy this recipe and impress your guests. For the Full Recipe, check here: [Full Recipe]. To keep your Southwest black bean salad fresh, store it in an airtight container. This helps to lock in flavors and keep ingredients crisp. The salad lasts about 3 to 5 days in the fridge. It’s best to eat it within the first few days for optimal taste. You can freeze this salad, but it’s best to freeze the ingredients separately. Black beans and corn freeze well, but the avocado and fresh herbs do not. If you want to enjoy the salad later, freeze black beans and corn in one bag. Store diced avocado and herbs in another. This way, you can mix them fresh when you’re ready to eat. To reheat the salad, gently warm the beans and corn in a pan over low heat. Avoid using high heat, as it can mush the beans. After reheating, check the flavors. You might need to add more lime juice or salt to bring back the taste. Enjoy your meal ready and full of flavor! Yes, you can make this salad ahead of time. It tastes even better after resting. To prep in advance, chop all your veggies and store them in a bowl. Keep the dressing in a separate container. When you are ready to eat, mix everything together. This keeps the salad fresh and crunchy. This salad works great for meal prepping! Portion the salad into containers. You can add the dressing just before eating. This way, the salad stays fresh throughout the week. Use airtight containers to keep everything crisp. Black beans are packed with nutrients. They are high in protein and fiber. This helps you feel full longer and aids digestion. They also contain vitamins and minerals like iron, magnesium, and folate. Adding black beans to your diet can support heart health and help maintain stable blood sugar levels. To add heat, increase the amount of jalapeño. You can also add diced serrano peppers for extra spice. A dash of hot sauce or cayenne pepper can kick it up, too. Taste as you go to find your perfect spice level. Fresh ingredients often taste brighter and have better texture. They can add more crunch to your salad. Canned ingredients are convenient and save time. They’re also usually less expensive. Be sure to rinse canned beans to remove extra salt. Choose what's best for your schedule and taste. For the complete recipe, check out the [Full Recipe]. This blog post covered how to make a delicious Southwest Black Bean Salad. We discussed the key ingredients, nutritional facts, and tasty variations. You learned the step-by-step process, from mixing to serving. We also shared tips for storage and answered common questions. Enjoy making this salad for your next meal or gathering. Remember, it’s easy to customize to suit your taste. With the right ingredients and a few tweaks, you'll have a healthy dish that everyone loves. Get cooking and enjoy!](https://dishtreats.com/wp-content/uploads/2025/07/9afc72a8-6225-467a-bc64-ad0cd532be46-768x768.webp)