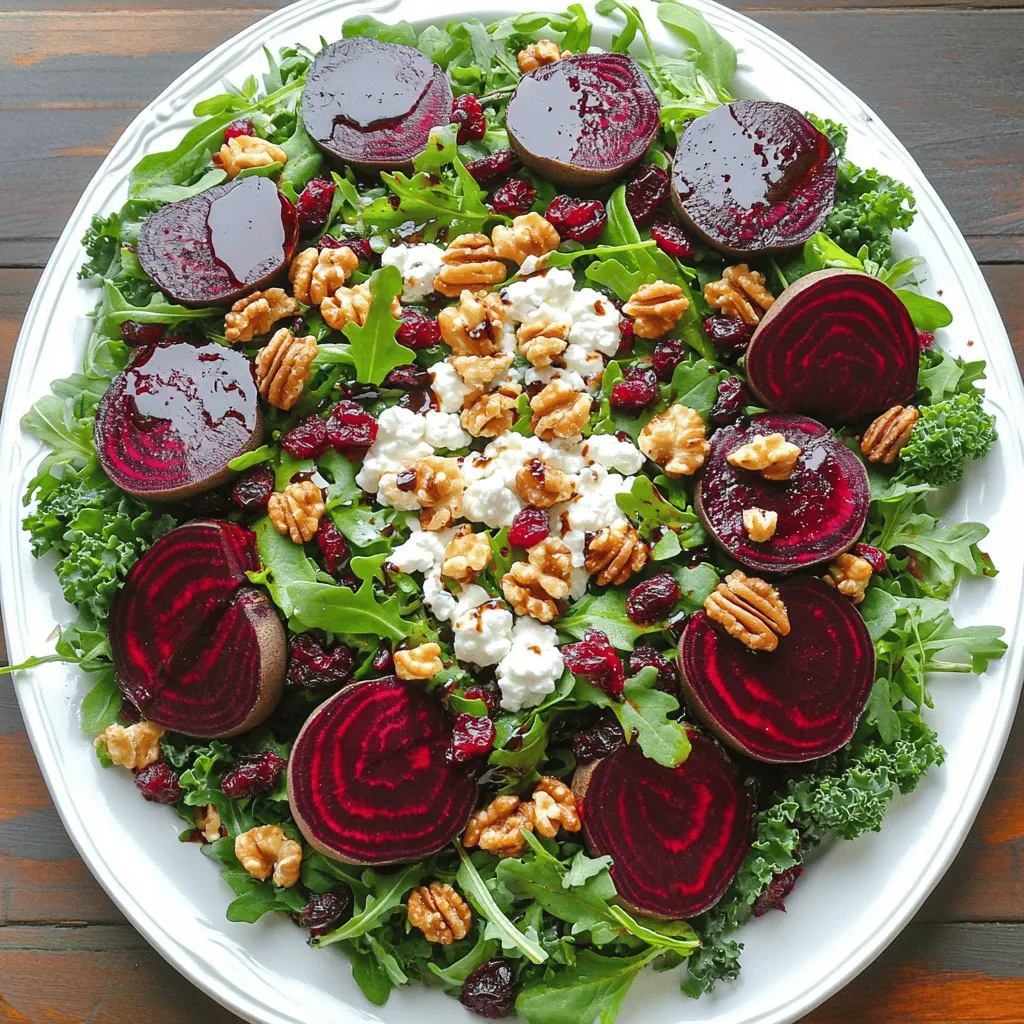
Roasted Beet and Goat Cheese Salad Nutritious Delight
![To create the Roasted Beet and Goat Cheese Salad, you will need the following ingredients: - 4 medium beets, scrubbed and trimmed - 2 tablespoons extra virgin olive oil, divided - Sea salt and freshly ground black pepper to taste - 4 cups mixed greens (arugula, spinach, and kale) - 1/2 cup creamy goat cheese, crumbled - 1/4 cup walnuts, toasted and roughly chopped - 1/4 cup dried cranberries - 2 tablespoons balsamic vinegar - 1 tablespoon pure honey - Fresh herbs (basil or parsley) for garnish Each ingredient adds not just flavor, but also nutrition. Beets are rich in vitamins and minerals. They help boost your energy levels. Goat cheese brings a creamy texture and a tangy taste. It pairs well with the sweetness of beets and cranberries. Walnuts add crunch and healthy fats, while mixed greens provide fiber. The dressing of balsamic vinegar and honey ties all the flavors together. You can find the Full Recipe for step-by-step instructions to make this delightful salad. 1. Preheat the oven: Set your oven to 400°F (200°C). This makes sure the beets roast well. 2. Wrap the beets: Take each beet and wrap it in foil. Drizzle 1 tablespoon of olive oil on them. Add sea salt and black pepper for flavor. Seal the foil tightly. 3. Roast the beets: Place the wrapped beets on a baking sheet. Roast them in the oven for 45-60 minutes. They are done when a fork easily pierces them. 1. Peel and slice the beets: Let the beets cool a bit. Then, peel off the skin. I recommend wearing gloves to avoid stains. Cut the beets into wedges for a nice look. 2. Combine salad ingredients: In a large mixing bowl, add the mixed greens, sliced roasted beets, crumbled goat cheese, toasted walnuts, and dried cranberries. Gently mix everything together. 1. Prepare the dressing: In a small bowl, whisk together the balsamic vinegar, the last tablespoon of olive oil, and honey. Stir well until combined. Taste it and add salt and pepper as needed. 2. Dress the salad: Drizzle the dressing over the salad. Toss everything gently to coat the greens and other ingredients. 3. Serve the salad: Plate the salad right away. Garnish with fresh herbs for a pop of color and extra flavor. For the full recipe, check out the Beet the Ordinary: Roasted Beet and Goat Cheese Salad. - Choosing the right beet size for even cooking: I recommend using medium beets. They cook evenly and are easy to handle. If you use larger beets, they may take longer to roast, leading to uneven texture. Smaller beets cook too quickly and may dry out. - How to properly season the beets: Before wrapping the beets in foil, drizzle them with olive oil. Add a generous pinch of sea salt and freshly ground black pepper. This simple seasoning enhances their natural sweetness and flavor during roasting. - Creative ways to plate the salad: For a stunning presentation, use a large, flat platter. Layer mixed greens as a base. Fan out the roasted beet wedges on top and sprinkle crumbled goat cheese and walnuts over the salad. This method creates a colorful and inviting look. - Garnishing tips to elevate the dish: Fresh herbs can add color and flavor. A sprinkle of chopped basil or parsley brightens the dish. You can also use edible flowers for a special touch, making it perfect for gatherings or celebrations. - Best practices for prepping ingredients in advance: You can roast the beets a day ahead. Once cooled, wrap them in plastic to keep fresh. Store the mixed greens and other ingredients separately. This way, you can quickly assemble your salad just before serving, keeping everything crisp and tasty. For the complete recipe, see [Full Recipe]. {{image_4}} You can switch up the greens in your salad to make it special. Try using arugula for a peppery kick or romaine for a crisp bite. Each green offers a different taste and texture, giving your salad a new vibe. If you want to change the cheese, feta or blue cheese can work wonders. Feta adds a salty flavor, while blue cheese brings a bold touch. Both complement the sweetness of the beets nicely. The right dressing can elevate your salad. A citrus vinaigrette adds a bright and zesty flavor. Mix fresh lemon juice with olive oil for a quick option. If you want something creamy, a yogurt dressing is perfect. It pairs well with the tang of goat cheese and makes the salad feel lush. Don’t hesitate to experiment with different dressings to find your favorite. Add protein to make your salad more filling. Grilled chicken is a great choice, giving the salad a hearty feel. For a plant-based option, chickpeas work well. They add protein and texture. You can also sprinkle seeds, like pumpkin or sunflower seeds, for some crunch. Fresh fruit, such as sliced pears or apples, can add a sweet note. Each add-in brings its own charm to the dish, making it unique every time. Don’t forget to check out the Full Recipe for more inspiration! To keep your roasted beet and goat cheese salad fresh, store it in an airtight container. Place any leftovers in the fridge. The salad will stay good for about three days. Make sure to keep the dressing separate until you are ready to eat. This helps keep the greens crisp and fresh. If you want to store beets for longer, you can freeze them. First, roast the beets as in the Full Recipe. Let them cool, then peel and slice them. Place the slices in a freezer-safe bag, removing as much air as possible. Beets can last up to six months in the freezer. However, I do not recommend freezing the prepared salad. The greens won't hold up well after thawing. When it's time to eat your stored salad, you can reheat the beets if you like. Just warm them in the microwave for about 30 seconds. Toss the salad again after reheating. This helps mix the flavors back together. If you stored the salad dressed, consider adding a bit more dressing before serving. This keeps everything tasty and vibrant. How long do roasted beets last in the fridge? Roasted beets can last up to five days in your fridge. Store them in an airtight container. This way, they stay fresh and tasty for your salads. Can I use pre-cooked beets for this recipe? Yes, you can use pre-cooked beets. They are a great time-saver. Just cut them into wedges and add them to your salad. They will still taste delicious! What type of goat cheese is best for salads? A creamy goat cheese works best for this salad. It adds a nice richness and tang. Look for soft, crumbled varieties for easy mixing. Can I substitute goat cheese with a dairy-free option? Absolutely! You can use a dairy-free cheese made from nuts. Look for a creamy cashew cheese or tofu-based option. Both will provide a nice flavor. What are the health benefits of beet and goat cheese salad? This salad is packed with nutrients. Beets are high in fiber and antioxidants. Goat cheese adds protein and calcium. Together, they support heart health and digestion. How many calories are in a serving of this salad? One serving of this salad has about 300 calories. This includes the beets, goat cheese, nuts, and dressing. It’s a great balance of flavors and nutrients without too many calories. For the complete recipe, check out the Full Recipe. This salad combines roasted beets, fresh greens, and tangy goat cheese. You learned how to roast beets and mix vibrant ingredients for a delicious dish. Remember to choose the right beet size and season well for great texture. Don't hesitate to try different greens or dressings to make it your own. Salad prep can be easy, helping you save time. Enjoy this healthy meal that packs flavor and nutrients. Make it today and impress yourself with your cooking skills!](https://dishtreats.com/wp-content/uploads/2025/06/a3a0567a-1f00-4857-8ef4-d1e9b38b024f.webp)
Looking for a salad that shines with flavor and nutrition? This Roasted Beet and Goat Cheese Salad is a true delight. With vibrant beets and creamy goat cheese, it bursts with colors and taste. It’s easy to make and packed with fresh greens and wholesome ingredients. Join me in exploring how to craft this perfect salad to impress your friends and boost your health. Let’s dive into the details!
Ingredients
To create the Roasted Beet and Goat Cheese Salad, you will need the following ingredients:
- 4 medium beets, scrubbed and trimmed
- 2 tablespoons extra virgin olive oil, divided
- Sea salt and freshly ground black pepper to taste
- 4 cups mixed greens (arugula, spinach, and kale)
- 1/2 cup creamy goat cheese, crumbled
- 1/4 cup walnuts, toasted and roughly chopped
- 1/4 cup dried cranberries
- 2 tablespoons balsamic vinegar
- 1 tablespoon pure honey
- Fresh herbs (basil or parsley) for garnish
Each ingredient adds not just flavor, but also nutrition. Beets are rich in vitamins and minerals. They help boost your energy levels. Goat cheese brings a creamy texture and a tangy taste. It pairs well with the sweetness of beets and cranberries. Walnuts add crunch and healthy fats, while mixed greens provide fiber. The dressing of balsamic vinegar and honey ties all the flavors together.
Step-by-Step Instructions
Preparation Steps
1. Preheat the oven: Set your oven to 400°F (200°C). This makes sure the beets roast well.
2. Wrap the beets: Take each beet and wrap it in foil. Drizzle 1 tablespoon of olive oil on them. Add sea salt and black pepper for flavor. Seal the foil tightly.
3. Roast the beets: Place the wrapped beets on a baking sheet. Roast them in the oven for 45-60 minutes. They are done when a fork easily pierces them.
After Roasting
1. Peel and slice the beets: Let the beets cool a bit. Then, peel off the skin. I recommend wearing gloves to avoid stains. Cut the beets into wedges for a nice look.
2. Combine salad ingredients: In a large mixing bowl, add the mixed greens, sliced roasted beets, crumbled goat cheese, toasted walnuts, and dried cranberries. Gently mix everything together.
Dressing and Serving
1. Prepare the dressing: In a small bowl, whisk together the balsamic vinegar, the last tablespoon of olive oil, and honey. Stir well until combined. Taste it and add salt and pepper as needed.
2. Dress the salad: Drizzle the dressing over the salad. Toss everything gently to coat the greens and other ingredients.
3. Serve the salad: Plate the salad right away. Garnish with fresh herbs for a pop of color and extra flavor.
Tips & Tricks
Perfecting the Texture
- Choosing the right beet size for even cooking: I recommend using medium beets. They cook evenly and are easy to handle. If you use larger beets, they may take longer to roast, leading to uneven texture. Smaller beets cook too quickly and may dry out.
- How to properly season the beets: Before wrapping the beets in foil, drizzle them with olive oil. Add a generous pinch of sea salt and freshly ground black pepper. This simple seasoning enhances their natural sweetness and flavor during roasting.
Presentation Suggestions
- Creative ways to plate the salad: For a stunning presentation, use a large, flat platter. Layer mixed greens as a base. Fan out the roasted beet wedges on top and sprinkle crumbled goat cheese and walnuts over the salad. This method creates a colorful and inviting look.
- Garnishing tips to elevate the dish: Fresh herbs can add color and flavor. A sprinkle of chopped basil or parsley brightens the dish. You can also use edible flowers for a special touch, making it perfect for gatherings or celebrations.
Making Ahead
- Best practices for prepping ingredients in advance: You can roast the beets a day ahead. Once cooled, wrap them in plastic to keep fresh. Store the mixed greens and other ingredients separately. This way, you can quickly assemble your salad just before serving, keeping everything crisp and tasty.
Variations
Alternative Ingredients
You can switch up the greens in your salad to make it special. Try using arugula for a peppery kick or romaine for a crisp bite. Each green offers a different taste and texture, giving your salad a new vibe. If you want to change the cheese, feta or blue cheese can work wonders. Feta adds a salty flavor, while blue cheese brings a bold touch. Both complement the sweetness of the beets nicely.
Dressings
The right dressing can elevate your salad. A citrus vinaigrette adds a bright and zesty flavor. Mix fresh lemon juice with olive oil for a quick option. If you want something creamy, a yogurt dressing is perfect. It pairs well with the tang of goat cheese and makes the salad feel lush. Don’t hesitate to experiment with different dressings to find your favorite.
Add-Ins
Add protein to make your salad more filling. Grilled chicken is a great choice, giving the salad a hearty feel. For a plant-based option, chickpeas work well. They add protein and texture. You can also sprinkle seeds, like pumpkin or sunflower seeds, for some crunch. Fresh fruit, such as sliced pears or apples, can add a sweet note. Each add-in brings its own charm to the dish, making it unique every time.
Storage Info
Short-term Storage
To keep your roasted beet and goat cheese salad fresh, store it in an airtight container. Place any leftovers in the fridge. The salad will stay good for about three days. Make sure to keep the dressing separate until you are ready to eat. This helps keep the greens crisp and fresh.
Long-term Storage
If you want to store beets for longer, you can freeze them.Let them cool, then peel and slice them. Place the slices in a freezer-safe bag, removing as much air as possible. Beets can last up to six months in the freezer. However, I do not recommend freezing the prepared salad. The greens won’t hold up well after thawing.
Best Practices
When it’s time to eat your stored salad, you can reheat the beets if you like. Just warm them in the microwave for about 30 seconds. Toss the salad again after reheating. This helps mix the flavors back together. If you stored the salad dressed, consider adding a bit more dressing before serving. This keeps everything tasty and vibrant.
FAQs
Common Questions About Roasted Beets
How long do roasted beets last in the fridge?
Roasted beets can last up to five days in your fridge. Store them in an airtight container. This way, they stay fresh and tasty for your salads.
Can I use pre-cooked beets for this recipe?
Yes, you can use pre-cooked beets. They are a great time-saver. Just cut them into wedges and add them to your salad. They will still taste delicious!
Goat Cheese Options
What type of goat cheese is best for salads?
A creamy goat cheese works best for this salad. It adds a nice richness and tang. Look for soft, crumbled varieties for easy mixing.
Can I substitute goat cheese with a dairy-free option?
Absolutely! You can use a dairy-free cheese made from nuts. Look for a creamy cashew cheese or tofu-based option. Both will provide a nice flavor.
Nutritional Information
What are the health benefits of beet and goat cheese salad?
This salad is packed with nutrients. Beets are high in fiber and antioxidants. Goat cheese adds protein and calcium. Together, they support heart health and digestion.
How many calories are in a serving of this salad?
One serving of this salad has about 300 calories. This includes the beets, goat cheese, nuts, and dressing. It’s a great balance of flavors and nutrients without too many calories.
This salad combines roasted beets, fresh greens, and tangy goat cheese. You learned how to roast beets and mix vibrant ingredients for a delicious dish. Remember to choose the right beet size and season well for great texture. Don’t hesitate to try different greens or dressings to make it your own. Salad prep can be easy, helping you save time. Enjoy this healthy meal that packs flavor and nutrients. Make it today and impress yourself with your cooking skills!
![To create the Roasted Beet and Goat Cheese Salad, you will need the following ingredients: - 4 medium beets, scrubbed and trimmed - 2 tablespoons extra virgin olive oil, divided - Sea salt and freshly ground black pepper to taste - 4 cups mixed greens (arugula, spinach, and kale) - 1/2 cup creamy goat cheese, crumbled - 1/4 cup walnuts, toasted and roughly chopped - 1/4 cup dried cranberries - 2 tablespoons balsamic vinegar - 1 tablespoon pure honey - Fresh herbs (basil or parsley) for garnish Each ingredient adds not just flavor, but also nutrition. Beets are rich in vitamins and minerals. They help boost your energy levels. Goat cheese brings a creamy texture and a tangy taste. It pairs well with the sweetness of beets and cranberries. Walnuts add crunch and healthy fats, while mixed greens provide fiber. The dressing of balsamic vinegar and honey ties all the flavors together. You can find the Full Recipe for step-by-step instructions to make this delightful salad. 1. Preheat the oven: Set your oven to 400°F (200°C). This makes sure the beets roast well. 2. Wrap the beets: Take each beet and wrap it in foil. Drizzle 1 tablespoon of olive oil on them. Add sea salt and black pepper for flavor. Seal the foil tightly. 3. Roast the beets: Place the wrapped beets on a baking sheet. Roast them in the oven for 45-60 minutes. They are done when a fork easily pierces them. 1. Peel and slice the beets: Let the beets cool a bit. Then, peel off the skin. I recommend wearing gloves to avoid stains. Cut the beets into wedges for a nice look. 2. Combine salad ingredients: In a large mixing bowl, add the mixed greens, sliced roasted beets, crumbled goat cheese, toasted walnuts, and dried cranberries. Gently mix everything together. 1. Prepare the dressing: In a small bowl, whisk together the balsamic vinegar, the last tablespoon of olive oil, and honey. Stir well until combined. Taste it and add salt and pepper as needed. 2. Dress the salad: Drizzle the dressing over the salad. Toss everything gently to coat the greens and other ingredients. 3. Serve the salad: Plate the salad right away. Garnish with fresh herbs for a pop of color and extra flavor. For the full recipe, check out the Beet the Ordinary: Roasted Beet and Goat Cheese Salad. - Choosing the right beet size for even cooking: I recommend using medium beets. They cook evenly and are easy to handle. If you use larger beets, they may take longer to roast, leading to uneven texture. Smaller beets cook too quickly and may dry out. - How to properly season the beets: Before wrapping the beets in foil, drizzle them with olive oil. Add a generous pinch of sea salt and freshly ground black pepper. This simple seasoning enhances their natural sweetness and flavor during roasting. - Creative ways to plate the salad: For a stunning presentation, use a large, flat platter. Layer mixed greens as a base. Fan out the roasted beet wedges on top and sprinkle crumbled goat cheese and walnuts over the salad. This method creates a colorful and inviting look. - Garnishing tips to elevate the dish: Fresh herbs can add color and flavor. A sprinkle of chopped basil or parsley brightens the dish. You can also use edible flowers for a special touch, making it perfect for gatherings or celebrations. - Best practices for prepping ingredients in advance: You can roast the beets a day ahead. Once cooled, wrap them in plastic to keep fresh. Store the mixed greens and other ingredients separately. This way, you can quickly assemble your salad just before serving, keeping everything crisp and tasty. For the complete recipe, see [Full Recipe]. {{image_4}} You can switch up the greens in your salad to make it special. Try using arugula for a peppery kick or romaine for a crisp bite. Each green offers a different taste and texture, giving your salad a new vibe. If you want to change the cheese, feta or blue cheese can work wonders. Feta adds a salty flavor, while blue cheese brings a bold touch. Both complement the sweetness of the beets nicely. The right dressing can elevate your salad. A citrus vinaigrette adds a bright and zesty flavor. Mix fresh lemon juice with olive oil for a quick option. If you want something creamy, a yogurt dressing is perfect. It pairs well with the tang of goat cheese and makes the salad feel lush. Don’t hesitate to experiment with different dressings to find your favorite. Add protein to make your salad more filling. Grilled chicken is a great choice, giving the salad a hearty feel. For a plant-based option, chickpeas work well. They add protein and texture. You can also sprinkle seeds, like pumpkin or sunflower seeds, for some crunch. Fresh fruit, such as sliced pears or apples, can add a sweet note. Each add-in brings its own charm to the dish, making it unique every time. Don’t forget to check out the Full Recipe for more inspiration! To keep your roasted beet and goat cheese salad fresh, store it in an airtight container. Place any leftovers in the fridge. The salad will stay good for about three days. Make sure to keep the dressing separate until you are ready to eat. This helps keep the greens crisp and fresh. If you want to store beets for longer, you can freeze them. First, roast the beets as in the Full Recipe. Let them cool, then peel and slice them. Place the slices in a freezer-safe bag, removing as much air as possible. Beets can last up to six months in the freezer. However, I do not recommend freezing the prepared salad. The greens won't hold up well after thawing. When it's time to eat your stored salad, you can reheat the beets if you like. Just warm them in the microwave for about 30 seconds. Toss the salad again after reheating. This helps mix the flavors back together. If you stored the salad dressed, consider adding a bit more dressing before serving. This keeps everything tasty and vibrant. How long do roasted beets last in the fridge? Roasted beets can last up to five days in your fridge. Store them in an airtight container. This way, they stay fresh and tasty for your salads. Can I use pre-cooked beets for this recipe? Yes, you can use pre-cooked beets. They are a great time-saver. Just cut them into wedges and add them to your salad. They will still taste delicious! What type of goat cheese is best for salads? A creamy goat cheese works best for this salad. It adds a nice richness and tang. Look for soft, crumbled varieties for easy mixing. Can I substitute goat cheese with a dairy-free option? Absolutely! You can use a dairy-free cheese made from nuts. Look for a creamy cashew cheese or tofu-based option. Both will provide a nice flavor. What are the health benefits of beet and goat cheese salad? This salad is packed with nutrients. Beets are high in fiber and antioxidants. Goat cheese adds protein and calcium. Together, they support heart health and digestion. How many calories are in a serving of this salad? One serving of this salad has about 300 calories. This includes the beets, goat cheese, nuts, and dressing. It’s a great balance of flavors and nutrients without too many calories. For the complete recipe, check out the Full Recipe. This salad combines roasted beets, fresh greens, and tangy goat cheese. You learned how to roast beets and mix vibrant ingredients for a delicious dish. Remember to choose the right beet size and season well for great texture. Don't hesitate to try different greens or dressings to make it your own. Salad prep can be easy, helping you save time. Enjoy this healthy meal that packs flavor and nutrients. Make it today and impress yourself with your cooking skills!](https://dishtreats.com/wp-content/uploads/2025/06/a3a0567a-1f00-4857-8ef4-d1e9b38b024f-300x300.webp)