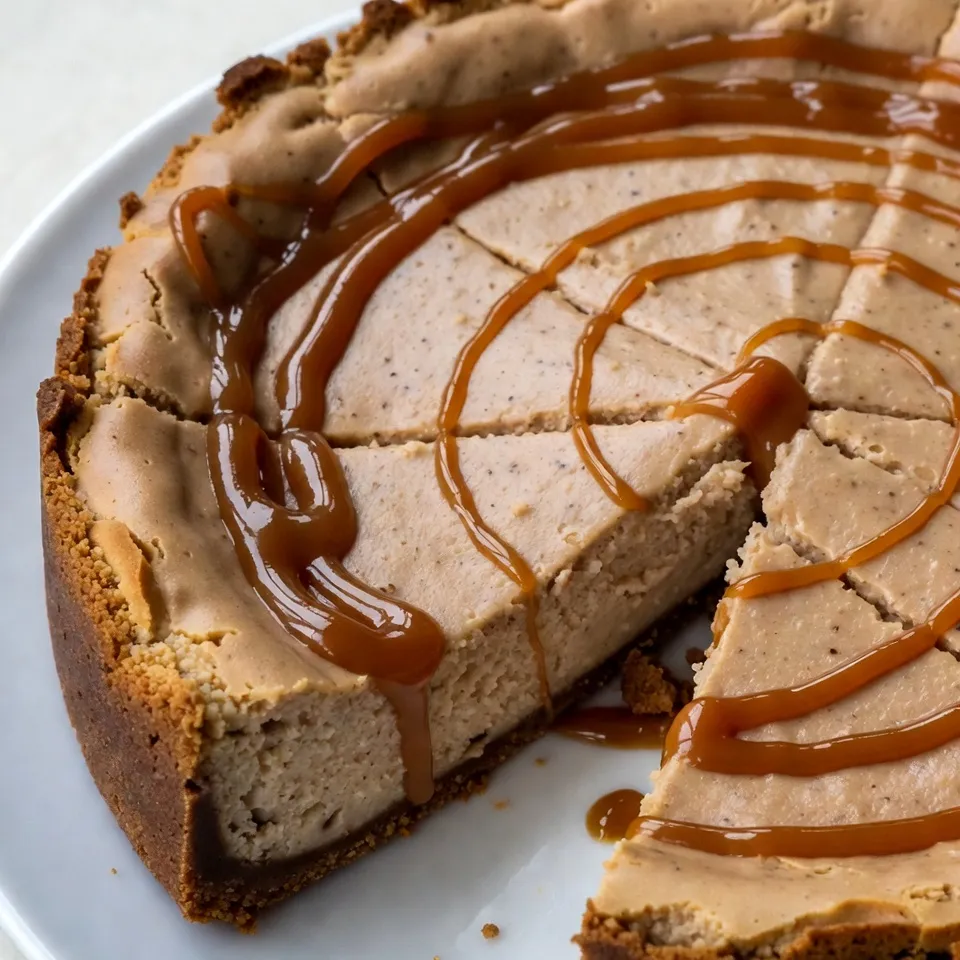
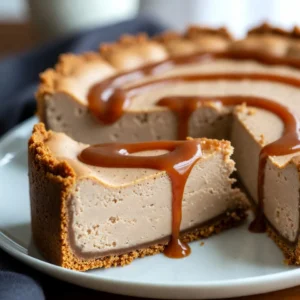
Caramel Macchiato Cheesecake Delightful and Easy Recipe

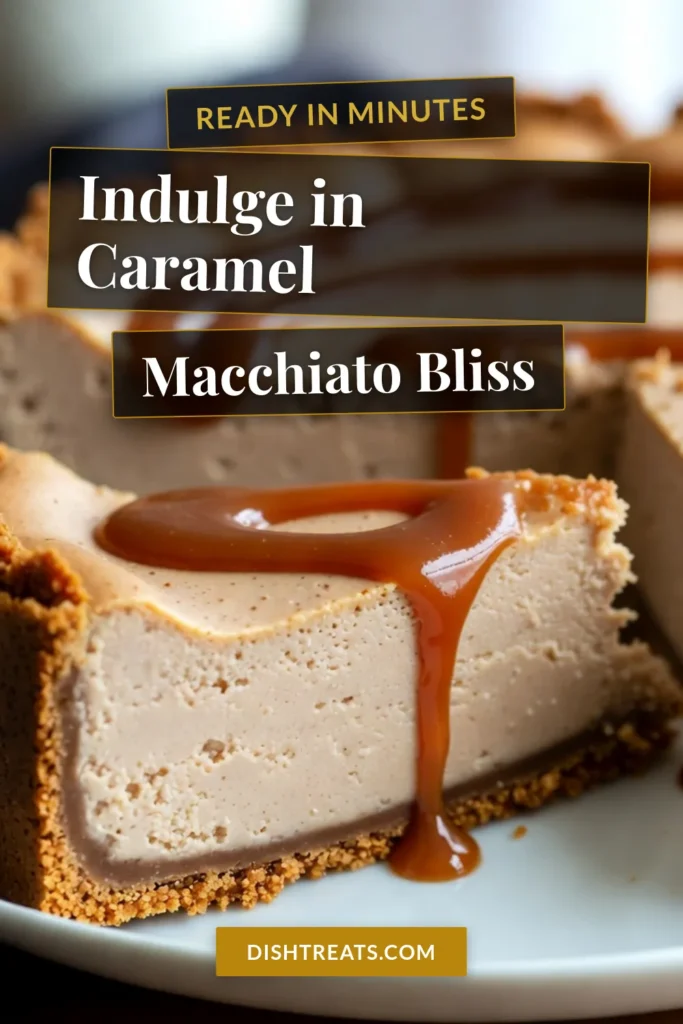
If you love cheesecake and caramel macchiatos, you’re in for a treat! This Caramel Macchiato Cheesecake is not only delightful but also easy to make. With just a few simple ingredients, you can whip up a dessert that impresses everyone. Imagine the rich creaminess of cheesecake paired with that bold coffee flavor and sweet caramel drizzle. Ready to get baking? Let’s dive into this mouthwatering recipe!
Why I Love This Recipe
- Rich Flavor: This cheesecake perfectly balances the creamy texture of the cheesecake with the robust flavor of espresso and sweet caramel.
- Decadent Dessert: It’s a show-stopping dessert that impresses guests at any gathering, making it perfect for special occasions.
- Easy to Make: Despite its gourmet taste, this recipe is straightforward, making it accessible for bakers of all skill levels.
- Customizable Toppings: You can easily customize it with various toppings like whipped cream, chocolate shavings, or extra caramel drizzle.
Ingredients
For a delicious Caramel Macchiato Cheesecake, you will need these simple ingredients:
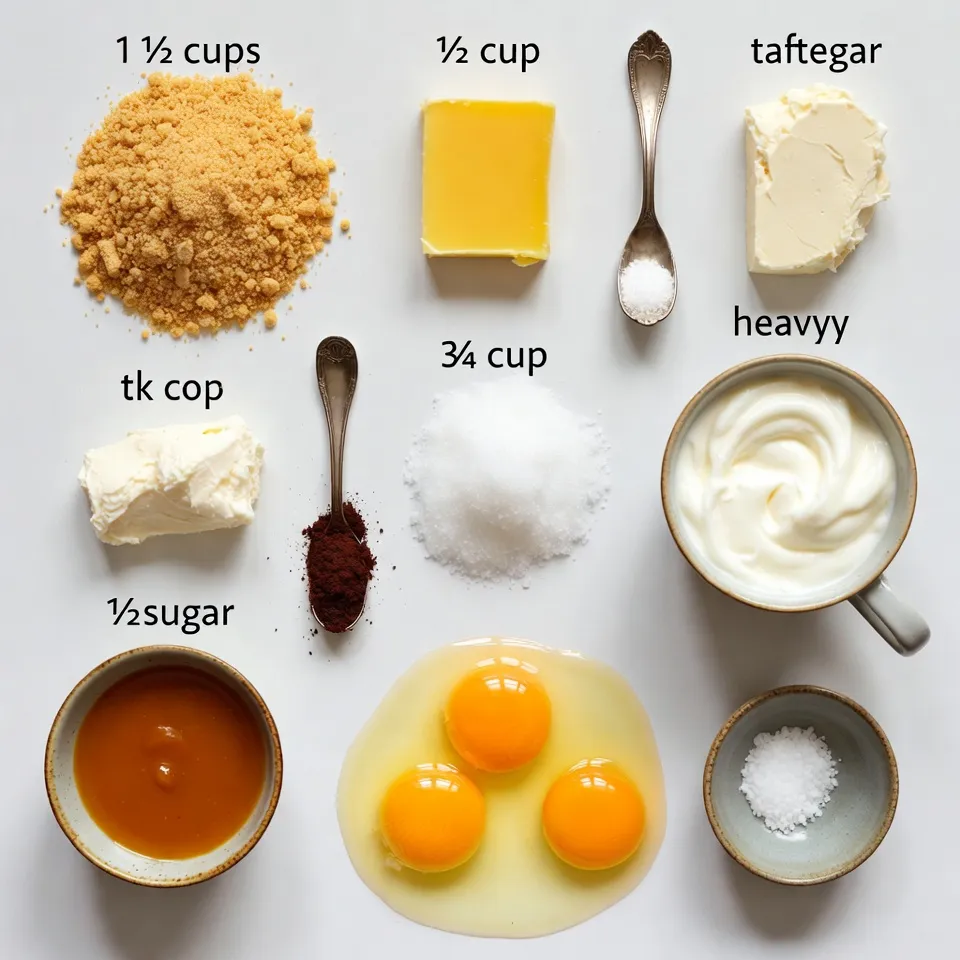
- 1 ½ cups graham cracker crumbs
- ½ cup unsalted butter, melted
- 1 tablespoon granulated sugar
- 16 oz cream cheese, softened
- ¾ cup granulated sugar
- 1 cup heavy cream
- 3 large eggs
- 2 teaspoons vanilla extract
- 2 tablespoons espresso powder
- ½ cup caramel sauce (plus extra for drizzling)
- Pinch of salt
These ingredients work together to create a rich and creamy cheesecake with a coffee kick. The graham cracker crumbs form a crunchy crust, while the cream cheese gives the filling its soft texture. The caramel and espresso powder add that delightful coffee flavor. Using fresh, high-quality ingredients will make your cheesecake even better.
Step-by-Step Instructions
Preheat Oven and Prepare the Crust
- Preheat oven to 325°F (163°C).
- In a medium bowl, mix graham cracker crumbs, melted butter, and sugar.
- Press this mixture firmly into the bottom of a 9-inch springform pan.
- Bake the crust for 10 minutes until lightly golden, then cool.
Make the Cheesecake Batter
- In a large bowl, beat cream cheese and sugar until smooth.
- Gradually add heavy cream, eggs, vanilla extract, espresso powder, and caramel sauce.
- Mix until fully combined. Be careful not to overmix.
Bake and Cool Cheesecake
- Pour the batter over the crust in the springform pan.
- Gently tap the pan to release any air bubbles.
- Bake for 50-60 minutes until the edges are set and the center jiggles.
- Turn off the oven and crack the door open to cool for 1 hour.
- Cover and refrigerate for at least 4 hours, or overnight for best results.
Tips & Tricks
Achieving a Perfect Texture
To get the best texture for your cheesecake, avoid overmixing. Overmixing adds too much air, which can cause cracks. Always mix just until smooth. Room-temperature ingredients are key, too. They blend better and result in a creamy texture. So, take your cream cheese and eggs out an hour before you start.
Serving Suggestions
For garnishes, consider adding whipped cream and a drizzle of caramel sauce. You can also sprinkle some espresso powder on top for a nice touch. This cheesecake works great for special occasions like birthdays or holidays. You can serve it after dinner or during coffee time with friends.
Troubleshooting Common Issues
If your cheesecake cracks, don’t worry. You can cover it with caramel sauce to hide it. The cracks won’t affect the taste. To ensure a smooth batter, mix on low speed. This will help keep the mixture dense and creamy without adding air.
Pro Tips
- Use Room Temperature Ingredients: Ensure that your cream cheese and eggs are at room temperature before mixing. This helps create a smoother batter and prevents lumps in your cheesecake.
- Check for Doneness: When baking, the center of the cheesecake should still have a slight jiggle. It will continue to set as it cools, ensuring a creamy texture.
- Cool Gradually: Allow the cheesecake to cool slowly in the oven with the door ajar. This helps prevent cracking on the surface by reducing temperature shock.
- Enhance Flavor: For a richer caramel taste, consider adding a touch of sea salt to the caramel sauce before drizzling it on top. It balances the sweetness beautifully.
Variations
Flavor Variations
You can make this cheesecake even more fun with different flavors. Try adding extracts like almond or hazelnut for a twist. A few drops will change the taste nicely. If you’re a chocolate lover, swap the caramel for chocolate sauce. This change gives you a rich, sweet treat. You can also mix in chocolate chips for extra texture. Each variation will keep your taste buds excited and happy.
Dietary Substitutions
If you need to change the recipe for dietary needs, there are great options. For a gluten-free crust, use crushed gluten-free cookies instead of graham crackers. Just mix them with melted butter and sugar like normal. For vegan options, swap the cream cheese with a plant-based cream cheese. You can also use coconut cream as a great alternative for heavy cream. These swaps keep your cheesecake delicious while meeting different diets. Enjoy making it work for you!
Storage Info
How to Store Leftover Cheesecake
To keep your caramel macchiato cheesecake fresh, store it in the fridge. Place it in an airtight container. You can also use plastic wrap to cover the cheesecake tightly. This helps prevent drying out or absorbing other smells from the fridge. If you want to save it for longer, freezing is a great option. Wrap individual slices in plastic wrap, then place them in a freezer-safe bag. This way, you can enjoy a piece whenever you want!
Shelf Life
For the best taste, eat your cheesecake within 4 to 5 days if stored in the fridge. If you freeze it, it can last up to 3 months. To know if the cheesecake has gone bad, look for these signs:
- Changes in color, like browning or dark spots.
- A sour smell that is not typical.
- A strange or off texture when you slice into it.
Always trust your senses! If it doesn’t seem right, it’s best to toss it out.
FAQs
What is a caramel macchiato cheesecake?
A caramel macchiato cheesecake blends coffee and caramel flavors into a creamy dessert. It has a rich, smooth filling made from cream cheese, heavy cream, and espresso powder. This cheesecake sits on a sweet graham cracker crust. Topped with drizzles of caramel, it looks and tastes amazing. You will love this twist on a classic dessert.
Can I make this recipe ahead of time?
Yes, you can make this cheesecake ahead of time. Prepare it a day before you need it. After baking and cooling, cover it tightly with plastic wrap or foil. Chill it in the fridge overnight. This allows flavors to develop, making it even tastier. Just remember to add the caramel drizzle before serving.
How do I know when the cheesecake is done baking?
Look for a few signs to know if your cheesecake is done. The edges should look set, while the center is still slightly jiggly. If it looks too liquid, give it more time. A toothpick inserted should come out clean or with a few moist crumbs. Once done, let it cool slowly in the oven with the door cracked.
This blog post covered a delicious caramel macchiato cheesecake recipe. We explored the key ingredients, simple steps to make it, and great tips for success. I shared variations for special diets and how to store leftovers properly. You can create this cheesecake for any occasion and impress your guests. With practice, you’ll master this dessert. Enjoy the process and let your baking skills shin
Caramel Macchiato Cheesecake
Ingredients
- 1.5 cups graham cracker crumbs
- 0.5 cups unsalted butter, melted
- 1 tablespoon granulated sugar
- 16 oz cream cheese, softened to room temperature
- 0.75 cups granulated sugar
- 1 cup heavy cream
- 3 large eggs
- 2 teaspoons vanilla extract
- 2 tablespoons espresso powder
- 0.5 cups caramel sauce (plus extra for drizzling on top)
- 1 pinch salt
Instructions
- Preheat your oven to 325°F (163°C) to ensure it reaches the right temperature before baking.
- In a medium bowl, combine the graham cracker crumbs, melted butter, and 1 tablespoon of sugar. Mix well until all the crumbs are evenly coated. Press this mixture firmly into the bottom of a 9-inch springform pan to create a solid crust. Bake the crust for 10 minutes until lightly golden, then remove it from the oven and allow it to cool.
- In a large mixing bowl, use an electric mixer to beat the softened cream cheese and ¾ cup of granulated sugar together until the mixture is smooth and creamy without lumps.
- Gradually add in the heavy cream, eggs (one at a time), vanilla extract, espresso powder, caramel sauce, and a pinch of salt to the cream cheese mixture. Blend on low speed just until all ingredients are fully combined and the batter is smooth, taking care to avoid overmixing.
- Carefully pour the cheesecake batter over the cooled graham cracker crust in the springform pan. Gently tap the pan on the counter to release any air bubbles trapped in the batter. Place in the preheated oven and bake for 50-60 minutes, or until the edges appear set and the center is slightly jiggly but not liquid.
- Once baking is complete, turn off the oven and crack the door open. Allow the cheesecake to cool in the oven for about 1 hour. Afterward, cover it with plastic wrap or foil and refrigerate for at least 4 hours, although overnight chilling is recommended for better flavor and texture.
- When ready to serve, carefully remove the cheesecake from the springform pan. Drizzle additional caramel sauce over the top for an extra sweet finish. Slice into 12 servings and enjoy every bite!
. Enjoy your delightful no bake lemon cheesecake! No Bake Lemon Cheesecake is simple and fun to make. We covered the ingredients, preparation, and storage tips. Remember to mix your filling gently for a light texture. Experiment with flavors or garnishes to make it your own. With this guide, you can impress your friends and family. Enjoy each slice and share this delightful dessert. It’s a tasty treat that everyone will love!](https://dishtreats.com/wp-content/uploads/2025/06/ce75718b-0697-4914-b5ee-7870880d7685-768x768.webp)
 for more details and tips. Start by preheating your oven to 375°F (190°C). This ensures even baking. While the oven heats, grab your donut pan. Lightly grease it or use non-stick cooking spray. This step keeps the donuts from sticking. In a medium bowl, whisk together 1 ½ cups of all-purpose flour, 1 teaspoon of baking powder, and ½ teaspoon of baking soda. Add ½ teaspoon of ground cinnamon, ¼ teaspoon of ground nutmeg, and ¼ teaspoon of salt. Mix until everything is well combined. Set this dry mix aside. In a large bowl, combine ½ cup of granulated sugar with 1 cup of cooked and mashed sweet potato. Use a fork or mixer to blend until smooth. Next, add 1 large egg, ¼ cup of milk (dairy or non-dairy), ¼ cup of melted unsalted butter, and 1 teaspoon of vanilla extract. Stir gently until it’s creamy and lump-free. Now, gradually fold the dry mixture into your sweet potato mix. Use a spatula to combine without overmixing. This keeps your donuts light and fluffy. To fill the donut pan, use a piping bag or ziplock bag with a snipped corner. Fill each cavity about ¾ full with batter. Bake the donuts for 12 to 15 minutes. Check for doneness with a toothpick; it should come out clean. Once baked, let them rest in the pan for about 5 minutes. Then, transfer the donuts to a wire rack to cool completely. While they cool, prepare your cinnamon sugar. In a shallow bowl, mix ¼ cup of granulated sugar with 1 tablespoon of ground cinnamon. Once the donuts are cool, brush each with melted butter. Roll or toss them in the cinnamon sugar mixture for a sweet finish. Enjoy your Cinnamon Sugar Sweet Potato Donuts! For a more detailed guide, refer to the Full Recipe. Making these donuts can be fun, but some mistakes can ruin them. Here are a few to watch out for: - Overmixing the batter: This can make your donuts tough. Mix until just combined. - Not measuring ingredients: Use precise measurements for the best results. - Skipping the cooling step: Donuts need to cool before coating. This helps the sugar stick better. Texture is key for these donuts. To get it just right, follow these tips: - Use fresh sweet potatoes: They should be soft and creamy when mashed. - Check your oven temp: An oven thermometer can help. Donuts bake best at 375°F. - Fill the pan correctly: Don’t overfill. Aim for ¾ full for the best rise. How you serve these donuts can make them even better. Here are some creative ideas: - Garnish with extra cinnamon sugar: Just a light sprinkle adds a nice touch. - Serve warm: Warm donuts taste best and melt in your mouth. - Pair with coffee or tea: The flavors blend perfectly for a delightful treat. For the full recipe, don’t forget to check the complete guide! {{image_4}} To make these donuts gluten-free, swap all-purpose flour with a gluten-free blend. Look for one that has xanthan gum for better texture. For a vegan option, replace the egg with a flaxseed or chia seed mixture. Mix 1 tablespoon of ground seeds with 2.5 tablespoons of water and let it sit for 5 minutes. Use almond milk or any plant-based milk instead of regular milk. These swaps keep the donuts tasty and light. You can add fun flavors to your donuts. Try stirring in a pinch of ginger or cloves for a warm taste. You can also add chocolate chips or nuts for a nice crunch. Dried fruits like cranberries or raisins add sweetness and chewiness. During the fall, consider a dash of pumpkin spice for a seasonal twist. Mix and match to create your perfect donut flavor! If you want to dress up your donuts, try a simple icing. Mix powdered sugar with a splash of milk to make a glaze. You can add vanilla or almond extract for extra flavor. Drizzle it over the warm donuts for a sweet touch. For a chocolate glaze, melt dark chocolate and dip the tops of the donuts. This makes them extra special. Don’t forget to sprinkle some crushed nuts on top for added crunch! For the complete process, check the Full Recipe. To keep your donuts fresh, store them in an airtight container. Place parchment paper between layers to prevent sticking. Keep the container at room temperature. They will stay good for up to three days. If you need them to last longer, consider freezing. To freeze the donuts, first let them cool completely. Wrap each donut in plastic wrap. Then place the wrapped donuts in a freezer-safe bag. They can last up to three months in the freezer. When ready to eat, just thaw them at room temperature. To reheat, preheat your oven to 350°F (175°C). Place the donuts on a baking sheet. Heat for about 5-7 minutes, just until warm. This helps keep them soft and tasty. Avoid using the microwave, as it can make the donuts tough. Cinnamon Sugar Sweet Potato Donuts last about 2-3 days at room temperature. Keep them in an airtight container to stay fresh. You can also place them in the fridge for up to a week. Just remember, cold donuts may not taste as good! Yes, you can use other types of sweet potatoes. Look for varieties like purple or white sweet potatoes. Each type will add a different flavor and color. Just make sure to cook and mash them first for the best results. To make these donuts ahead of time, you can bake them a day early. Store the cooled donuts in an airtight container. You can also freeze them. Just thaw and warm them before serving. This way, they stay fresh and tasty! Using a donut pan is the best way to shape these donuts. It helps them bake evenly and hold their form. If you don’t have a donut pan, you can use a muffin tin. Just know that the shape and texture will differ a bit. These Cinnamon Sugar Sweet Potato Donuts are fun to make and tasty to eat. We covered the key ingredients and shared tips for perfect texture. Consider swapping ingredients for healthier versions, and don’t forget to explore flavor variations. Proper storage helps keep leftovers fresh, making your treats last longer. Finally, remember that you can adjust the recipe to fit your needs. Enjoy baking these delightful donuts and sharing them with others!](https://dishtreats.com/wp-content/uploads/2025/07/04b40064-aac7-4876-84c8-c93335adf97c-768x768.webp)