
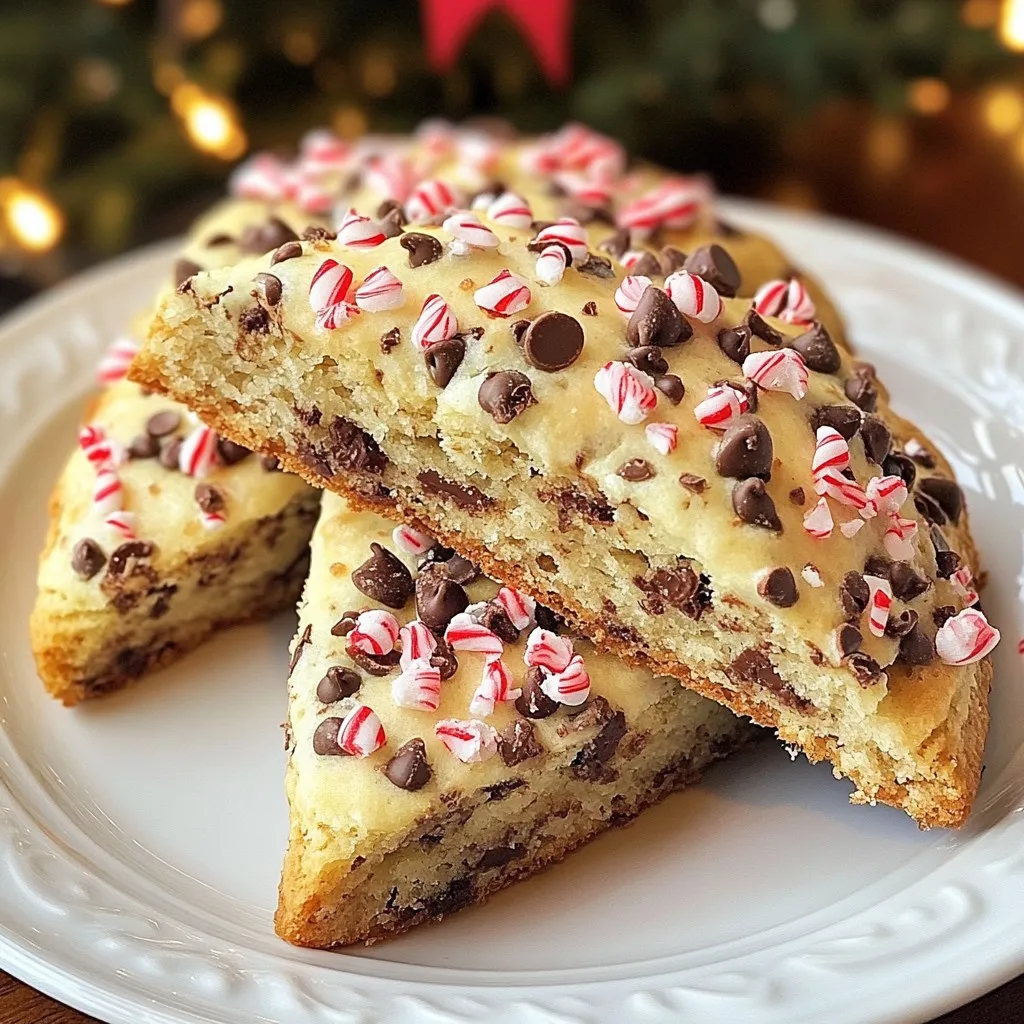
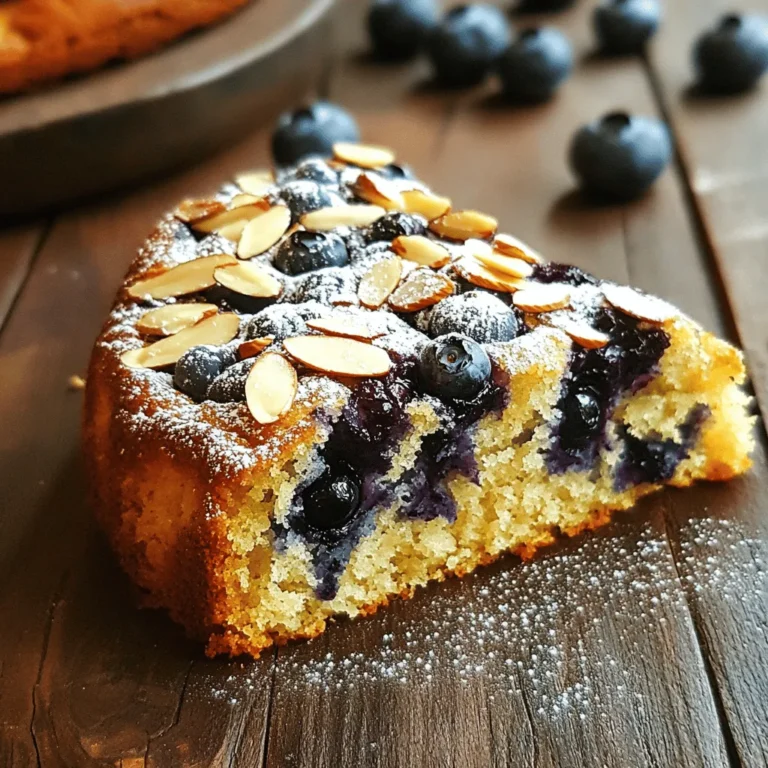
Peppermint Chocolate Chip Scones Festive Holiday Treat


Looking for a festive treat to brighten your holiday season? These Peppermint Chocolate Chip Scones pack sweet chocolate and refreshing peppermint in every bite. They’re simple to make and perfect for a cozy gathering or a morning treat. Join me as we mix, shape, and bake these delightful scones. Your friends and family will love the taste of the holidays in each flaky, warm bite. Let’s get started!
Why I Love This Recipe
- Festive Flavor: The combination of peppermint and chocolate creates a delightful holiday treat that captures the spirit of the season.
- Easy to Make: This scone recipe is simple enough for bakers of all levels, making it a quick option for holiday gatherings.
- Perfect Texture: The addition of cold butter and heavy cream ensures that the scones are flaky and tender, providing a satisfying bite.
- Customizable: You can easily adapt this recipe by adding your favorite mix-ins or adjusting the level of peppermint for personal taste.
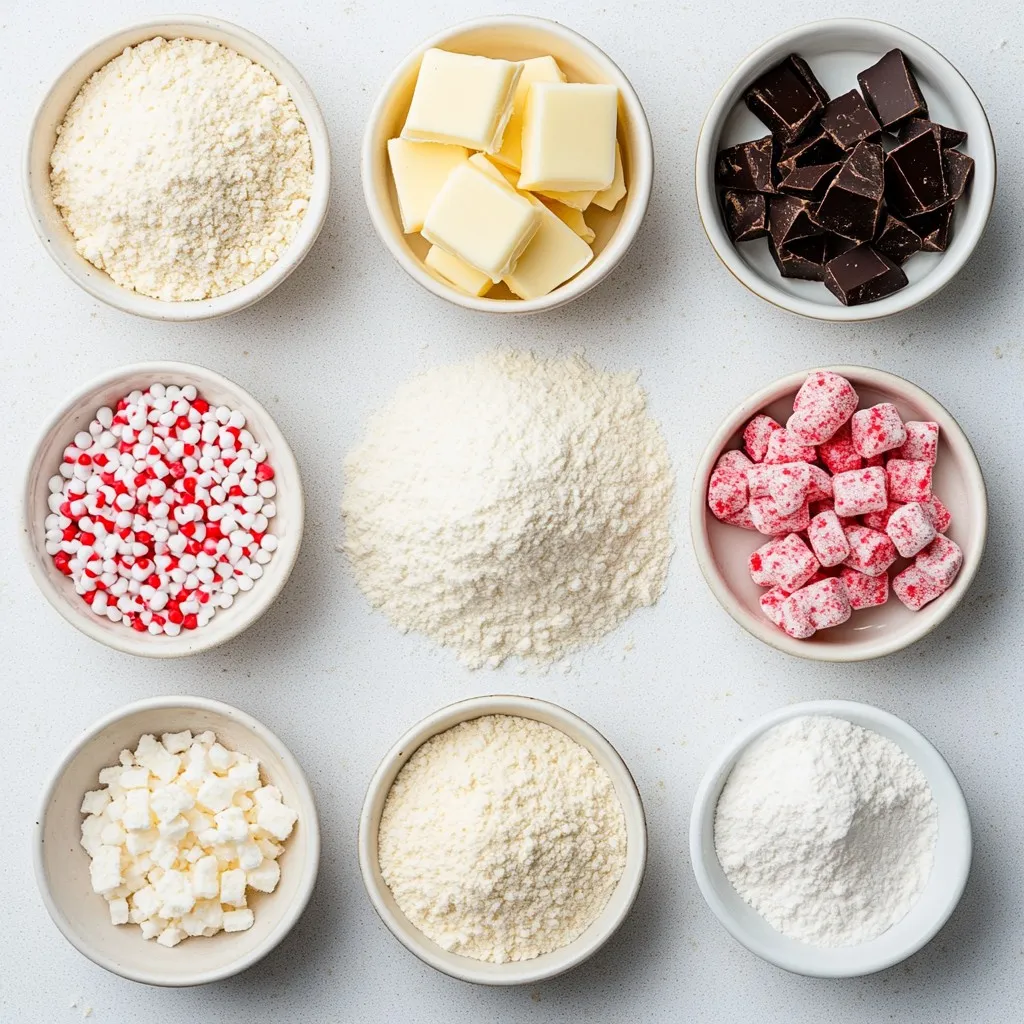
Ingredients
Main Ingredients for Peppermint Chocolate Chip Scones
To make these tasty scones, gather these main ingredients:
- 2 cups all-purpose flour
- 1/4 cup granulated sugar
- 1 tablespoon baking powder
- 1/2 teaspoon salt
- 1/2 cup unsalted butter, cold and cubed
- 1/2 cup heavy cream
- 1 teaspoon vanilla extract
- 1/2 teaspoon peppermint extract
- 1/2 cup semi-sweet chocolate chips
- 1/4 cup crushed peppermint candies (plus extra for garnish)
- 1 large egg, for egg wash
Each ingredient plays a key role. The flour gives structure, while the butter makes them flaky. Sugar adds sweetness, and baking powder helps them rise. The cream adds moisture, and the extracts bring in the festive flavors. Chocolate chips and crushed peppermint candies add a delightful crunch and taste.
Additional Garnish Recommendations
To make these scones extra special, consider these garnish ideas:
- Extra crushed peppermint candies for topping
- A dusting of powdered sugar
- A drizzle of white chocolate
These garnishes not only look great but also enhance the flavor. Extra peppermint gives a nice crunch and brightens the festive feel.
Ingredient Substitutions
Don’t have all the ingredients? Here are some easy swaps:
- Use coconut oil instead of butter for a dairy-free option.
- Substitute buttermilk for heavy cream for a tangy twist.
- Swap in dark chocolate chips for a richer taste.
These substitutions can change the flavor, but they keep the scones delicious. Always remember to keep the main ratios similar for the best texture.
Step-by-Step Instructions
Preparing the Oven and Baking Sheet
First, set your oven to 400°F (200°C). While it heats up, line a baking sheet with parchment paper. This helps with cleanup and keeps the scones from sticking.
Mixing Dry Ingredients
In a big bowl, mix 2 cups of all-purpose flour, 1/4 cup of granulated sugar, 1 tablespoon of baking powder, and 1/2 teaspoon of salt. Use a whisk to blend them well. This step ensures the baking powder spreads evenly.
Incorporating Butter and Forming Dough
Next, take 1/2 cup of cold, cubed unsalted butter and add it to the dry mix. Use a pastry cutter or your fingers to break the butter into the flour. You want it to look like coarse crumbs with some small bits of butter still visible. This makes the scones flaky.
Combining Wet Ingredients
In a separate bowl, whisk together 1/2 cup of heavy cream, 1 teaspoon of vanilla extract, and 1/2 teaspoon of peppermint extract. This mixture adds moisture and flavor to the scones.
Folding in Chocolate Chips and Peppermint
Make a well in the center of your flour mix and pour in the cream mixture. Use a spatula to stir gently until combined. Don’t mix too much, as this can make the scones tough. Then, fold in 1/2 cup of semi-sweet chocolate chips and 1/4 cup of crushed peppermint candies.
Shaping and Cutting the Scones
Lightly flour your work surface and turn the dough out onto it. Knead gently a few times until it holds together. Shape it into a circle about 1 inch thick. Use a sharp knife to cut the circle into 8 wedges. Place them on the baking sheet, leaving space between each scone.
Applying Egg Wash and Baking
In a small bowl, beat 1 large egg until frothy. Brush the egg wash over the tops of the scones for a nice golden color. Bake for 15 to 20 minutes or until lightly browned. Check with a toothpick; it should come out clean. After baking, let the scones cool slightly on a wire rack.
Tips & Tricks
Achieving the Perfect Texture
To get that perfect texture in your peppermint chocolate chip scones, focus on the butter. Use cold, cubed butter and blend it until it looks like coarse crumbs. This step is key. It makes your scones flaky and tender. Also, mix the dough gently. Overmixing can lead to tough scones. It’s best to stir just until everything is combined.
Common Mistakes to Avoid
One common mistake is not measuring ingredients correctly. Always measure flour and sugar with precision. Too much flour can make your scones dry. Another mistake is skipping the egg wash. This step adds a beautiful color to your scones. Lastly, don’t forget to check your oven temperature. An oven that’s too hot can burn the scones.
Storing Leftover Scones
If you have leftover scones, store them in an airtight container. This keeps them fresh for up to two days at room temperature. You can also freeze scones for longer storage. Place them in a freezer bag. When you want to enjoy them, just reheat in the oven at 350°F (175°C) for about 10 minutes. This restores their warmth and texture!
Pro Tips
- Chill the Dough: For even flakier scones, chill the dough in the refrigerator for about 15 minutes before baking. This helps the butter to firm up, resulting in a better texture.
- Customize the Flavor: Feel free to adjust the amount of peppermint extract according to your taste preference. If you prefer a milder flavor, start with less and add more if desired.
- Use a Sharp Knife: When cutting the scones, use a sharp knife to ensure clean edges. This helps the scones rise evenly and look more appealing.
- Store Properly: To keep your scones fresh, store them in an airtight container at room temperature for up to 2 days. For longer storage, freeze them and reheat when ready to serve.
Variations
Alternative Flavors to Try
You can switch up flavors for these scones. Try orange zest instead of peppermint. It gives a bright, fresh taste. Or use almond extract for a nutty twist. For a fruity touch, add dried cranberries or cherries. These flavors keep the spirit of the holiday alive while offering a new experience.
Gluten-Free Options
If you need gluten-free scones, substitute the all-purpose flour with a gluten-free blend. Look for one that contains xanthan gum. This helps with texture. You can also use almond flour or coconut flour. Just remember to adjust the liquid. Keep an eye on baking times, as they may vary.
Adding Different Mix-Ins
Mix in other tasty treats to your scone dough! Chopped nuts like pecans or walnuts add crunch. For a richer flavor, use dark chocolate chips or white chocolate. You can also add spices like cinnamon or nutmeg for warmth. Get creative and make these scones your own!
Storage Info
How to Store Peppermint Chocolate Chip Scones
To store your peppermint chocolate chip scones, let them cool completely. Place them in an airtight container. This keeps them fresh for about two days at room temperature. If you want to keep them longer, consider freezing them.
Best Practices for Freezing Scones
For freezing, wrap each scone in plastic wrap. Then, place them in a freezer bag or container. This helps prevent freezer burn. You can freeze them for up to three months. When ready to enjoy, you can bake them straight from the freezer.
Reheating Instructions
To reheat scones, preheat your oven to 350°F (175°C). Place the scones on a baking sheet. Heat them for about 10 minutes or until warm. You can also microwave them for about 20 seconds if you want a quicker option. Enjoy them fresh and warm!
FAQs
How to make Peppermint Chocolate Chip Scones more festive?
You can make these scones more festive by adding colorful sprinkles on top. Another great idea is to glaze them with a simple icing made of powdered sugar and milk. You might also try using red and green crushed peppermint candies for a holiday touch. Serving them on a festive platter adds a nice visual appeal too!
Can I use other types of chocolate?
Yes, you can use other types of chocolate! Dark chocolate, white chocolate, or even mint chocolate all work well. Each type adds a unique flavor to the scones. Feel free to mix and match to find your favorite combination.
Are these scones suitable for freezing?
Absolutely! These scones freeze very well. You can freeze the unbaked scones before egg washing them. Just wrap them tightly in plastic wrap and place them in a freezer bag. When you’re ready to bake, just add a few extra minutes to the baking time.
What can I serve with Peppermint Chocolate Chip Scones?
These scones pair wonderfully with hot cocoa or spiced tea. You might also enjoy them with whipped cream or your favorite fruit preserves. A dollop of cream cheese or mascarpone also adds a nice touch!
How do I tell when scones are done baking?
To know when your scones are done, look for a light golden color on the tops. You can also insert a toothpick into the center. If it comes out clean, the scones are ready. Keep an eye on them, especially towards the end of baking time!
Peppermint chocolate chip scones are a treat you can easily make at home. We covered the key ingredients, from basic items to fun garnishes. I shared step-by-step instructions to help you bake perfectly. Remember to watch out for common mistakes. You can also explore variations and storage tips for freshness. In the end, these scones can bring joy to any occasion. Enjoy baking and tasting your delicious creation

Peppermint Chocolate Chip Scones
Ingredients
- 2 cups all-purpose flour
- 0.25 cups granulated sugar
- 1 tablespoon baking powder
- 0.5 teaspoon salt
- 0.5 cups unsalted butter, cold and cubed
- 0.5 cups heavy cream
- 1 teaspoon vanilla extract
- 0.5 teaspoon peppermint extract
- 0.5 cups semi-sweet chocolate chips
- 0.25 cups crushed peppermint candies
- 1 large egg, for egg wash
Instructions
- Preheat your oven to 400°F (200°C). Prepare a baking sheet by lining it with parchment paper for easy cleanup and to prevent sticking.
- In a spacious mixing bowl, combine 2 cups of all-purpose flour, 1/4 cup of granulated sugar, 1 tablespoon of baking powder, and 1/2 teaspoon of salt. Use a whisk to blend the dry ingredients thoroughly.
- Add the 1/2 cup of cold, cubed unsalted butter to the bowl with the dry ingredients. Work the butter into the flour mixture until it resembles coarse crumbs.
- In a separate bowl, whisk together 1/2 cup of heavy cream, 1 teaspoon of vanilla extract, and 1/2 teaspoon of peppermint extract until well combined.
- Make a well in the center of the flour mixture and pour in the cream mixture. Stir gently until the ingredients are just combined.
- Gently fold in the 1/2 cup of semi-sweet chocolate chips and 1/4 cup of crushed peppermint candies until evenly distributed.
- Lightly flour a clean work surface, then turn the dough out onto it. Knead the dough a few times until it just comes together.
- Shape the dough into a circle, roughly 1 inch thick. Cut the circle into 8 wedges and transfer them to the prepared baking sheet.
- In a small bowl, beat the egg until frothy. Brush the egg wash over the tops of each scone.
- Bake in the preheated oven for 15 to 20 minutes, or until the scones are lightly browned and a toothpick inserted comes out clean.
- Allow the scones to cool slightly on a wire rack before serving.

![- 1 cup rolled oats - 2 cups almond milk (or your preferred milk) - 1 medium sweet apple, diced (suggestions: Fuji or Gala) - 1 teaspoon ground cinnamon - 2 tablespoons maple syrup (or honey if you prefer) - 1/2 teaspoon vanilla extract - 1/4 cup plain Greek yogurt (optional) - Pinch of salt - Chopped nuts for topping - Extra apple slices and cinnamon for garnish Apple cinnamon overnight oats are easy to make and full of flavor. The oats soak overnight, making them creamy and delicious. You can customize this recipe based on your taste. For the base, I use rolled oats and almond milk, but feel free to pick any milk you like. The diced apple brings sweetness and crunch. I suggest using Fuji or Gala apples since they are sweet and juicy. Ground cinnamon adds warmth and a cozy touch. Maple syrup gives the oats a natural sweetness. If you want a little creaminess, add Greek yogurt. Don’t forget the pinch of salt; it enhances all the flavors. Chopped nuts add a nice crunch on top. You can use walnuts, pecans, or any nuts you enjoy. Finally, garnish with extra apple slices and a dusting of cinnamon for a pretty finish. - Different types of milk (coconut, oat, etc.) - Sweeteners (agave syrup, stevia, etc.) - Additional fruit (berries, bananas, etc.) If you want to try something different, there are many options. Swap almond milk for coconut or oat milk if you prefer. You can change sweeteners too; agave syrup or stevia work well. Add in more fruits like berries or sliced bananas for extra flavor. This makes each serving unique and fun. The best part? You can make it just how you like it! For the full recipe, check out Apple Cinnamon Overnight Oats Delight. - Step 1: Combine rolled oats with milk and yogurt. In a large bowl, mix 1 cup of rolled oats with 2 cups of almond milk. If you like, add 1/4 cup of Greek yogurt for creaminess. Stir until mixed well. - Step 2: Add apples, cinnamon, sweetener, vanilla, and salt. Fold in 1 diced apple, 1 teaspoon of ground cinnamon, and 2 tablespoons of maple syrup. Add 1/2 teaspoon of vanilla extract and a pinch of salt. Mix until everything is evenly distributed. - Step 3: Transfer mixture into jars and refrigerate. Spoon the oat mix into jars. Make sure each jar has some apple pieces. Close the lids and place them in the fridge overnight. - Evenly distribute diced apples among jars. This ensures each jar has the same amount of apple flavor. - Layer ingredients for visual appeal. Create a pretty look by layering oats and apples. This makes your breakfast even more inviting. - Stir before serving and adjust consistency. When you take the jars out, give them a good stir. If they feel too thick, add a splash of milk. - Top with nuts and additional apple slices. Finish with a sprinkle of chopped nuts and a few apple slices for crunch. A dash of cinnamon adds warmth and flavor. For full details, check the [Full Recipe]. To get the best texture, always use rolled oats. They soak up the liquid well. Steel-cut oats take longer to soften. You might want to avoid them for overnight oats. Adjust the sweetness by adding more or less maple syrup. Taste as you mix to find your perfect balance. Make a big batch of oats for quick breakfasts. You can prepare up to five jars at once. Store them in the refrigerator for up to five days. This way, you’ll have a quick meal ready on busy mornings. Feel free to experiment with spices like nutmeg or cardamom. Just a pinch can add a warm kick. You can also add seeds like chia or flaxseed. These add fiber and make your oats even better for you. {{image_4}} You can easily make apple cinnamon overnight oats vegan. Just swap the Greek yogurt for a plant-based yogurt. Use almond, coconut, or oat milk for a creamy base. These changes keep the flavor rich and tasty while being dairy-free. If you need gluten-free options, choose certified gluten-free oats. Many brands offer oats that are safe for those with gluten sensitivities. This way, you can enjoy your oats without worry. You can mix in other fruits to change the taste. Try berries like strawberries or blueberries for a fresh twist. Bananas also work well, adding sweetness and creaminess. For toppings, nuts and seeds add crunch. Chopped almonds, walnuts, or sunflower seeds all taste great. You can also sprinkle chia seeds for extra fiber and health benefits. In fall, add pumpkin spice to your oats for a cozy taste. Just mix in a teaspoon or two for that warm, spiced flavor. It pairs perfectly with apples. In summer, think about fresh fruits like peaches or mangoes. These fruits add a bright, juicy flavor. You can mix them in or use them as a topping for a colorful and tasty breakfast. For the complete recipe, check out the [Full Recipe]. To keep your apple cinnamon overnight oats fresh, use jars or airtight containers. Glass jars work great. They seal well and let you see the yummy layers. Make sure to refrigerate them right after you prepare them. This keeps the oats safe to eat. You can freeze individual servings of overnight oats. First, pour the oats into freezer-safe containers or jars. Leave some space at the top, as they will expand. To enjoy later, thaw them in the fridge overnight. Once thawed, stir well. You might want to add a splash of milk to make them creamy again. Apple cinnamon overnight oats can stay fresh in the fridge for up to five days. Check for any signs of spoilage before eating. If the oats smell sour or have a strange color, throw them away. Always trust your nose and eyes! For the best taste, enjoy them within the first few days. Apple cinnamon overnight oats are a tasty breakfast. They combine oats, milk, apples, and cinnamon. The mixture sits in the fridge overnight. This soaking makes the oats soft and creamy. You get a nice blend of flavors. It’s a quick way to enjoy a healthy meal. Yes, you can use quick oats. However, they have a different texture. Quick oats cook faster and become mushy. If you use them, soak for less time. Rolled oats keep a firmer bite and work better for overnight oats. Overnight oats last about 5 days in the fridge. Store them in airtight jars or containers. Check for bad smells or changes in texture. If they look or smell off, toss them out. Yes, kids love apple cinnamon overnight oats! They are sweet and fun to eat. Serve in small jars for a cute look. You can also add toppings like nuts or more fruit for variety. This makes it a family-friendly dish everyone can enjoy. Apple cinnamon overnight oats offer a delightful and easy breakfast option. You can prepare them quickly with just a few simple steps. This meal not only fills you up but also lets you customize flavors to your taste. Experiment with different fruits, sweeteners, and spices to keep it fun. Remember to store your oats correctly for freshness. Enjoy this nutritious dish throughout the week! Your mornings can be bright and delicious with this recipe.](https://dishtreats.com/wp-content/uploads/2025/06/6eb7544b-1d16-4ecc-8a32-decb7f29ee21-768x768.webp)
![To make a true classic key lime pie, you need these key items: - 1 ½ cups graham cracker crumbs - ½ cup unsweetened coconut flakes - ⅓ cup granulated sugar - ½ cup unsalted butter, melted - 4 large egg yolks - 1 (14 oz) can sweetened condensed milk - ½ cup freshly squeezed key lime juice (approx. 12 key limes) - Zest of 2 key limes - 1 cup heavy whipping cream - 2 tablespoons powdered sugar - Lime slices and extra zest for garnish These ingredients work together to create a sweet, tangy pie that sings of sunshine. You can add some optional ingredients to enhance your pie: - Toasted coconut flakes for extra crunch - A pinch of salt to balance sweetness - Lime zest for a stronger lime flavor These add-ons can make your pie even more delightful. If you're missing an ingredient, here are some easy swaps: - Use regular lime juice instead of key lime juice. It will taste different but still good. - Swap graham cracker crumbs with crushed vanilla wafers for a unique flavor. - Replace heavy cream with whipped topping for a lighter version. These substitutions can help you prepare the pie with what you have. For the exact steps, check out the Full Recipe. First, preheat your oven to 350°F (175°C). This step is key for a great crust. In a medium bowl, mix the graham cracker crumbs, coconut flakes, and granulated sugar. Pour in the melted butter and stir until it feels like moist sand. Next, grab a 9-inch pie pan. Press the crumb mixture into the bottom and up the sides of the pan. Make sure it’s firm and even. Bake this crust for 8-10 minutes until the edges are golden. After baking, let it cool completely. Now, let’s make the filling. In a large bowl, whisk the egg yolks until they are pale yellow. Then, add the sweetened condensed milk, key lime juice, and lime zest. Whisk until everything is smooth. You want to have no lumps here! Carefully pour this lime mixture into your cooled crust. Spread it out evenly. Bake the pie for 15 minutes. The filling should be set but still a bit jiggly in the center. After baking, take it out and let it cool at room temperature. Once it’s cool, put the pie in the fridge for at least 2 hours. This chilling time makes it even tastier! For the full recipe, check out the details above! To get the best texture and flavor in your Key Lime Pie, follow a few simple tips: - Use Fresh Key Limes: Fresh key limes give a bright taste. They also add a nice zing. - Whisk Egg Yolks Well: Whisk the yolks until they are pale. This helps create a smooth filling. - Don’t Overbake: Bake the filling until it is just set. It should still jiggle a bit in the middle. - Chill Properly: Let the pie cool at room temp before refrigerating. This step enhances the flavor. Some mistakes can ruin your pie. Here are a few to watch out for: - Skipping the Zest: The zest adds flavor and aroma. Don’t skip it! - Using Cold Ingredients: Let your ingredients reach room temperature. This helps them mix better. - Overmixing the Filling: Whisk just until combined. Overmixing can create bubbles in the filling. - Not Cooling the Crust: Always cool the crust completely before adding the filling. A warm crust can make the filling runny. Having the right tools makes cooking easier and more fun: - 9-inch Pie Pan: This is the perfect size for your Key Lime Pie. - Mixing Bowls: Use medium and large bowls for mixing your crust and filling. - Electric Mixer: This helps you whip the cream to stiff peaks easily. - Zester or Grater: A good zester is key for getting the lime zest just right. These tips and tools will help you create a perfect Key Lime Pie every time. For the full recipe, check out the [Full Recipe]. {{image_4}} You can change up the crust for your Key Lime Pie. Here are some fun ideas: - Graham Cracker Crust: This is the classic choice. It’s sweet and crunchy. - Oreo Crust: Use crushed Oreos instead of graham crackers for a chocolate twist. - Nut Crust: Ground almonds or pecans add a nice nutty flavor. Mix them with butter and a bit of sugar. - Coconut Crust: Use shredded coconut for a tropical feel. It pairs well with the lime. Want to try something different? Here are some tasty twists: - Mango Key Lime Pie: Add pureed mango to the filling for a fruity kick. - Berry Key Lime Pie: Mix in fresh berries like strawberries or blueberries for color and flavor. - Coconut Key Lime Pie: Stir in coconut milk for a creamier texture and tropical taste. - Chocolate Key Lime Pie: Add melted chocolate to the filling for a rich, sweet layer. Making your pie look great can be fun. Here are some ideas: - Whipped Cream Topping: Spread whipped cream on top. Use a spatula to make swirls. - Garnish with Lime: Add lime slices or zest for a pop of color. - Serve in Mason Jars: For a fun twist, serve individual portions in jars. - Add Fresh Berries: Place berries around the pie for extra flair. For the full recipe, check out the Zesty Classic Key Lime Pie . To keep your key lime pie fresh, cover it tightly with plastic wrap or aluminum foil. This prevents the pie from absorbing fridge odors. Store it in the fridge for up to three days. Make sure to slice the pie before storing to make it easier to serve later. You can freeze key lime pie if you want to save some for later. First, let the pie cool completely after baking. Wrap the pie tightly in plastic wrap and then in aluminum foil. This double wrapping helps prevent freezer burn. You can freeze it for up to three months. Just remember to label it with the date. To enjoy your frozen key lime pie, move it from the freezer to the fridge. Let it thaw overnight. If you're in a hurry, you can leave it at room temperature for about two hours. Do not microwave it, as this can change the texture. Once thawed, you can add fresh whipped cream or lime zest for extra flavor before serving. Yes, you can use regular limes. Key limes are smaller and more fragrant. They have a tart flavor that makes the pie special. If you use regular limes, the pie will taste a bit different but still good. You might want to adjust the sugar to balance the flavor. You can keep key lime pie in the fridge for up to three days. Cover it well to prevent it from drying out. If the pie has whipped cream on top, eat it within two days. The cream can lose its texture after that. You can use coconut cream or a dairy-free option. If you need a lighter option, try using yogurt. For a richer flavor, you can also use mascarpone cheese. Each choice will change the taste and texture a bit, but they all work well in this recipe. Check the [Full Recipe] for more details. In this post, we explored the key ingredients for classic Key Lime Pie, from crust to filling. I shared step-by-step instructions for baking. We discussed tips to avoid common mistakes and explored variations for flavor and presentation. Additionally, we covered how to store and reheat leftovers effectively. Key Lime Pie is simple to make and delightful to share. Enjoy creating your version and savor each bite. When you follow these tips, your pie will shine!](https://dishtreats.com/wp-content/uploads/2025/07/bf504450-0d09-4d53-b035-55d87c168019-768x768.webp)