Chocolate Covered Pretzel Bark Delightful and Easy Treat

Ready to satisfy your sweet cravings? Chocolate Covered Pretzel Bark is the perfect mix of crunchy and creamy. With just a few simple ingredients, you can create a delightful treat that’s sure to impress your friends and family. Follow me as we dive into easy steps, yummy tips, and fun variations. Let’s turn this snack into your new favorite dessert!
Why I Love This Recipe
- Quick to Make: This recipe is perfect for when you need a delicious treat in a hurry, taking just 45 minutes from start to finish.
- Perfect Balance of Flavors: The combination of sweet and salty from the chocolates, pretzels, and sea salt creates an irresistible flavor profile.
- Customizable Toppings: You can easily switch up the nuts or candies based on your personal preferences, making it versatile for any occasion.
- Great for Sharing: This bark is perfect for gatherings, ensuring there’s enough to go around and impress your friends and family!
Ingredients
List of Ingredients
- 2 cups pretzel sticks
- 1 cup semi-sweet chocolate chips
- 1 cup white chocolate chips
- 1/2 cup mini M&M’s
- 1/4 cup chopped nuts (almonds or peanuts)
- Sea salt for sprinkling
Gather these ingredients before you start. The pretzel sticks give a nice crunch. Semi-sweet and white chocolate chips add sweetness. Mini M&M’s bring color and fun. Chopped nuts add a tasty crunch. Sea salt balances the sweetness. Make sure you measure them out first. This will help you keep track as you go. Having everything ready makes cooking easy and fun!

Step-by-Step Instructions
Preparing the Baking Sheet
Start by preheating your refrigerator. This helps the bark set quickly. Next, grab a standard baking sheet. Line it with parchment paper. Make sure the paper is large enough for all your pretzel sticks. You want them in a single layer. This ensures even cooling and easy removal later.
Melting the Chocolates
For the semi-sweet chocolate, take a microwave-safe bowl. Add the chocolate chips to the bowl. Microwave on high for 30 seconds. After that, take it out and stir. Repeat this until the chocolate is smooth. This will take about 1-2 minutes in total.
Now, do the same for the white chocolate. Use a separate bowl. Microwave just like before. Stir until it becomes velvety and smooth.
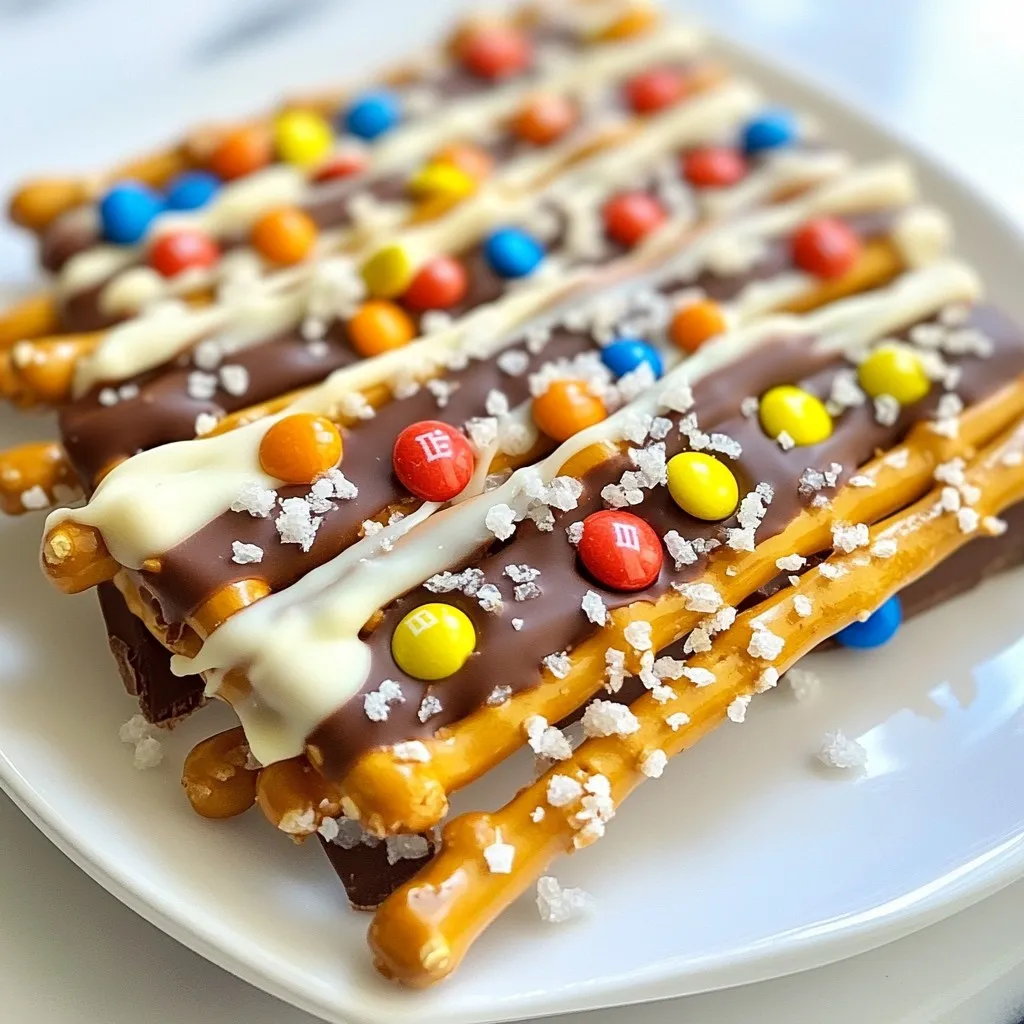
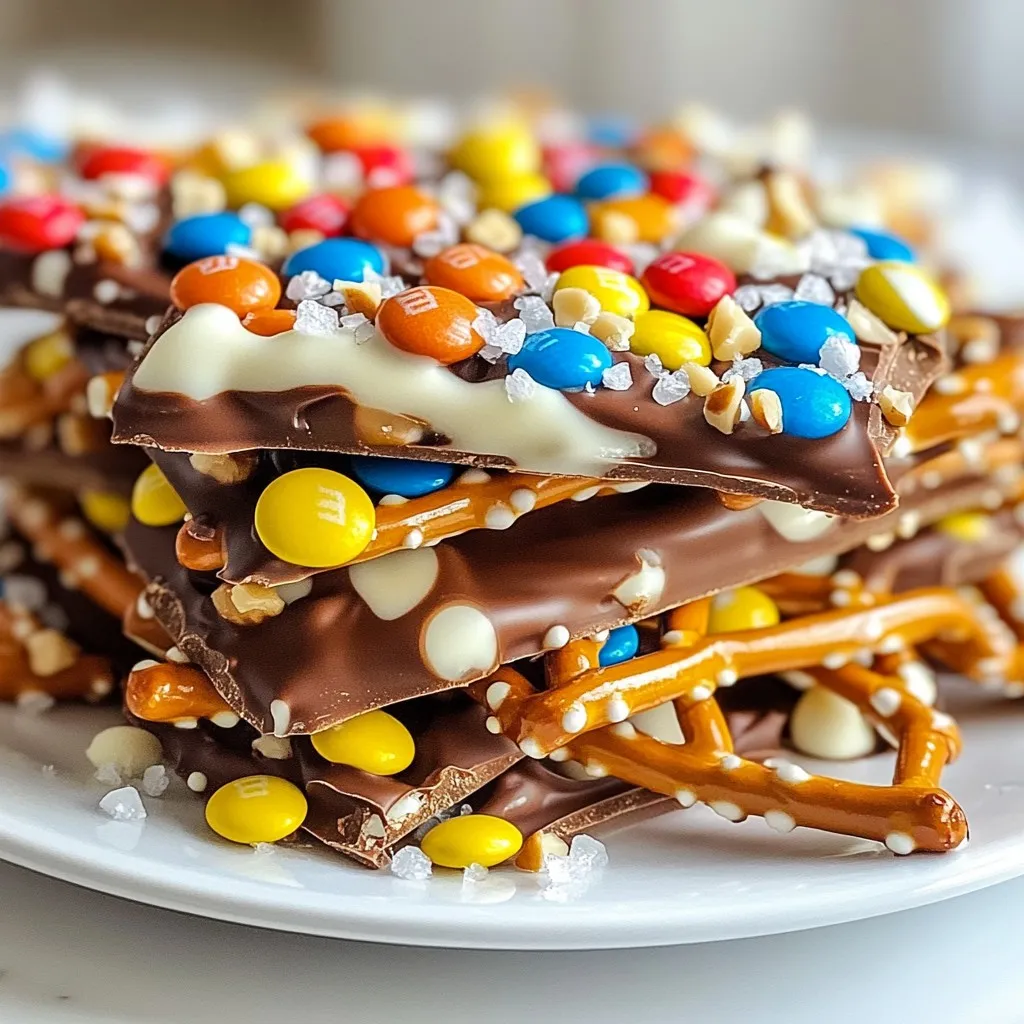
Assembling the Bark
Take half of the pretzel sticks and dip them in the melted semi-sweet chocolate. Let any extra chocolate drip off. Place them on the lined baking sheet in a single layer. Make sure they do not touch each other.
Next, drizzle the warm white chocolate over the chocolate-covered pretzels. Use a spoon or a piping bag for a nice zigzag pattern. This makes it look fancy. While the white chocolate is still warm, add mini M&M’s and chopped nuts. Gently press them down so they stick.
Finally, sprinkle sea salt over the entire bark. This adds a tasty sweet and salty contrast. Focus on spots with less chocolate.
Setting the Bark
Carefully place the baking sheet in the refrigerator. Chill it for at least 30 minutes. This step is very important. It helps the chocolate harden and makes breaking the bark easier.
Breaking the Bark
Once the chocolate is set, take the bark out of the refrigerator. Break it into irregular pieces by hand for a rustic look. You can also use a sharp knife to cut it into neat squares. Choose whichever way you like best. Enjoy your chocolate-covered pretzel bark treat!
Tips & Tricks
Enhancing the Flavor
To make your Chocolate Covered Pretzel Bark even tastier, think of fun toppings. You can add crushed Oreos or a sprinkle of toffee bits. These choices give great flavor and crunch. You can also use different nuts, like walnuts or pecans. They add a nice twist.
Using quality chocolate is key. Choose chocolate with a high cocoa content. This makes a big difference in taste. Good chocolate melts smoothly and has a richer flavor. It makes your bark taste gourmet.
Presentation Tips
For a great presentation, arrange the bark on a colorful platter. You can add extra M&M’s and chopped nuts around the edges. This makes the plate look vibrant and inviting. You might also drizzle more melted white chocolate on top for flair.
If you want to gift this treat, think about fun packaging. Use clear bags tied with colorful ribbons. You can also place pieces in small boxes. This adds a personal touch and makes it special.
Pro Tips
- Use Quality Chocolate: For the best flavor, choose high-quality chocolate chips. They melt better and provide a richer taste to your bark.
- Experiment with Toppings: Feel free to customize your bark with different toppings like dried fruits, coconut flakes, or even crushed cookies for added texture.
- Keep It Cool: Make sure to chill your bark in the refrigerator until fully set. This ensures it breaks easily and maintains its shape when serving.
- Be Creative with Presentation: When serving, arrange the bark on a decorative platter and add colorful sprinkles or additional toppings for an eye-catching display.
Variations
Different Chocolate Combinations
You can mix things up with different types of chocolate. Use milk chocolate for a creamier taste. Dark chocolate works well for a richer flavor. I love how both options change the bark’s feel and taste. Each type brings its unique charm. Feel free to experiment to find your favorite!
Topping Alternatives
You can add many fun toppings to your pretzel bark. Try using crushed candy bars, sprinkles, or even dried fruit. Chopped nuts like walnuts or pecans also add a nice crunch. For holidays, think about seasonal options. For Halloween, use candy corn. For Christmas, sprinkle on crushed peppermint or festive colors. These choices make your bark exciting and fun for any occasion!
Storage Info
Best Storage Practices
To keep your chocolate covered pretzel bark fresh, store it in an airtight container. Use a container with a tight seal to prevent air from getting in. This way, your bark stays crisp and tasty. If you plan to share, use smaller containers for easy gifting.
Shelf Life
You can store your chocolate covered pretzel bark in the fridge for up to two weeks. If you keep it at room temperature, it will last about one week. Just make sure it is in a cool, dry place. Avoid direct sunlight and heat to keep the chocolate from melting.
FAQs
How do I make Chocolate Covered Pretzel Bark without nuts?
You can easily make this bark without nuts by simply omitting them. Instead, add more mini M&M’s or use a different topping. You could also add dried fruit like raisins or cranberries. This keeps the crunch while making it nut-free. Always check the labels if you have allergies.
Can I use different types of pretzels?
Yes, you can use other pretzel types. Try pretzel rods, pretzel crisps, or even flavored pretzels. Each type will bring a unique taste and crunch to your bark. Flavored pretzels like cheese or garlic can add a fun twist.
What’s the best way to melt chocolate?
The best way to melt chocolate is in the microwave. Use a microwave-safe bowl and heat in short bursts, about 30 seconds. Stir in between to prevent burning. You want it smooth and shiny. If using a double boiler, ensure no water touches the chocolate.
Where can I buy pre-made Chocolate Covered Pretzel Bark?
Many stores have pre-made Chocolate Covered Pretzel Bark. Look in the snack aisle or the candy section. Brands like Bark Thins or Trader Joe’s often carry options. You can also find it in specialty shops or online retailers.
This post outlined a fun and tasty recipe for Chocolate Covered Pretzel Bark. We covered ingredients, step-by-step instructions, and helpful tips for perfecting your bark.
You can easily customize flavors and toppings to fit any occasion. Store your bark for long-lasting snacks or gifts. Enjoy making this treat with family and friends. It’s sure to bring smiles all aroun

Choco-Crunchy Delight Bark
Ingredients
- 2 cups pretzel sticks
- 1 cup semi-sweet chocolate chips
- 1 cup white chocolate chips
- 0.5 cup mini M&M's
- 0.25 cup chopped nuts (almonds or peanuts)
- 1 pinch sea salt for sprinkling
Instructions
- Prepare the Baking Sheet: Start by preheating your refrigerator. Line a standard baking sheet with parchment paper, ensuring it’s large enough to accommodate all pretzel sticks in a single layer for even distribution.
- Melt the Semi-Sweet Chocolate: In a microwave-safe bowl, add the semi-sweet chocolate chips. Microwave on high for 30 seconds. Remove and stir. Repeat this process until the chocolate is completely melted and smooth, which should take about 1-2 minutes depending on your microwave.
- Dip the Pretzels: Take half of the pretzel sticks and carefully dip them into the melted semi-sweet chocolate. Allow any excess chocolate to drip off before arranging them on the lined baking sheet in a single layer, ensuring they are not touching.
- Melt the White Chocolate: In a separate microwave-safe bowl, repeat the melting process with the white chocolate chips until they are fully melted and velvety.
- Drizzle with White Chocolate: Using a spoon or a piping bag, drizzle the warm melted white chocolate over the chocolate-covered pretzels in a zigzag pattern to create a beautiful visual effect.
- Add Toppings: While the white chocolate is still warm, generously sprinkle mini M&M's and the chopped nuts over the bark. Gently press each one down to help them stick into the chocolate, enhancing both flavor and texture.
- Sprinkle with Sea Salt: For a delightful sweet and salty contrast, lightly sprinkle sea salt over the entire bark, focusing on areas that seem to have less chocolate.
- Chill to Set: Carefully place the baking sheet in the refrigerator and chill for at least 30 minutes, or until the chocolate has completely hardened. This step is crucial for easily breaking the bark later.
- Break into Pieces: Once the chocolate is set, remove the bark from the refrigerator. Break it into irregular pieces by hand for a rustic look, or use a sharp knife to cut it into neat squares if preferred.
![To make the best pumpkin spice muffins, you need the following key ingredients: - 1 cup pumpkin puree - 1/2 cup brown sugar - 1/2 cup granulated sugar - 1/3 cup vegetable oil - 2 large eggs - 1 teaspoon vanilla extract - 1 1/2 cups all-purpose flour - 1 teaspoon baking soda - 1 teaspoon baking powder - 2 teaspoons pumpkin pie spice - 1/2 teaspoon salt These ingredients create a fluffy, moist muffin that bursts with autumn flavor. The pumpkin puree adds natural sweetness and moisture. Brown sugar gives a rich, caramel taste, while the spices bring warmth and comfort to each bite. You can make your muffins even better with these optional ingredients: - 1/2 cup chopped walnuts or pecans - 1/2 cup chocolate chips Adding nuts gives a nice crunch, while chocolate chips add sweetness. Feel free to mix and match based on your taste. You can even leave them out for a classic muffin. Accurate measurement is key to great baking. Here’s how to measure your ingredients correctly: - Flour: Use a spoon to fill your measuring cup, then level it off with a knife. - Brown Sugar: Pack it firmly into the cup for proper measurement. - Liquid Ingredients: Use a liquid measuring cup and check at eye level for accuracy. Following these tips ensures your muffins turn out perfectly every time. For the full recipe, check out the details above and get ready to bake your delicious pumpkin spice muffins! Start by preheating your oven to 350°F (175°C). This step is key for even baking. Next, prepare a standard muffin tin. You can use paper liners or spray each cup with non-stick spray. This will make it easy to remove the muffins later. In a large bowl, combine the pumpkin puree, brown sugar, granulated sugar, and vegetable oil. Add in the eggs and vanilla extract. Whisk these together until smooth. Make sure there are no lumps. This mix gives your muffins their rich flavor. In another bowl, sift together the all-purpose flour, baking soda, baking powder, pumpkin pie spice, and salt. Sifting helps to mix and aerate the flour. It makes for a lighter muffin. This mix is important for texture. If you want to add some extra texture, gently fold in chopped walnuts or pecans. You can also add chocolate chips for a sweet touch. Be careful not to overmix; just combine until they’re evenly spread in the batter. Now, spoon the muffin batter into the prepared tin. Fill each cup about 3/4 full. This allows room for the muffins to rise. Bake for 18-20 minutes. Check if they’re ready by inserting a toothpick in the center. If it comes out clean, they’re done! Let them cool in the tin for 5 minutes before moving them to a wire rack. This cooling step is essential for the best texture. For the complete recipe, check out the [Full Recipe]. To keep muffins light and fluffy, don’t overmix the batter. When you combine wet and dry ingredients, mix just until you see no dry flour. A few lumps are okay. Overmixing makes muffins tough. Also, ensure your baking powder and baking soda are fresh. Old leavening agents won't help the muffins rise. Store your pumpkin spice muffins in an airtight container. This keeps them soft and moist. You can keep them at room temperature for up to three days. For longer storage, place them in the fridge for a week. If you want to save them for later, freeze them. Wrap each muffin in plastic wrap before placing them in a freezer-safe bag. They can last for up to three months in the freezer. Presentation makes any dish more inviting. For a lovely touch, sprinkle powdered sugar on top of each muffin. Serve them on a pretty platter. You can also add a small bowl of softened butter for easy spreading. This makes your muffins look even more delicious and inviting. {{image_4}} You can make gluten-free pumpkin spice muffins easily. To do this, swap regular flour with gluten-free flour. Look for blends that work well in baking. These blends often include almond flour or coconut flour. Check the package to ensure it has a good flavor. The muffins will still taste great! The texture may vary slightly, but they will remain soft and delicious. If you want vegan muffins, you can make some simple changes. Replace eggs with flax eggs. To make a flax egg, mix 1 tablespoon of ground flaxseed with 2.5 tablespoons of water. Let it sit for about 5 minutes until it thickens. Use plant-based oil instead of vegetable oil. You can also use almond milk or another plant-based milk instead of regular milk. These muffins will be light and fluffy, just like the classic recipe. You can jazz up your pumpkin spice muffins with extra flavors. Try adding maple syrup for a sweet twist. Just reduce the sugar a little to balance it out. You can also add orange zest for a fresh, bright taste. A teaspoon of orange zest will give the muffins a nice citrus kick. Feel free to get creative! You can mix and match these flavors to find your favorite combination. These variations can make your pumpkin spice muffins even more special. Check out the full recipe to get started! To keep your pumpkin spice muffins fresh, store them in an airtight container. Place a paper towel in the container to absorb moisture. This helps prevent sogginess. Store them at room temperature for up to three days. If you want to keep them longer, consider freezing. Freezing is a great way to save your muffins. Start by letting them cool completely. Then, wrap each muffin in plastic wrap. Place the wrapped muffins in a freezer-safe bag. Label the bag with the date. You can freeze them for up to three months. To enjoy your muffins warm, reheat them in the oven. Preheat your oven to 350°F (175°C). Place the muffins on a baking sheet. Heat for 10 to 15 minutes. You can also use a microwave for quick reheating. Just warm them for 15 to 20 seconds. Enjoy your pumpkin spice muffins fresh! Yes, you can use canned pumpkin. It saves time and gives great flavor. Make sure to choose 100% pure pumpkin, not pumpkin pie filling. This keeps the taste just right. Canned pumpkin is often smoother, which helps in mixing. It also has a longer shelf life. So, if you have a can, use it! For eggs, you can use several substitutes. Common options include: - 1/4 cup unsweetened applesauce - 1/4 cup mashed banana - 1 tablespoon ground flaxseed mixed with 2.5 tablespoons water These options keep your muffins moist and fluffy. They also add a hint of flavor. Choose what fits your taste best! Check your muffins after 18 minutes. Insert a toothpick into the center. If it comes out clean or with a few crumbs, they are done. If the toothpick is wet, bake for 1-2 more minutes. Keep an eye on them to avoid overbaking. Perfect muffins should be soft and lightly golden. Absolutely! To make mini muffins, use a mini muffin tin. Fill each cup about halfway. Bake them for 10-12 minutes. Keep checking with a toothpick until they are done. Mini muffins are great for snacks and sharing. They are just as tasty and fun! For the full recipe, check out the details above. In this post, we explored how to make delicious pumpkin spice muffins. I covered the essential and optional ingredients, along with measuring them for great results. The step-by-step instructions guide you through prepping, mixing, and baking. I also shared tips for light muffins and ways to store them well. Finally, I offered tasty variations like gluten-free and vegan options. Now you’re ready to enjoy these warm, flavorful treats any time! Your perfect pumpkin spice muffin awaits.](https://dishtreats.com/wp-content/uploads/2025/06/e45c4b1d-a4d2-42b5-b442-a33a757785ba-768x768.webp)