Skip to content
About
Contact
Cookie Policy
Copyright Policy
Disclaimer
Search
Home
Dinner
Appetizer
Desserts
Drinks
About
Contact
Privacy Policy
Toggle Menu
Home
/
NO-ING-IMG
- Page 79
NO-ING-IMG
Creamy Cilantro Lime Dip Fresh and Flavorful Recipe
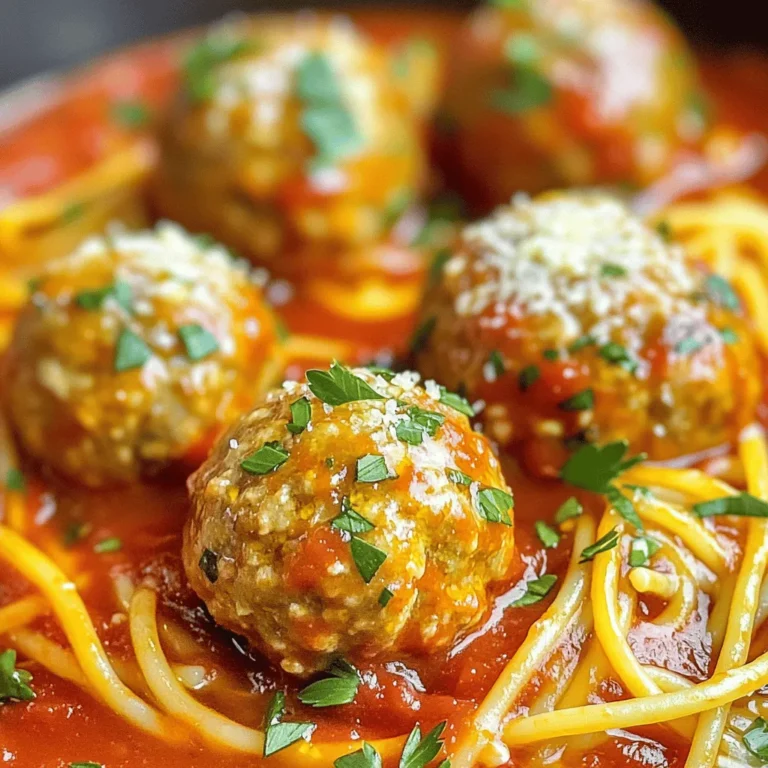
Classic Italian Meatballs Flavor-Packed Delight Recipe
Garlic Butter Chicken and Rice Easy Comfort Meal
Cheesy Spinach and Artichoke Dip Delicious Party Snack
Mango Lime Chicken Skewers Flavorful and Simple Dish
Buffalo Chicken Sliders Tasty and Easy Recipe
Chocolate Chip Cookie Bars Simple and Delicious Treat
Savory Breakfast Burritos Simple and Flavorful Treat
Vegetable Curry with Chickpeas Tasty and Simple Dish
Pasta Primavera with Lemon Flavorful Veggie Delight
Page navigation
Previous Page
Previous
1
…
77
78
79
80
81
Next Page
Next
Home
Dinner
Appetizer
Desserts
Drinks
About
Contact
Privacy Policy
Toggle Menu Close
Search for:
Search


![- 4 boneless, skinless chicken thighs - 2 cups long-grain rice - 4 tablespoons unsalted butter, divided - 5 cloves garlic, finely minced - 1 medium onion, finely chopped - 1 teaspoon dried oregano - 1 teaspoon paprika - Salt and freshly ground black pepper, to taste - 3 cups chicken broth - 1 cup frozen peas - Fresh parsley, chopped (for garnish) When I prepare Garlic Butter Chicken and Rice, I love the way the flavors mix. The chicken thighs bring a juicy texture. Long-grain rice soaks up all the savory chicken broth. Unsalted butter adds a rich taste. Aromatics play a big role here. Garlic cloves and onion give a sweet aroma. Dried oregano and paprika add warmth and depth. I always use fresh black pepper and salt to make the dish pop. For a splash of color, I toss in frozen peas. They keep their bright green shade when cooked. Fresh parsley adds a nice finish. It makes the dish look inviting and fresh. If you want to try this dish, check the Full Recipe for all the steps! You'll enjoy making it, and even more, eating it. 1. Start by melting 2 tablespoons of butter in a large skillet over medium heat. This will create a rich base for your dish. 2. Once the butter melts, add the chopped onion. Sauté it for about 5 minutes until it turns soft and fragrant. 3. Next, add 5 cloves of minced garlic to the skillet. Cook it for 1 minute, just until the garlic smells good but isn’t browned. 4. While the onion and garlic are cooking, season 4 chicken thighs on both sides. Use 1 teaspoon of oregano, 1 teaspoon of paprika, salt, and pepper. This will add a lot of flavor. 5. Move the onion and garlic to one side of the skillet. Place the seasoned chicken thighs in the center. Cook each side for 6-7 minutes until they turn golden brown. Once done, take the chicken out and set it aside. 1. In the same skillet, add the remaining 2 tablespoons of butter. Let it melt completely. 2. Now, stir in 2 cups of long-grain rice. Toast the rice for 2-3 minutes, stirring often. This step brings out the nutty flavor. 3. Pour 3 cups of chicken broth over the toasted rice. Gently stir to coat all the grains. Increase the heat to bring the mixture to a boil. 1. Once the broth is boiling, lower the heat to a simmer. Nestle the cooked chicken thighs on top of the rice. Cover the skillet with a lid and let it cook for 15-20 minutes. The rice should absorb most of the broth and become tender. 2. For the last 5 minutes of cooking, sprinkle 1 cup of frozen peas directly over the rice. Do not stir. This will keep the peas bright and fresh. 3. After cooking, remove the skillet from the heat. Leave it covered for an extra 5 minutes. This helps the rice fluff up nicely. 4. Finally, use a fork to fluff the rice and mix in the peas. Serve warm, with fresh parsley on top for color and flavor. This simple process makes Garlic Butter Chicken and Rice a fun and tasty comfort meal. For the complete recipe, check out the [Full Recipe]. To boost the flavor of your garlic butter chicken and rice, consider adding fresh herbs. Thyme, rosemary, or basil can bring new notes to the dish. You can also mix in some red pepper flakes for a little heat. Adjust the spices to fit your taste. If you like it spicy, add more paprika or even cayenne pepper. Remember, always taste as you go to find your perfect balance. Sautéing is key for great flavor. Start with a medium heat to avoid burning the garlic and onions. Stir them often to help them cook evenly. When cooking the chicken, ensure it's golden and cooked through. Use a meat thermometer to check the internal temperature. It should reach 165°F (75°C) for safe eating. This way, you get juicy chicken every time. For a beautiful presentation, serve your garlic butter chicken and rice on a large platter. Sprinkle fresh parsley on top for a pop of color. You can also add lemon wedges on the side. This adds a zesty touch when served. Pair your meal with a simple green salad or steamed vegetables. For drinks, try a light white wine or sparkling water with lemon. Enjoy your delicious creation! You can find the full recipe [here](#). {{image_4}} You can make this dish lighter by swapping rice for cauliflower rice. Cauliflower rice offers a low-carb option that still tastes great. It cooks quickly and absorbs flavors well. Using skinless chicken breasts instead of thighs is another healthy choice. Breasts have less fat but still provide protein. Spice things up by adding cayenne pepper for heat. A pinch can really enhance the dish. You can also try Italian seasoning for a different twist. Adding veggies like bell peppers or carrots boosts nutrition and color. They add crunch and sweetness that pairs well with garlic butter. If you need gluten-free options, use gluten-free chicken broth. It keeps the dish flavorful while meeting dietary needs. For those avoiding dairy, there are great butter substitutes. Look for dairy-free spreads made from plant oils. They work well in this recipe without losing taste. To keep your Garlic Butter Chicken and Rice fresh, store any leftovers in airtight containers. This helps lock in the flavor and moisture. Make sure to let the dish cool down before sealing it up. For longer storage, you can freeze it. Divide the dish into smaller portions to make thawing easier later. When it's time to reheat, use a skillet or a microwave. If using a skillet, add a splash of chicken broth to keep it moist. Heat it over low to medium heat, stirring gently. In the microwave, cover the dish with a damp paper towel. This keeps moisture in and avoids a dry result. Remember, you want your chicken and rice to stay tender. In the fridge, your Garlic Butter Chicken and Rice lasts about 3 to 4 days. Always check for signs before eating. Look for any off smells or changes in color. If it smells funny or looks slimy, it’s best to toss it. Always trust your senses to keep your meals safe and tasty. To amp up the flavor, try adding fresh herbs like thyme or rosemary. You can also mix in spices such as garlic powder or onion powder for extra depth. A splash of lemon juice at the end brightens the dish. For a spicy kick, consider adding crushed red pepper flakes. These little changes can make a big taste difference. Yes, you can! To adapt this recipe, first, brown the chicken thighs in a skillet. This step gives great flavor. Then, place the chicken, onions, garlic, and rice into the slow cooker. Add chicken broth and spices. Cook on low for 4-6 hours. Check the rice for doneness. Slow cooking makes this dish very tender and delicious. This dish pairs well with a side of steamed vegetables like broccoli or green beans. A fresh salad with vinaigrette is also nice. For drinks, consider serving iced tea or a light white wine. These choices balance the rich flavors of the chicken and rice. Absolutely! You can make this dish ahead of time. Store the chicken and rice in separate containers to keep them fresh. It lasts up to four days in the fridge. When ready to eat, simply reheat in the microwave or on the stovetop. This makes it a perfect option for busy weekdays. For the full recipe, check out the link above. This article guides you through making Garlic Butter Chicken and Rice. You learned about key ingredients like chicken thighs, long-grain rice, and garlic. I shared easy steps for cooking flavorful meals, plus tips to enhance taste and presentation. In conclusion, this dish is tasty and versatile. You can adjust it to fit your diet or mood. Enjoy experimenting with flavors and make it your own! Happy cooking!](https://dishtreats.com/wp-content/uploads/2025/05/2b69aced-7351-4258-8c9e-dc4a3c9f0304-768x768.webp)


![To make yummy buffalo chicken sliders, you need a few key items: - 1 pound of cooked chicken, shredded - 1/2 cup of buffalo sauce - 1/4 cup of ranch dressing - 12 slider rolls (mini burger buns) - 1 cup of shredded lettuce - 1/2 cup of diced tomatoes - 1/2 cup of shredded cheddar cheese - 1 tablespoon of olive oil - Salt and pepper to taste These main ingredients create a great base for your sliders. The combination of chicken, buffalo sauce, and ranch dressing gives them a nice kick. When serving your sliders, consider adding these extras: - A small bowl of ranch dressing for dipping - Fresh parsley for garnish - Crisp celery sticks for crunch These items enhance the experience. They add freshness and flavor. Plus, they look nice on the plate. If you want to boost the flavor, try these optional ingredients: - Crumbled blue cheese for a tangy taste - Sliced jalapeños for heat - Pickles for a crunchy contrast These additions can make your sliders even more exciting. Feel free to mix and match based on your taste. For the full recipe to create your buffalo chicken sliders, check the Full Recipe. First, grab a medium bowl. In this bowl, mix the shredded chicken with buffalo sauce and ranch dressing. Use a spoon to coat every piece of chicken well. This step is key; it gives the chicken great flavor. Next, heat a skillet over medium heat. Add the olive oil and let it shimmer. Carefully pour in your buffalo chicken mixture. Cook it for about 5 to 7 minutes. Stir it often to warm it evenly and make it thicker. Taste your mixture and add salt or pepper if needed. While the chicken cooks, take the slider rolls. Slice each roll in half. You will use the bottom half first. Spoon a nice portion of the buffalo chicken mixture onto each bottom half. Make it nice and high for a hearty bite! Then, add shredded lettuce, diced tomatoes, and a sprinkle of cheddar cheese. Finally, place the top half of the bun on each slider. If you want a crispy touch, broil the sliders. Place them on a baking sheet. Broil for 1 to 2 minutes until the tops are golden brown. Keep an eye on them to prevent burning. This step adds a nice crunch and makes the sliders even better. Enjoy your tasty creations using the Full Recipe! To keep your chicken tender, use cooked chicken. Shredded rotisserie chicken works great. If you cook it yourself, avoid overcooking. Always add buffalo sauce while the chicken is warm. This helps the flavors blend well. Choose soft, small slider rolls for the best taste. Hawaiian rolls add a sweet touch. You can also use potato rolls for a fluffy texture. Ensure they are fresh for a perfect bite. Buffalo chicken sliders shine with extra toppings. Serve them with ranch or blue cheese dressing for dipping. Fresh veggies, like celery sticks or carrot sticks, add crunch. Pair sliders with crispy fries or a light salad. Don’t forget to check the [Full Recipe] for all the steps! {{image_4}} You can make your buffalo chicken sliders even spicier. Add more hot sauce to your chicken mixture. You can also mix in diced jalapeños for extra heat. If you love bold flavors, try adding a dash of smoked paprika. This spice gives a nice twist to the flavor. If you want a vegetarian option, use cauliflower instead of chicken. Start by roasting cauliflower florets until they are tender. Then, toss them in buffalo sauce just like you would with chicken. This method gives you that spicy flavor while keeping it meat-free. It’s a great way to enjoy sliders without the meat. Switching up the sauce can change the whole dish. Instead of traditional buffalo sauce, experiment with teriyaki or garlic parmesan sauces. These sauces add different tastes to your sliders. You can mix and match different toppings, like blue cheese or avocado, to create your own flavor profile. This makes your sliders unique and fun. For more ideas, you can check the Full Recipe. After a fun meal, you may have some sliders left. Store them in an airtight container. Keep them in the fridge for up to three days. If you want to keep them longer, consider freezing. Place the sliders in freezer-safe bags, removing as much air as possible. To reheat your sliders, use an oven. Preheat it to 350°F (175°C). Wrap the sliders in foil to keep them moist. Heat for about 10-15 minutes. You can also use a microwave. Just heat each slider for 30 seconds to 1 minute. Be careful not to overheat, as that can dry them out. If you want to enjoy these sliders later, freezing is a great option. After cooking, let them cool completely. Place them in freezer-safe containers or bags. They can last in the freezer for up to three months. When ready to eat, thaw them in the fridge overnight before reheating. For the best taste, follow the reheating tips mentioned earlier. Enjoy your Buffalo Chicken Sliders anytime! For the full recipe, check out the [Full Recipe]. The best buffalo sauce balances heat and flavor. Look for sauces that blend cayenne pepper, vinegar, and butter. Brands like Frank’s RedHot or Crystal Hot Sauce work well. You can also make your own by mixing hot sauce with melted butter. This gives you control over the heat level and taste. To add spice, try these tips: - Use a hotter buffalo sauce. - Mix in diced jalapeños or chili flakes. - Add hot sauce directly to the chicken mix. - Serve with spicy pickles or a jalapeño slice on top. Experiment to find the right heat for your taste! Yes, you can prepare buffalo chicken sliders in advance. Cook the chicken and store it in the fridge for up to three days. Assemble the sliders just before serving. This keeps the rolls fresh and the flavors bright. You can also freeze the chicken mixture for up to three months. Buffalo chicken sliders pair well with many sides. Here are some great options: - Celery sticks and carrot sticks with ranch dressing. - Crispy potato wedges or French fries. - A fresh green salad with a light vinaigrette. - Coleslaw for a crunchy contrast. These sides will enhance your meal and keep it fun! In this blog post, we explored how to make delicious buffalo chicken sliders. We covered key ingredients, step-by-step cooking instructions, and helpful tips to ensure great taste. You learned about variations, storage options, and answered common questions. Buffalo chicken sliders are easy to prepare and fun to customize. Enjoying these sliders with friends or family brings joy to any gathering. Try your favorite pairing and savor the rich flavors. Keep experimenting with new ideas for even more tasty sliders!](https://dishtreats.com/wp-content/uploads/2025/05/2a959048-bde5-4e87-837c-50029693f266-768x768.webp)
. Can I use dark chocolate instead of semi-sweet? Yes, you can use dark chocolate. It adds a richer flavor. Dark chocolate makes the bars less sweet. This change gives you a nice balance in taste. If you love dark chocolate, go for it! What can I substitute for eggs in this recipe? You can use applesauce or mashed bananas. Use 1/4 cup for each egg. This keeps the bars moist. It also adds a bit of natural sweetness. Another option is flaxseed meal mixed with water. Mix 1 tablespoon of flaxseed meal with 2.5 tablespoons of water. Let it sit for five minutes before using. How do I know when the cookie bars are done baking? Check the edges for a golden brown color. The center should look set but may be soft. Insert a toothpick in the center. If it comes out clean or with a few crumbs, they are done. Let them cool before cutting for the best results. You now know how to make delicious chocolate chip cookie bars from scratch. We covered essential ingredients, step-by-step instructions, and expert tips. You learned about gluten-free and vegan options, plus how to store them well. Remember, measuring accurately and not overmixing are key for the best results. Enjoy your baking journey. Share these tips with friends so everyone can enjoy these tasty treats!](https://dishtreats.com/wp-content/uploads/2025/05/88326a6b-fa01-43d4-bb00-6171d5f3f1c3-768x768.webp)


![- 8 oz. spaghetti or pasta of your choice - 1 cup cherry tomatoes, halved - 1 cup zucchini, sliced into half-moons - 1 cup mixed bell peppers, sliced - 1 cup broccoli florets - 1 cup fresh spinach - 2 tablespoons extra virgin olive oil - 3 cloves garlic, finely minced - Zest and juice from 1 medium-sized lemon - 1 teaspoon dried oregano - Salt and freshly ground black pepper, to taste - Fresh basil leaves and grated Parmesan cheese (optional) When I craft my Pasta Primavera, I focus on fresh and vibrant veggies. The cherry tomatoes burst with flavor, giving a sweet touch. Zucchini adds a nice crunch, while bell peppers bring color. Broccoli florets add a delightful bite, and fresh spinach wilts perfectly into the mix. I love using extra virgin olive oil for its rich taste. Garlic gives it a fragrant kick. The zest and juice of the lemon brighten the dish and enhance all the flavors. Dried oregano is my go-to herb here, adding warmth and depth. A pinch of salt and pepper brings it all together. For a finishing touch, I often sprinkle fresh basil on top. You can also add grated Parmesan cheese for creaminess. This recipe is simple yet packed with flavor, perfect for any meal. To see the full recipe, check out the details above. - Fill a large pot with salted water. - Bring to a boil and cook pasta until al dente. - Reserve pasta water and drain. To cook the pasta, I fill a big pot with water and add a good amount of salt. This helps to flavor the pasta. Once the water boils, I add my spaghetti or whatever pasta I choose. I cook it until it is al dente, which means it is firm but cooked. Before draining, I set aside about one cup of the pasta water. This water is full of starch and will help make my sauce creamy later. - Heat olive oil in a skillet. - Sauté minced garlic for fragrance. - Add broccoli and mixed bell peppers, sauté for 3-4 minutes. Next, I heat some olive oil in a large skillet over medium heat. Once the oil is hot, I add minced garlic and sauté it for about 30 seconds. The smell is amazing! I have to be careful not to burn it. After that, I toss in the broccoli and mixed bell peppers. I sauté these for 3-4 minutes until they soften a bit but still have some crunch. - Incorporate zucchini and cherry tomatoes. - Add reserved pasta water and seasonings. - Let simmer to create sauce. Now, I add my zucchini and cherry tomatoes to the skillet. I stir everything for about three minutes. The tomatoes will start to release their juices, making the dish juicy. I then pour in the reserved pasta water, followed by the lemon juice and zest, and dried oregano. This creates a light sauce. I let it simmer for two minutes to blend the flavors. - Add drained pasta and fresh spinach. - Toss until well mixed. - Season to taste and plate with garnishes. Finally, I gently add the drained pasta to the skillet along with fresh spinach. I toss everything well so the pasta gets coated in the sauce. The heat wilts the spinach just right. I taste the dish and season it with salt and black pepper. To serve, I plate the pasta in deep bowls and garnish with fresh basil and a sprinkle of Parmesan cheese if I want. This dish looks and tastes great. You can find the full recipe for this delightful dish to enjoy! To achieve al dente pasta, you need to watch the clock. Start checking your pasta a minute before the package time. It should be firm but not hard. The texture is key! Reserving pasta water is a must. Always save about one cup before you drain it. This water is starchy and helps create a silky sauce later. It can make your dish creamy without adding heavy cream. To boost flavor, think about adding fresh herbs like parsley or thyme. You can also sprinkle in some red pepper flakes for heat. These add extra layers of taste and excitement. When sautéing vegetables, keep the heat high but don’t overcook them. Stir them quickly to keep their crunch. A short cooking time keeps veggies bright and fresh. For a beautiful presentation, use deep bowls for serving. This allows the colors to pop. A splash of lemon zest on top adds brightness, too. Garnishing can elevate your dish. Scatter fresh basil leaves over the top. A sprinkle of grated Parmesan cheese adds a nice touch. It makes your dish look like it came from a restaurant! For the full recipe, check out the detailed instructions above. Enjoy your cooking adventure! {{image_4}} You can change up the veggies in your Pasta Primavera with Lemon. Seasonal veggies work best. Try using asparagus, snap peas, or carrots. These will add color and flavor. If fresh veggies aren't available, frozen ones are a great option too. Just remember to thaw them and drain any excess water before cooking. This keeps your dish from getting soggy. Want to make your Pasta Primavera heartier? You can add protein! Chicken, shrimp, or tofu are great choices. If you use chicken, cook it in the skillet first, and then add the veggies. For shrimp, toss them in when the veggies are almost done. They only need a few minutes to cook. If you prefer tofu, press it to remove moisture, then cube and sauté until golden before adding it to the mix. Pasta Primavera is very flexible with pasta types. You can choose gluten-free pasta if you need it. Options like brown rice or quinoa pasta work well. Whole grain pasta is another healthy choice, adding fiber to your meal. If you want something unique, try legume-based pasta made from lentils or chickpeas. These add a nice twist and extra protein. For the full recipe, check out the [Full Recipe]. To keep your Pasta Primavera fresh, refrigerate it right after cooling. Place it in airtight containers. This helps lock in flavors and keeps it safe to eat. Always store leftovers within two hours of cooking. The pasta will taste great for up to three days in the fridge. When you reheat your pasta, use a stove or microwave. For the stove, add a splash of water or olive oil. Stir gently to heat evenly. If using a microwave, cover it to keep moisture in. Avoid overheating to prevent soggy pasta. Heat just until warm. To freeze Pasta Primavera, let it cool first. Transfer it to freezer-safe containers, leaving space for expansion. This dish can be frozen for up to three months. When ready to eat, thaw it overnight in the fridge. Reheat it on the stove or microwave, adding a bit of water to help it steam. Enjoy your flavorful veggie delight later! For the full recipe, check out the details above. Pasta Primavera lasts about 3 to 5 days in the fridge. To keep it fresh, store it in an airtight container. It’s best to let the pasta cool before sealing. This helps prevent moisture buildup, which can make it soggy. Yes, you can make Pasta Primavera ahead of time. To prepare, cook the pasta and veggies as usual. Let everything cool completely before storing. When you are ready to eat, just reheat it in a skillet over low heat. Add a splash of water or extra olive oil to keep it moist. If you need a lemon substitute, try lime juice or vinegar. Use the same amount, about 2 tablespoons. You can also use orange juice for a sweeter flavor. Adjust to your taste, as different fruits can change the dish's profile. Pasta Primavera is healthy and full of nutrients. It has lots of veggies like broccoli, spinach, and bell peppers. These provide vitamins and fiber. The olive oil adds healthy fats. Overall, this dish is low in calories and high in flavor, making it a great choice. Pasta Primavera is a simple and tasty dish. We discussed the essential ingredients, like pasta, fresh vegetables, and seasonings. I shared step-by-step instructions for cooking and combining ingredients. You can enhance flavors with herbs and spices while following tips for perfect presentation. Consider variations with protein and different pasta types for more options. Lastly, I covered storage and reheating to keep leftovers fresh. This dish is not only delicious but also healthy, making it a great meal for everyone. Enjoy experimenting with it!](https://dishtreats.com/wp-content/uploads/2025/05/1202f33f-9285-4746-af91-946a78d77e80-768x768.webp)