Skip to content
About
Contact
Cookie Policy
Copyright Policy
Disclaimer
Search
Home
Dinner
Appetizer
Desserts
Drinks
About
Contact
Privacy Policy
Toggle Menu
Home
/
NO-ING-IMG
- Page 74
NO-ING-IMG
Honey Mustard Chicken Thighs Flavorful and Simple Meal
Classic Beef Stroganoff Flavorful Comfort Food Dish
Savory Sweet Potato Hash Flavorful and Simple Dish
Maple Glazed Brussels Sprouts Flavorful Side Dish
Delicious Avocado and Tomato Toast Fresh Flavor Fix
Spicy Chickpea Tacos Flavorful and Quick Recipe
Garlic Butter Shrimp Scampi Flavorful and Easy Recipe
Lemon Garlic Roasted Corn Flavorful and Simple Dish
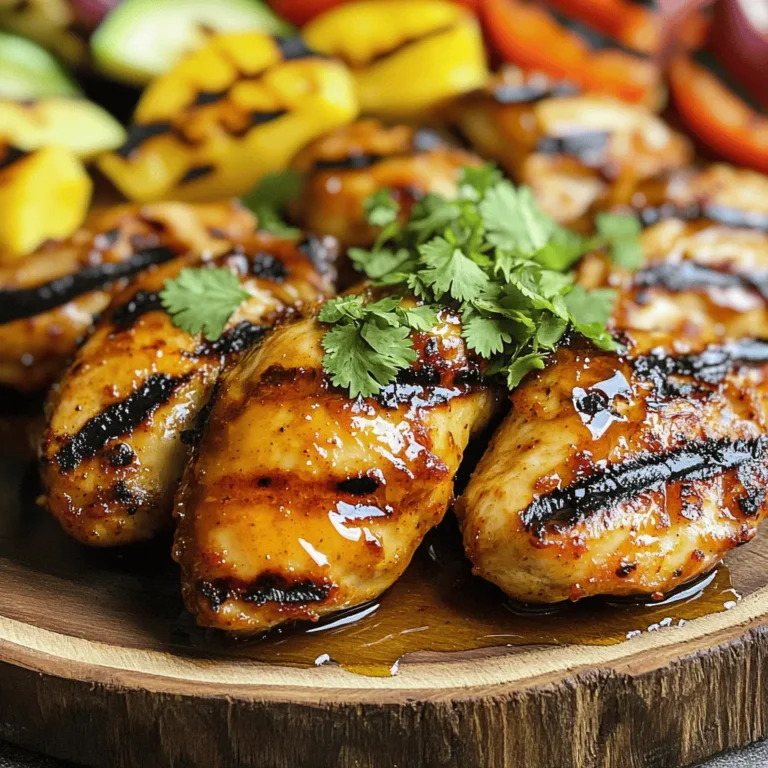
Sweet and Spicy Grilled Chicken Flavorful Recipe Guide
Crispy Brussels Sprouts with Bacon Tasty Side Dish
Page navigation
Previous Page
Previous
1
…
72
73
74
75
76
…
81
Next Page
Next
Home
Dinner
Appetizer
Desserts
Drinks
About
Contact
Privacy Policy
Toggle Menu Close
Search for:
Search

![To make Honey Mustard Chicken Thighs, you need simple, fresh ingredients. Here’s what you will need: - 4 bone-in chicken thighs, skin-on - 1/4 cup honey - 1/4 cup Dijon mustard - 2 tablespoons olive oil - 3 cloves garlic, minced - 1 teaspoon dried thyme - 1 teaspoon paprika - Salt and black pepper to taste - Fresh parsley for garnish These ingredients bring great flavor to your meal. The honey adds sweetness, while the Dijon mustard gives it a nice tang. Olive oil keeps the chicken juicy, and garlic boosts the taste. Dried thyme and paprika add depth, making every bite delicious. Don’t forget the parsley! It makes your dish look pretty and fresh. This recipe is quick and easy, perfect for any night. For the full instructions, check the Full Recipe. First, preheat your oven to 400°F (200°C). This heat will cook your chicken just right. In a small bowl, whisk together these ingredients: - 1/4 cup honey - 1/4 cup Dijon mustard - 2 tablespoons olive oil - 3 cloves garlic, minced - 1 teaspoon dried thyme - 1 teaspoon paprika - Salt and black pepper to taste Make sure to mix well. This creates a smooth and tasty marinade. Next, take your chicken thighs and place them in a large bowl or a resealable bag. Pour the marinade over the chicken. Ensure each piece is coated well. For the best flavor, let it marinate for at least 30 minutes. If you have more time, refrigerating it overnight works wonders. Now, heat a large oven-safe skillet over medium-high heat. Once hot, add the marinated chicken thighs, skin-side down. Sear them for about 5-7 minutes until the skin is golden brown. This step gives the chicken a nice crisp. After that, flip the thighs using tongs. Transfer the skillet to your preheated oven. Bake for 25-30 minutes. Check that the internal temperature reaches 165°F (75°C). If the juices run clear, the chicken is done. Once cooked, take the skillet from the oven and let the chicken rest for 5 minutes. This helps keep it juicy. Before serving, sprinkle some fresh parsley on top for a lovely finish. For the complete recipe, don't forget to check the [Full Recipe]. To get the best flavor, marinate the chicken thighs well. Use a large bowl or a resealable plastic bag for this. After mixing the marinade, pour it over the chicken. Make sure each piece is coated. For great results, let the chicken sit in the marinade for at least 30 minutes. You can also refrigerate it overnight. This extra time helps the flavors soak in deep. Cooking chicken thighs at the right temperature is key. Preheat your oven to 400°F (200°C). This hot oven cooks the chicken evenly and keeps it juicy. After searing the chicken for 5-7 minutes on the stovetop, transfer it to the oven. Bake for 25-30 minutes. Check the chicken's internal temperature. It should reach 165°F (75°C) for safe eating. Let it rest for 5 minutes before serving, which helps keep it moist. When serving, presentation matters. Place the chicken thighs on a white platter or a wooden board. Drizzle any leftover marinade over the top for added flavor. Garnish with fresh parsley for a pop of color. This simple touch makes the dish look more inviting. You can pair the chicken with roasted veggies or a fresh salad. These sides complement the sweet and tangy flavors of the honey mustard. For the full recipe, check out the details above. {{image_4}} You can change the sauce to fit your taste. Try using maple syrup instead of honey. This gives a unique sweetness. You can also mix in some soy sauce for a savory twist. If you like heat, add a dash of hot sauce or cayenne pepper. For a tangy flavor, consider apple cider vinegar. Each option adds a new layer to the dish. While chicken thighs are great, you can also use chicken breasts. They cook faster but stay moist if cooked right. Drumsticks are another option. They have lots of flavor and a nice crisp skin. You can even use a whole chicken, just adjust cooking time. Each cut brings its own charm to the recipe. For a full meal, add vegetables. Root veggies like carrots and potatoes roast well. Toss them in the marinade for extra flavor. You can also use green beans or broccoli. Place them in the skillet with the chicken. They will soak up the sauce and cook perfectly. This way, you have a tasty one-pan meal that's easy to serve. For the full recipe, check out the previous section. After cooking, let the chicken cool down. Place the chicken thighs in an airtight container. Store them in the fridge for up to three days. Make sure the temperature stays below 40°F (4°C). This keeps your chicken safe and tasty. If you want to store the chicken longer, freezing is a great option. Wrap each thigh tightly in plastic wrap. Then put them in a freezer-safe bag. You can freeze them for up to three months. Remember to label the bag with the date. When you are ready to enjoy leftovers, preheat your oven to 350°F (175°C). Place the chicken in a baking dish. Cover it with foil to keep it moist. Heat for about 20-25 minutes. You can also use a microwave, but it may dry the chicken out. For the best taste, the oven is the way to go. Enjoy your meal again! You should marinate honey mustard chicken thighs for at least 30 minutes. This allows the flavors to soak into the meat. If you have time, marinating overnight works even better. It deepens the taste and makes the chicken more tender. Yes, you can use boneless chicken thighs. They cook faster than bone-in thighs. Adjust the cooking time to about 20-25 minutes in the oven. Always check that the internal temperature reaches 165°F (75°C) for safety. Honey mustard chicken thighs pair well with many sides. Here are some ideas: - Steamed vegetables: Broccoli or green beans add color. - Rice or quinoa: Both soak up the sauce nicely. - Salad: A fresh green salad balances the meal. - Mashed potatoes: Creamy potatoes are a great comfort food option. You can find the full recipe to help you create this delicious meal. In this post, I shared ingredients and steps for making honey mustard chicken thighs. I provided tips for marinating and cooking this dish to enhance its flavor. You learned about variations and how to store leftovers properly. Remember, simple changes can make a big impact on taste. I encourage you to try these ideas for yourself. Enjoy cooking and delight in every bite!](https://dishtreats.com/wp-content/uploads/2025/06/0b4fb8df-5400-4b6b-9acb-490ad2d6fca7-768x768.webp)
![- 1 lb beef sirloin, thinly sliced against the grain - 1 medium onion, finely chopped - 2 cloves garlic, minced - 8 oz mushrooms, sliced (cremini or button) - 1 cup beef broth (preferably low-sodium) - 1 cup sour cream (or Greek yogurt for a lighter option) - 2 tablespoons all-purpose flour - 2 tablespoons olive oil - 1 teaspoon Dijon mustard - Salt and freshly ground black pepper to taste - 12 oz egg noodles (or your favorite pasta) The beef sirloin is the star of the dish. It should be tender and flavorful. Use fresh onions and garlic to build a tasty base. The mushrooms add a nice earthiness. A good beef broth gives depth to the sauce. The sour cream adds creaminess and tang. If you want a lighter dish, Greek yogurt works well too. - Greek yogurt instead of sour cream - Alternative pasta types If you do not have sour cream, Greek yogurt is a great swap. It gives a similar creamy texture while being a bit healthier. You can also try different pasta types, like fettuccine or penne, based on your preference. - 1 teaspoon Dijon mustard - Salt and freshly ground black pepper - Fresh parsley, finely chopped for garnish Dijon mustard adds a subtle kick and depth of flavor. Salt and pepper are key for bringing out the taste in all the ingredients. A sprinkle of fresh parsley on top makes the dish look bright and fresh. It is a simple way to enhance the visual appeal. - Start by boiling salted water in a large pot. - Once boiling, add 12 oz of egg noodles. - Cook them until al dente, following package instructions. - When ready, drain the noodles and set them aside. - Toss the noodles with a drop of olive oil to keep them from sticking. - Heat 2 tablespoons of olive oil in a large skillet over medium-high heat. - Add 1 lb of thinly sliced beef sirloin to the hot pan. - Season the beef with salt and freshly ground black pepper. - Cook for about 3 to 4 minutes until the beef is browned. - Use a slotted spoon to remove the beef and place it on a plate. - In the same skillet, add the remaining olive oil. - Once hot, stir in 1 medium chopped onion and 2 minced garlic cloves. - Sauté for 2 to 3 minutes until the onion is soft and clear. - Next, add 8 oz of sliced mushrooms, cooking for another 4 to 5 minutes. - When the mushrooms are golden, sprinkle 2 tablespoons of flour over the mix. - Slowly pour in 1 cup of beef broth, whisking constantly. - Keep stirring until the mixture thickens, about 3 to 4 minutes. - Lower the heat to medium-low, then stir in 1 cup of sour cream. - Add 1 teaspoon of Dijon mustard for extra flavor. - Return the beef to the skillet, mixing well in the sauce. - Warm it through for 2 to 3 minutes without boiling. - Taste and adjust the seasoning as needed. - For plating, place a generous portion of noodles on each plate. - Ladle the creamy beef stroganoff over the noodles. - Finish by garnishing with finely chopped fresh parsley. - This adds a pop of color and freshness to your dish. For the full recipe, check out the [Full Recipe]. Enjoy this comforting meal! To make a smooth sauce, avoid lumps. When you add flour, stir it well before adding beef broth. This will help mix everything perfectly. Keep the heat low. You want to see gentle bubbles, not a rolling boil. A simmer will thicken your sauce without breaking it down. Slice your beef against the grain. This makes it tender and easy to chew. If you cut with the grain, the beef will be tough. Pay attention to the mushrooms too. Cook them until they are golden brown. This brings out their flavor and gives a nice texture. About 4-5 minutes should do the trick. Serve your beef stroganoff in shallow bowls. This allows the sauce to spread out and look rich. Add a sprinkle of fresh parsley on top for color. A bit of greenery makes the dish pop. It also adds a fresh taste to each bite. {{image_4}} You can make a tasty vegetarian beef stroganoff. Simply swap the beef for mushrooms or tofu. Mushrooms give a great, meaty flavor. Tofu adds protein and absorbs the sauce well. For a creamy mushroom stroganoff, follow these steps: - Use 16 oz of sliced mushrooms instead of beef. - Cook the mushrooms until they are soft and browned. - Add 1 cup of vegetable broth instead of beef broth. - Stir in the same sour cream for creaminess. If you want a lighter option, try using chicken or turkey. Both cook quickly and taste great in stroganoff. Use diced chicken breast or turkey breast instead of beef. Adjust the cooking time to about 5-7 minutes. Ensure the chicken or turkey is cooked through before adding the sauce. To elevate the flavor, consider adding Worcestershire sauce or a splash of red wine. These ingredients add depth and richness. You can also include fresh herbs like thyme or rosemary. They bring a nice aroma and complement the creamy sauce. A teaspoon of Worcestershire sauce or a ¼ cup of red wine can make a big difference. After enjoying your beef stroganoff, you may have some leftovers. Store them in an airtight container. Refrigerate the stroganoff within two hours of cooking. It will stay fresh for about three to four days. When you reheat, warm it gently over low heat. This keeps the sauce creamy. Stir often to avoid burning. You can also use a microwave. Heat it in short bursts, stirring in between. This method helps the dish heat evenly. If you want to keep beef stroganoff longer, freezing is a great option. To freeze, let the dish cool completely. Then, transfer it to a freezer-safe container. Leave some space at the top for expansion. Seal it tightly to prevent freezer burn. For thawing, the best method is overnight in the fridge. This keeps the flavor and texture nice. If you need it fast, you can use the microwave. Set it to defrost and check every few minutes. After thawing, reheat as I mentioned before, ensuring it warms evenly. You can find the full recipe for this comforting dish above. Enjoy every bite! You can enjoy Classic Beef Stroganoff with several tasty sides. Here are some great options: - Steamed green beans - Roasted broccoli - Mashed potatoes - A fresh garden salad - Garlic bread Each side adds a nice touch. Steamed veggies give color and crunch. Mashed potatoes soak up the sauce well. A salad offers a refreshing contrast. Classic Beef Stroganoff lasts about 3 to 4 days in the fridge. Store it in an airtight container. Always cool the dish before sealing it up. Check for any signs of spoilage before eating. If it smells off or looks strange, throw it away. Yes, you can prepare parts of Classic Beef Stroganoff ahead of time. Cook the beef and sauce, then store them separately from the noodles. When you’re ready to eat, heat the beef and sauce. Cook the noodles fresh for best results. This way, you keep everything tasty and warm. Classic Beef Stroganoff is not gluten-free due to the flour in the sauce. You can make it gluten-free by using cornstarch or gluten-free flour. Be sure to check that your beef broth and noodles are also gluten-free. This way, everyone can enjoy this delicious meal. For the full recipe, check my earlier section. You learned about the key ingredients for Classic Beef Stroganoff, including beef sirloin and egg noodles. We discussed how to cook the noodles, sauté the beef, and prepare a rich sauce. You also saw tips for perfecting the dish and its various options for customization, like vegetarian alternatives. In summary, you can make a delicious meal everyone will enjoy. Remember, cooking is about creativity. Feel free to experiment with flavors and ingredients until it’s just right for you. Enjoy your cooking journey!](https://dishtreats.com/wp-content/uploads/2025/06/f14c56cb-cc13-4cc3-a3ff-e0f76ee8bdb9-768x768.webp)


![- 2 ripe avocados - 1 cup cherry tomatoes, halved - 1 teaspoon balsamic vinegar - 1 tablespoon extra virgin olive oil - 1 small garlic clove, finely minced - 1 tablespoon fresh basil leaves, chopped - Salt and freshly cracked pepper to taste - Optional: A pinch of red pepper flakes - 4 slices of your favorite whole grain or sourdough bread For this avocado and tomato toast, I love using fresh and ripe ingredients. Ripe avocados give a creamy texture that blends well with the juicy tomatoes. The balsamic vinegar adds a sweet and tangy kick. You can also use high-quality extra virgin olive oil for richness. Minced garlic adds a nice bite, while fresh basil brightens the flavors. Salt and cracked pepper help bring out the taste of each ingredient. If you want a little heat, sprinkle on red pepper flakes. When it comes to bread, I recommend whole grain or sourdough. These options add a hearty crunch and a lovely flavor. Toasting the bread perfectly is key to a satisfying bite. For the full recipe, you can check out Avocado Bliss & Tomato Magic Toast. This recipe is not just easy to make; it’s also packed with nutrition and flavor. Enjoy your fresh flavor fix! First, grab your ripe avocados. Cut them in half and scoop out the flesh. Place the avocado in a bowl. Mash it with a fork until it’s creamy but still a bit chunky. Now, add the minced garlic and olive oil. Season with salt and pepper. Mix well until everything blends together nicely. Next, take your halved cherry tomatoes. In a separate bowl, mix them with balsamic vinegar and chopped basil. Add a little salt and pepper for taste. Gently toss to coat the tomatoes. Let them sit for about 10 minutes. This step lets the flavors combine and taste great. While the tomatoes marinate, it’s time to toast your bread. Preheat your toaster or skillet to medium heat. Place the bread slices in the toaster or skillet. Toast them until they're golden brown and crispy. This should take around 3 to 5 minutes, depending on your method. Now comes the fun part—putting it all together! Take the toasted bread and spread the creamy avocado mix on each slice. Be generous! Then, pile those marinated cherry tomatoes on top. Let the juices drizzle over the avocado. This makes the toast extra tasty! To finish, add some fresh basil leaves on top. Drizzle a little olive oil for richness. If you like heat, sprinkle on some red pepper flakes. Serve your delicious avocado and tomato toast right away for the best flavor. Enjoy this fresh flavor fix! For the full recipe, check [Full Recipe]. How to select ripe avocados: To find a ripe avocado, gently squeeze it in your palm. It should feel slightly soft but not mushy. Look for dark green to black skin. Avoid any ones with large dark spots. Best varieties for toast: I love using Hass avocados. They are creamy and rich. If you can find Bacon avocados, they are also a good choice. They have a lighter flavor and a smooth texture. Skillet vs. toaster for optimal crunch: I prefer using a skillet for toasting bread. It gives a nice, even crunch. Heat the skillet over medium heat. You can also use a toaster if you want a quick option. Tips for even browning: Make sure to flip the bread halfway through toasting. This helps achieve an even golden color. If using a skillet, keep an eye on the bread to avoid burning. Suggestions for extra toppings: Try adding sliced radishes or a sprinkle of feta cheese. They add great texture and flavor. You can also include a poached egg on top for more protein. Alternate seasonings for added zest: Add a squeeze of fresh lemon or lime juice for brightness. A pinch of smoked paprika can also enhance the flavor. Don't forget a dash of salt and pepper to bring it all together. For the full recipe and more detailed steps, check the Full Recipe. {{image_4}} To make your avocado and tomato toast more plant-based, skip any cheese and enjoy the creamy avocado. If you crave richness, consider nut butters like almond or cashew. They add great flavor and texture. You can even blend a bit of nutritional yeast into your avocado spread for a cheesy taste without dairy. You can mix in other veggies, like radishes or cucumbers, for a fresh crunch. Thinly sliced radishes add a peppery kick. Cucumbers give a cool, crisp texture. For extra flavor, try adding herbs like cilantro or dill. Spices like smoked paprika or cumin can elevate your toast, making it a fun twist on the classic dish. For gluten-free options, choose bread made from almond flour or coconut flour. Sourdough is often gluten-free, so read labels carefully. You can also make your own gluten-free bread at home. Adapting the recipe is easy; just ensure your bread is crisp and your toppings are fresh. This makes it suitable for all diets while still being delicious. For the full recipe, check out the Avocado Bliss & Tomato Magic Toast. To keep avocados fresh, store them in the fridge. Wrap them tightly in plastic wrap. This helps slow down browning. For tomatoes, keep them at room temperature. Sunlight can cause them to spoil fast. If you cut a tomato, cover the cut side with plastic wrap and eat it within a day. For bread, put it in a sealed bag. This helps keep it fresh. If you have extra slices, freeze them. Just toast them straight from the freezer later. You can prep the avocado spread and marinated tomatoes ahead of time. Store the avocado mix in an airtight container. Add a bit of lemon juice to help it stay green. Keep the tomatoes in a separate container. This way, they stay fresh and tasty. When you are ready to eat, toast the bread. Assemble the toast right before serving. Avoid storing it fully assembled. The bread can get soggy if left too long. In the fridge, ripe avocados last about 2-3 days. Cut avocados should be eaten within a day. Cherry tomatoes can last about a week. Keep an eye on them for any signs of spoilage. Look for soft spots or wrinkled skin on tomatoes. For avocados, if they feel mushy, they may be bad. Always check for a smell—bad avocados often have a sour odor. Enjoy your avocado and tomato toast, knowing how to store and prep it right! For the full recipe, check out the details above. Yes, you can make components ahead of time. I suggest storing the avocado spread and marinated tomatoes separately. Keep them in airtight containers in the fridge. Toast the bread just before serving. This keeps everything fresh and tasty. If you want a different taste, try red wine vinegar or apple cider vinegar. Both add a nice tang. Red wine vinegar is a bit stronger, while apple cider vinegar has a milder flavor. Experiment to find your favorite! To keep your avocado fresh, use lemon juice or lime juice. The acid helps slow down browning. Also, store any leftover avocado in an airtight container. Press plastic wrap directly onto the surface to limit air exposure. Absolutely! Adding a poached egg on top is a great choice. You can also use chickpeas or black beans for a plant-based option. They add protein and make the toast more filling. Pair your toast with a fresh salad or a side of fruit. A light soup, like tomato basil, complements it well. For drinks, enjoy a refreshing iced tea or a smooth smoothie. This blog post covered how to make a delicious avocado and tomato toast. You learned about the key ingredients and step-by-step instructions. We explored tips for perfecting your toast and variations to suit your tastes. Remember, the right ingredients and methods make all the difference. Enjoy mixing flavors and creating tasty meals. Your options are endless, whether you want to stay classic or try something new. Happy cooking!](https://dishtreats.com/wp-content/uploads/2025/06/20a8b7cc-cc3e-420d-bfd4-ab317546e8bf-768x768.webp)
![To make spicy chickpea tacos, you need some key items. Here is what you will need: - 1 can (15 oz) chickpeas, thoroughly drained and rinsed - 2 tablespoons extra virgin olive oil - 1 teaspoon ground chili powder - 1 teaspoon ground cumin - 1/2 teaspoon smoked paprika - 1/4 teaspoon cayenne pepper - Sea salt and freshly cracked black pepper to taste - 8 small corn or flour tortillas - 1 ripe avocado, sliced into thin pieces - 1 cup finely shredded purple cabbage - Fresh cilantro leaves for garnish - Lime wedges for serving These ingredients create a tasty and spicy base for your tacos. The spices bring warmth and depth, while the chickpeas offer a great source of protein and fiber. You can add some unique touches to your tacos. Here are some ideas: - Diced tomatoes for freshness - Sliced jalapeños for extra heat - A dollop of sour cream or yogurt for creaminess - Shredded cheese for richness - Corn or black beans for more texture Feel free to mix and match these extras. They can elevate your tacos to a whole new level. Chickpeas are not just tasty; they are also very healthy. Here are some benefits: - High in protein, which helps build muscle - Rich in fiber, aiding in digestion - Contain vitamins and minerals like iron and magnesium - Low in fat, making them a great choice for heart health Including chickpeas in your diet can support your overall health. They are a smart ingredient in any meal. For the full recipe, check the [Full Recipe]. Start by opening a can of chickpeas. Drain and rinse them well. In a bowl, use a fork or potato masher to gently mash the chickpeas. Leave some chunks for texture. You want them slightly broken but not a paste. This will help them stay firm while cooking. Heat 2 tablespoons of extra virgin olive oil in a skillet over medium heat. Once the oil shimmers, add the mashed chickpeas. Sprinkle in the spices: 1 teaspoon of chili powder, 1 teaspoon of cumin, 1/2 teaspoon of smoked paprika, and 1/4 teaspoon of cayenne pepper. Add sea salt and black pepper to taste. Stir well to coat all the chickpeas. Cook for about 5 to 7 minutes. This will make the spices fragrant and the chickpeas slightly crispy. While the chickpeas cook, warm the tortillas in another skillet for about 30 seconds on each side. You can also heat them in the oven. Once the chickpeas are ready, spoon a generous amount onto each tortilla. Top with sliced avocado, shredded purple cabbage, and fresh cilantro. Serve with lime wedges on the side. This adds a zesty touch just before eating. For the full recipe, check out the complete guide! To make your spicy chickpea tacos pop, use a mix of spices. I love pairing chili powder with cumin for a warm base. Adding smoked paprika brings a nice depth. If you want more heat, cayenne pepper is the way to go. You can also try adding garlic powder or onion powder for extra flavor. Experiment until you find your favorite blend. Warming your tortillas is key to a great taco. You can heat them in a skillet, about 30 seconds on each side. This keeps them soft and pliable. Alternatively, stack them, wrap in foil, and warm in the oven. If you prefer a crispy texture, try frying them lightly in oil. Just be careful not to overcook them! Serving matters! Place your tacos on a large platter. Add lime wedges and fresh cilantro for color. You can even include cherry tomatoes or sliced radishes for a vibrant touch. This not only looks great but also invites your guests to dig in. For a fun twist, serve with a side of salsa or guacamole to enhance the flavor. Enjoy the Full Recipe for more tips! {{image_4}} You can turn your spicy chickpea tacos into a taco bowl. Start with a base of rice or quinoa. Then, add your chickpea mixture on top. Pile on shredded cabbage, avocado, and cilantro. This bowl offers a fun twist on the classic taco. You could also add salsa or hot sauce for extra flavor. Feel free to mix in different proteins or veggies. You can add cooked chicken, beef, or shrimp if you want. For a veggie boost, try bell peppers, corn, or zucchini. These options add variety and nutrition to your meal. You can also swap chickpeas for black beans or lentils for a new taste. Making this dish gluten-free is easy. Just use corn tortillas instead of flour ones. They are tasty and safe for those with gluten issues. This recipe is already vegan, so you can enjoy it as is. To enhance flavors, add avocado or a vegan sour cream. These small changes can make a big difference in taste and texture. For the full recipe, check out the earlier sections. To store leftover chickpeas, place them in a clean, airtight container. Make sure the lid seals tightly. You can keep them in the fridge for up to three days. If you want to store them for longer, freeze the chickpeas. They will last for about three months in the freezer. Just remember to label your container with the date. This helps you keep track of freshness. Reheating your tacos is easy! You can microwave them for about 30 seconds. Make sure to cover them with a damp paper towel. This keeps the tortillas soft. If you prefer a crispier taco, reheat them in a skillet. Heat the skillet on medium and warm each taco for about one minute on each side. This way, you keep that delicious crunch! For storing your ingredients, glass containers are best. They are safe, durable, and help keep food fresh. You can also use plastic containers, but make sure they are BPA-free. Small jars work well for spices and herbs. Label each container so you can find what you need quickly. Keep everything in a cool, dry place for the best results. For a full recipe, check the Spicy Chickpea Tacos section. You can make chickpea tacos spicier by adding more cayenne pepper. Start with 1/2 teaspoon and adjust to your heat level. You can also use hot sauce for an extra kick. Another idea is to add chopped jalapeños or serrano peppers. These fresh peppers bring heat and flavor. If you love smoky flavors, try adding chipotle powder. This will give your tacos a nice depth. Yes, you can prepare chickpea tacos in advance. I suggest cooking the chickpeas and storing them in an airtight container. Keep the tortillas and toppings separate until ready to serve. This way, everything stays fresh. You can store the chickpea mixture in the fridge for up to three days. Just reheat it before serving. Fresh toppings like avocado and cilantro should be added last. Spicy chickpea tacos pair well with many sides. You could serve them with rice or quinoa for a filling meal. A fresh salad adds brightness and crunch. Try a simple cabbage slaw or a corn salad. You might also enjoy salsa or guacamole on the side. For drinks, consider a refreshing limeade or a cold beer. This will balance the spice and add flavor. For the full recipe, check out the detailed instructions above. In this post, we covered how to make spicy chickpea tacos. We explored essential ingredients and their health benefits. You learned step-by-step instructions for preparing and cooking chickpeas, assembling tacos, and customizing them. We shared tips for seasoning, tortilla methods, and serving ideas. Variations included taco bowls and gluten-free options. Finally, we discussed how to store leftovers effectively. These tacos are fun, tasty, and good for you. Ready to enjoy your homemade spicy chickpea tacos?](https://dishtreats.com/wp-content/uploads/2025/06/78aca89b-dca0-4457-a4a9-555278ab1264-768x768.webp)


![- 1 pound Brussels sprouts - 3 tablespoons olive oil - 2 tablespoons maple syrup - 2 tablespoons balsamic vinegar - 1 teaspoon garlic powder - 1 teaspoon smoked paprika - Salt and pepper to taste - 1/4 cup chopped walnuts (optional) - 2 tablespoons grated Parmesan cheese (optional) To create crispy Brussels sprouts, start with fresh Brussels sprouts. Look for firm, small ones for the best taste. Trim the ends and cut each sprout in half. This helps them cook evenly and get crispy. Next, use olive oil to coat the sprouts. It adds flavor and helps them crisp up in the oven. Maple syrup and balsamic vinegar give the sprouts a sweet and tangy glaze. These flavors work great together! For seasonings, garlic powder and smoked paprika add depth. Adjust salt and pepper to match your taste. If you want to add crunch, use walnuts. Grated Parmesan cheese also makes a delicious topping. You can find the full recipe in the article. Enjoy the process, and get ready for a tasty side dish! - Preheat oven to 425°F (220°C). - Trim and halve the Brussels sprouts. Start by preheating your oven. This step is vital for a perfect roast. Next, take your Brussels sprouts and trim off the tough ends. Then, cut each sprout in half. This helps them cook evenly and get crispy. - Mixing oil and seasonings. - Tossing the Brussels sprouts to coat evenly. In a large bowl, pour in three tablespoons of olive oil. Add garlic powder, smoked paprika, salt, and pepper. Mix well. Now, toss in the halved Brussels sprouts. Use your hands to coat them evenly. Each sprout should be shiny and full of flavor. - Spread out on a baking sheet. - Roasting time and tips for even crispiness. Spread the Brussels sprouts in a single layer on a baking sheet. Make sure there’s space between them; this helps with crispiness. Roast them for 20-25 minutes. Halfway through, stir them around. This helps them brown evenly for that perfect crunch. - Whisking together maple syrup and balsamic vinegar. While the sprouts roast, it’s time to make the glaze. In a small bowl, mix two tablespoons of maple syrup with two tablespoons of balsamic vinegar. Whisk until combined. This glaze adds a sweet and tangy kick to the sprouts. - Drizzling glaze and optional toppings. - Return to oven for additional roasting. Once the Brussels sprouts are done roasting, take them out of the oven. Drizzle the maple balsamic glaze over them. Toss gently to coat each sprout. For extra flavor, sprinkle chopped walnuts and grated Parmesan cheese on top. Return the baking sheet to the oven for another 5 minutes to caramelize the glaze. Serve these crispy Brussels sprouts warm for the best taste. Full Recipe can be found in the earlier section for a complete guide. To get the best crispiness, space matters. Place your Brussels sprouts in a single layer on the baking sheet. This helps them roast evenly. If they touch, they will steam instead of crisp. Stirring is key, too. Halfway through cooking, give them a good stir. This ensures all sides get that golden brown color. You can boost flavor with simple spices. Try adding cayenne for heat or lemon zest for brightness. Fresh herbs like thyme or rosemary also work great. For toppings, consider adding crunchy nuts or cheese. Chopped walnuts or grated Parmesan cheese add fun textures and flavors. Avoid overcrowding your pan. If you pack the sprouts too tight, they won’t crisp up. They need room to breathe. Also, always preheat your oven. A hot oven starts the cooking process right. If the oven isn’t hot enough, you’ll lose that nice crunch. For the full recipe, check out the complete guide on making crispy Brussels sprouts with bacon! {{image_4}} You can make crispy Brussels sprouts without bacon. For a tasty vegetarian version, skip the bacon and add a mix of nuts. Try using walnuts or pecans for crunch. You can also sprinkle on some nutritional yeast to give it a cheesy flavor. Adding roasted chickpeas can boost protein and flavor, making it hearty. To change the taste, try new herbs or spices. Rosemary or thyme can add a lovely earthiness. You could also use chili flakes for some heat. For a fresh twist, add lemon or orange zest. The citrus brightens up the dish and makes it pop. You can squeeze fresh lemon juice over the sprouts after roasting for extra zing. Crispy Brussels sprouts pair well with meats like chicken, pork, or fish. Serve them as a side to grilled chicken for a balanced meal. If you want plant-based protein, try adding lentils or quinoa. This makes the dish more filling and nutritious. You can also toss in some cooked bacon if you like the flavor and want to keep the original dish vibe. For the full recipe, check out the details on how to make this delicious side dish! To keep your crispy Brussels sprouts fresh, you need to cool them well. Allow them to sit at room temperature for about 30 minutes. This prevents moisture buildup. After they cool, use airtight containers. Glass or plastic containers work great. Make sure they are sealed tightly to keep out air. Store them in the fridge for up to three days. When it’s time to enjoy your leftovers, reheating is key. Use an oven or an air fryer. Preheat the oven to 350°F (175°C). Spread the sprouts on a baking sheet. Heat them for about 10 to 15 minutes. This helps regain their crispiness. If using an air fryer, set it to 375°F (190°C) for about 5 to 7 minutes. To keep the sprouts crunchy, avoid using the microwave. The microwave makes them soggy, which is not ideal. Enjoy your tasty side dish again with these simple steps. For the full recipe, check out the detailed instructions above! To make crispy Brussels sprouts, follow these steps: 1. Preheat your oven to 425°F (220°C). 2. Trim and halve 1 pound of Brussels sprouts. 3. Mix 3 tablespoons of olive oil, 1 teaspoon of garlic powder, and 1 teaspoon of smoked paprika in a bowl. 4. Toss the halved sprouts in the oil mixture until they are well coated. 5. Spread the sprouts on a baking sheet in a single layer. 6. Roast them for 20-25 minutes, stirring halfway through. 7. Drizzle with a maple balsamic glaze and toss. 8. Return to the oven for 5 more minutes for extra flavor. This method gives you a delicious side dish with a crisp texture. You can use frozen Brussels sprouts, but they might not get as crispy. Frozen sprouts often have more moisture. This can lead to steaming instead of roasting. If you use them, thaw first and pat dry to help with crispiness. Fresh is always best for a crunchy bite. Crispy Brussels sprouts pair well with many dishes. Try serving them with: - Grilled chicken - Roasted pork - Quinoa salad - Baked salmon These options balance flavors and make for a hearty meal. Crispy Brussels sprouts last in the fridge for about 3-4 days. Store them in an airtight container. This helps keep them fresh and safe to eat. However, they may lose some crispiness over time. Yes, you can prep Brussels sprouts ahead of time. Trim and halve them and store in the fridge for up to 2 days. For cooking, roast them fresh for the best texture. If you need to reheat, use the oven to keep them crispy. For the complete recipe for crispy Brussels sprouts with bacon, check out the [Full Recipe]. In this blog post, we explored how to make crispy Brussels sprouts. You learned about the key ingredients, from Brussels sprouts to maple syrup. We covered easy step-by-step instructions, tips for crispiness, and ways to customize flavors. Remember, good cooking involves attention to detail and a dash of creativity. With the right techniques, you can enjoy this tasty dish at home. Now, go ahead and try making it for yourself!](https://dishtreats.com/wp-content/uploads/2025/06/4d1da713-6118-4ecf-9fc1-c93df0ff8318-768x768.webp)