Spicy Zucchini Relish Flavorful and Easy Recipe Guide

Are you ready to spice up your meals? This easy Spicy Zucchini Relish recipe will tickle your taste buds and add a zesty kick to your dishes. With fresh ingredients and simple steps, I’ll guide you through making this flavorful relish. Whether you’re a cooking novice or a kitchen pro, you’ll find tips and tricks to elevate your relish game. Let’s dive into this delicious journey together!
Ingredients
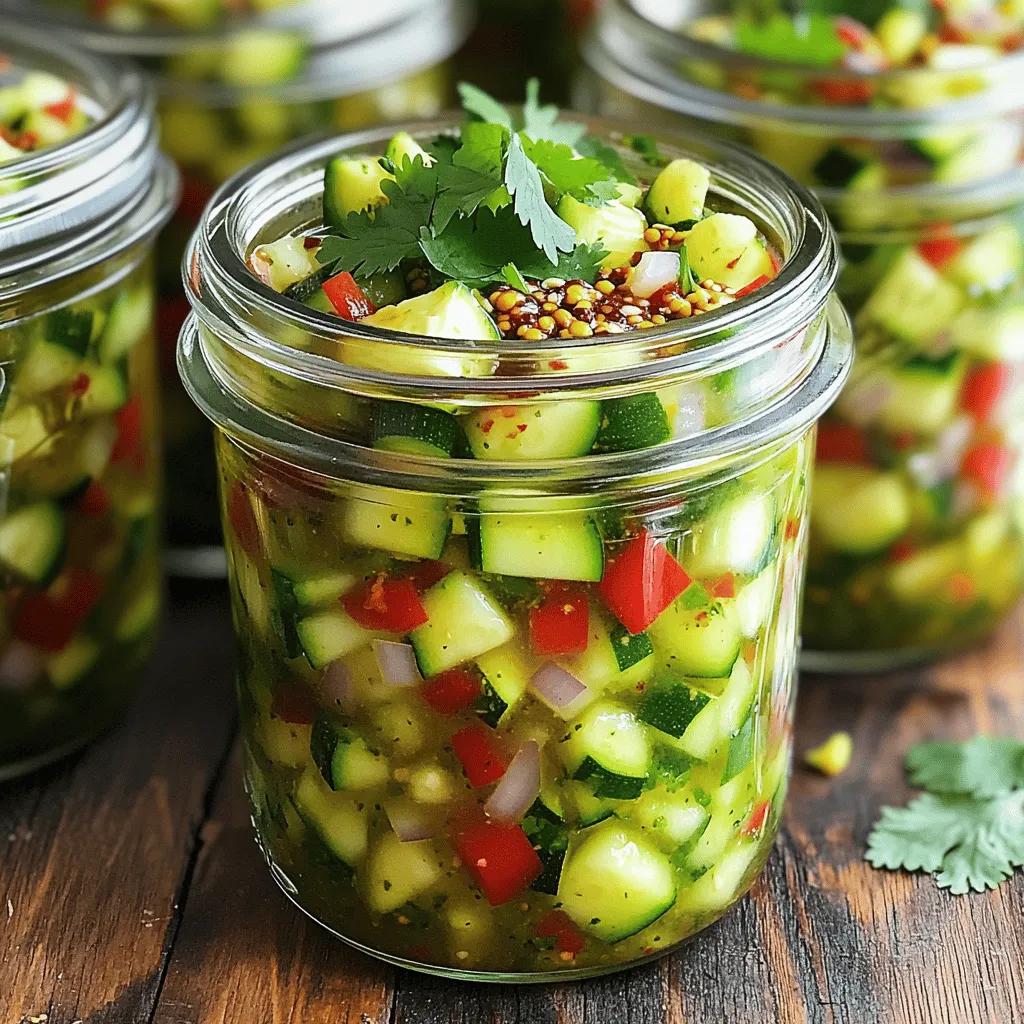
Complete Ingredient List for Spicy Zucchini Relish
To make spicy zucchini relish, you need:
- 4 medium zucchinis, thoroughly washed and finely chopped
- 1 large onion, finely minced
- 1 red bell pepper, finely diced
- 2 cloves garlic, finely minced
- 1 tablespoon fresh ginger, grated
- 1 cup apple cider vinegar
- ¾ cup granulated sugar
- 1 tablespoon mustard seeds
- 1 tablespoon chili flakes (adjust based on your preferred spice level)
- 1 teaspoon turmeric powder
- 1 teaspoon salt
- ¼ cup fresh cilantro, finely chopped
Importance of Fresh Ingredients
Fresh ingredients make a big difference in how your relish tastes. They bring out the flavors and make every bite enjoyable. Using fresh zucchinis, peppers, and herbs means you get a crunch and vibrancy in every spoonful. When you choose fresh, you also ensure your relish stays bright and zesty, perfect for summer meals or cozy winter gatherings.
Tips for Selecting the Best Zucchini
Choosing the right zucchini can elevate your dish. Here are some tips:
- Look for firmness: The best zucchinis feel firm and are free of soft spots.
- Check the skin: A shiny, smooth skin indicates freshness. Dull skin may mean it’s past its prime.
- Size matters: Smaller zucchinis tend to be sweeter and more tender. Aim for ones that are about 6-8 inches long for the best taste.
- Color is key: Look for a rich green color. Avoid any that have yellowing, as this can signal overripeness.
Using these tips will help you find the best zucchinis for your spicy zucchini relish, ensuring a dish full of flavor and freshness.
Step-by-Step Instructions
Preparation of the Vegetables
Start by washing the zucchinis under cold water. This step removes dirt and debris. Cut off both ends of the zucchinis. Next, finely chop them into small, even pieces. This helps them cook evenly.
In a large mixing bowl, combine the chopped zucchinis with the minced onion, diced red bell pepper, minced garlic, and grated ginger. Mix well until everything is evenly distributed. This blend of vegetables adds depth to your relish.
Cooking Process for Spicy Zucchini Relish
In a large pot, heat the apple cider vinegar over medium heat. Add sugar, mustard seeds, chili flakes, turmeric powder, and salt. Stir well until the sugar dissolves and the mixture starts to simmer.
Carefully add the vegetable mix into the pot. Stir to combine and bring it to a gentle boil. Once boiling, reduce the heat to low and let it simmer for 30 to 40 minutes. Stir occasionally to keep anything from sticking to the bottom.
Checkpoints for Consistency and Flavor
Watch the relish as it cooks. You want it to thicken to your liking. Once it thickens, remove the pot from heat. Fold in the chopped cilantro for extra flavor and freshness. Let the relish cool in the pot for a bit.
When it’s slightly cool, use a funnel to transfer it into sterilized jars. Seal the jars tightly. Allow them to cool completely at room temperature before placing them in the fridge. This recipe yields about 4 cups of spicy zucchini relish. You can enjoy it with crackers, grilled meats, or sandwiches. For the complete recipe, refer to the earlier section.
Tips & Tricks
Common Mistakes to Avoid
When making spicy zucchini relish, avoid chopping your veggies too large. Small pieces cook evenly and blend well. Don’t skip the salt; it helps to draw out moisture. If your relish is too watery, it won’t have the right texture. Stir often while it simmers; this keeps it from sticking to the pot. Finally, remember to let it cool before sealing the jars. This helps preserve the flavor and prevents spoilage.
Enhancing Flavor with Additional Ingredients
Want to amp up the flavor? Consider adding diced jalapeños for more heat or fresh herbs like dill for a unique twist. You can also try a splash of lemon juice for brightness. If you love a bit of sweetness, throw in some diced mango or peaches. Each of these additions can change the flavor profile, making your relish special every time.
Presentation and Serving Suggestions
To impress your guests, serve the relish in a colorful bowl. Pair it with crisp crackers or toasted bread for a tasty appetizer. You can also use it as a zesty condiment with grilled meats or sandwiches. For a fun twist, try it in tacos or as a topping for burgers. With its bright colors and bold flavors, spicy zucchini relish will always stand out on your table.

Variations
Alternative Ingredients for Unique Flavors
You can switch up the flavors in spicy zucchini relish easily. Try using yellow squash instead of zucchini for a different texture. Red onions add a sweeter taste than regular onions. You can also mix in diced jalapeños for an extra kick. If you enjoy sweetness, add some diced peaches or mango. These fruits will balance the heat well. For a smoky flavor, try adding smoked paprika. This small change can make a big impact on taste.
Adjusting Spice Levels to Taste
Want to change the heat? Start with less chili flakes if you prefer milder relish. You can always add more spice later. For those who love heat, consider using fresh chopped chili peppers. Thai chilies or serranos can bring intense heat. Remember, the cooking process will mellow the flavors, so taste as you go. Adjusting the spice level makes this relish work for anyone.
Ideas for Serving with Different Dishes
Spicy zucchini relish is very versatile. Use it as a topping for grilled meats like chicken or pork. It also pairs well with fish tacos for a fresh twist. Spread it on sandwiches or burgers for added zest. For a unique appetizer, serve it with cream cheese and crackers. You can even mix it into salads for a flavorful boost. No matter how you serve it, the relish adds excitement to any dish.
Storage Info
Proper Jar Sealing Techniques
To keep your spicy zucchini relish fresh, sealing jars correctly is key. First, use clean, sterilized jars. Fill each jar with relish, leaving about half an inch of space at the top. Wipe the rim of the jar to remove any residue. Then, place the lid on top and screw it on tightly. This helps create a vacuum seal. You can also process jars in a hot water bath for extra safety. This process ensures your relish stays fresh longer.
Best Practices for Refrigeration
After sealing your jars, store them in the fridge. The cool temperature will help maintain flavor and texture. Make sure to keep the jars upright to avoid leaks. Always allow the relish to cool fully before placing it in the fridge. If you plan to eat the relish within a few weeks, refrigeration is perfect. Just remember to use clean utensils when scooping out the relish.
Shelf Life and Freezing Options
Homemade spicy zucchini relish can last in the fridge for about 2-3 weeks. If you want to save it for longer, freezing is a great option. Pour the relish into freezer-safe containers, leaving some space at the top for expansion. Seal them tightly and label with the date. You can freeze the relish for up to six months. When you’re ready to use it, thaw it overnight in the fridge. Enjoy your delicious relish anytime!
FAQs
How long does homemade spicy zucchini relish last?
Homemade spicy zucchini relish lasts about 2 to 3 weeks in the fridge. Make sure to store it in a clean, airtight jar. If you want to keep it longer, you can freeze it. Just remember to leave some space in the jar for expansion.
Can I use other vegetables in this recipe?
Yes, you can use other vegetables! Carrots, cucumbers, or even bell peppers work great. Just ensure you chop them finely. This way, they blend well in the relish. Mixing different veggies can give your relish a unique twist.
What dishes pair well with spicy zucchini relish?
Spicy zucchini relish pairs well with many dishes. It adds a kick to grilled meats, sandwiches, or burgers. You can also serve it with cheese and crackers for a tasty appetizer. For a fun twist, try it on tacos or mixed in with rice.We covered fresh ingredients, step-by-step cooking, and tips to enhance your relish. Also, we discussed variations and storage methods to keep your relish tasty.
I believe you can now create a delicious batch that suits your taste. Enjoy experimenting with flavors, and remember to share your creations. Happy cooking!


![- 2 cups cooked chicken, shredded - 1 cup shredded cheddar cheese - 1 cup shredded Monterey Jack cheese - 4 large flour tortillas - 1 small onion, diced - 1 bell pepper, diced - 2 tablespoons olive oil - 1 teaspoon ground cumin - 1 teaspoon smoked paprika - ½ teaspoon garlic powder - Salt and black pepper to taste - Fresh cilantro, chopped - Sour cream - Salsa To make the Chicken and Cheese Quesadilla Skillet, gather these simple ingredients. The chicken gives it a hearty base. Cheese adds that melty goodness we all love. Using flour tortillas helps hold everything together. You can pick your favorite bell pepper color to add a pop of brightness. The spices elevate the flavor. Ground cumin offers a warm, earthy taste. Smoked paprika adds a hint of smokiness. Garlic powder gives a nice kick. Don’t forget the salt and black pepper to enhance all the flavors. Finally, for garnishes, fresh cilantro provides a burst of freshness. Serving it with sour cream and salsa makes each bite even better. You can find the full recipe at the beginning of this article. Enjoy your cooking! - Heat the skillet with olive oil - Add diced onion and bell pepper First, grab a large skillet and set it over medium heat. Pour in two tablespoons of olive oil and let it warm up. You want the oil to shimmer, which shows it's ready. Next, toss in the diced onion and bell pepper. Sauté them for about five minutes. Stir occasionally until they are soft and fragrant. This step builds a great flavor base for your quesadilla. - Mix in shredded chicken - Season with spices and cook until heated Now it's time to add the star of our dish: shredded chicken. Stir it in with the veggies. Sprinkle in one teaspoon of ground cumin, one teaspoon of smoked paprika, and half a teaspoon of garlic powder. Add salt and black pepper to taste. This mix brings out all the flavors. Cook everything for another three to five minutes. You want the chicken to heat up and soak in those tasty spices. - Distribute cheese and layer tortillas - Cover and cook until golden brown, flipping carefully Next, lower the heat to a gentle simmer. Grab half of your shredded cheddar and Monterey Jack cheese. Spread it evenly over the chicken and veggies. Place two tortillas on top, pushing them down gently. Now, add the rest of the cheese, followed by the other two tortillas. Cover the skillet with a lid and let it cook for four to five minutes. This will make the bottom crispy and let the cheese melt. When the bottom turns golden brown, carefully flip the quesadilla with a spatula. Cook for another four to five minutes until the second side is also golden and the cheese is gooey. For the complete recipe, check out the Full Recipe section! To get crispy tortillas, heat your skillet well. Use medium heat and add enough olive oil. Let the oil shimmer before adding your tortillas. Cook until golden brown on each side, about 4-5 minutes. For gooey cheese, use a mix of cheddar and Monterey Jack. These cheeses melt nicely together. Layer the cheese between tortillas and cover the skillet. This helps the cheese melt evenly and creates a delicious pull when you slice. To boost flavors, add spices like chili powder or cayenne pepper. These spices add a nice kick. You can also mix in fresh herbs, such as cilantro or parsley, for freshness. Pair your quesadilla with sides like guacamole or pico de gallo. These add extra flavor and texture. A squeeze of lime juice brightens up the dish too. For the best results, use a non-stick skillet. This helps avoid sticking and makes flipping easier. Cast iron skillets are also great for even heat. Use a wide spatula for flipping the quesadilla. This helps keep it intact. A pizza cutter is perfect for slicing your quesadilla into wedges. For the full recipe, check out the detailed instructions above. {{image_4}} You can easily change up the protein in your quesadilla. If you want beef, use ground beef or steak strips. For a seafood twist, shrimp works great too. If you're feeling vegetarian, try black beans or mushrooms. These options keep the dish fresh and fun. Want more heat? Add sliced jalapeños or diced green chilies to bring spice. You can also change the cheese for different flavors. Try pepper jack for a kick or gouda for a smokier taste. Mixing cheeses adds depth and makes every bite exciting. You can serve quesadillas in stacks or as traditional wedges. Stacking them makes a fun dinner party dish. For dips, consider guacamole, ranch, or a zesty salsa. These enhance the meal and let everyone personalize their bites. Enjoy exploring these variations while making your own Chicken and Cheese Quesadilla Skillet Delight! For the full recipe, check out the [Full Recipe]. To store leftovers, let your quesadilla cool first. Then, wrap each piece tightly in plastic wrap. This keeps them fresh. Place the wrapped quesadillas in an airtight container. I recommend using glass or BPA-free plastic containers for safety. They can last in the fridge for about three days. For reheating quesadillas, the best method is using a skillet. Heat your skillet over medium heat. Place the quesadilla in the skillet and cover it with a lid. This will help the cheese melt evenly. You can also use an oven at 350°F (175°C) for about 10 minutes. This keeps the tortilla crispy. Avoid using a microwave, as it can make the quesadilla soggy. To freeze leftovers, wrap each quesadilla in plastic wrap. Then, place them in a freezer-safe bag or container. Make sure to remove as much air as possible. They can stay frozen for up to three months. When you are ready to eat, thaw them in the fridge overnight. Reheat as mentioned before to enjoy a tasty meal again. Making a Chicken and Cheese Quesadilla Skillet is quick and easy. It takes about 10 minutes to prep and around 20 minutes to cook. In total, you can enjoy this dish in about 30 minutes. Yes, you can make this dish gluten-free. Simply swap the flour tortillas for corn tortillas or gluten-free tortillas. Both options work well and keep the flavors intact. For sides, I suggest fresh guacamole, a light salad, or refried beans. These add a nice touch to your meal. For drinks, a cold lemonade or a light beer works well with the flavors. You could also try a refreshing iced tea. This blog post covered everything you need for a tasty Chicken and Cheese Quesadilla Skillet. I shared the key ingredients, step-by-step cooking tips, and even fun variations. Remember to store leftovers well and try reheating them for that crunch. With these tips, you can enjoy a delicious meal anytime. Experiment and make it your own! Make cooking fun and tasty with these simple ideas. Enjoy your next quesadilla adventure!](https://dishtreats.com/wp-content/uploads/2025/06/644c33a7-6eb8-49b0-b6be-df01f2332de8-768x768.webp)
. - Preheat the oven to 425°F (220°C). - Slice the red bell peppers in half. Remove the seeds and membranes. Place them skin-side up on a lined baking sheet. - Roast the peppers for about 25 minutes until the skin is blistered. - Let the peppers cool. Once cool, peel off the skin and chop them into bite-sized pieces. - Rinse 1 cup of quinoa thoroughly under cold water. - In a saucepan, combine the rinsed quinoa with 2 cups of water. Bring it to a boil. - Reduce the heat to low, cover, and simmer for about 15 minutes until the water is absorbed. - Fluff the quinoa with a fork and let it cool. - In a large mixing bowl, combine the cooled quinoa with the roasted peppers, halved cherry tomatoes, finely diced red onion, and diced cucumber. - Mix gently to ensure even distribution of all ingredients. - In a small bowl, whisk together 3 tablespoons of olive oil, 2 tablespoons of balsamic vinegar, and 1 teaspoon of garlic powder. - Add a pinch of salt and freshly ground black pepper, to taste. - Drizzle the dressing over the salad mixture and toss gently to coat. - If you want, sprinkle 1/4 cup of crumbled feta cheese on top and mix lightly. - Finally, garnish with freshly chopped parsley for a colorful finish. For more details, refer to the Full Recipe. To get that perfect blistered skin on your red peppers, follow these steps: - Choose fresh peppers: Look for firm, shiny skin. - Cut them right: Slice each pepper in half lengthwise. This helps them roast evenly. - High heat is key: Roast at 425°F (220°C) for about 25 minutes. - Watch for bubbles: The skin should bubble and char slightly. This adds great flavor. For seasoning your peppers, try these ideas: - Simple salt and pepper: This lets the natural sweetness shine. - Add garlic powder: This gives a rich taste. - Sprinkle paprika: This adds a nice smoky flavor. To ensure your quinoa is fluffy and not mushy, use this method: - Rinse well: Rinse quinoa under cold water to remove bitterness. - Water ratio matters: Use 2 cups of water for every 1 cup of quinoa. - Don’t skip the simmer: Bring to a boil, then lower the heat and cover. Let it simmer for 15 minutes. You can also hydrate quinoa with broth instead of water. This adds extra flavor to your dish. To make your Roasted Red Pepper Quinoa Salad even tastier, consider these tips: - Add fresh herbs: Basil or cilantro can brighten the dish. - Spice it up: A pinch of red pepper flakes adds heat. - Mix textures: Add nuts for crunch or avocado for creaminess. These simple changes can elevate your salad and keep it exciting. For the full recipe, refer to the earlier section. {{image_4}} For a vegan twist, you can skip the feta cheese. Instead, use avocado or vegan cheese. These options add creaminess without dairy. You can also mix in other vegetables. Try adding spinach, roasted zucchini, or artichokes. They boost flavor and nutrition. Want to make your salad heartier? Add chickpeas or grilled chicken. Chickpeas add fiber and protein. They make the salad more filling. If you prefer meat, grilled chicken works great. You can also try other legumes like black beans or lentils. They offer different flavors and textures. You can change the salad with the seasons. In summer, use fresh corn, tomatoes, or cucumber. These veggies are sweet and crunchy. You might also swap roasted red peppers for grilled asparagus or eggplant. These changes keep the salad exciting and fresh all year. For the full recipe, check out the details above. To keep your roasted red pepper quinoa salad fresh, store it in the fridge. Use an airtight container to avoid moisture loss. Place a piece of parchment paper between the salad and the lid. This helps keep it crisp. This salad lasts about 3 to 5 days in the refrigerator. Look for signs of spoilage like an off smell or slimy texture. If the salad looks or smells bad, it’s best to toss it. You can freeze quinoa, but it's best not to freeze the whole salad. Freezing can change the texture of the veggies. To freeze quinoa, cook it and let it cool. Then, place it in a freezer-safe bag. Remove as much air as possible. This way, you can use it later for quick meals. Yes, you can make this salad ahead. Prepare it in advance for busy days. I suggest making it up to two days before serving. Store it in an airtight container in the fridge. The flavors will meld nicely. Just keep the dressing separate until you’re ready to eat. This keeps the salad fresh and crisp. If you want a change, try using brown rice, farro, or couscous. Each option gives a different taste and texture. You can even use lentils for a protein boost. Just make sure to cook them according to package directions. This keeps your salad hearty and filling. This salad has a mild flavor. The roasted peppers add sweetness, not heat. If you like spice, you can add jalapeños or red pepper flakes. For a milder taste, skip the spicy additions. You can also add more cucumber or feta to balance the heat. This salad works great as a side or main dish. Pair it with grilled chicken or fish for protein. It also complements roasted veggies or a light soup. For a vegetarian option, add chickpeas or serve with hummus. You can enjoy it as part of a larger meal or on its own. Check out the Full Recipe for more ideas! This Roasted Red Pepper Quinoa Salad is easy and tasty. We covered key ingredients, cooking steps, and helpful tips. You can customize it to fit your diet and likes. Always store leftovers properly to enjoy later. Remember, fresh flavors and textures make this salad shine. With these ideas, you can impress your friends or family at any meal. Enjoy making and sharing this healthy dish!](https://dishtreats.com/wp-content/uploads/2025/06/1f28db07-8093-4cb7-8796-796da85cb13a-768x768.webp)
![To make roasted garlic hummus, gather these essential ingredients: - 1 cup canned chickpeas, rinsed and drained - 1/4 cup tahini - 1/4 cup extra virgin olive oil - 1 whole head of garlic - 2 tablespoons freshly squeezed lemon juice - 1/2 teaspoon ground cumin - Sea salt, to taste - Water, as needed These ingredients work together to create a creamy and delicious hummus. The chickpeas provide a smooth base, while tahini adds richness. Roasted garlic brings a sweet, mellow flavor that transforms the dish. To elevate your hummus, consider these optional garnishes: - Chopped fresh parsley - Smoked paprika Adding these garnishes gives your hummus a pop of color. Fresh parsley adds a touch of brightness, while smoked paprika contributes a subtle warmth. You will need a few key tools to prepare your hummus: - Food processor - Aluminum foil - Baking sheet A food processor is essential for achieving a smooth texture. Aluminum foil helps roast the garlic evenly, while a baking sheet supports the garlic in the oven. For the full recipe, check out the complete guide to making roasted garlic hummus. Enjoy the process and get ready for a tasty treat! To start, I preheat my oven to 400°F (200°C). This heat helps the garlic roast well. Next, I take a whole head of garlic and cut off the top. I make sure to expose the tops of the cloves. Then, I drizzle a little olive oil over the cloves. This step helps the garlic stay moist. I wrap the garlic in aluminum foil tightly and place it in the oven. I roast it for about 30-35 minutes. The cloves should turn soft and golden brown. After roasting, I let it cool for a few minutes. In my food processor, I add 1 cup of rinsed chickpeas and 1/4 cup of tahini. Then, I squeeze in 2 tablespoons of lemon juice and add 1/2 teaspoon of ground cumin. I also sprinkle in some sea salt. Next, I squeeze the roasted garlic cloves from their skins into the bowl. I usually use three to four cloves for a great flavor. I blend everything until it becomes smooth and creamy. While blending, I slowly drizzle in 1/4 cup of extra virgin olive oil. If the hummus feels too thick, I add water by the tablespoon until I like the texture. Once my hummus is smooth, I taste it to check if it needs more salt or lemon juice. This step is key for flavor balance. I then transfer the hummus to a serving bowl. I drizzle a bit of olive oil on top to add richness. For a pop of color, I garnish it with chopped parsley and a sprinkle of smoked paprika. To serve, I love pairing the hummus with fresh pita bread or sliced veggies. This makes for a great snack or appetizer. You can find the Full Recipe [here]. To get the right texture, start with good chickpeas. Use canned chickpeas for ease. Rinse and drain them well to remove excess salt. When blending, add olive oil slowly. If your hummus is too thick, add water a bit at a time. This makes it smooth and creamy. Roasted garlic is the star here, but you can add more flavor. Try adding herbs like fresh parsley or basil. A pinch of smoked paprika gives a nice kick. For a zestier taste, add more lemon juice. Taste as you go—this is key! One big mistake is not roasting the garlic enough. Soft, golden cloves bring the best flavor. Another common error is adding too much water at once. This can make your hummus runny. Lastly, don’t forget to taste your blend. Adjusting salt and lemon juice helps create a balanced dip. For the full recipe, refer to the main article. {{image_4}} You can change the flavor of your hummus easily. Adding herbs like basil or cilantro gives a fresh taste. For a warm twist, try adding spices like smoked paprika or chili powder. Just a pinch can turn your dip into a flavor explosion. Mix in fresh herbs or spices after blending for the best taste. While chickpeas are classic, other beans work well too. White beans, like cannellini, add creaminess. Black beans offer a rich, earthy flavor. You can even use lentils for a different texture. Each bean brings its own taste. Feel free to swap them out and explore new flavors. If you love heat, this spicy hummus is for you. Start with the full recipe and add heat! After blending, mix in chopped jalapeños or a splash of hot sauce. You can also use crushed red pepper for a milder kick. This spicy version pairs well with crunchy veggies or pita chips, making your snack time exciting. To keep your roasted garlic hummus fresh, store it in an airtight container. This helps prevent exposure to air, which can lead to spoilage. Always let the hummus cool completely if you just made it. Once cooled, cover it tightly and place it in the fridge. You can freeze hummus for later use. Portion it into smaller containers. This makes it easy to thaw only what you need. Leave a little space at the top of the container. Hummus expands when frozen. When you’re ready to eat it, thaw it in the fridge overnight. Stir well before serving. Homemade roasted garlic hummus lasts about five to seven days in the fridge. Check for any off smells or changes in color. If you see any mold, it’s best to throw it away. Fresh hummus should have a smooth texture and rich aroma. Keeping these tips in mind helps you enjoy your hummus at its best. Don't forget to check the [Full Recipe] for the perfect hummus experience! Roasted garlic can last about one week in the fridge. Store it in a sealed container. If you want to keep it longer, you can freeze it. Roasted garlic freezes well and can last up to three months. Yes, you can use fresh garlic, but the flavor will be different. Fresh garlic is sharp and strong, while roasted garlic is sweet and mild. If you want a more intense garlic taste, add a small amount of fresh garlic to your hummus. Start with one clove and adjust to your taste. Roasted garlic offers many health benefits. It can help boost your immune system. It also may lower blood pressure and improve heart health. Roasted garlic is rich in antioxidants, which fight free radicals. Plus, it can aid digestion and add flavor to meals without extra fat or salt. Enjoying roasted garlic in hummus gives you these benefits in a tasty way. This blog covered all you need for tasty roasted garlic hummus. We explored key ingredients, helpful tools, and the easy steps for making hummus. You learned tips to get the right texture and boost flavor. We shared fun variations to try, plus essential storage advice. Roasted garlic hummus is simple and fun to make. Enjoy the process and don't hesitate to get creative with your flavors! Remember, practice makes perfect.](https://dishtreats.com/wp-content/uploads/2025/06/4ccbc263-5457-4179-8ada-bd86b908b6b9-768x768.webp)