Rainbow Fruit Skewers Vibrant and Fun Summer Snack

Summer fun is here, and what better way to celebrate than with colorful Rainbow Fruit Skewers? These vibrant snacks are not only eye-catching but also packed with tasty fruit that kids and adults love. I’ll show you how to create these easy and healthy treats step by step. Plus, I’ll share fun presentation tips, storage secrets, and variations for any occasion. Let’s get started on this fruity adventure!
Ingredients
List of Fruits
To make your rainbow fruit skewers, you will need a fun mix of colorful fruits:
- 1 cup fresh strawberries, hulled and halved
- 1 cup sweet orange segments
- 1 cup juicy pineapple chunks
- 1 cup crisp green grapes, halved
- 1 cup plump blueberries
- 1 ripe banana, beautifully sliced
These fruits create a vibrant look and a tasty flavor. Each fruit brings its own unique taste and texture.
Optional Ingredients for Sweetness
If you want a little extra sweetness, consider adding:
- 1 tablespoon honey (optional, for sweetness)
- 1 teaspoon fresh lime juice
The honey adds a lovely sweetness, while lime juice gives a nice tang. You can adjust these to your taste.
Equipment Needed
You will need a few simple tools to make this snack:
- Wooden skewers or metal grilling skewers
These skewers will hold all the delicious fruit together. Make sure they are sturdy enough for your creations.
Step-by-Step Instructions
Preparing the Fruits
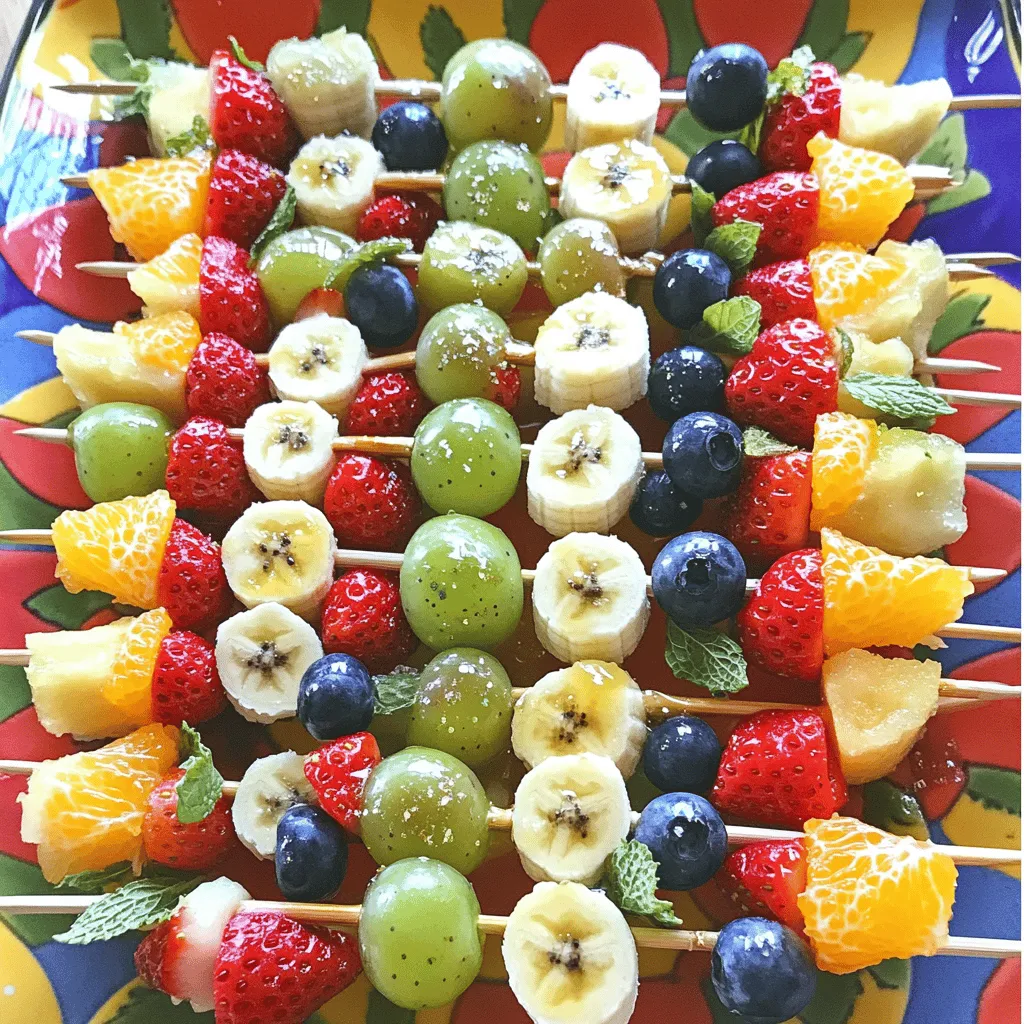
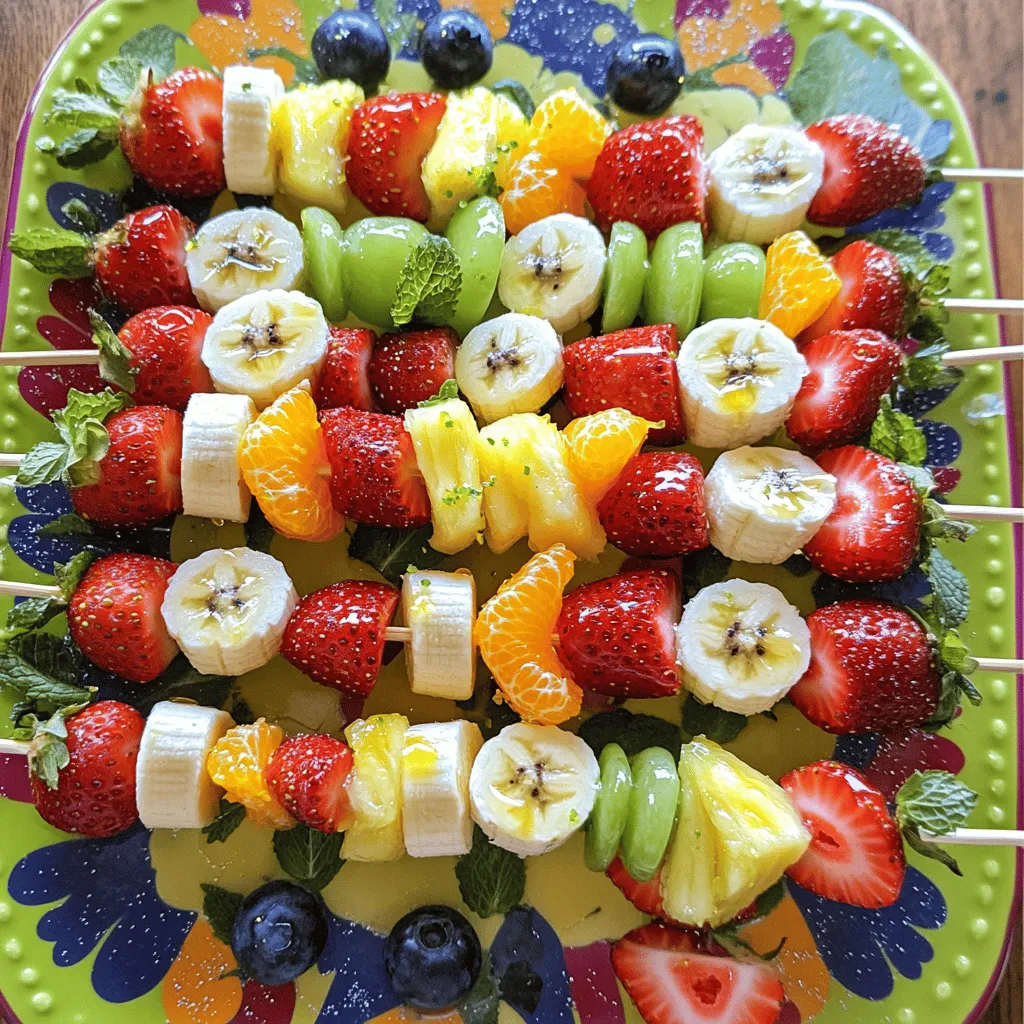
Start by washing all the fruits. This step is key for freshness. Hull the strawberries and cut them in half. Next, segment the sweet oranges. Chop the pineapple into small chunks. Halve the green grapes and slice the banana into even rounds. Ensure each piece is about the same size. This makes your skewers look neat and colorful.
Assembling the Skewers
Grab a wooden or metal skewer for this part. Start with a strawberry on the skewer. Then, add an orange segment. Follow with a chunk of pineapple, then a green grape. Next, add a slice of banana. Finish with a blueberry at the end. Aim to alternate colors and types of fruit. This creates a fun and vibrant look. You can fit 4-5 pieces of fruit on each skewer. Leave some space at the bottom for easy handling.
Preparing the Dipping Sauce
For the dipping sauce, take a small bowl. Combine one tablespoon of honey and one teaspoon of fresh lime juice. Stir the mixture until it blends well. This creates a sweet and zesty flavor. Adjust the honey amount if you want it sweeter. This drizzle adds a lovely touch to your skewers.
Tips & Tricks
Presentation Ideas
To make your rainbow fruit skewers shine, use a bright platter. A white plate can show off the colors well. You might add edible glitter for sparkle. Fresh mint leaves also add a lovely green touch. Arrange the skewers in a fun pattern. This makes them look more inviting. You can even stand them up in a jar. This way, everyone sees the vibrant colors.
Ensuring Even Sizes
Cut all your fruit pieces to similar sizes. This makes the skewers look neat. When fruits are even, they cook evenly if you grill them. It also helps with the taste. If one piece is too big, it can overpower the others. Use a sharp knife for clean cuts. Measure pieces against each other as you cut. This will help keep them uniform.
Drizzling Techniques for Dipping Sauce
For a great drizzle, use a squeeze bottle or a spoon. Start at the top of the skewers and move down. This helps cover all the fruit without making a mess. A light hand gives a nice touch. If you want to add more flavor, mix in a bit of zest from a lime. This will enhance the taste of the honey-lime drizzle. Remember, a little goes a long way!

Variations
Using Different Fruits
You can change the fruits in your skewers to suit your taste. Try using kiwi, mango, or raspberries. These fruits add unique colors and flavors. For a tropical twist, use coconut chunks or papaya. If you like it sweet, add some cherries or peaches. Mixing fruits keeps it fresh and fun!
Dietary Modifications
Rainbow fruit skewers are perfect for everyone, including vegans. All the ingredients are plant-based. You can skip honey and use agave syrup instead. This keeps the skewers sweet without adding animal products. You can also add nuts or seeds for some crunch. These changes make the skewers healthy and tasty.
Themed Skewer Ideas for Events
Want to impress your guests? Create themed skewers for parties! For a summer BBQ, use watermelon, lime, and mint. For Halloween, pick fruits like blackberries and oranges, and shape them like spooky faces. You can also use cookie cutters to make fun shapes. Themed skewers are a hit at any gathering!
Storage Info
Best Ways to Store Leftover Skewers
After you enjoy your rainbow fruit skewers, you may have some left. Store them in the fridge. Place them in an airtight container. This helps keep them fresh. Use a layer of plastic wrap to cover them tightly. This will prevent the fruit from drying out. Leftover skewers taste best when eaten within two days.
Freezing Options for Fruits
You can freeze the fruits for future use. Wash and cut the fruits as needed. Lay them flat on a baking sheet. Freeze them for a few hours until firm. Then, transfer them to a freezer bag. This method keeps them from sticking together. Frozen fruits are great for smoothies or future skewers. However, they will lose some texture after thawing.
Shelf Life of Prepared Skewers
Prepared skewers stay fresh in the fridge for up to two days. After that, the fruits may lose their shine and taste. For the best flavor, enjoy them soon after making. If you notice any changes in color or smell, it’s best to toss them out. Always trust your senses when it comes to food safety.
FAQs
How do you keep fruit skewers from turning brown?
To keep fruit fresh, use lemon juice. It slows browning on fruits like apples and bananas. Just mix a little lemon juice with water. Dip the cut fruit in the solution before placing on skewers. This method preserves color and taste.
Can I use frozen fruits for skewers?
Yes, you can use frozen fruits! Thaw them first, then drain excess water. Frozen fruits might not hold their shape well but still taste great. They add a fun twist to your skewers. Just remember, they can be a bit mushy.
What are some alternative dipping sauces for fruit skewers?
You can try yogurt for a creamy dip. Mix it with honey or vanilla for extra flavor. Another option is chocolate sauce. It pairs well with many fruits. Peanut butter is fun too; it gives a nutty taste. Feel free to get creative with your favorite dips!
This blog post covered how to make tasty fruit skewers. We discussed the best fruits, optional sweetness, and needed tools. You learned how to prep the fruit and assemble the skewers. We shared tips for making them look nice and stay fresh. Variations let you mix flavors and adapt for dietary needs. Lastly, we talked about storage and answered common questions. Enjoy making fruit skewers and feel free to explore new flavors and ideas!


![- Rice paper wrappers - 1 ripe mango, peeled and cut into thin julienne strips - 2 ripe avocados, halved, pitted, and sliced into thin wedges - 1/2 cucumber, peeled and julienned - 1 cup shredded carrots - 1/4 cup fresh mint leaves, torn if large - 1/4 cup fresh cilantro leaves - 1 tablespoon sesame seeds (optional) - 3 tablespoons soy sauce - 1 tablespoon freshly squeezed lime juice - 1 teaspoon honey or agave syrup - 1/2 teaspoon freshly grated ginger Mango avocado summer rolls shine with fresh ingredients. You need rice paper wrappers to hold all this goodness. The key fresh items are ripe mango and creamy avocado. Their flavors blend perfectly. Crunchy cucumber and colorful carrots add texture and fun. Fresh herbs like mint and cilantro brighten the rolls. For a twist, sprinkle sesame seeds for extra crunch. Now, let's talk about the dipping sauce. It's easy to make and enhances the taste. Just mix soy sauce, lime juice, honey, and ginger. This sauce adds a tangy, sweet kick that pairs well with the rolls. You can find the full recipe with all these details. Enjoy creating your mango avocado summer rolls today! To start, you need to make the dipping sauce. In a small mixing bowl, add the soy sauce, lime juice, honey or agave syrup, and grated ginger. Whisk these ingredients together well. This sauce adds a bright, tangy flavor that pairs nicely with the fresh summer rolls. Set it aside for the flavors to blend. Next, grab a shallow dish or a large plate. Fill it with warm water. Take one rice paper wrapper and dip it in the warm water for about 10 seconds. You want it to be soft but not too mushy. Carefully lift it out and lay it flat on a damp kitchen towel or a clean surface. This makes it easier to work with. Now it’s time to layer your ingredients. In the center of the rice paper wrapper, place a few strips of mango, a couple of avocado slices, sticks of cucumber, and a handful of shredded carrots. Don’t forget the fresh mint and cilantro leaves! They add a burst of flavor. You can also sprinkle sesame seeds on top for extra crunch if you like. To roll up the summer rolls, fold the sides of the wrapper over the filling. Then, gently roll the wrapper away from you while tucking in the filling tightly. This helps keep everything secure inside. Repeat this for the rest of the wrappers and filling. You’ll soon have a beautiful platter of summer rolls! After rolling, place the summer rolls on a serving plate. Cover them with a damp cloth. This keeps them fresh and prevents them from drying out while you finish the rest. Make sure they stay moist for the best taste. When you are ready to serve, present the summer rolls with the dipping sauce on the side. This makes it fun for everyone to dip their rolls as they wish. Enjoy the fresh flavors and the crisp textures of your homemade Mango Avocado Summer Rolls! For the full recipe, check out the complete instructions above. To avoid tearing the rice paper wrappers, keep these tips in mind: - Soak each wrapper just until soft, about 10 seconds in warm water. - Work on a damp surface to prevent sticking. - Don't overfill the wrapper; less is more! - When rolling, tuck in the sides gently, but firmly. Choosing ripe ingredients makes a big difference. Here are my best practices: - Look for mangoes that yield slightly to gentle pressure. - Choose avocados that are firm but not hard. - Select cucumbers that are crisp and have a smooth skin. - Fresh herbs should be vibrant and fragrant; avoid wilting. Want to make your rolls even better? Try these ideas: - Add cooked shrimp or chicken for extra protein. - Include bell peppers or radishes for a crunchier bite. - Swap in different herbs like basil or parsley for a unique flavor. - Use quinoa or rice noodles for a heartier filling. For the complete recipe, check out the [Full Recipe]. Enjoy making your summer rolls! {{image_4}} If you want a fully plant-based dish, there are many fun swaps. You can use tofu instead of fish or shrimp. Try adding bean sprouts for a nice crunch. You can also toss in sliced bell peppers for a splash of color. These swaps keep the rolls fresh and tasty. To give your summer rolls an Asian twist, add fresh herbs like basil or dill. You can also use hoisin sauce or peanut sauce instead of the soy sauce. A drizzle of sriracha can bring some heat. These changes will make your rolls pop with flavor. For easy assembly, prep your ingredients ahead of time. Cut your mango, avocado, and cucumber in advance. Store them in airtight containers in the fridge. This way, you can whip up these rolls in just a few minutes. It makes summer roll night so much easier! For the full recipe, check out the detailed instructions provided. To keep your summer rolls fresh, wrap them in a damp cloth. Place them on a plate and cover with plastic wrap. This method helps prevent the rice paper from drying out. Store the rolls in the fridge if you plan to eat them later. Try to consume them within 24 hours for the best taste and texture. If you want to freeze unassembled summer rolls, first prepare the ingredients. Gather your mango, avocados, and veggies. Then, make the rolls but do not roll them up yet. Lay each rice paper wrapper flat on a parchment-lined tray. Fill the wrappers but leave them open. Freeze the tray for about one hour. Once frozen, place the rolls in a freezer bag. This helps you save space and keeps them fresh. When you’re ready to enjoy your summer rolls, take them out of the freezer. Place them in the fridge for a few hours or overnight to thaw. For a faster option, you can run them under warm water for a few seconds. Never use a microwave, as it can make the rice paper tough. After thawing, assemble the rolls with your favorite sauce, and enjoy a fresh and tasty meal! To make Mango Avocado Summer Rolls, follow these steps: 1. First, prepare the dipping sauce by mixing soy sauce, lime juice, honey, and ginger. 2. Next, soak rice paper wrappers in warm water for about 10 seconds. 3. Lay the softened wrapper on a damp surface. 4. Place mango strips, avocado slices, cucumber sticks, shredded carrots, and herbs in the center. 5. Optionally, add sesame seeds for crunch. 6. Fold the sides over the filling and roll tightly. 7. Repeat until all ingredients are used. Serve with dipping sauce. This process is easy and fun, perfect for summer gatherings. Yes, you can add meat or seafood to your summer rolls. Here are some great options: - Grilled chicken or shrimp adds protein and flavor. - Thinly sliced beef or pork works well too. - For a tasty twist, try crab or lobster. These additions make your rolls even more filling and delicious. You can try different dipping sauces beyond the suggested one. Here are some ideas: - Peanut sauce for a creamy texture and nutty flavor. - Sweet chili sauce adds a spicy kick. - A simple vinegar and soy sauce mix is also tasty. Feel free to experiment with flavors you love! You now know how to make delicious summer rolls with fresh ingredients and tasty dipping sauce. We covered the necessary components, step-by-step instructions, and tips for success. Remember, you can customize these rolls to fit your tastes. With the right care, you can store or even freeze them for later. Enjoy the fun of making and sharing these tasty treats. Trust me, they’re worth the effort!](https://dishtreats.com/wp-content/uploads/2025/07/e9c41e61-bd63-46cf-9640-b605cd161798-768x768.webp)
![To make roasted garlic hummus, gather these essential ingredients: - 1 cup canned chickpeas, rinsed and drained - 1/4 cup tahini - 1/4 cup extra virgin olive oil - 1 whole head of garlic - 2 tablespoons freshly squeezed lemon juice - 1/2 teaspoon ground cumin - Sea salt, to taste - Water, as needed These ingredients work together to create a creamy and delicious hummus. The chickpeas provide a smooth base, while tahini adds richness. Roasted garlic brings a sweet, mellow flavor that transforms the dish. To elevate your hummus, consider these optional garnishes: - Chopped fresh parsley - Smoked paprika Adding these garnishes gives your hummus a pop of color. Fresh parsley adds a touch of brightness, while smoked paprika contributes a subtle warmth. You will need a few key tools to prepare your hummus: - Food processor - Aluminum foil - Baking sheet A food processor is essential for achieving a smooth texture. Aluminum foil helps roast the garlic evenly, while a baking sheet supports the garlic in the oven. For the full recipe, check out the complete guide to making roasted garlic hummus. Enjoy the process and get ready for a tasty treat! To start, I preheat my oven to 400°F (200°C). This heat helps the garlic roast well. Next, I take a whole head of garlic and cut off the top. I make sure to expose the tops of the cloves. Then, I drizzle a little olive oil over the cloves. This step helps the garlic stay moist. I wrap the garlic in aluminum foil tightly and place it in the oven. I roast it for about 30-35 minutes. The cloves should turn soft and golden brown. After roasting, I let it cool for a few minutes. In my food processor, I add 1 cup of rinsed chickpeas and 1/4 cup of tahini. Then, I squeeze in 2 tablespoons of lemon juice and add 1/2 teaspoon of ground cumin. I also sprinkle in some sea salt. Next, I squeeze the roasted garlic cloves from their skins into the bowl. I usually use three to four cloves for a great flavor. I blend everything until it becomes smooth and creamy. While blending, I slowly drizzle in 1/4 cup of extra virgin olive oil. If the hummus feels too thick, I add water by the tablespoon until I like the texture. Once my hummus is smooth, I taste it to check if it needs more salt or lemon juice. This step is key for flavor balance. I then transfer the hummus to a serving bowl. I drizzle a bit of olive oil on top to add richness. For a pop of color, I garnish it with chopped parsley and a sprinkle of smoked paprika. To serve, I love pairing the hummus with fresh pita bread or sliced veggies. This makes for a great snack or appetizer. You can find the Full Recipe [here]. To get the right texture, start with good chickpeas. Use canned chickpeas for ease. Rinse and drain them well to remove excess salt. When blending, add olive oil slowly. If your hummus is too thick, add water a bit at a time. This makes it smooth and creamy. Roasted garlic is the star here, but you can add more flavor. Try adding herbs like fresh parsley or basil. A pinch of smoked paprika gives a nice kick. For a zestier taste, add more lemon juice. Taste as you go—this is key! One big mistake is not roasting the garlic enough. Soft, golden cloves bring the best flavor. Another common error is adding too much water at once. This can make your hummus runny. Lastly, don’t forget to taste your blend. Adjusting salt and lemon juice helps create a balanced dip. For the full recipe, refer to the main article. {{image_4}} You can change the flavor of your hummus easily. Adding herbs like basil or cilantro gives a fresh taste. For a warm twist, try adding spices like smoked paprika or chili powder. Just a pinch can turn your dip into a flavor explosion. Mix in fresh herbs or spices after blending for the best taste. While chickpeas are classic, other beans work well too. White beans, like cannellini, add creaminess. Black beans offer a rich, earthy flavor. You can even use lentils for a different texture. Each bean brings its own taste. Feel free to swap them out and explore new flavors. If you love heat, this spicy hummus is for you. Start with the full recipe and add heat! After blending, mix in chopped jalapeños or a splash of hot sauce. You can also use crushed red pepper for a milder kick. This spicy version pairs well with crunchy veggies or pita chips, making your snack time exciting. To keep your roasted garlic hummus fresh, store it in an airtight container. This helps prevent exposure to air, which can lead to spoilage. Always let the hummus cool completely if you just made it. Once cooled, cover it tightly and place it in the fridge. You can freeze hummus for later use. Portion it into smaller containers. This makes it easy to thaw only what you need. Leave a little space at the top of the container. Hummus expands when frozen. When you’re ready to eat it, thaw it in the fridge overnight. Stir well before serving. Homemade roasted garlic hummus lasts about five to seven days in the fridge. Check for any off smells or changes in color. If you see any mold, it’s best to throw it away. Fresh hummus should have a smooth texture and rich aroma. Keeping these tips in mind helps you enjoy your hummus at its best. Don't forget to check the [Full Recipe] for the perfect hummus experience! Roasted garlic can last about one week in the fridge. Store it in a sealed container. If you want to keep it longer, you can freeze it. Roasted garlic freezes well and can last up to three months. Yes, you can use fresh garlic, but the flavor will be different. Fresh garlic is sharp and strong, while roasted garlic is sweet and mild. If you want a more intense garlic taste, add a small amount of fresh garlic to your hummus. Start with one clove and adjust to your taste. Roasted garlic offers many health benefits. It can help boost your immune system. It also may lower blood pressure and improve heart health. Roasted garlic is rich in antioxidants, which fight free radicals. Plus, it can aid digestion and add flavor to meals without extra fat or salt. Enjoying roasted garlic in hummus gives you these benefits in a tasty way. This blog covered all you need for tasty roasted garlic hummus. We explored key ingredients, helpful tools, and the easy steps for making hummus. You learned tips to get the right texture and boost flavor. We shared fun variations to try, plus essential storage advice. Roasted garlic hummus is simple and fun to make. Enjoy the process and don't hesitate to get creative with your flavors! Remember, practice makes perfect.](https://dishtreats.com/wp-content/uploads/2025/06/4ccbc263-5457-4179-8ada-bd86b908b6b9-768x768.webp)

