
Are you ready for a dinner that’s as simple as it is delicious? One Pan Honey Garlic Chicken is here to save your evening! With tender chicken thighs bathed in a sweet and savory sauce, plus vibrant veggies, this dish is a flavor hit. Best of all, you’ll only need one pan, making clean-up a breeze. Let’s dive into this tasty recipe that will impress your family and friends!
Ingredients
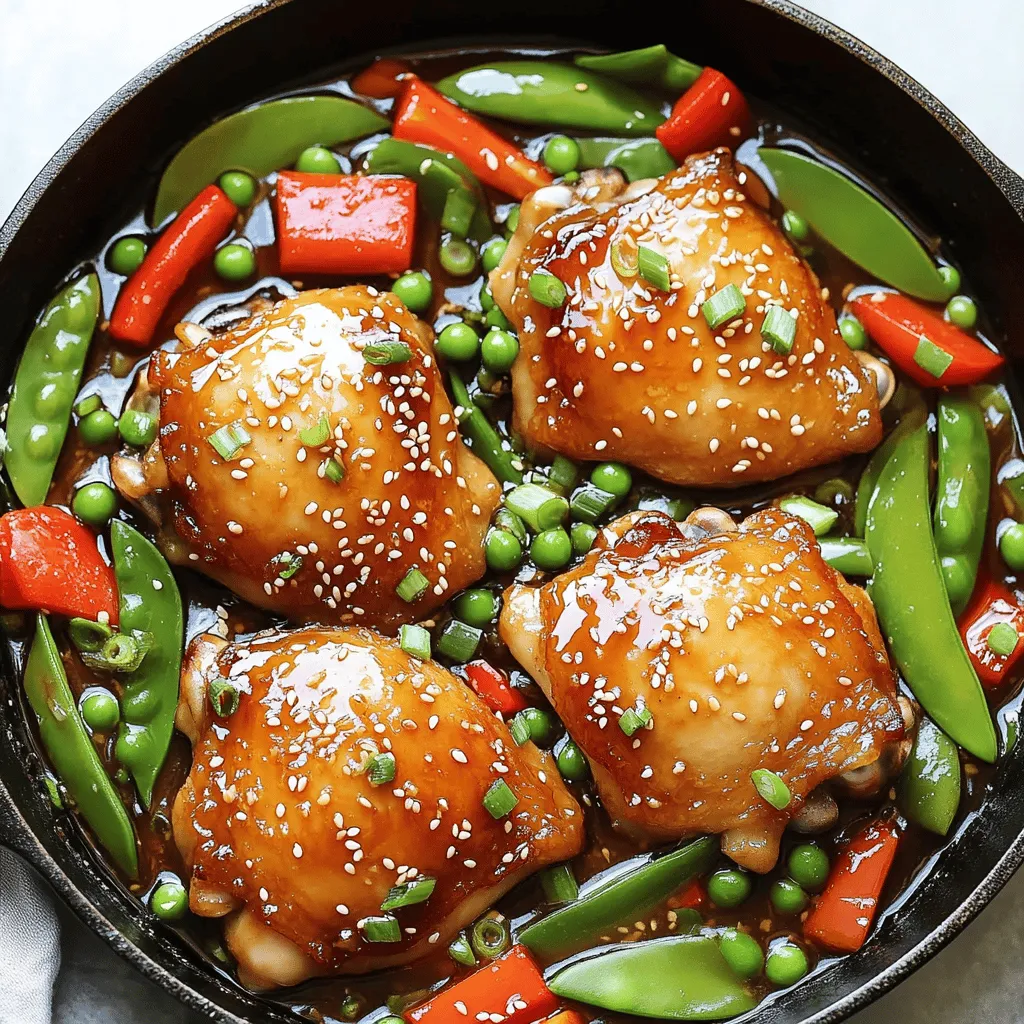
List of Ingredients
– 4 boneless, skinless chicken thighs
– 3 tablespoons honey
– 3 tablespoons soy sauce
– 4 cloves garlic, finely minced
– 1 tablespoon fresh ginger, grated
– 2 tablespoons olive oil
– 1 teaspoon sesame oil
– 1 large red bell pepper, cored and sliced
– 1 large green bell pepper, cored and sliced
– 1 cup snap peas, trimmed
– Salt and freshly cracked black pepper to taste
– Sesame seeds for garnish
– Chopped green onions for garnish
The right ingredients make all the difference. I love using boneless, skinless chicken thighs for this dish. They stay juicy and tender. Honey adds a sweet touch, while soy sauce gives it depth. Minced garlic and grated ginger provide a punch of flavor.
When choosing vegetables, red and green bell peppers work great. They add color and crunch. Snap peas bring a nice sweetness, too. Don’t forget the salt and pepper to enhance all these flavors. For a finishing touch, sprinkle sesame seeds and green onions. They give it a nice look and extra taste!
This list is key to making the One Pan Honey Garlic Chicken come alive.
Step-by-Step Instructions
Marinate the Chicken
– Ingredients for marinade
– 3 tablespoons honey
– 3 tablespoons soy sauce
– 4 cloves garlic, finely minced
– 1 tablespoon fresh ginger, grated
In a bowl, whisk honey, soy sauce, garlic, and ginger together. You want a smooth mix. Add your chicken thighs, ensuring they get fully coated. Cover the bowl and let it sit in the fridge for at least 20 minutes. This step is key for flavor!
Prepare the Cooking Pan
– Oil combinations and tips
– 2 tablespoons olive oil
– 1 teaspoon sesame oil
Choose a large skillet or frying pan. Heat together olive oil and sesame oil over medium-high heat. This mix gives a rich base to your dish. A good pan helps the chicken cook evenly and get that nice crust.
Sear the Chicken
Remove the chicken from the marinade, but don’t throw the marinade away. Once the oil is hot, add the chicken to the pan. Sear each side for about 5-6 minutes. Watch for a golden-brown crust. This is where the flavor builds!
Add the Vegetables
For a pop of color and taste, add sliced red and green bell peppers along with snap peas. Sauté them for 3-4 minutes. Stir occasionally. You want the veggies to stay bright and tender-crisp.
Incorporate the Sauce
Now, pour the reserved marinade over the chicken and veggies. Lower the heat to medium and let it simmer for about 5 minutes. This helps thicken the sauce and blend the flavors. Stir gently to coat everything.
Check for Doneness
To be safe, check the chicken’s internal temperature. It should reach 165°F (74°C). Taste the dish, and add salt and freshly cracked black pepper as needed. Adjust to your liking.
Serve
Once done, remove the pan from the heat. Let the dish rest for a couple of minutes. Before serving, sprinkle sesame seeds and chopped green onions on top. This adds a nice touch and extra flavor. Enjoy your One Pan Honey Garlic Chicken!
Tips & Tricks
Perfecting the Flavors
To make your one pan honey garlic chicken shine, you must balance sweetness and saltiness. The honey provides a rich sweetness, while soy sauce adds a savory touch. Try to taste the sauce as you go. Adjust the honey or soy sauce to fit your taste. Adding a bit more honey can make it sweeter if you love that flavor. On the other hand, a splash of soy sauce can deepen the savory notes.
Fresh ingredients play a huge role, too. Always use fresh garlic and ginger for the best taste. They provide a bright and vibrant flavor that dried versions can’t match. The bell peppers should be crisp and colorful, adding not just taste but also visual appeal. Pick vegetables that look fresh, and they will enhance your dish.
Cooking Efficiency
Time-saving techniques can make cooking fun and quick. Prepare all your ingredients before you start cooking. Chop the garlic, ginger, and vegetables ahead of time. This way, you can focus on cooking without delays.
One-pan cooking is great for easy clean-up. You only need one skillet. This means less washing up after dinner. Plus, as the chicken cooks, the flavors from the meat infuse into the vegetables. This creates a delicious harmony in your dish, making every bite enjoyable.
Common Mistakes to Avoid
One common mistake is not marinating the chicken long enough. I recommend a minimum of 20 minutes. If you can, try to marinate for a few hours or overnight. This allows the chicken to soak up all the wonderful flavors.
Another mistake is overcooking the chicken or vegetables. Chicken should reach 165°F for safety. Use a meat thermometer to check. Vegetables should stay bright and tender-crisp. Keep an eye on them while cooking. This way, you’ll enjoy a juicy chicken and vibrant veggies in your meal.Enjoy cooking!
Variations
Alternative Proteins
You can easily swap chicken thighs for other proteins. Try using chicken breasts or pork chops. If you prefer beef, flank steak works well. Adjust cooking times to ensure these proteins reach safe temperatures. For chicken breasts, cook for about 6-7 minutes per side. Pork chops will need about 5-6 minutes each side. For flank steak, sear for 3-4 minutes per side, then let it rest before slicing.
Vegetarian Option
If you want a vegetarian dish, tofu or tempeh are great choices. Use firm tofu for the best texture. Cut it into cubes and marinate just like the chicken. Cook it for about 5-6 minutes until golden. Tempeh also works well and adds a nutty flavor. Slice it thin and sauté for the same time. You may want to add a bit more garlic and ginger to boost the flavor.
Different Sauce Variations
Feel free to play with the sauce! Instead of honey, you can use maple syrup or agave nectar for a different sweetness. Add sriracha or chili paste for a spicy kick. Mix in a tablespoon or two, depending on how hot you want it. You can even blend in some orange juice for a citrus twist. Just make sure to adjust the sweetness to balance the heat.
Storage Info
How to Store Leftovers
To store your leftover One Pan Honey Garlic Chicken, use airtight containers. Glass or plastic containers work well. Always let the dish cool before sealing. This helps keep the flavors fresh. Try to store it in small portions. This way, you can grab just what you need.
Reheating Tips
When reheating, use the stove for the best flavor. Place the chicken in a skillet over low heat. Add a splash of water or broth to keep it moist. Cover the skillet to trap steam. This helps maintain the chicken’s texture. You can also microwave it, but be careful. Heat it in short bursts, so it doesn’t dry out.
Freezing Instructions
To freeze, let the chicken cool completely first. Portion it into freezer-safe bags or containers. Remove as much air as possible to prevent freezer burn. Label the bags with the date. For thawing, move the chicken to the fridge overnight. This keeps it safe and tasty. If you’re in a hurry, you can use the microwave. Just make sure to cook it thoroughly after thawing.
FAQs
How long can I marinate the chicken?
I recommend marinating the chicken for at least 20 minutes. This time allows the flavors to seep in well. If you have more time, you can marinate it for up to 4 hours. Just keep it in the fridge. Longer marinating makes the chicken taste even better!
Can I use frozen chicken?
Yes, you can use frozen chicken. Just make sure to fully thaw it first. The best way is to leave it in the fridge overnight. If you need it fast, you can use the microwave. After thawing, marinate it as usual. This step helps lock in the flavor.
What should I serve with honey garlic chicken?
Honey garlic chicken pairs great with rice or quinoa. You can also serve it with steamed vegetables. A fresh salad is another yummy option. These sides balance the sweet and savory flavors. They also add color to your plate!
Is this recipe gluten-free?
This recipe is not gluten-free because of soy sauce. However, you can use gluten-free soy sauce instead. Look for tamari or coconut aminos. Both options taste great and keep the dish safe for those with gluten sensitivity.
Can I make this recipe ahead of time?
You can make this dish ahead of time! Cook it fully, then let it cool. Store it in an airtight container in the fridge. It will stay fresh for up to 3 days. When ready to eat, just reheat it gently on the stove or in the microwave.
This blog post covered how to make a delicious honey garlic chicken dish. We went through ingredients, step-by-step cooking instructions, and handy tips. Remember, marinating the chicken and using fresh veggies make a big difference in taste. Don’t forget to try different proteins or sauces to switch things up. Storing and reheating leftovers properly helps keep your meal tasty. With these insights, you can easily create a flavorful dish that impresses. Enjoy cooking and make it your own!


