Honey Garlic Chicken Wings Simple and Tasty Recipe

Are you ready to spice up your game day or dinner table? I’m excited to share my simple and tasty Honey Garlic Chicken Wings recipe! These wings are flavorful, sticky, and super easy to make. With just a handful of ingredients, you’ll have a crowd-pleasing dish in no time. Let’s dive into making these mouthwatering wings that will leave everyone asking for more!
Ingredients
List of Ingredients
- 2 pounds chicken wings
- 1/2 cup honey
- 1/4 cup low-sodium soy sauce
- 3 tablespoons minced garlic
- 1 tablespoon fresh ginger, grated
- 1 tablespoon rice vinegar
- 1 teaspoon sesame oil
- 1/2 teaspoon black pepper
- 1 tablespoon cornstarch (optional)
- 2 tablespoons green onions, finely chopped (for garnish)
- Sesame seeds (for garnish)
For this tasty honey garlic chicken wings recipe, you need simple ingredients. Each one adds great flavor.
Chicken wings are the main star. They should be fresh and plump. I use honey for sweetness. It gives the wings a sticky glaze. Low-sodium soy sauce adds a salty depth.
Next, I love minced garlic. It gives a strong punch. Fresh ginger brings a nice warmth. Rice vinegar adds some tang. A dash of sesame oil gives a unique taste.
Black pepper adds a little heat. If you want a thicker sauce, use cornstarch. This is optional but great for extra stickiness.
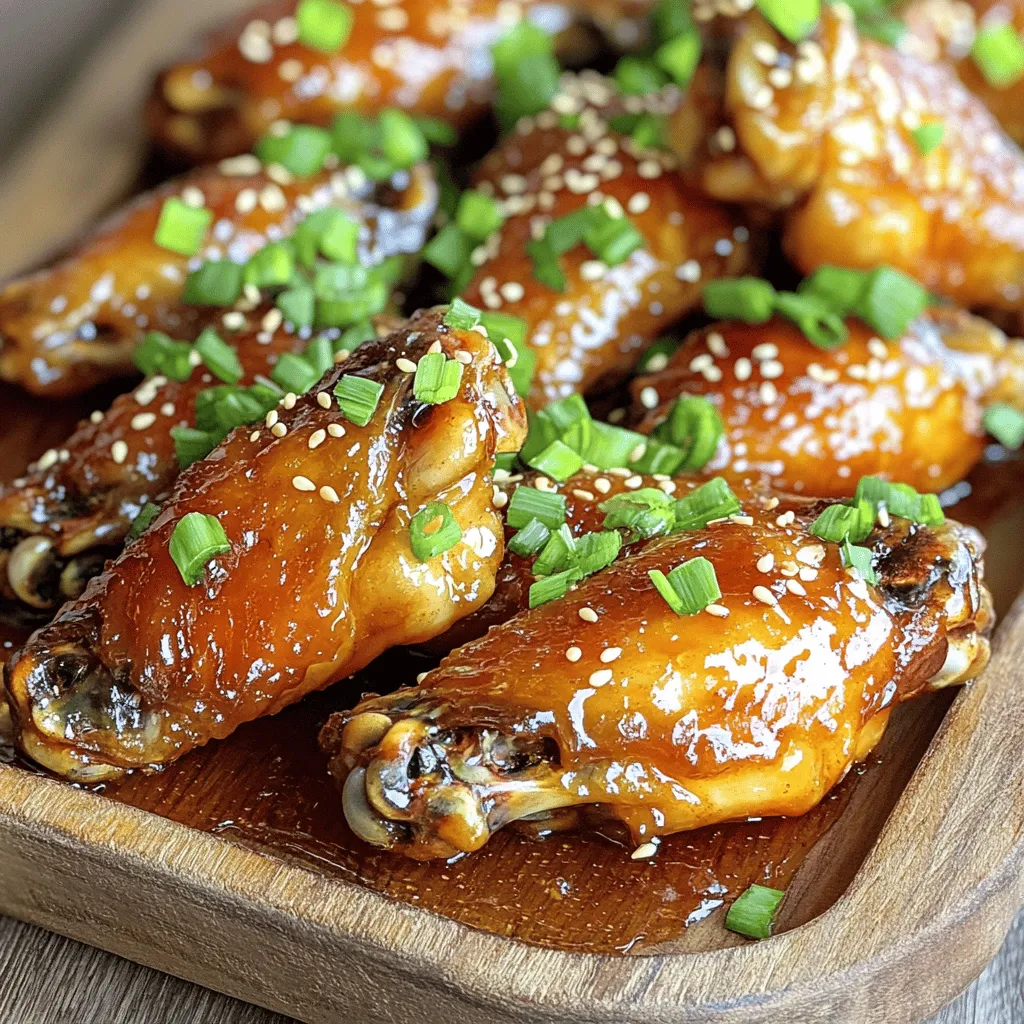
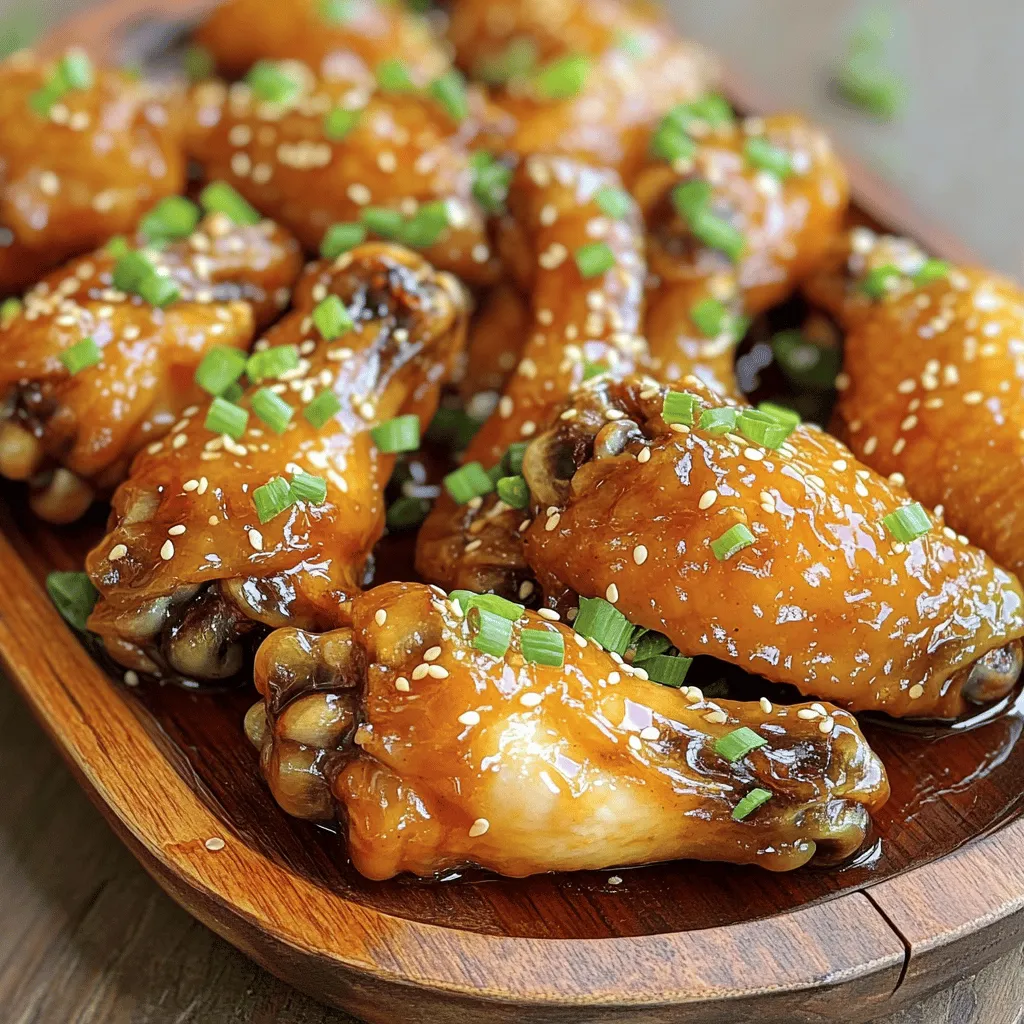
Finally, I like to garnish with green onions and sesame seeds. They make the dish look bright and fresh.You will impress your friends and family with this dish!
Step-by-Step Instructions
Preparation Steps
- Preheat the oven: Start by heating your oven to 400°F (200°C). Line a baking sheet with aluminum foil and place a wire rack on top. This setup helps the wings get crispy as they cook.
- Prepare the wings: Rinse the chicken wings under cold water. Make sure to dry them well with paper towels. A dry surface is key for a crispy finish.
- Make the marinade: In a medium bowl, mix together the honey, low-sodium soy sauce, minced garlic, fresh ginger, rice vinegar, sesame oil, and black pepper. Whisk until well combined. If you want a thicker sauce, stir in cornstarch until it dissolves completely.
Cooking Steps
- Marinate the wings: Place the wings in a large bowl and pour the marinade over them. Toss gently to coat every wing. Cover the bowl and refrigerate for at least 30 minutes, or up to 2 hours for more flavor.
- Bake the wings: Once marinated, arrange the wings on the wire rack in a single layer. Bake in the preheated oven for 25-30 minutes. Flip the wings halfway through to ensure they brown nicely. They should look golden and crispy when done.
- Glaze the wings: In the last 5 minutes, pour any leftover marinade into a small pot. Heat it over medium heat until it boils, then lower the heat and simmer for 3-5 minutes. This thickens the glaze.
- Final touch for serving: Remove the wings from the oven and brush them with the thickened glaze. This adds extra flavor and stickiness.
Carefully place the sticky wings on a platter.
Tips & Tricks
Achieving Crispy Wings
To get crispy wings, start by drying them well. Moisture will make them soggy. Use paper towels to pat them completely dry. A dry surface helps them crisp up in the oven.
Using a wire rack is key, too. Place it on a baking sheet. This allows air to flow around the wings. Good airflow helps them cook evenly and become crispy.
Flavor Enhancements
You can add spices or hot sauce to the marinade. This gives the wings a kick. If you like heat, try adding cayenne or chili powder. You can also adjust the sweetness. If you prefer less sweetness, reduce the honey. Taste the marinade before using it to find your perfect balance.
Serving Suggestions
These wings pair well with a variety of side dishes. Try them with celery sticks or carrot sticks. A cool ranch dip or blue cheese dip works great, too. For presentation, arrange the wings on a large platter. Sprinkle green onions and sesame seeds on top for a pop of color. Enjoy your wings with friends at parties or game nights!

Variations
Alternative Sauces
You can change the sauce for different flavors.
- Spicy honey garlic wings: Add hot sauce to the honey garlic mix. This gives a sweet and spicy kick. Adjust the heat to fit your taste.
- Ginger-soy wings: Replace honey with more soy sauce and add fresh ginger. This will give your wings a savory and zesty twist.
Cooking Methods
You can cook these wings in different ways.
- Air fryer version: Preheat your air fryer to 360°F (182°C). Place the marinated wings in a single layer. Cook for 25-30 minutes, flipping halfway through for even crispiness.
- Grill option: Heat your grill to medium-high. Grill the wings for 15-20 minutes, turning often. This adds a smoky flavor that is hard to beat.
Dietary Adjustments
You can make these wings fit your diet.
- Gluten-free substitution: Use gluten-free soy sauce instead of regular soy sauce. This keeps the flavor while being safe for a gluten-free diet.
- Low-sugar alternatives: Use sugar-free honey or a sugar substitute in the marinade. This way, you can enjoy the wings with less sugar.
Storage Info
Refrigeration Guidelines
To keep your leftover wings fresh, store them in an airtight container. Place a paper towel inside to soak up moisture. This helps prevent sogginess. You can store them in the fridge for up to four days. When you want to eat them again, reheat them in the oven. Set your oven to 350°F (175°C) and bake for 10-15 minutes. This will make them crispy again.
Freezing Options
If you want to save wings for later, freezing is a great choice. After cooking, let the wings cool completely. Place them in a freezer-safe bag or container. Remove as much air as possible to prevent freezer burn. Frozen wings can last for about three months. When you’re ready to eat, thaw them in the fridge overnight. To reheat, bake them at 350°F (175°C) for about 15-20 minutes. This will warm them through and keep them tasty.
FAQs
What is the best way to make chicken wings crispy?
To make chicken wings crispy, dry them well before cooking. Use paper towels to remove moisture. Cooking on a wire rack helps air flow around the wings. This method allows the heat to crisp them up nicely. High heat also helps, so bake at 400°F (200°C).
Can I marinate the wings overnight?
Yes, you can marinate the wings overnight. This extra time lets the flavors soak in deeper. Just ensure you cover the bowl tightly in the fridge. It’s a great way to save time on cooking day. Remember, marinating for at least 30 minutes still gives good flavor.
How do I know when the wings are done cooking?
You know wings are done when they turn golden brown and crispy. Use a meat thermometer to check the internal temperature. It should reach 165°F (74°C) for safe eating. If you see juices running clear, that’s a good sign too.
What are good side dishes to serve with honey garlic chicken wings?
Some great side dishes include crispy fries, coleslaw, or a fresh garden salad. You can also serve them with veggies and dip. Rice or a grain salad can complement them well. Choose sides that balance the sweet and savory taste of the wings.
Can I use other types of chicken for this recipe?
You can use other chicken pieces like drumsticks or thighs. Adjust the cooking time based on the size of the chicken pieces. Ensure they also reach 165°F (74°C) for safe eating. Wings are great for this recipe, but other cuts will work too.
How do I adjust the recipe for larger servings?
To serve more people, simply double or triple the ingredient amounts. Keep in mind the cooking time might change slightly. Make sure to bake the wings in batches if needed. Overcrowding the pan can lead to uneven cooking.
You learned how to make delicious honey garlic chicken wings. First, we listed the ingredients needed. Then, we went through step-by-step instructions for preparation and cooking. I also shared tips for crispy wings and suggested ways to enhance flavors. You can explore variations and know how to store leftovers.
Now, you can impress family and friends with these tasty wings. Enjoy experimenting with this recipe, and happy cooking!


. It will guide you through each step with details and tips. Enjoy cooking! In summary, we explored how to make delicious Roasted Garlic Parmesan Brussels Sprouts. I shared a full list of ingredients and options for substitutions. Fresh ingredients elevate taste and nutrition. You learned step-by-step instructions for perfect roasting, along with tips for flavor and presentation. Variations and storage tips help you customize and save leftovers. Remember to check FAQs for any lingering questions. Enjoy this simple yet tasty dish at your next meal!](https://dishtreats.com/wp-content/uploads/2025/08/f224f6d0-5adb-4fa1-b176-de066c43a5f2-3-768x768.webp)

![- 2 cups diced apples - 1 cup celery, thinly sliced - 1 cup red grapes, halved - 1/2 cup walnuts, chopped - 1/2 cup raisins or dried cranberries - 1 cup plain Greek yogurt - 1 tablespoon honey - 1/2 teaspoon fresh lemon juice - Salt and pepper to taste - Lettuce leaves for serving Fresh produce makes this salad shine. I love using crisp apples, like Granny Smith, for their tartness. They add a nice crunch. The celery brings a refreshing snap, while juicy red grapes add sweetness. Nuts and dried fruits give texture and flavor. Chopped walnuts are my go-to. Toast them for even more flavor. Raisins or dried cranberries add a touch of sweetness, balancing the dish well. For the dressing, I use plain Greek yogurt. It’s creamy and healthy. Honey adds sweetness, and a bit of lemon juice brightens the flavors. Season with salt and pepper to enhance everything. Finally, serve on fresh lettuce leaves. They make a great base and add color. This combination of ingredients creates a delightful Waldorf salad. You can find the full recipe at [Full Recipe]. - Start by adding 2 cups of diced apples to a large bowl. - Drizzle the apples with 1/2 teaspoon of fresh lemon juice. This keeps them fresh and bright. - Next, slice 1 cup of celery into thin pieces. Add this to the bowl. - Halve 1 cup of red grapes and toss them in too. - In the same bowl, mix the fruit with 1/2 cup of chopped walnuts. - Add 1/2 cup of raisins or dried cranberries for sweetness. Gently toss the mixture. - In a separate bowl, combine 1 cup of plain Greek yogurt with 1 tablespoon of honey. Stir until smooth. - Carefully fold the yogurt dressing into the fruit mixture. Make sure everything is coated. - Season with salt and pepper to taste, folding gently to mix. - Cover the bowl and chill it in the fridge for at least 30 minutes. This helps the flavors blend. - When ready, serve on fresh lettuce leaves for a beautiful presentation. Enjoy your Waldorf salad! - For the complete recipe, check out the Full Recipe. You can swap out fruits and nuts to suit your taste. Try pears or oranges for a fresh twist. For nuts, almonds or pecans work well, too. If you want a creamier texture, use Greek yogurt instead of mayonnaise. The yogurt adds protein and keeps the salad light. Toasting walnuts really boosts their flavor. Just place them in a dry pan over medium heat. Stir them until they smell nutty and are lightly browned. You can also adjust sweetness or tartness. If the salad is too sweet, add a dash of lemon juice. For more sweetness, drizzle in extra honey. Serve your Waldorf salad on crisp lettuce leaves for a vibrant look. Arrange the salad in a large bowl or individual cups. Garnish with mint leaves for a fresh pop of color. You can also sprinkle extra toasted walnuts on top for added crunch. These simple touches make your dish stand out. For the full recipe, refer to the Waldorf Wonderland Salad 🥗. {{image_4}} The classic Waldorf salad uses simple, fresh ingredients. It combines apples, celery, grapes, and walnuts in a creamy dressing. Modern twists can add new flavors. You might see variations like adding chicken or swapping yogurt for mayonnaise. These changes keep the dish fresh and fun. You can experiment with spices, too. A hint of cinnamon or nutmeg can add warmth. If you want a vegan Waldorf salad, swap Greek yogurt for a plant-based option. Silken tofu blended with lemon juice makes a great dressing. For a gluten-free version, check your nuts and dried fruits. Most are safe, but some brands add gluten. You can also cut calories by using low-fat yogurt. This keeps the creaminess while reducing fat. Seasonal fruits can enhance the Waldorf salad. In fall, add sliced pears for sweetness. In winter, pomegranate seeds add color and crunch. Fresh berries in summer create a bright, juicy contrast. Each season brings a new twist to this classic salad. Try different fruits to match the season and your taste. The full recipe allows you to mix and match as you please. To store leftover Waldorf salad, place it in an airtight container. This keeps the salad fresh. Use a lid or plastic wrap to seal it well. The salad can last up to 3 days in the fridge. After that, the texture and flavor may change. If you see any browning apples, it’s best to toss them out. You can prepare some ingredients in advance. Chop your apples, celery, and grapes a day before. Keep them in separate containers in the fridge. This saves time when you want to make the salad. If you want to freeze Waldorf salad, I suggest not freezing it whole. The fruits will lose their crunch. Instead, freeze just the nuts or dried fruits. This keeps them fresh longer. When you are ready, mix them in fresh, chilled salad. You can enjoy that fresh taste even after storage! For the full recipe, check out the Waldorf Wonderland Salad. Waldorf Salad dates back to the late 1800s. A chef at the Waldorf Astoria Hotel in New York created it. The original recipe had only apples, celery, and mayonnaise. Over time, people added more ingredients, like walnuts and grapes. This salad became popular at formal dinners and events. It has a classic, timeless appeal that many enjoy today. Yes, you can prepare Waldorf Salad ahead of time. Make it a few hours before serving for best results. Just follow the steps of mixing everything and keep it in the fridge. This helps the flavors blend well. If you plan to serve it the next day, be careful with the apples. They can brown, so use lemon juice to keep them fresh. Waldorf Salad is quite healthy! It features fresh fruits and nuts, which offer great nutrients. Apples provide fiber and vitamins, while walnuts add healthy fats. The Greek yogurt dressing gives protein and a creamy texture. This salad is a great choice for a light meal or side dish. Eating it can help you feel full and satisfied. You can find the full recipe for this delightful salad [here](#). Waldorf salad combines fresh produce, nuts, and a creamy dressing. You learned how to prepare it step-by-step. I shared tips to enhance flavor and presentation. Feel free to adjust ingredients based on your taste. You can also explore various dietary options and seasonal fruits. This salad is not only tasty but also healthy. With proper storage methods, you’ll enjoy it for days. Now, it's time to create your own delicious version!](https://dishtreats.com/wp-content/uploads/2025/06/24fb7af7-5454-4649-a19f-39fd463a867f-768x768.webp)

![- Cooked chicken - Creamy mayonnaise - Dill pickle relish - Ranch seasoning mix - Green onions - Celery - Salt and black pepper - Buttery croissants - Lettuce leaves - Dill pickle slices To make the Pickle Ranch Chicken Salad Croissants, you need a few simple ingredients. Start with cooked chicken. Shredded chicken works best, and you can use leftover rotisserie chicken if you like. Next, grab creamy mayonnaise, which adds richness and binds everything together. You will also need some dill pickle relish. This gives the salad a tangy kick. For flavor, add a packet of ranch seasoning mix. It brings a burst of taste to the dish. Then, you will need green onions and celery. They add crunch and freshness to the chicken salad. Don’t forget salt and black pepper to season your salad to your liking. For the base, use buttery croissants. They are soft and flaky, perfect for holding the chicken salad. You’ll also need lettuce leaves to line the croissants and keep them from getting soggy. Lastly, you can add dill pickle slices on the side for extra crunch and flavor. You can find the full recipe [Full Recipe] in the next section. First, we mix the chicken salad. Start with two cups of cooked chicken, shredded. Add half a cup of creamy mayonnaise and a quarter cup of dill pickle relish. Then, mix in one tablespoon of ranch seasoning. Stir until everything is well combined. Next, we season the mixture. Taste your chicken salad and add salt and black pepper to your liking. This step is key for great flavor. Now, we assemble the croissants. Carefully slice each croissant in half. Place a lettuce leaf on the bottom half. This keeps the croissant from getting soggy. Let’s combine the base ingredients. In a large bowl, mix the chicken, mayonnaise, relish, and ranch seasoning. Use a spatula to blend well. Now, we add vegetables for crunch. Toss in a quarter cup of finely chopped green onions and celery. Mix until all the veggies are evenly spread throughout. Finally, we make the chicken salad shine. After seasoning, ensure everything is properly mixed. This is the moment when you can adjust the flavor if needed. For the finishing touch, scoop the chicken salad onto the lettuce-covered croissant halves. Pile it high for a tasty bite! Don't forget to garnish with extra dill pickle slices for added flavor. For the full recipe, refer to the beginning section. To get the best texture for your chicken salad, start with shredded chicken. It's key to keep the pieces small and evenly shredded. This helps each bite feel tender and smooth. Use cooked chicken that’s still warm, as it mixes better with the other ingredients. When it comes to seasoning, don’t hold back. The ranch seasoning mix adds a great taste. I always suggest starting with a tablespoon. You can adjust to your liking. Taste as you mix. Add salt and pepper, a little at a time, until it’s just right. Presentation can make your croissants stand out. Arrange them neatly on a platter. You can serve them whole or cut in half for easy grabbing. Place a small bowl of extra dill pickles next to them. This adds a nice touch and makes it easy for guests. For sides, consider serving fresh fruit or a light salad. A simple green salad pairs nicely. You can even add some crunchy chips for texture. This makes for a fun and tasty meal that everyone will enjoy. {{image_4}} You can change this recipe to suit your taste. Here are some ideas. - Alternative proteins to try: Instead of chicken, use turkey or canned tuna. Both work well and give a new twist. For a meat-free option, try chickpeas or tofu for a healthy plant-based salad. - Different seasoning blends: Swap the ranch mix for other blends, like garlic or lemon pepper. You can also add some hot sauce for a spicy kick. If you seek healthier choices, here are some easy swaps. - Low-calorie alternatives: Use Greek yogurt instead of mayonnaise. This keeps the creamy texture but cuts calories. You can also use less chicken or add more veggies to lighten it up. - Gluten-free options for croissants: Look for gluten-free croissants at your local store. You can also use lettuce wraps or gluten-free bread for a crunchy and satisfying meal. Explore these variations to make your Pickle Ranch Chicken Salad Croissants even more exciting. For the full recipe, check the recipe section above. To keep your pickle ranch chicken salad croissants fresh, store any leftovers in an airtight container. This helps prevent drying out. You can place a paper towel in the container to absorb moisture. The best time to eat them is within three days for optimal taste. After that, the croissants may become soggy or lose flavor. You might want to enjoy your croissants warm. To reheat them, use an oven or toaster oven. Heat at 350°F for about 5-7 minutes. This keeps the croissants crisp. Avoid using a microwave, as it can make them chewy. If you have extra chicken salad, you can use it in wraps or on a bed of greens. This way, you can create a new meal with the leftovers that is just as tasty! Can I use rotisserie chicken? Yes, rotisserie chicken works great in this recipe. It saves time and adds flavor. Simply shred the chicken and mix it in. How do I make this salad ahead of time? You can make the salad a day in advance. Store it in an airtight container in the fridge. Just assemble the croissants when you’re ready to serve. What are some good sides to serve with these croissants? Some tasty sides include fresh fruit, chips, or a simple green salad. These pair well and add color to your plate. Where can I buy ready-made chicken salad? You can find ready-made chicken salad at grocery stores or deli counters. Look for local options for the freshest taste. Can I substitute the croissants with other bread? Yes, you can use any bread you like. Try using bagels, pita, or even lettuce wraps for a low-carb option. This blog post covered how to make a tasty chicken salad for croissants. You learned the key ingredients and the steps for mixing and assembling. I shared tips to get the best flavors and textures. You can also try different proteins or seasonings to make it your own. Store any leftovers properly to keep them fresh. This dish is great for gatherings or a simple meal at home. Enjoy making your delicious chicken salad and impress your friends and family!](https://dishtreats.com/wp-content/uploads/2025/07/dff408d1-932c-47c7-977b-b0a9332b2143-768x768.webp)
