Easy Strawberry Yogurt Bark Simple and Healthy Snack

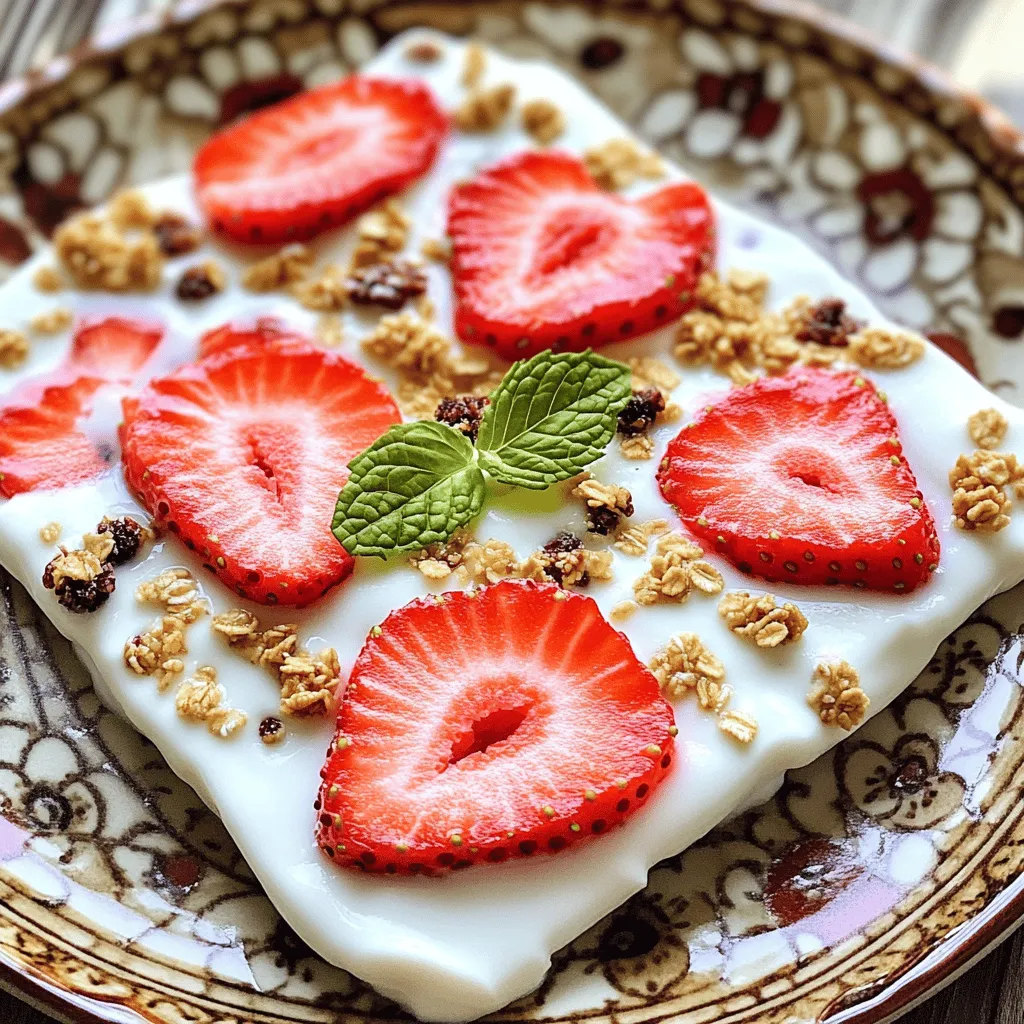
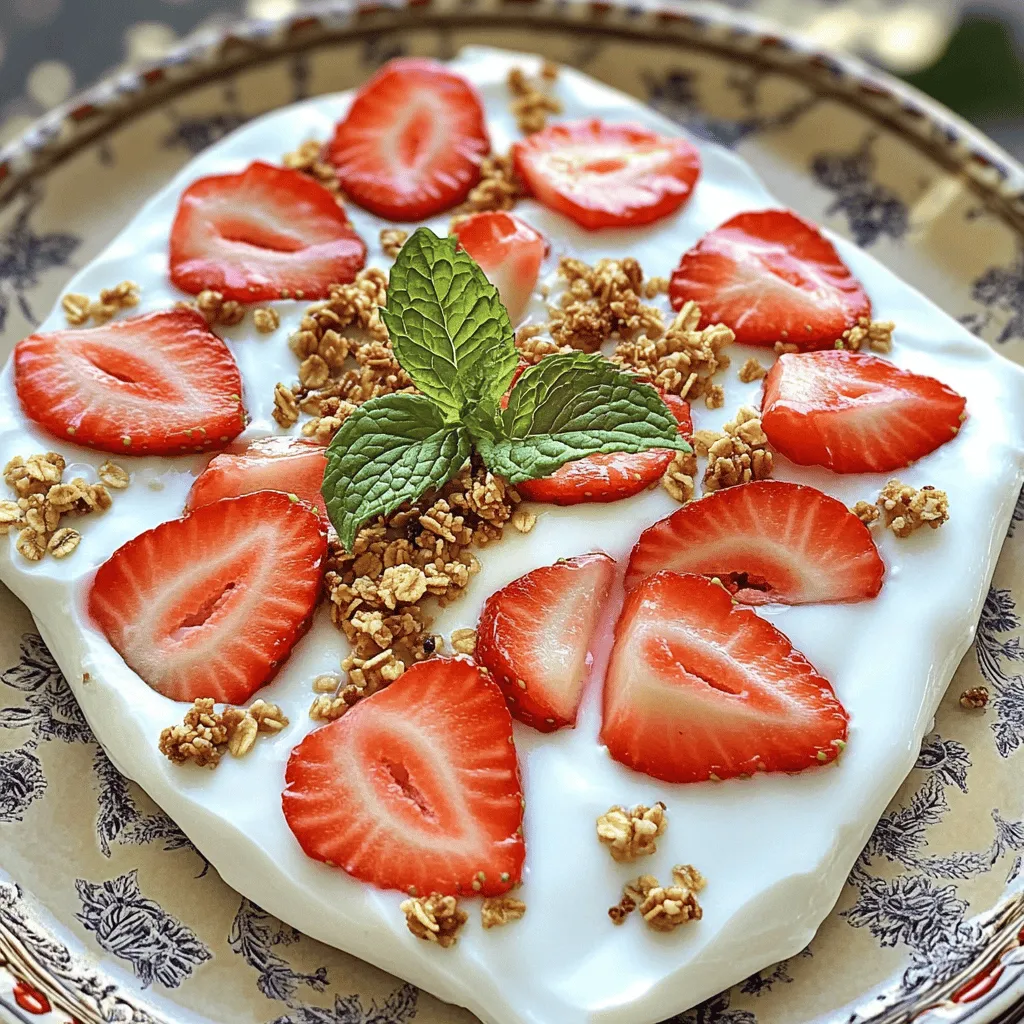
Looking for a simple yet tasty snack? Easy Strawberry Yogurt Bark is perfect! It combines creamy Greek yogurt with fresh strawberries for a sweet treat that’s both healthy and fun to make. In just a few easy steps, you can create a delicious snack that satisfies your sweet tooth and boosts your energy. Let’s dive into this delightful recipe and discover how to whip up this refreshing, guilt-free treat!
Ingredients
Main Ingredients for Easy Strawberry Yogurt Bark
- 2 cups Greek yogurt (plain or vanilla)
- 1 cup fresh strawberries, hulled and thinly sliced
- 2 tablespoons honey or maple syrup (optional)
The main ingredients for Easy Strawberry Yogurt Bark are simple and fresh. Greek yogurt gives it a creamy base. You can use plain or vanilla yogurt based on your taste. Fresh strawberries add sweetness and color. Honey or maple syrup sweetens the mix, but you can skip it if you prefer.
Optional Add-ins
- 1/4 cup granola or crushed nuts
- Fresh mint leaves for garnish
You can add granola or crushed nuts for a crunchy texture. This also boosts flavor and nutrition. Fresh mint leaves work great as a garnish. They make the dish look pretty and add a refreshing taste.
Nutritional Information
A serving of this yogurt bark has about 100 calories. It includes protein and healthy fats from the yogurt. Strawberries add vitamins and fiber. If you add granola or nuts, you increase the fiber and healthy fats even more. This snack is not only tasty but also good for you.
Step-by-Step Instructions
Preparation Steps
- Line a baking sheet with parchment paper. Make sure it sticks out on all sides. This helps you pull out the bark easily later.
- In a bowl, mix 2 cups of Greek yogurt with 2 tablespoons of honey or maple syrup. Stir until smooth. Taste it! You can add more sweetener if you like.
Assembling the Bark
- Pour the yogurt mixture onto the baking sheet. Use a spatula to spread it out evenly. Aim for a thickness of about 1/4 inch.
- Take 1 cup of sliced strawberries and place them on top of the yogurt. Press them down a little to stick.
- Scatter 1/4 cup of granola or crushed nuts on top. This adds a nice crunch to your bark.
Freezing and Serving
- Place the baking sheet in the freezer. Let it freeze for about 3 to 4 hours. You want it to be solid all the way through.
- When it’s frozen, take it out and break it into pieces. You can make shards or bite-sized pieces.
- Serve it right away for a cool treat. If you have leftovers, store them in an airtight container in the freezer for up to a week.
Tips & Tricks
Customization Options
You can make this yogurt bark your own! Swap fruits like bananas, blueberries, or even mango. Each fruit adds its own flavor and charm. You can also change the yogurt. Use coconut yogurt for a tropical twist or almond yogurt for a nutty taste.
If you like it sweeter, adjust the honey or maple syrup. Start with two tablespoons and taste. Add more if you want it sweeter. You control the sweetness!
Presentation Ideas
When serving, use a colorful plate to make it pop. A simple white plate works too, but a vibrant one adds flair. Garnish with fresh mint leaves. They add color and freshness.
For gatherings, cut the bark into fun shapes. Use cookie cutters for stars or hearts. This makes a snack more fun and invites conversation.
Common Mistakes to Avoid
One big mistake is not freezing long enough. The yogurt needs at least 3 to 4 hours to freeze fully. If it’s not solid, it won’t break into nice pieces.
Also, watch the layer thickness. Aim for about 1/4 inch thick. If it’s too thick, it may not freeze well. If it’s too thin, it might break easily. Keep an eye on these details for the best results!

Variations
Flavor Variations
You can mix it up by using different berries. Blueberries and raspberries give a fun twist. You can also add flavors like vanilla or almond extract. Just a few drops can change the taste completely.
Dietary Modifications
If you want a dairy-free option, use coconut yogurt instead of Greek yogurt. For vegan needs, skip the honey and use agave nectar or maple syrup. These swaps keep your snack tasty and healthy. You can also use low-sugar yogurt to cut down on sweetness.
Seasonal Variations
This recipe is great for using seasonal fruits. In summer, try peaches or cherries. In fall, add apples or pears. It helps keep the recipe fresh and exciting. Use whatever fruits you have on hand to adapt the recipe. You can always make your own unique version of this snack with what you find!
Storage Info
Best Practices for Storing Leftovers
To keep your Easy Strawberry Yogurt Bark fresh, use an airtight container. This helps prevent freezer burn. Make sure it’s sealed tightly. You can store it in the freezer for up to one week. After that, the texture and taste may change.
Thawing Tips
To safely thaw your yogurt bark, remove it from the freezer. Place it in the fridge for about 30 minutes. This method keeps the texture smooth and creamy. If you’re in a hurry, you can leave it at room temperature for 10-15 minutes. Just be careful not to let it sit too long, or it may melt.
Re-freezing Considerations
It is not safe to re-freeze yogurt bark once it has thawed. Doing so can change the texture and taste. Instead, if you have leftovers, try to eat them within a week. If you notice any ice crystals forming, it’s best to toss it. Always handle your leftovers gently to maintain that delightful crispness.
FAQs
How long does Easy Strawberry Yogurt Bark last in the freezer?
Easy Strawberry Yogurt Bark can last about one week in the freezer. Store it in an airtight container. This keeps it fresh and prevents freezer burn. Always check for any ice crystals before eating. If you see any, it’s best to toss it.
Can I use frozen strawberries instead?
Yes, you can use frozen strawberries. However, they may release more juice than fresh ones. This could make the yogurt bark a bit watery. On the plus side, frozen strawberries are often cheaper and available year-round. Just make sure to thaw them and drain any extra juice before adding them to the yogurt.
What is the best way to cut frozen yogurt bark?
To cut frozen yogurt bark easily, let it thaw for a few minutes. This softens it just enough to cut through without breaking. Use a sharp knife or a pizza cutter for clean slices. If you want fun shapes, use cookie cutters!
How to make Easy Strawberry Yogurt Bark without sugar?
You can use natural sweeteners like mashed bananas or applesauce. These options add sweetness without added sugar. You can also try using stevia or monk fruit for a low-calorie choice. Just mix the sweetener into the yogurt until it reaches your desired taste.
In this blog post, we explored how to make Easy Strawberry Yogurt Bark. We covered the main ingredients, optional add-ins, and step-by-step instructions for preparation. We also shared tips for customization and common mistakes to avoid.
As you create this tasty treat, remember it’s all about your preferences. Feel free to experiment with fruits and flavors. Enjoying yogurt bark can be fun and healthy!


![- 1 lb (450g) chicken breast, thinly sliced - 1 cup fresh Thai basil leaves, packed - 3 cloves garlic, minced - 2 red Thai chili peppers, thinly sliced (adjust based on your spice preference) For this dish, I prefer chicken breast. It cooks quickly and stays juicy. Fresh Thai basil gives this meal its unique flavor. Garlic adds a nice aroma, and Thai chili peppers bring heat. You can control the spice by adding more or less chili. - 2 tablespoons soy sauce - 1 tablespoon oyster sauce (or substitute with mushroom sauce for vegetarian) - 1 tablespoon fish sauce (or an extra tablespoon of soy sauce for vegetarian) - 1 teaspoon sugar (to balance flavors) - 1 tablespoon vegetable oil (for frying) These sauces are key to great taste. Soy sauce offers saltiness, while oyster and fish sauces add depth. Sugar balances the salty flavors, making everything taste better. - 1 bell pepper, sliced (your choice of color for visual appeal) - 1 small onion, sliced into thin wedges - Optional: other vegetables for added nutrition I like using bell pepper and onion for color and crunch. You can add other veggies like carrots or snap peas. They bring more nutrition and flavor, making the dish more vibrant. For the full recipe, refer to the [Full Recipe]. To start, you need to combine the chicken with the sauces. In a medium bowl, add the sliced chicken breast, soy sauce, oyster sauce, fish sauce, and sugar. Mix these ingredients well so the chicken gets all the flavor. Let it marinate for 15 minutes. This short time helps the chicken absorb the tasty sauces. Next, heat the vegetable oil in a large skillet or wok over medium-high heat. You want the oil to shimmer before adding anything. Then, add the minced garlic and sliced Thai chili peppers. Stir-fry them for about 30 seconds until they smell amazing. Be careful not to burn the garlic. Now, add the marinated chicken to the pan. Spread it out evenly for even cooking. Stir-fry for about 5 to 7 minutes. Cook until the chicken is no longer pink and has a nice brown color. After that, toss in the sliced bell pepper and onion. Stir-fry for another 3 to 4 minutes. This will make the vegetables tender but still crisp. Once the chicken and veggies are done, take the skillet off the heat. Gently fold in the fresh Thai basil leaves. They will wilt quickly from the heat and add a lovely aroma. Serve the dish hot, over a bed of fluffy jasmine rice. This rice complements the stir-fry well. Enjoy your Thai Basil Chicken Stir-Fry! For the full recipe, check out the details above. Using fresh ingredients makes a big difference. Fresh Thai basil gives a sweet and fragrant flavor to the dish. Always choose bright green basil leaves. They should smell strong and sweet. The chicken should be fresh, too. This keeps your stir-fry tasty and safe to eat. For the best flavor, cook on high heat. A hot pan helps to sear the chicken. This adds a nice caramel color and enhances the taste. When you add garlic and chili, cook them quickly. This brings out their strong flavors without burning them. You can change the heat level easily. If you want it milder, remove the seeds from the chili peppers. You can also use fewer peppers or substitute with sweet bell peppers. If you like a kick but want it less spicy, try adding sugar. It balances the heat. You can also use a bit of honey for sweetness without heat. Pair your Thai basil chicken stir-fry with jasmine rice. The rice absorbs the sauce well. You can also add a side of steamed veggies for extra nutrition. For garnishes, consider adding lime wedges or crushed peanuts. They add color and crunch. Fresh cilantro or extra basil leaves also make it pop. Enjoy your meal with these simple touches! For the full recipe, check out the details above. {{image_4}} For a vegetarian or vegan version, you can swap chicken for tofu or tempeh. These options give a nice texture. Use mushroom sauce instead of oyster sauce. It brings depth and umami flavor. For the fish sauce, simply add an extra tablespoon of soy sauce. This keeps the taste bold. To maintain flavor, marinate the tofu or tempeh just like chicken. Allow it to soak up the sauces. When cooking, make sure to press out excess moisture. This helps achieve that nice, crispy texture we all love. If you want to try something new, switch the chicken for shrimp or beef. Shrimp cooks quickly, so cut down the cooking time to about 3-4 minutes. Beef takes longer. Slice it thin and cook it for about 6-8 minutes. Remember, cooking times change based on what protein you use. Always make sure your protein is fully cooked before adding in the veggies. Want to shake things up? Add sauces like teriyaki or sriracha for an exciting twist. Teriyaki gives a sweet flavor, while sriracha adds heat. You can even mix both for a sweet and spicy kick. Feel free to experiment with herbs and spices too. Adding cilantro or mint can brighten the dish. Try a sprinkle of lime juice for an extra zest. These tiny changes can create a whole new taste experience. For the full recipe, check the section above. Enjoy cooking! To keep your Thai basil chicken stir-fry fresh, store it in an airtight container. Refrigerate the leftovers within two hours of cooking. If you want to save it longer, freeze the stir-fry. Make sure to cool it completely before freezing. This method helps retain flavor and texture. When you reheat your stir-fry, use a skillet for the best results. Heat it over medium warmth and stir often. This keeps the chicken juicy and prevents it from drying out. For rice, add a splash of water and cover it. This helps the rice steam and become fluffy again. In the fridge, your Thai basil chicken stir-fry lasts up to four days. If frozen, it can last for about three months. Always check for off smells or changes in color. If you see these, it's best to discard it for safety. Thai Basil Chicken Stir-Fry has roots in Thai street food. This dish reflects the vibrant flavors of Thai cuisine. It showcases fresh herbs, bold spices, and simple cooking techniques. Thai basil, known for its unique flavor, is key to this dish. It adds a sweet and slightly spicy note that enhances the chicken. This meal represents the balance of sweet, salty, and spicy tastes typical in Thai dishes. Each bite transports you to bustling markets in Thailand. Yes, you can prepare Thai basil chicken stir-fry in advance. Cook and store it in the fridge for up to three days. To keep it fresh, store it in an airtight container. When you are ready to eat, simply reheat it on the stove. This dish tastes even better the next day as flavors meld. Serve it over freshly cooked jasmine rice for a quick meal. If you cannot find Thai basil, you have options. Sweet basil or holy basil works well as a substitute. Sweet basil offers a milder flavor, while holy basil is spicier. You can also mix in a bit of mint for a fresh twist. While these substitutes change the taste slightly, they still create a tasty dish. Just remember, the flavor will differ from the original recipe. The spice level of Thai Basil Chicken Stir-Fry can vary. It depends on the number of Thai chili peppers you use. Typically, this dish has a mild to medium heat. If you prefer a milder dish, use fewer chilis or remove the seeds. For those who love heat, add extra chilis or a dash of hot sauce. Adjusting spice levels allows everyone to enjoy this flavorful meal. Thai Basil Chicken Stir-Fry is a simple yet flavorful dish. You learned about the key ingredients, like fresh basil and chicken. The step-by-step instructions make cooking easy, even for beginners. We explored tips to enhance flavor and adjust spice levels to suit your taste. You can even try fun variations with different proteins or herbs. Enjoy making it your own, and savor the fresh flavors. Every bite will bring joy to your table.](https://dishtreats.com/wp-content/uploads/2025/06/20a2f9de-1755-4b6a-ade1-393123d10e24-768x768.webp)


![To make delicious roasted red pepper hummus, gather these key ingredients: - 1 cup canned chickpeas, drained and thoroughly rinsed - 1 large roasted red pepper (store-bought jarred or homemade) - 2 tablespoons tahini - 2 tablespoons extra virgin olive oil, plus more for drizzling - 2 tablespoons freshly squeezed lemon juice - 1 clove of garlic, finely minced - 1/2 teaspoon ground cumin - Salt, to taste These ingredients create a smooth and creamy dip. Each one plays a vital role. Chickpeas give it body. Roasted red pepper adds sweetness and depth. Tahini brings a nutty flavor, while olive oil adds richness. Lemon juice gives it brightness and balance. Garlic adds a punch, and cumin adds warmth. To make your hummus even better, you can add some garnishes: - Fresh parsley, finely chopped (for garnish, optional) - Paprika, for garnish (optional) These garnishes not only look nice but also enhance the taste. Fresh parsley adds a pop of color and freshness. Paprika gives a hint of smokiness and warmth. You can use these garnishes to personalize your hummus. For the full recipe, check the detailed instructions that guide you through preparation and blending for a perfect dip. Roasting Techniques (Oven & Grill) You can roast red peppers in two main ways. The oven is great for a consistent roast. Start by preheating your oven to 450°F (230°C). Place whole red peppers on a lined baking sheet. Roast them for 20-25 minutes. Turn them every few minutes until the skin is blistered and charred. If you prefer grilling, place the peppers directly on the grill. Turn them often until they are blackened all around. How to Steam and Peel After roasting, steaming helps peel the skin. Place the hot peppers in a heatproof bowl. Cover it tightly with plastic wrap for about 10 minutes. This traps steam, loosening the skin. Once cool enough to handle, peel off the blackened skin. Remove the seeds, and set the peppers aside. Food Processor Tips Using a food processor makes blending easy. Start with the chickpeas and roasted red pepper in the bowl. Add tahini, olive oil, lemon juice, minced garlic, and ground cumin. Blend on low speed first. Gradually increase to high until smooth. Achieving Creamy Consistency To get a creamy texture, you may need to add water. If the hummus is thick, add one tablespoon at a time while blending. Keep processing until it reaches your desired consistency. Importance of Seasoning Seasoning makes a big difference in taste. After blending, taste your hummus. Add salt slowly, mixing well after each addition. This helps to enhance the overall flavor. Customizing Thickness If you want a thinner hummus, keep adding water. Blend in small amounts until you reach the right thickness. Remember, you can always add more, but you can't take it out! - Experimenting with Spices: You can add spices to boost flavor. Try smoked paprika for a smoky taste. Or add a pinch of cayenne pepper for some heat. Each spice adds a unique twist to your hummus. - Using Fresh Ingredients: Fresh ingredients make a big difference. Fresh garlic brings a sharp bite. Choose ripe lemons for the best juice. They add zest and brightness to the dish. - Store-Bought Ingredient Options: If you're short on time, use store-bought roasted red peppers. They save you the hassle of roasting at home. Check the jar for quality; it should have no added sugars. - Quick Prep Hacks: Use canned chickpeas to save time. They are ready to go. Rinse them well to remove excess sodium. This step helps keep your hummus light and tasty. - Best Pairings for Hummus: Roasted red pepper hummus pairs well with fresh veggies. Carrot sticks, cucumber slices, and bell peppers create a colorful plate. You can also serve it with pita chips or crackers. - Creative Serving Ideas: For a fun twist, serve hummus in cute bowls. Drizzle olive oil on top for a glossy finish. Add a sprinkle of paprika and fresh parsley for color. It looks great and tastes even better. For the full recipe, check out the [Full Recipe]. {{image_4}} To make your hummus spicy, add fresh jalapeños or crushed red pepper flakes. Start with a small amount. Blend everything well and taste. Adjust the heat to your liking. For a balanced flavor, add a bit of honey or maple syrup. This sweetness can tone down the heat and enhance the taste. Fresh herbs give hummus a bright twist. Try adding basil, cilantro, or dill. Just chop them finely before blending. These herbs pair well with roasted red pepper. They add freshness and depth. You can also mix in some sun-dried tomatoes for a Mediterranean vibe. It brings a rich flavor that complements the hummus nicely. Want to make your hummus even healthier? Add superfoods like spinach or kale. They blend in well and boost nutrients. If you have dietary needs, this hummus is easy to adjust. It's naturally vegan and gluten-free. You can enjoy it without worry. Check the full recipe for more tips on adding these healthy ingredients. To keep your roasted red pepper hummus fresh, use an airtight container. Glass containers work best to avoid any odors. If you do not have glass, BPA-free plastic containers are also a good choice. This way, your hummus stays tasty and does not absorb other flavors in the fridge. Homemade hummus lasts up to one week in the fridge. Make sure to check for any signs of spoilage before eating. If it looks or smells off, it is best to toss it. You can freeze hummus for longer storage. First, place the hummus in a freezer-safe container. Leave some space at the top for expansion as it freezes. You can also use ice cube trays for smaller portions. To thaw, place the frozen hummus in the fridge overnight. This will help keep its texture smooth. If it seems a bit thick after thawing, simply add a splash of water and stir well. Enjoy your hummus in wraps, sandwiches, or with fresh veggies. - Start by gathering your ingredients. - Roast the red pepper and cool it. - Blend chickpeas, roasted pepper, tahini, olive oil, lemon juice, garlic, and cumin. - Add water for the right texture. - Season with salt and blend again. - Serve it with a drizzle of olive oil. Making roasted red pepper hummus is simple. You can easily prepare it at home. Follow the quick steps above, and you have a fresh dip ready in about 35 minutes. For the full recipe, check out the detailed instructions provided earlier. - Fresh veggie sticks (carrots, cucumbers, bell peppers) - Warm pita bread or pita chips - Crackers or breadsticks - Grilled meats or seafood - Salads as a dressing Roasted red pepper hummus is versatile. It pairs well with many foods. Fresh veggies make a crunchy, healthy option. You can also enjoy it with pita bread for a classic taste. - Local grocery stores often carry it. - Check health food stores for unique brands. - Look in the deli section for fresh options. - Popular brands include Tribe, Sabra, and Hope. If you prefer buying hummus, many stores have pre-made options. Check your local store's shelves or the deli section for fresh varieties. Each brand may offer a unique taste, so explore a few! - High in protein from chickpeas. - Contains healthy fats from olive oil and tahini. - Rich in vitamins from red peppers and garlic. - Low in saturated fat and cholesterol-free. Roasted red pepper hummus is a healthy snack. It offers many nutritional benefits. The chickpeas give protein, while olive oil adds healthy fats. This dip is not just tasty; it's good for you too! Roasted red pepper hummus is easy to make and packed with flavor. We discussed key ingredients like chickpeas, roasted red peppers, and tahini. You learned step-by-step how to prepare and blend, plus tips to enhance taste and texture. Explore variations by adding spices or herbs to fit your taste. Don't forget how to store your hummus for freshness. I hope this guide inspires you to create your own hummus and enjoy it!](https://dishtreats.com/wp-content/uploads/2025/07/4eff3fe8-7a50-4e3c-86ee-c946a92fe799-768x768.webp)
