Easy Garlic Parmesan Knots Flavorful and Simple Recipe

Craving a delicious snack that’s quick and easy? You’re in the right spot! These Easy Garlic Parmesan Knots are bursting with flavor and perfect for any occasion. With just a few simple ingredients and steps, you’ll have golden, cheesy knots that everyone will love. Let’s dive into this simple recipe and transform your snack game. You won’t believe how easy it is!
Ingredients
List of Ingredients
- 1 package (16 oz) refrigerated pizza dough
- 4 tablespoons unsalted butter, melted
- 4 cloves garlic, minced
- ½ cup grated Parmesan cheese
- 2 tablespoons fresh parsley, finely chopped
- 1 teaspoon garlic powder
- ½ teaspoon salt
- ¼ teaspoon black pepper
When it comes to making Garlic Parmesan Knots, the ingredients are key. Each one plays a part in creating that delicious flavor.
Pizza dough is the base. Choose a good quality, refrigerated pizza dough. It saves time and makes the process easier.
Unsalted butter adds richness. You will melt this butter to mix with the garlic. It gives the knots a tasty coating.
Next is garlic. I use fresh garlic for its strong flavor. Mincing it helps release its oils, packing a punch.
Parmesan cheese brings a salty, nutty taste. Grate it finely so it melts well on the knots.
Fresh parsley adds color and a light taste. It brightens the dish and makes it look nice.
Garlic powder boosts the garlic flavor. It blends well with the melted butter.
Salt and black pepper round out the flavors. They ensure each bite is savory.
Tools Needed
- Baking sheet
- Parchment paper
- Mixing bowl
- Pastry brush
- Knife or pizza cutter
Having the right tools makes cooking easier. A baking sheet is essential for holding your knots. Parchment paper prevents sticking and makes cleanup simple.
A mixing bowl is needed for your garlic butter. Use a pastry brush to spread the butter on the knots.
Finally, a knife or pizza cutter helps you cut the dough into strips. These tools will help you create perfect knots every time.
Step-by-Step Instructions
Prepping the Oven and Dough
- Preheat the oven to 400°F (200°C).
- Prepare the baking sheet with parchment paper.
Before you start, get the oven hot. This step helps the knots bake evenly. Lining the baking sheet with parchment paper keeps the knots from sticking. It also makes cleaning easier.
Shaping the Knots
- Roll out the pizza dough and cut into strips.
- Tie each strip into a knot and place on the baking sheet.
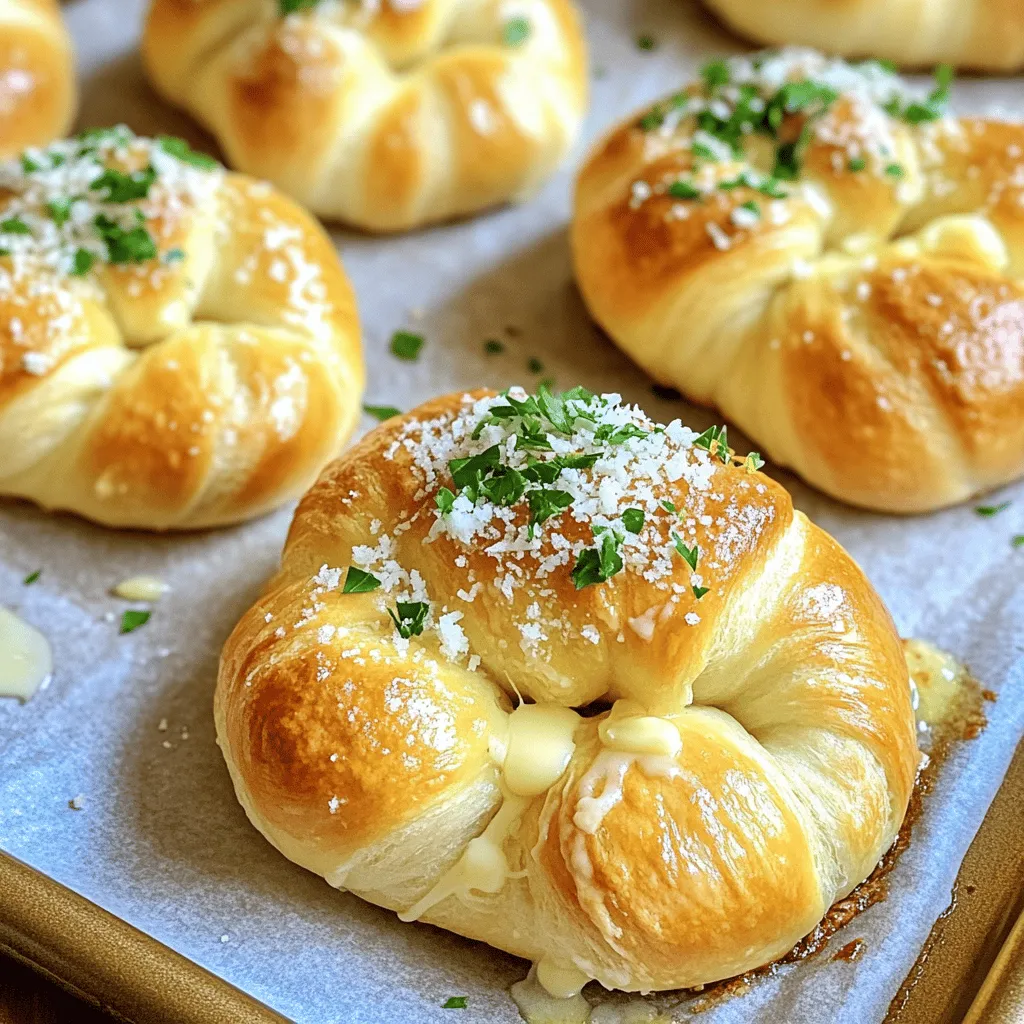
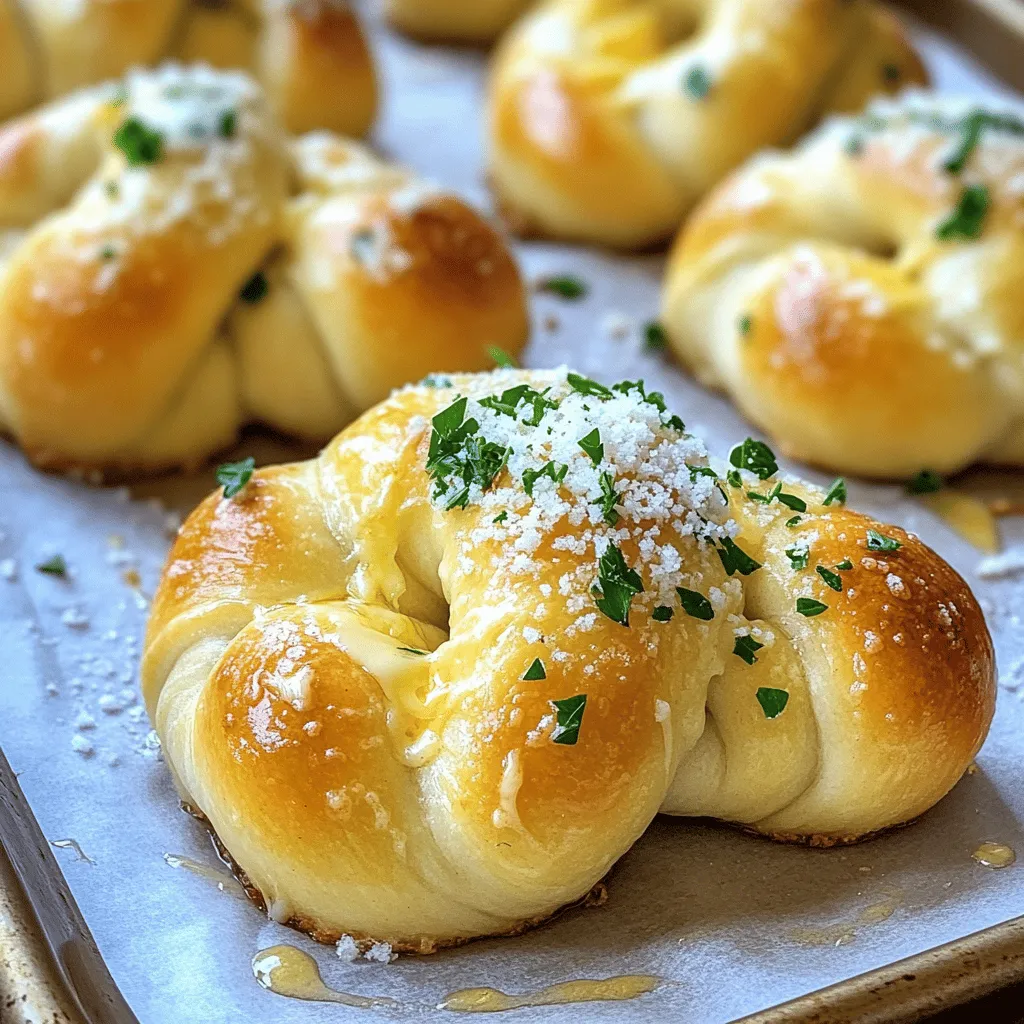
Take your refrigerated pizza dough and roll it out on a floured surface. Aim for about ¼ inch thick. Then use a knife or pizza cutter to slice the dough into 1-inch wide strips. Each strip should be about 6 inches long. Now, tie each strip into a simple knot. Tuck the ends underneath to make them look neat. Place the knots on your baking sheet with some space between them. This allows them to rise while baking.
Making the Garlic Butter Mixture
- Combine melted butter, garlic, garlic powder, salt, and black pepper.
In a mixing bowl, mix together melted butter, minced garlic, garlic powder, salt, and black pepper. Stir well until all ingredients combine. This garlic butter will give your knots a rich flavor.
Baking the Knots
- Coat knots with garlic butter and sprinkle cheese and parsley.
- Bake for 12-15 minutes until golden brown.
Use a pastry brush or spoon to coat each knot with the garlic butter mixture. Be generous! After that, sprinkle grated Parmesan cheese and chopped parsley over the top. Then, place the baking sheet in the oven. Bake for 12 to 15 minutes. Keep an eye on them as they bake. Look for a golden brown color, which means they are ready.
Tips & Tricks
Perfecting the Garlic Flavor
To get the best garlic taste, use fresh garlic. Fresh garlic has a bright and strong flavor. You can also mix in garlic powder for an extra kick. Try adding a pinch of red pepper flakes for heat. It gives a nice twist to the flavor.
Ensuring the Right Texture
For soft yet chewy knots, don’t roll the dough too thin. Aim for about ¼ inch thick. This helps keep them fluffy. Watch the time closely while baking. If you overbake, they will turn hard. Bake until they are golden brown, then remove them right away.
Making Ahead
You can prepare these knots in advance. Shape them and place them on the baking sheet. Cover them and chill in the fridge for up to 24 hours. For longer storage, freeze the unbaked knots. When ready to bake, just pop them in the oven straight from the freezer. They take a little longer to cook, so add a few extra minutes.

Variations
Cheese Variations
You can switch up the cheese in your knots. Try using mozzarella or cheddar instead of Parmesan. Both will melt wonderfully and add a rich taste. For an even cheesier bite, place some cheese inside the knots before you tie them. This will give you a gooey, cheesy surprise with each bite.
Herb Infusions
Herbs can add a new dimension to your knots. Fresh rosemary or oregano gives a bright flavor. You can also create a garlic herb butter. Just mix your melted butter with chopped herbs. This will coat the knots in a fragrant layer of flavor.
Spicy Additions
If you love heat, add red pepper flakes to your garlic butter. This gives the knots a warm kick. For a fun twist, make taco-inspired garlic knots. Mix in taco seasoning and top with shredded cheese. These will be a hit at any gathering.
Storage Info
Proper Storage Techniques
To keep leftover Garlic Parmesan Knots fresh, store them in an airtight container. This keeps them soft and tasty. If you do not have a container, wrap them tightly in plastic wrap or foil. You can store them at room temperature for up to two days. For longer storage, place them in the fridge for up to a week.
Reheating Instructions
When you want to enjoy your Garlic Parmesan Knots again, you can reheat them quickly. Use the oven for best results. Preheat it to 350°F (175°C). Place the knots on a baking sheet and warm them for about 5 to 8 minutes. This will help keep them soft and crisp.
If you are short on time, you can use the microwave. Place the knots on a microwave-safe plate. Heat them in short bursts, about 10 to 15 seconds. Check after each burst to avoid sogginess. Enjoy them warm!
FAQs
Can I use homemade pizza dough instead?
Yes, you can use homemade pizza dough. Make sure it is soft and easy to handle. Roll it out to about ¼ inch thick. Cut it into 1-inch wide strips, then tie them into knots. Follow the same steps for coating with garlic butter and baking.
What can I serve with Garlic Parmesan Knots?
You can serve these knots with many tasty sides. Try marinara sauce for dipping. It adds a nice tomato flavor. You can also serve them with garlic aioli or ranch dressing. A side salad or soup pairs well too, enhancing your meal.
How do I know when the knots are done baking?
Your knots are done when they turn a golden brown. They should feel firm to the touch but still soft inside. Check the bottom; it should be lightly browned. If they look too dark, take them out right away to avoid burning.
In this post, we covered how to make Garlic Parmesan Knots. We started with the ingredients and tools needed, then I outlined each step—from prepping the oven to baking. I shared tips for great flavor, texture, and variations you can try.
These knots are simple to make and perfect for any meal. Enjoy them fresh or reheat leftovers easily. Dive into your kitchen and create these tasty treats today!


![To make this dish, you will need: - 1 lb Brussels sprouts, trimmed and halved - 3 tablespoons extra virgin olive oil - 1/4 cup pure maple syrup - 1 tablespoon balsamic vinegar - 1 teaspoon garlic powder - Salt and freshly ground black pepper to taste These ingredients come together to create a sweet and savory glaze. The maple syrup adds sweetness, while the balsamic vinegar gives tanginess. The olive oil helps with roasting, making the sprouts tender and tasty. You can add these optional ingredients for extra flavor and texture: - 1/4 cup chopped walnuts - Fresh thyme leaves for garnish Walnuts add a nice crunch, while thyme gives a fresh aroma. Both options enhance the dish without overpowering it. This dish is not just tasty; it’s also good for you. Here’s a quick look at the nutrition per serving: - Calories: About 180 - Protein: 3g - Carbohydrates: 25g - Fat: 8g - Fiber: 4g Brussels sprouts are rich in vitamins C and K. The maple syrup provides natural sugars, making this dish a healthy choice. You get great flavors and health benefits in one meal. For the complete recipe, check the Full Recipe section above! First, we need to preheat the oven to 400°F (200°C). This heat is perfect for roasting. A hot oven ensures crispy edges and tender centers for your Brussels sprouts. Next, gather your ingredients. You will need: - 1 lb Brussels sprouts, trimmed and halved - 3 tablespoons extra virgin olive oil - 1/4 cup pure maple syrup - 1 tablespoon balsamic vinegar - 1 teaspoon garlic powder - Salt and freshly ground black pepper to taste - 1/4 cup chopped walnuts (optional for crunch) - Fresh thyme leaves for garnish (optional for aroma and color) In a large bowl, mix the halved Brussels sprouts with olive oil, maple syrup, balsamic vinegar, garlic powder, salt, and pepper. Toss everything well. Make sure every sprout gets coated in the sweet and savory sauce. This step is key for flavor. Prepare your baking sheet by lining it with parchment paper. This makes cleaning easy and helps prevent sticking. Spread the Brussels sprouts in a single layer on the sheet. Give them space to roast well. Now, place the baking sheet in the hot oven. Roast the sprouts for 25 minutes. Halfway through, stir them to promote even cooking. You want them to get tender and brown. If you add walnuts, toss them on the sheet during the last 5 minutes. This will give them a nice toast and extra crunch. Once done, take the Brussels sprouts out and let them cool for a minute. Transfer them to a serving dish. For a finishing touch, sprinkle fresh thyme leaves on top. This adds a nice pop of color and aroma to your dish. Enjoy this full recipe for a delicious treat! To get that perfect glaze, start with good maple syrup. Use pure maple syrup for the best flavor. Mix it well with olive oil and balsamic vinegar; this combo really shines. Make sure to coat the Brussels sprouts evenly. This helps each piece get that sweet, sticky glaze. Toss them well in the bowl before roasting. Roasting Brussels sprouts needs some care. First, preheat your oven to 400°F (200°C). This hot oven helps them caramelize. Spread the sprouts on a baking sheet in a single layer. If they are crowded, they won't brown well. Stir them halfway through cooking to ensure even roasting. You want them golden brown and tender, about 25 minutes in the oven. When ready to serve, think about how to make them look nice. Place the roasted sprouts on a large platter. You can arrange them in a circle for a pretty look. If you added walnuts, sprinkle them on top for crunch. Fresh thyme leaves also add color and smell great. This makes the dish not just tasty but beautiful too. For the full recipe, check out the details above. {{image_4}} You can switch up the sweetener for a twist. Try honey or agave syrup. These will add their own unique flavors. You can also use coconut sugar for a richer taste. If you like a kick, add some chili flakes for heat. A dash of orange juice can also brighten up the sweetness. This recipe is already vegetarian. To make it vegan, ensure the maple syrup is pure. You can also use almond oil instead of olive oil for a different flavor. For creaminess, add a dollop of vegan sour cream on top before serving. This adds a lovely tang that pairs well with the sweetness. Seasonal swaps can make this dish even better. In spring, add fresh peas for color and sweetness. During fall, toss in some diced apples for a sweet crunch. In winter, try adding roasted chestnuts for a nutty flavor. These changes keep the dish fresh and exciting every time you make it. For the full recipe, you can refer back to the detailed instructions provided. After enjoying your maple glazed Brussels sprouts, store any leftovers in an airtight container. This keeps them fresh and prevents odors. Let them cool first before sealing. Place the container in the fridge. They stay good for about 3 to 5 days. If you want to keep them longer, consider freezing. Reheating your Brussels sprouts can be quick and easy. You can use the oven or stovetop. If you use the oven, preheat it to 350°F (175°C). Spread the sprouts on a baking sheet and heat for about 10-15 minutes. Stir halfway through to ensure even warming. If you prefer the stovetop, heat a pan over medium heat. Add a bit of olive oil and toss the sprouts until warmed through. Freezing Brussels sprouts is a smart way to save them for later. First, blanch them in boiling water for 3 minutes. Then, cool them in ice water. This keeps their bright color and flavor. Drain and dry the sprouts, then place them in a freezer bag. Remove as much air as you can before sealing. They can last up to 6 months in the freezer. When you're ready to use them, just thaw and reheat! Enjoy your deliciously roasted maple glazed Brussels sprouts from [Full Recipe] and savor every bite! Yes, you can prep Brussels sprouts in advance. Trim and halve them a day before. Store them in an airtight container in the fridge. When you're ready, mix them with the other ingredients from the Full Recipe. This helps save time and makes cooking easier. Maple glazed Brussels sprouts pair well with many dishes. Here are some great options: - Roast chicken for a savory touch. - Grilled salmon for a healthy protein. - Quinoa salad for a hearty side. - Mashed potatoes for comfort food lovers. These options balance the sweet and savory flavors of the sprouts. To make this dish vegan, swap out the maple syrup for agave nectar. This keeps the sweetness intact. You can also use vegetable oil instead of olive oil if you prefer. Follow the Full Recipe as is, making those simple swaps. Enjoy the same great taste with a vegan twist! In this blog post, we covered how to make maple glazed Brussels sprouts. We discussed the key ingredients and provided step-by-step instructions. Tips helped you achieve the perfect glaze and roasting method. You also learned about variations, storage, and common questions. Now, you have all the tools to enjoy this dish. Experiment with flavors and enjoy your cooking!](https://dishtreats.com/wp-content/uploads/2025/06/8ccc11bb-56ad-4722-8e0d-cbebb28a9ca5-768x768.webp)
![- 1 can (15 oz) black beans, rinsed and well-drained - 1 cup corn kernels (fresh, frozen, or canned) - 1 red bell pepper, diced - 1/2 cup red onion, finely chopped - 1 jalapeño pepper, deseeded and minced - 1 ripe avocado, diced - 1/4 cup fresh cilantro, chopped - Juice of 2 limes - 3 tablespoons extra-virgin olive oil - 1 teaspoon ground cumin - 1 teaspoon smoked paprika - Salt and freshly ground pepper to taste I love using black beans in this salad. They add protein and fiber. They also make the dish filling. Corn brings a sweet crunch. It pairs well with the beans. The red bell pepper adds color and a slight sweetness. Red onion gives a sharp taste that balances the flavors. For spice, I use jalapeño. It adds heat without being too strong. If you want less spice, remove the seeds or skip the jalapeño. The ripe avocado adds creaminess. It makes every bite smooth and rich. Fresh cilantro brings a bright, fresh taste. The lime juice adds acidity. It brightens the salad and keeps it fresh. Olive oil adds healthy fats. The ground cumin and smoked paprika give depth. These spices add warmth and a hint of smokiness. This salad is not just tasty; it's also nutritious. The black beans are high in protein and fiber. They support digestion and keep you full longer. The corn, bell pepper, and avocado provide key vitamins. They help keep your body healthy. You can find the Full Recipe for this salad at the end. Enjoy making this colorful dish and feel good about what you eat! Start by mixing the base ingredients in a large bowl. Add the black beans, corn, diced red bell pepper, chopped red onion, and minced jalapeño. Stir gently to combine everything without mashing the beans. This keeps the texture nice. Next, gently fold in the diced avocado and chopped cilantro. Be careful here! You want those avocado pieces to stay whole. They add a creamy texture to the salad, which is delightful. Now, let’s make the dressing. In a small bowl, whisk together the lime juice, olive oil, ground cumin, and smoked paprika. Add salt and pepper to taste. This dressing adds zing and flavor to the salad. To achieve the ideal consistency, ensure that you mix well. You want it to be smooth but not too runny. If it seems thick, add a bit more olive oil or lime juice. Drizzle the dressing over your salad mixture. Gently toss everything together until it’s evenly coated. This step is important! It ensures every bite is full of flavor. Allow the salad to rest for about 10-15 minutes at room temperature. This helps the flavors meld beautifully. Trust me, the wait is worth it! You can check the [Full Recipe] for more details. To make your Southwest Black Bean Salad pop, add more spices or herbs. You can try adding a pinch of cayenne pepper or a dash of chili powder for heat. Fresh herbs like parsley or oregano can also bring a nice twist. If you want to switch things up, use different beans, like pinto or kidney beans. Each type adds its own flavor and texture, making your salad unique. When serving this salad, think about how it looks. A large, colorful bowl makes for a great centerpiece. You can also layer the salad in clear jars for a fun and stylish option. This way, guests can see all the vibrant colors. It’s perfect for parties or picnics. Plus, it’s easy for guests to grab their own jar! One mistake to watch out for is overmixing the salad. This can mash the beans and ruin the texture. Gently fold the ingredients instead. Another common issue is using overly ripe ingredients, especially the avocado. If the avocado is too soft, it can break apart and make the salad mushy. Pick firm, ripe avocados for the best results. {{image_4}} You can change the base of your Southwest black bean salad. Adding grilled chicken or tofu makes it heartier. Both protein options give you energy. You can also include more veggies. Cucumbers add crunch, while tomatoes bring sweetness. These changes keep the salad fresh and exciting. The dressing can change the whole taste of your salad. You can try different vinaigrettes, like balsamic or honey mustard. Each adds its own twist. If you prefer a creamier texture, go for a yogurt-based dressing. This will make the salad rich and smooth. This salad pairs well with many dishes. You can serve it with tacos or burritos for a complete meal. It also works great as a side with grilled meats. The bright flavors complement spicy foods nicely. For a fun touch, scoop the salad into taco shells. It’s a delicious way to enjoy this recipe and impress your guests. For the Full Recipe, check here: [Full Recipe]. To keep your Southwest black bean salad fresh, store it in an airtight container. This helps to lock in flavors and keep ingredients crisp. The salad lasts about 3 to 5 days in the fridge. It’s best to eat it within the first few days for optimal taste. You can freeze this salad, but it’s best to freeze the ingredients separately. Black beans and corn freeze well, but the avocado and fresh herbs do not. If you want to enjoy the salad later, freeze black beans and corn in one bag. Store diced avocado and herbs in another. This way, you can mix them fresh when you’re ready to eat. To reheat the salad, gently warm the beans and corn in a pan over low heat. Avoid using high heat, as it can mush the beans. After reheating, check the flavors. You might need to add more lime juice or salt to bring back the taste. Enjoy your meal ready and full of flavor! Yes, you can make this salad ahead of time. It tastes even better after resting. To prep in advance, chop all your veggies and store them in a bowl. Keep the dressing in a separate container. When you are ready to eat, mix everything together. This keeps the salad fresh and crunchy. This salad works great for meal prepping! Portion the salad into containers. You can add the dressing just before eating. This way, the salad stays fresh throughout the week. Use airtight containers to keep everything crisp. Black beans are packed with nutrients. They are high in protein and fiber. This helps you feel full longer and aids digestion. They also contain vitamins and minerals like iron, magnesium, and folate. Adding black beans to your diet can support heart health and help maintain stable blood sugar levels. To add heat, increase the amount of jalapeño. You can also add diced serrano peppers for extra spice. A dash of hot sauce or cayenne pepper can kick it up, too. Taste as you go to find your perfect spice level. Fresh ingredients often taste brighter and have better texture. They can add more crunch to your salad. Canned ingredients are convenient and save time. They’re also usually less expensive. Be sure to rinse canned beans to remove extra salt. Choose what's best for your schedule and taste. For the complete recipe, check out the [Full Recipe]. This blog post covered how to make a delicious Southwest Black Bean Salad. We discussed the key ingredients, nutritional facts, and tasty variations. You learned the step-by-step process, from mixing to serving. We also shared tips for storage and answered common questions. Enjoy making this salad for your next meal or gathering. Remember, it’s easy to customize to suit your taste. With the right ingredients and a few tweaks, you'll have a healthy dish that everyone loves. Get cooking and enjoy!](https://dishtreats.com/wp-content/uploads/2025/07/9afc72a8-6225-467a-bc64-ad0cd532be46-768x768.webp)
![- 3 medium zucchinis (spiralized) - 1 cup cherry tomatoes (halved) - 1/2 cup bell peppers (diced) - 1/4 cup red onion (thinly sliced) - 1 cup fresh basil leaves - 1/4 cup pine nuts (lightly toasted) - 1/2 cup grated parmesan cheese (or nutritional yeast for a vegan option) - 1/2 cup extra virgin olive oil - 2 cloves garlic (minced) - Sea salt and freshly ground black pepper (to taste) - Juice of 1 lemon I love choosing fresh ingredients for my Pesto Zoodle Salad. The zucchinis become long, curly noodles when you spiralize them. They are light and perfect for summer. Cherry tomatoes add a sweet bite. Use any color bell peppers for a pop of color. I enjoy the crunch of red onions. Fresh basil gives that classic pesto flavor. Pine nuts add a rich, nutty taste. You can swap grated parmesan cheese for nutritional yeast if you prefer a vegan option. Extra virgin olive oil makes the pesto creamy and smooth. The garlic gives a punch of flavor, while lemon juice brightens the dish. Don’t forget the sea salt and black pepper for seasoning. - Spiralizer - Food processor - Mixing bowl You will need a spiralizer to create the zoodles. A food processor helps blend the pesto quickly. A mixing bowl is essential for combining all the delicious ingredients. The caloric content per serving varies based on the ingredients used. On average, this salad packs around 200 calories per serving. The macronutrient breakdown is roughly 15g of fat, 8g of carbs, and 5g of protein. This makes it a light and healthy dish. You can find the full recipe for the Pesto Zoodle Salad above. Enjoy making this fresh and healthy meal! To make the pesto, you'll need: - 1 cup fresh basil leaves - 1/4 cup pine nuts (lightly toasted) - 1/2 cup grated parmesan cheese (or nutritional yeast) - 2 cloves garlic (minced) - 1/2 cup extra virgin olive oil - Sea salt and freshly ground black pepper - Juice of 1 lemon Start by placing the basil, pine nuts, parmesan, and garlic in a food processor. Blend them until smooth. While blending, slowly add the olive oil until the mixture is creamy. If you find it too thick, add more olive oil. Taste it, then adjust the seasoning with salt, pepper, and lemon juice. For spiralizing zucchini, use a spiralizer to create long, thin noodles called zoodles. Simply place the zucchini in the spiralizer and twist to form strands. If you don't have a spiralizer, you can use a julienne peeler or a sharp knife. Just slice the zucchini into thin strips to mimic zoodles. In a large mixing bowl, combine the zoodles, halved cherry tomatoes, diced bell peppers, and thinly sliced red onion. Pour the vibrant pesto over this mix. Carefully toss all the ingredients with tongs until the zoodles are well coated. Letting the salad rest for about 10 minutes is key. This marinating time allows all the flavors to blend nicely. It makes each bite more tasty and refreshing. Enjoy your vibrant Pesto Zoodle Salad! For the complete recipe, check the [Full Recipe]. To boost the taste of your pesto zoodle salad, add fresh herbs like parsley or mint. These herbs brighten your dish. You can also adjust the garlic and lemon. If you love garlic, add more. For a zesty kick, squeeze in more lemon juice. Soggy zoodles can ruin your salad. To avoid this, salt the zoodles first. Let them sit for a few minutes, then pat them dry. This step helps remove excess moisture. For the pesto, if it's too thick, add more olive oil. This keeps it light and creamy. For a stunning presentation, serve your salad in a large bowl. This lets the colors shine. You can garnish it with extra basil leaves and lemon zest. If you want to add protein, grilled chicken or shrimp works well. These pair nicely with the fresh flavors of the salad. Don't forget to check the [Full Recipe] for more details and tips! {{image_4}} You can switch zoodles for other veggies. Carrots and cucumbers make great alternatives. They add crunch and color, too. If you want a vegan option, skip the cheese. Use nutritional yeast instead. It gives a cheesy flavor without dairy. While pesto shines here, other dressings work well. Try a lemon vinaigrette for a bright taste. You can also use tahini or a simple olive oil and vinegar mix. Add spices like paprika or cumin to change the flavor. These can add warmth and depth. Seasonal veggies can enhance your salad. Think fresh corn, snap peas, or bell peppers. They add a burst of color and nutrition. You can also toss in fruits like diced peaches or berries. They bring sweetness to the mix, making every bite exciting. For more ideas, check the Full Recipe for inspiration! Store your Pesto Zoodle Salad in an airtight container. This keeps it fresh longer. Make sure you let it cool to room temperature before sealing. I recommend using glass containers. They do not hold odors and are easy to clean. The salad lasts in the fridge for about 3 days. After that, it may lose flavor and crispness. Signs of spoilage include a slimy texture or off smell. If you see these signs, it's best to toss it. You can enjoy this salad cold or at room temperature. If you want to warm it up, use a microwave. Heat it gently for about 30 seconds. Avoid reheating if you have added fresh veggies, as they can become mushy. A zucchini noodle salad, or zoodle salad, uses spiralized zucchinis as noodles. Zoodles are light and low in carbs. They are a great alternative to pasta. Zoodles help add more veggies to your meals while keeping the dish fresh and crunchy. Yes, you can make the pesto ahead of time. Store it in an airtight container in the fridge. It lasts about one week. You can also freeze it for up to three months. Just remember to leave some space in the container. The pesto will expand when frozen. Absolutely! This salad works well for meal prep. You can prepare the zoodles and pesto in advance. Keep them separate until you are ready to eat. This way, the zoodles stay fresh and do not get soggy. You can pack the salad in lunch boxes for easy grab-and-go meals. To make this recipe gluten-free, check all your ingredients. Ensure the pesto does not contain any gluten. Use gluten-free pasta or zoodles as a base. The other ingredients, like veggies and cheese, are naturally gluten-free. This way, you can enjoy the salad worry-free. Freezing the Pesto Zoodle Salad is not ideal. The zoodles can become mushy after freezing. However, you can freeze the pesto alone. When ready to enjoy, just thaw the pesto and mix it with fresh zoodles and veggies. This keeps your salad fresh and tasty. For the full recipe, check the main section. Pesto Zoodle Salad is a fresh, tasty dish made from zoodles, tomatoes, peppers, and pesto. You learned how to prepare the pesto and combine all the ingredients for a delightful meal. Remember to store any leftovers properly for the best taste. Try out the flavor tips and variations to make the dish your own. This recipe is not only nutritious but also easy to adapt for different diets. Enjoy exploring your cooking skills with this vibrant salad!](https://dishtreats.com/wp-content/uploads/2025/07/8637ce27-f1ae-4e5b-b0b9-802b4b26ee84-768x768.webp)
