Creamy Tomato Basil Pasta Rich and Flavorful Dish

Looking for a dish that’s both rich and simple? You’re in the right place! Creamy Tomato Basil Pasta brings together fresh flavors and creamy goodness in each bite. This quick recipe uses everyday ingredients that you might already have in your kitchen. Let’s dive into the world of vibrant tomatoes and fragrant basil, and you’ll soon impress everyone at your dinner table. Ready to cook? Let’s get started!
Ingredients
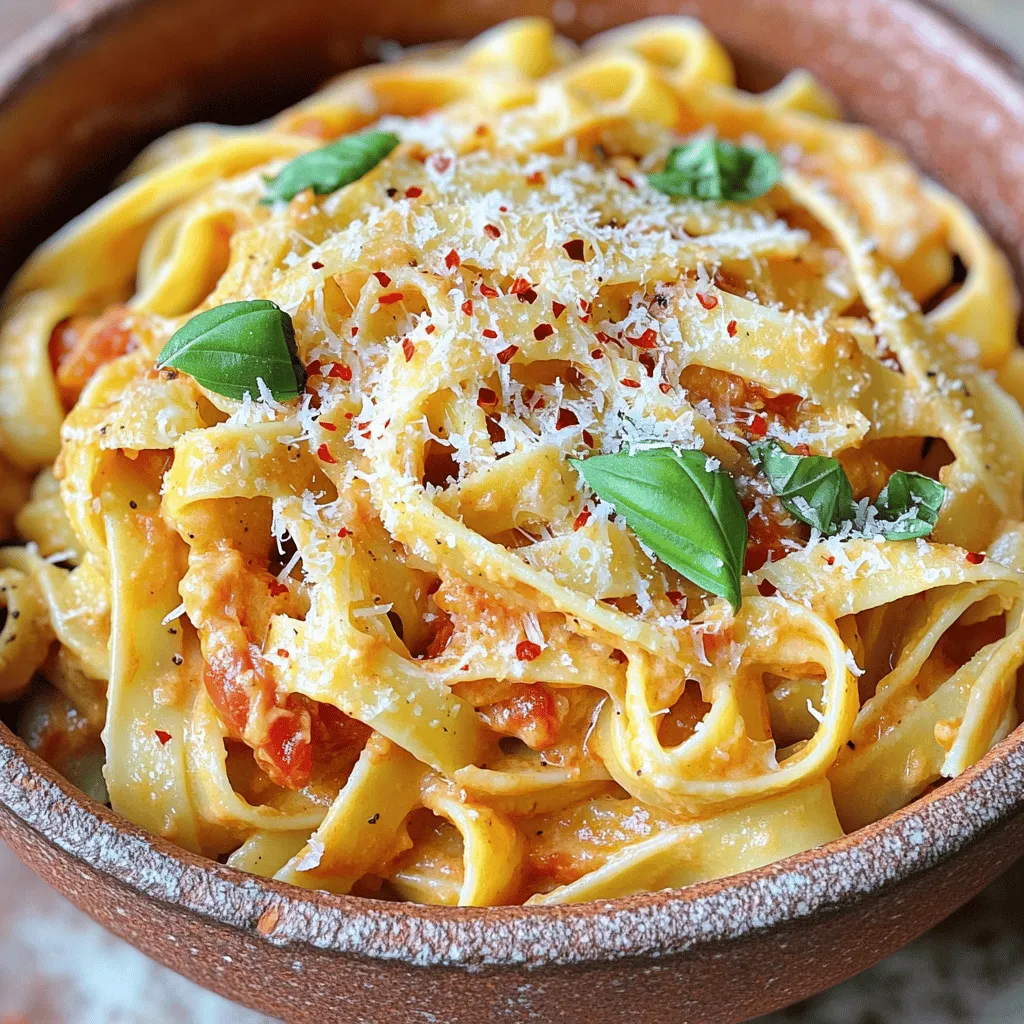
Main Ingredients for Creamy Tomato Basil Pasta
To make creamy tomato basil pasta, you will need:
- 12 oz pasta (fettuccine or penne)
- 2 tablespoons extra virgin olive oil
- 3 cloves garlic, finely minced
- 1 can (14 oz) crushed tomatoes
- 1 cup heavy cream
- 1 cup fresh basil leaves, roughly chopped
- 1 teaspoon granulated sugar
- Salt and freshly ground black pepper to taste
- ½ cup grated Parmesan cheese, plus more for serving
These ingredients blend well to create a rich and creamy dish. The pasta acts as the base, while the tomatoes, garlic, and basil bring in bold flavors. The heavy cream adds that luxurious texture.
Optional Ingredients for Enhanced Flavor
Some optional ingredients can enhance your dish:
- A pinch of red pepper flakes for added heat
- A splash of white wine for depth
- Fresh oregano or thyme for more aroma
Adding these extras can elevate the taste. Each brings a twist that can make your pasta unique and even more delightful.
Ingredient Substitutions
If you don’t have certain ingredients, here are some good swaps:
- Substitute heavy cream with half-and-half for a lighter option.
- Use canned tomato sauce if crushed tomatoes are not available.
- Swap fresh basil with dried basil in a pinch, but use less.
These substitutions will keep the dish flavorful. You can enjoy creamy tomato basil pasta no matter what you have on hand.
Step-by-Step Instructions
Cooking the Pasta
To start, grab a large pot. Fill it with water and add a good amount of salt. Bring it to a boil. Once the water is bubbling, add 12 oz of your favorite pasta. I like fettuccine or penne. Cook the pasta according to the package instructions. Look for that perfect al dente texture. When it’s done, drain it well, but save half a cup of the starchy pasta water. This helps later to make the sauce smooth. Set your pasta aside.
Sautéing the Garlic for Flavor
Next, take a large skillet and place it on medium heat. Add 2 tablespoons of extra virgin olive oil. Once the oil is hot, toss in 3 cloves of finely minced garlic. Stir this for about a minute, just until you smell that wonderful aroma. Be careful not to let the garlic turn brown. Burnt garlic can ruin the taste.
Creating the Tomato and Cream Sauce
After savoring the garlic scent, carefully pour in a can of 14 oz crushed tomatoes. Add 1 teaspoon of granulated sugar to cut the acidity. Season it well with salt and freshly ground black pepper. Stir the mix and let it simmer gently for about 5 minutes. This step allows all the flavors to blend together nicely.
Mixing and Finishing the Dish
Now, reduce the heat to low and pour in 1 cup of heavy cream. Stir well to combine. Let the sauce cook gently for another 3-4 minutes. This is where the magic happens; the sauce becomes rich and creamy. Next, add 1 cup of roughly chopped fresh basil to the mix. If the sauce feels too thick, add some of that reserved pasta water a little at a time. Now, toss in the cooked pasta, mixing it well so every piece gets coated. Let it cook on low for 2 more minutes. Finally, remove the skillet from the heat and sprinkle in ½ cup of grated Parmesan cheese. Stir until the cheese melts and everything is creamy. Taste your dish and adjust the seasoning if needed. Serve it up nice and hot, garnished with more cheese or red pepper flakes if you like a little heat.
Tips & Tricks
Common Mistakes to Avoid
When making creamy tomato basil pasta, some mistakes can ruin your dish. Here are a few to watch for:
- Overcooking the Pasta: Always cook pasta until it is al dente. This keeps it firm and prevents it from becoming mushy.
- Burning the Garlic: Garlic adds flavor but burns quickly. Sauté it gently and keep an eye on it.
- Skipping the Sugar: A pinch of sugar balances the acidity of the tomatoes. Don’t skip this step!
- Not Reserving Pasta Water: This starchy water helps adjust sauce thickness. Always save some before draining the pasta.
How to Achieve the Perfect Creamy Sauce
To create a rich and creamy sauce, follow these tips:
- Use Heavy Cream: It gives the sauce a thick and smooth feel. Avoid light cream, as it won’t be as rich.
- Simmer Gently: After adding the cream, keep the heat low. This allows flavors to meld without boiling the cream.
- Add Fresh Basil Last: Stir in the basil just before serving. This keeps it vibrant and fresh.
- Adjust Consistency: If the sauce is too thick, add reserved pasta water a little at a time. This helps reach your desired creaminess.
Best Practices for Cooking Pasta
Cooking pasta correctly sets the stage for your dish. Here are some best practices:
- Use Plenty of Water: Fill a large pot with plenty of salted water. This allows pasta to move freely and cook evenly.
- Salt the Water: Add salt to the boiling water. This flavors the pasta itself.
- Stir Occasionally: Stir the pasta in the pot to prevent it from sticking together.
- Taste for Doneness: Start tasting the pasta a minute or two before the package time ends. This ensures perfect texture.
Following these tips will help you craft a creamy tomato basil pasta that is rich and flavorful.

Variations
Different Types of Pasta to Use
You can use many types of pasta for this dish. Fettuccine and penne are popular choices. However, you can also try spaghetti, rigatoni, or even farfalle. Each shape holds the sauce differently. For a fun twist, use whole wheat or gluten-free pasta. These options add taste and texture to your meal.
Vegetarian and Vegan Alternatives
To make this dish vegetarian, simply skip the cheese or use a vegetarian alternative. For a vegan version, replace heavy cream with coconut milk or cashew cream. You can also use nutritional yeast for a cheesy flavor without dairy. Fresh vegetables like spinach or bell peppers can add color and nutrients.
Adding Proteins like Chicken or Shrimp
Adding protein can make this dish even heartier. Grilled chicken is a great option. Simply slice it and toss it with the pasta. Shrimp is another tasty choice. Cook the shrimp in the skillet before adding the sauce. This way, they soak up all the flavors. You can mix and match proteins to fit your taste.
Storage Info
How to Store Leftovers Properly
To keep your creamy tomato basil pasta fresh, let it cool completely. Use airtight containers for storage. This helps maintain flavor and texture. Place the leftovers in the fridge. They will stay good for about three to five days. Make sure to label the container with the date. This way, you won’t forget how long they’ve been stored.
Reheating Instructions
When you’re ready to enjoy leftovers, heat them gently. Start by adding a splash of water or cream to the pasta. This prevents it from drying out. You can reheat in a skillet over low heat. Stir often to ensure even warming. If you prefer the microwave, place the pasta in a microwave-safe bowl. Heat in short bursts, stirring in between. This helps to warm it evenly.
Freezing the Creamy Tomato Basil Pasta
If you want to keep the pasta for longer, freezing is a good option. Allow the pasta to cool, then portion it out. Use freezer-safe bags or containers for storage. Squeeze out any extra air to prevent freezer burn. You can freeze the pasta for up to three months. To eat, thaw it in the fridge overnight. Reheat gently as mentioned before. Enjoy your creamy tomato basil pasta anytime!
FAQs
Can I use canned tomato sauce instead of crushed tomatoes?
Yes, you can. Canned tomato sauce works well. It gives a smoother texture. Just remember to adjust the seasoning. You might need to add a bit more salt or sugar. This will help balance the flavors.
How can I make this recipe gluten-free?
To make this dish gluten-free, choose gluten-free pasta. Many brands offer great options. Look for pasta made from rice or corn. They cook similarly to regular pasta. Just check the cooking time on the package.
What are some good sides to serve with creamy tomato basil pasta?
This pasta pairs well with many sides. Here are a few ideas:
- Garlic bread
- A fresh green salad
- Roasted vegetables
- Grilled chicken or shrimp
These sides add flavor and balance to your meal.
Can I make creamy tomato basil pasta ahead of time?
You can prepare this dish ahead of time. Cook the pasta and sauce separately. Store them in airtight containers in the fridge. When ready to eat, just heat them together. Add a splash of pasta water if needed. This keeps the sauce creamy and fresh.
This blog post explored creamy tomato basil pasta. It covered key ingredients, cooking steps, and useful tips. I shared variations to make the dish your own. Proper storage and reheating methods extend the life of your meal.
Embrace creativity in your cooking. Experiment with flavors and enjoy every bite. You have the tools to make delicious pasta that suits your taste. Happy cooking!


![To make honey garlic glazed carrots, gather these items: - 1 lb baby carrots (or 4-5 regular carrots, peeled and cut into sticks) - 3 tablespoons honey - 2 tablespoons unsalted butter - 2 cloves garlic, minced - 1 tablespoon fresh ginger, finely grated - Salt and freshly ground black pepper to taste - 2 tablespoons fresh parsley, finely chopped (for garnish) You can change up the flavor with these ingredients: - 1 teaspoon red pepper flakes for heat - 1 tablespoon soy sauce for depth - 1 tablespoon lemon juice for brightness - Chopped nuts like walnuts or pecans for crunch When selecting carrots, look for these signs: - Choose bright orange carrots without dark spots. - Check for firmness; soft carrots may be old. - Look for greens if buying whole carrots; they should be fresh and vibrant. - Avoid carrots with cracks or wrinkles, as they may be dry. These tips help ensure you use the best carrots for your dish. Fresh carrots enhance the taste and texture of your honey garlic glazed carrots. For the full recipe, don't forget to check the complete instructions! 1. Start by washing your carrots well. If you use regular carrots, peel them. Then, cut them into sticks. Baby carrots need less prep. Just wash them. 2. Take a large skillet and add the unsalted butter. Heat it on medium. Watch closely until it starts to foam. 3. Next, add the minced garlic and grated ginger. Stir them for 1-2 minutes. You want them to smell great but not brown. 4. Now, pour in the honey. Mix it well with the garlic and ginger. This makes a tasty glaze. 5. Carefully add your carrots into the skillet. Use tongs or a spoon to toss them in the glaze. Make sure they get covered well. 6. Season with salt and black pepper to taste. Lower the heat and cover the skillet. Cook for 10-15 minutes. Stir them a bit to cook evenly. They should be tender but not mushy. 7. When the carrots are done, remove the lid. Turn the heat back to medium. Sauté them uncovered for 2-3 minutes. This helps the glaze become sticky. 8. Finally, take the skillet off the heat. Move the glazed carrots to a serving dish. Garnish with fresh parsley for a bright touch. - Prep: Use a sharp knife for even cuts. This helps with cooking time. - Sautéing: Keep the heat steady. This prevents burning the garlic. - Glaze: Watch for a shiny, thick look. That means it's ready to serve. - Don’t burn the garlic. It can turn bitter fast. - Avoid overcrowding the pan. This can lead to uneven cooking. - Don’t skip the garnish. Fresh parsley adds flavor and color. By following these steps, you can create delicious honey garlic glazed carrots that everyone will love! For the full recipe, check out the [Full Recipe]. To get the best glaze, start with fresh ingredients. Use high-quality honey for more flavor. Heat the butter slowly to avoid burning. Once the garlic and ginger smell great, add the honey. Stir it well to mix the flavors. Cook the carrots in the glaze until they are tender but not mushy. This gives you that nice sticky texture. Don't forget to sauté them uncovered at the end. This helps the glaze thicken and shine. Serve your honey garlic glazed carrots in a shallow bowl. This way, the glossy glaze stands out. Add an extra sprinkle of parsley on top for color. These carrots pair well with roasted chicken or grilled fish. You can also serve them alongside rice or quinoa for a nice meal balance. They make a great side dish for any dinner. Want to spice things up? Try adding fresh herbs like thyme or rosemary. A pinch of chili flakes can give a nice kick. You can also use lemon zest for a bright taste. If you like a deeper flavor, add a splash of soy sauce. Just remember, keep it balanced. You want the sweet honey to shine, too. For even more fun, try mixing in some nuts for crunch. {{image_4}} You can make honey garlic glaze work with many veggies. Try adding green beans, broccoli, or bell peppers. Cut them to the same size as the carrots. This helps them cook evenly. Each vegetable brings its own texture and flavor. You can mix and match to keep it fun! To make this dish vegan, swap butter for olive oil or coconut oil. This keeps the flavor rich while making it plant-based. Also, use maple syrup instead of honey. It gives a sweet touch that works great with garlic. Your dish will still taste amazing while being vegan-friendly. In fall, try using roasted squash or sweet potatoes. These add a lovely flavor. For a winter twist, consider using parsnips or turnips. If you want to avoid honey, you can use agave syrup or date syrup. Both are sweet and work well with garlic. Each season offers unique veggies to explore. After enjoying your honey garlic glazed carrots, let them cool down. Place leftovers in an airtight container. Make sure to store them in the fridge. They can last up to 3 days. If you notice any excess moisture, use a paper towel to absorb it. You can freeze honey garlic glazed carrots, but they may lose some texture. Place cooled carrots in a freezer-safe bag. Try to remove as much air as possible. They can stay good for about 2 months. When you’re ready to use them, thaw them in the fridge overnight. To reheat, you have a few options. You can use the microwave for quick warming. Heat in intervals, stirring in between to ensure even heating. If you prefer, reheat them on the stove. Add a splash of water or broth in a pan. This helps keep them moist. Heat on low until warmed through, stirring gently. For a crispy finish, sauté them in a pan for a few minutes. Enjoy your sweet and savory dish again! Yes, you can! While I love baby carrots, you can use regular carrots too. Just peel and cut them into sticks. This helps them cook evenly. If you want a fun twist, try rainbow carrots. They add color and taste to your dish. These glazed carrots pair well with many dishes. Try them with roasted chicken or grilled fish. They also go great with rice or quinoa. For a hearty meal, serve them with beef or pork. You can even add them to a veggie bowl for a healthy lunch. To thicken the glaze, cook it longer. Let it simmer until it reduces and gets sticky. If you want a thinner glaze, add a bit of water or broth. Stir well to combine. Adjust it to your taste and enjoy! For the full recipe, check out the detailed steps above. Honey garlic glazed carrots are a simple side dish. They bring sweet and savory flavors to your meal. The honey adds a nice touch of sweetness. Garlic and ginger give it a warm, spicy zing. This dish is perfect for any dinner, big or small. - Prep Time: 10 min - Cook Time: 15 min - Total Time: 25 min - Servings: 4 This recipe is quick and easy. You can have it ready in just 25 minutes. Each serving of honey garlic glazed carrots is about: - Calories: 150 - Fat: 7g - Carbohydrates: 23g - Fiber: 3g - Sugar: 12g - Protein: 1g These carrots are good for you and taste great. They are a fun way to add veggies to any meal. For the full recipe, you can check out the details above. This blog post covered all you need for honey garlic glazed carrots. We talked about key ingredients, cooking steps, and variations. You learned how to avoid common mistakes and store leftovers. Remember, fresh carrots boost flavor, and adding spices can elevate your dish. Try different vegetables or keep it vegan for new tastes. With these tips, you can serve a delicious side meal every time. Happy cooking!](https://dishtreats.com/wp-content/uploads/2025/07/6848e6f0-ffb0-4855-be77-9b0adbe9293f-768x768.webp)

![- 4 boneless, skinless chicken thighs - 2 cups long-grain rice - 4 tablespoons unsalted butter, divided - 5 cloves garlic, finely minced - 1 medium onion, finely chopped - 1 teaspoon dried oregano - 1 teaspoon paprika - Salt and freshly ground black pepper, to taste - 3 cups chicken broth - 1 cup frozen peas - Fresh parsley, chopped (for garnish) When I prepare Garlic Butter Chicken and Rice, I love the way the flavors mix. The chicken thighs bring a juicy texture. Long-grain rice soaks up all the savory chicken broth. Unsalted butter adds a rich taste. Aromatics play a big role here. Garlic cloves and onion give a sweet aroma. Dried oregano and paprika add warmth and depth. I always use fresh black pepper and salt to make the dish pop. For a splash of color, I toss in frozen peas. They keep their bright green shade when cooked. Fresh parsley adds a nice finish. It makes the dish look inviting and fresh. If you want to try this dish, check the Full Recipe for all the steps! You'll enjoy making it, and even more, eating it. 1. Start by melting 2 tablespoons of butter in a large skillet over medium heat. This will create a rich base for your dish. 2. Once the butter melts, add the chopped onion. Sauté it for about 5 minutes until it turns soft and fragrant. 3. Next, add 5 cloves of minced garlic to the skillet. Cook it for 1 minute, just until the garlic smells good but isn’t browned. 4. While the onion and garlic are cooking, season 4 chicken thighs on both sides. Use 1 teaspoon of oregano, 1 teaspoon of paprika, salt, and pepper. This will add a lot of flavor. 5. Move the onion and garlic to one side of the skillet. Place the seasoned chicken thighs in the center. Cook each side for 6-7 minutes until they turn golden brown. Once done, take the chicken out and set it aside. 1. In the same skillet, add the remaining 2 tablespoons of butter. Let it melt completely. 2. Now, stir in 2 cups of long-grain rice. Toast the rice for 2-3 minutes, stirring often. This step brings out the nutty flavor. 3. Pour 3 cups of chicken broth over the toasted rice. Gently stir to coat all the grains. Increase the heat to bring the mixture to a boil. 1. Once the broth is boiling, lower the heat to a simmer. Nestle the cooked chicken thighs on top of the rice. Cover the skillet with a lid and let it cook for 15-20 minutes. The rice should absorb most of the broth and become tender. 2. For the last 5 minutes of cooking, sprinkle 1 cup of frozen peas directly over the rice. Do not stir. This will keep the peas bright and fresh. 3. After cooking, remove the skillet from the heat. Leave it covered for an extra 5 minutes. This helps the rice fluff up nicely. 4. Finally, use a fork to fluff the rice and mix in the peas. Serve warm, with fresh parsley on top for color and flavor. This simple process makes Garlic Butter Chicken and Rice a fun and tasty comfort meal. For the complete recipe, check out the [Full Recipe]. To boost the flavor of your garlic butter chicken and rice, consider adding fresh herbs. Thyme, rosemary, or basil can bring new notes to the dish. You can also mix in some red pepper flakes for a little heat. Adjust the spices to fit your taste. If you like it spicy, add more paprika or even cayenne pepper. Remember, always taste as you go to find your perfect balance. Sautéing is key for great flavor. Start with a medium heat to avoid burning the garlic and onions. Stir them often to help them cook evenly. When cooking the chicken, ensure it's golden and cooked through. Use a meat thermometer to check the internal temperature. It should reach 165°F (75°C) for safe eating. This way, you get juicy chicken every time. For a beautiful presentation, serve your garlic butter chicken and rice on a large platter. Sprinkle fresh parsley on top for a pop of color. You can also add lemon wedges on the side. This adds a zesty touch when served. Pair your meal with a simple green salad or steamed vegetables. For drinks, try a light white wine or sparkling water with lemon. Enjoy your delicious creation! You can find the full recipe [here](#). {{image_4}} You can make this dish lighter by swapping rice for cauliflower rice. Cauliflower rice offers a low-carb option that still tastes great. It cooks quickly and absorbs flavors well. Using skinless chicken breasts instead of thighs is another healthy choice. Breasts have less fat but still provide protein. Spice things up by adding cayenne pepper for heat. A pinch can really enhance the dish. You can also try Italian seasoning for a different twist. Adding veggies like bell peppers or carrots boosts nutrition and color. They add crunch and sweetness that pairs well with garlic butter. If you need gluten-free options, use gluten-free chicken broth. It keeps the dish flavorful while meeting dietary needs. For those avoiding dairy, there are great butter substitutes. Look for dairy-free spreads made from plant oils. They work well in this recipe without losing taste. To keep your Garlic Butter Chicken and Rice fresh, store any leftovers in airtight containers. This helps lock in the flavor and moisture. Make sure to let the dish cool down before sealing it up. For longer storage, you can freeze it. Divide the dish into smaller portions to make thawing easier later. When it's time to reheat, use a skillet or a microwave. If using a skillet, add a splash of chicken broth to keep it moist. Heat it over low to medium heat, stirring gently. In the microwave, cover the dish with a damp paper towel. This keeps moisture in and avoids a dry result. Remember, you want your chicken and rice to stay tender. In the fridge, your Garlic Butter Chicken and Rice lasts about 3 to 4 days. Always check for signs before eating. Look for any off smells or changes in color. If it smells funny or looks slimy, it’s best to toss it. Always trust your senses to keep your meals safe and tasty. To amp up the flavor, try adding fresh herbs like thyme or rosemary. You can also mix in spices such as garlic powder or onion powder for extra depth. A splash of lemon juice at the end brightens the dish. For a spicy kick, consider adding crushed red pepper flakes. These little changes can make a big taste difference. Yes, you can! To adapt this recipe, first, brown the chicken thighs in a skillet. This step gives great flavor. Then, place the chicken, onions, garlic, and rice into the slow cooker. Add chicken broth and spices. Cook on low for 4-6 hours. Check the rice for doneness. Slow cooking makes this dish very tender and delicious. This dish pairs well with a side of steamed vegetables like broccoli or green beans. A fresh salad with vinaigrette is also nice. For drinks, consider serving iced tea or a light white wine. These choices balance the rich flavors of the chicken and rice. Absolutely! You can make this dish ahead of time. Store the chicken and rice in separate containers to keep them fresh. It lasts up to four days in the fridge. When ready to eat, simply reheat in the microwave or on the stovetop. This makes it a perfect option for busy weekdays. For the full recipe, check out the link above. This article guides you through making Garlic Butter Chicken and Rice. You learned about key ingredients like chicken thighs, long-grain rice, and garlic. I shared easy steps for cooking flavorful meals, plus tips to enhance taste and presentation. In conclusion, this dish is tasty and versatile. You can adjust it to fit your diet or mood. Enjoy experimenting with flavors and make it your own! Happy cooking!](https://dishtreats.com/wp-content/uploads/2025/05/2b69aced-7351-4258-8c9e-dc4a3c9f0304-768x768.webp)
