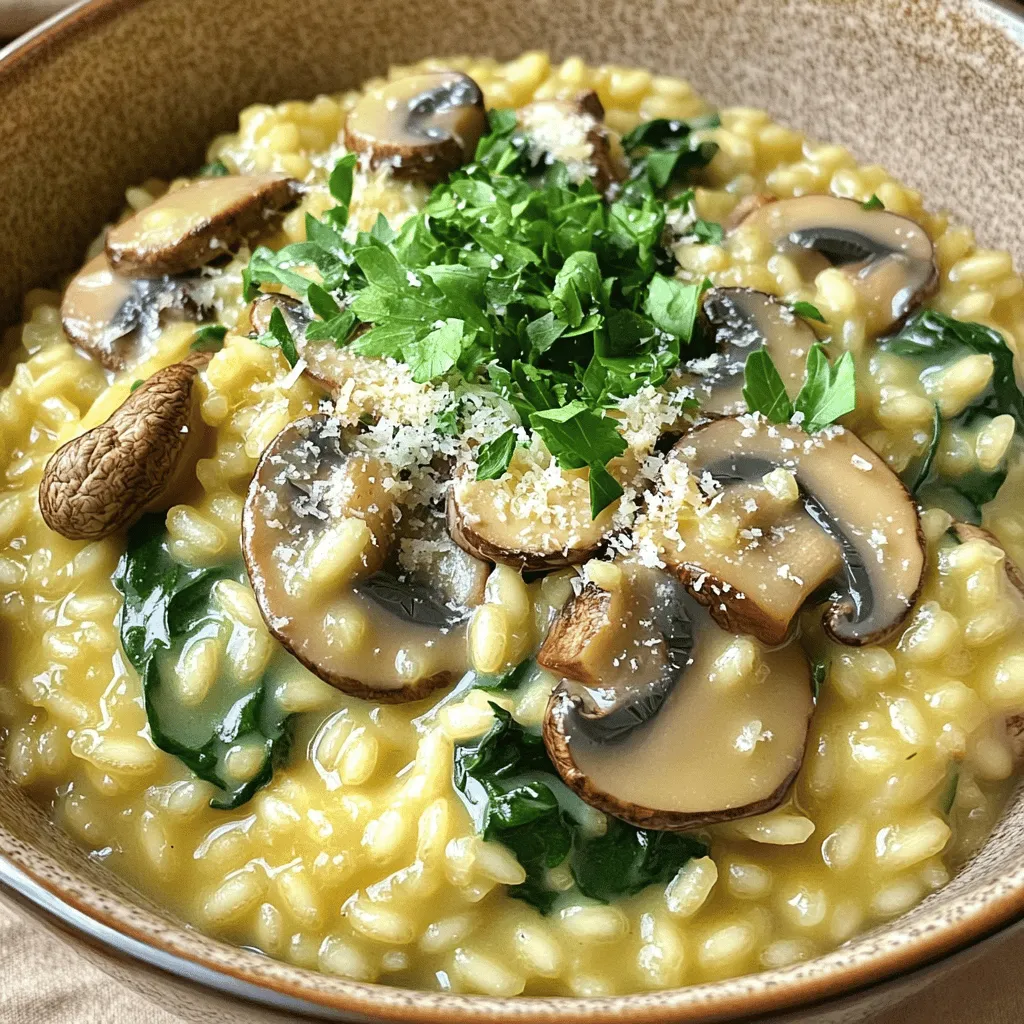
Creamy Mushroom Risotto Comforting and Simple Dish
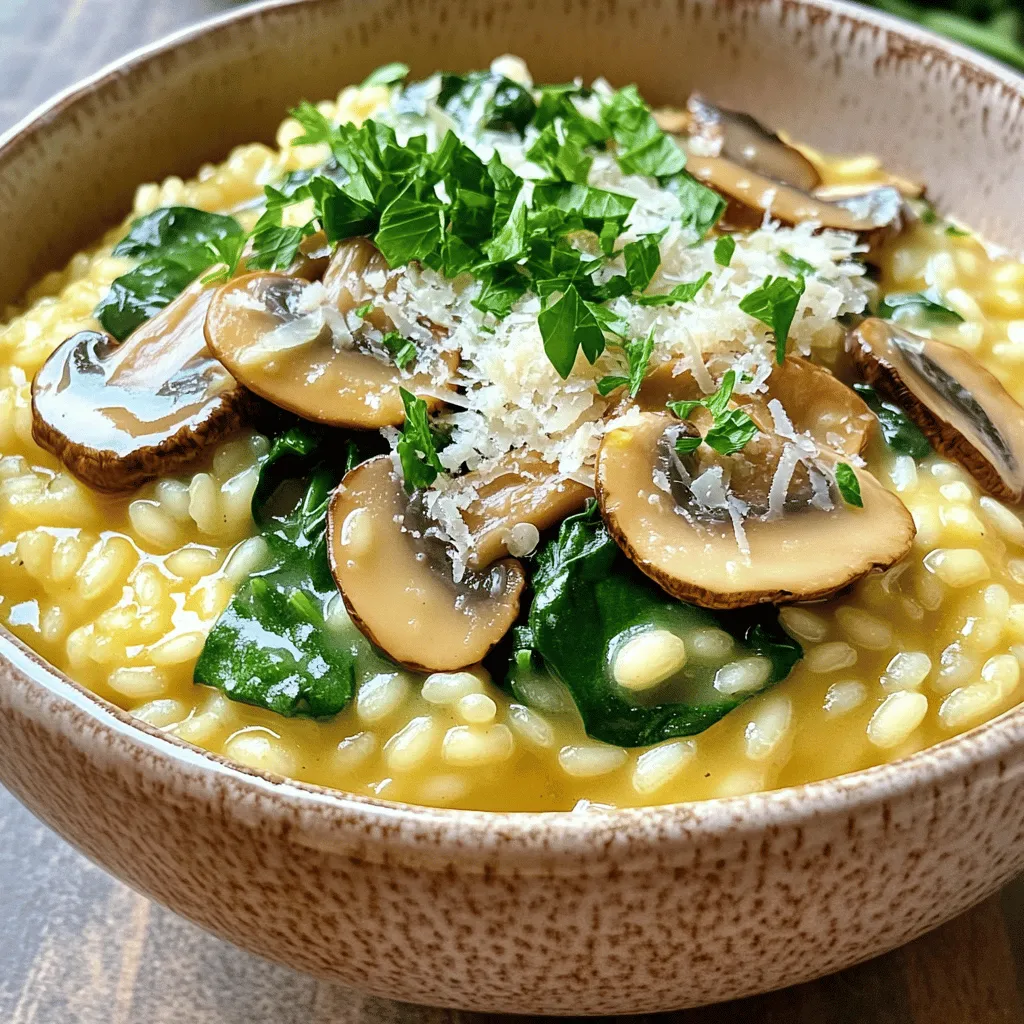
Do you crave a warm, delicious meal that feels like a hug? Creamy Mushroom Risotto is the answer! This dish combines the perfect blend of Arborio rice, fresh mushrooms, and rich flavors, creating comfort food at its best. In this article, I’ll guide you step-by-step through the process of crafting this creamy delight. Let’s dive into the ingredients and start cooking your new favorite dish!
Ingredients
Main Ingredients
- 1 cup Arborio rice
- 4 cups vegetable broth, kept warm
- 1 cup mixed mushrooms (cremini, shiitake, and button), sliced
Additional Ingredients
- 1 small onion, finely chopped
- 2 cloves garlic, minced
- 1 cup fresh spinach, roughly chopped
- 1/2 cup heavy cream
- 1/2 cup freshly grated Parmesan cheese
Seasoning and Garnishing
- 2 tablespoons olive oil
- 1 tablespoon unsalted butter
- Salt and freshly ground black pepper, to taste
- Fresh parsley, finely chopped, for garnish
I love using Arborio rice for this dish. It has a creamy texture that creates the perfect base. You need to keep the vegetable broth warm while cooking. This helps the rice absorb flavors well. Mixed mushrooms add depth and earthiness to the risotto. I often use cremini, shiitake, and button mushrooms for a nice mix.
Chopping the onion and garlic finely is key. You want them to blend in well with the rice. Fresh spinach gives a bright color and flavor. The heavy cream and Parmesan cheese make it rich and delicious. Don’t forget the olive oil and butter for sautéing! They add a lovely flavor to the dish.
Season with salt and pepper to taste. Fresh parsley adds a nice touch at the end. It brightens the dish and makes it look pretty. Using these ingredients, you can create a warm, comforting bowl of creamy mushroom risotto that tastes like a hug in a dish.
Step-by-Step Instructions
Preparing the Broth
Step 1: Heating vegetable broth
Start by gently heating 4 cups of vegetable broth. Use a medium saucepan. Keep the heat low. You want it warm, not boiling. This helps the rice cook evenly. Warm broth mixes well with the rice.
Importance of keeping it warm
Keeping your broth warm is key. Cold broth can shock the rice. This may lead to uneven cooking. Warm broth helps the risotto absorb flavors better. It keeps the dish creamy and smooth.
Sautéing Ingredients
Step 2: Cooking onion and garlic
In a large skillet, heat 2 tablespoons of olive oil and 1 tablespoon of unsalted butter over medium heat. Add 1 small finely chopped onion. Cook for about 3-4 minutes. The onion should turn translucent. Next, add 2 minced garlic cloves. Sauté for another minute to bring out the flavor.
Step 3: Adding mushrooms
Now, it’s time to add 1 cup of sliced mixed mushrooms. Use cremini, shiitake, or button mushrooms. Cook for 5-7 minutes. The mushrooms should become tender and release moisture. This step adds depth to your risotto.
Cooking the Risotto
Step 4: Toasting the Arborio rice
Add 1 cup of Arborio rice to the skillet. Stir it well to coat the rice with oil and butter. Toast the rice for 1-2 minutes. You want a light, nutty aroma. This step enhances the flavor.
Step 5: Incorporating vegetable broth
Start adding the warm vegetable broth. Use a ladle to scoop it in, one at a time. Stir constantly as the rice absorbs the liquid. Wait until the rice is mostly dry before adding more broth. Repeat this for about 18-20 minutes. The risotto should become creamy and the rice al dente.
Step 6: Adding cream and cheese
Once the rice is cooked, stir in 1/2 cup of heavy cream. Add 1/2 cup of freshly grated Parmesan cheese next. Mix thoroughly until everything is well combined. This makes your risotto rich and creamy.
After this, gently fold in 1 cup of roughly chopped fresh spinach. Season with salt and freshly ground black pepper to taste. Cook for another 2-3 minutes until the spinach wilts. This adds color and flavor to the dish.
Tips & Tricks
Perfecting the Risotto Texture
To get the best risotto, stir often. This helps release starch from the rice. Starch makes your risotto creamy. Use a wooden spoon for easy stirring.
Know when your risotto is done. It should be creamy and slightly firm. Taste the rice after 18 minutes. If it’s still hard, keep cooking.
Flavor Enhancements
Try adding herbs to boost flavor. Fresh thyme or rosemary works well. You can also add a pinch of nutmeg for warmth.
For cheese lovers, try different cheeses. Goat cheese adds a tangy taste. Gruyère gives a rich flavor. Experiment to find what you like best.
Presentation Tips
Serve your risotto in warm bowls. This keeps it hot and inviting. Top with fresh parsley for color. A sprinkle of extra Parmesan makes it look fancy.
For added visual appeal, drizzle a little olive oil on top. This adds shine and flavor. Your dish will look as good as it tastes!
Variations
Mushroom Variations
You can change the flavor of your risotto by using different types of mushrooms. Cremini, shiitake, and button mushrooms add unique tastes. You can also mix them for a more complex flavor. Try adding portobello mushrooms for a rich, earthy taste.
You can add other vegetables too. Spinach is a great choice, as it blends well with mushrooms. You can also try peas, asparagus, or zucchini for added color and nutrition. Just be sure to sauté them until they are tender.
Dairy-Free Options
If you want a dairy-free risotto, you can substitute cream and cheese. Use coconut cream for a rich texture. For cheese, try nutritional yeast. It adds a cheesy flavor without dairy.
There are vegan alternatives that work well too. Swap the heavy cream with a blend of silken tofu and vegetable broth. This keeps your risotto creamy and delicious, while still being plant-based.
Protein Additions
Adding proteins can make your risotto a complete meal. You can include chicken or shrimp for extra flavor and nutrition. Cook the protein separately, then stir it into the risotto at the end.
For a vegetarian option, try adding cooked lentils or chickpeas. These add protein and make the dish heartier. You can customize the risotto to fit your dietary needs, making it both satisfying and delicious.
Storage Info
Refrigeration Tips
To keep your risotto fresh in the fridge, store it in an airtight container. This keeps moisture in while blocking outside air. Risotto lasts about 3 to 5 days when properly stored. Make sure the risotto cools before sealing it up.
Freezing Risotto
If you want to freeze risotto, portion it into smaller containers. This helps speed up thawing. Use freezer-safe bags or containers to avoid freezer burn. It can last up to three months in the freezer. To thaw, place it in the fridge overnight. You can also reheat it straight from the freezer, but it takes longer.
Reheating Instructions
For the best reheating, use a saucepan over low heat. Add a splash of broth or water to keep it moist. Stir often to avoid sticking. Microwaving is also an option, but be careful not to overheat it. Always check for dryness. If it looks dry, add more liquid while reheating.
FAQs
What is the best rice for risotto?
The best rice for risotto is Arborio rice. Arborio rice has a high starch content. This starch gives risotto its creamy texture. It absorbs liquid well and cooks evenly. The grains remain firm in the center while being soft on the outside. This balance makes Arborio ideal for creamy dishes. You can find it in most grocery stores.
How can I make risotto creamier?
To make risotto creamier, you can use a few tips. First, stir the rice frequently as it cooks. This helps release more starch from the grains. Second, add warm broth slowly, one ladle at a time. Let the rice absorb the liquid fully before adding more. Third, incorporate heavy cream and cheese at the end. This adds richness and depth. You can also use a bit of butter for extra creaminess.
Can I make risotto ahead of time?
Yes, you can make risotto ahead of time, but it’s not the best option. Risotto is best served fresh and warm. If you want to prep in advance, cook the rice until it’s almost done. Then, cool it quickly and store it in the fridge. To reheat, add a little broth and stir on low heat. This helps bring back the creamy texture. Be careful not to overcook it during reheating.
This blog post covered how to make a delicious risotto. We discussed key ingredients like Arborio rice, mushrooms, and creamy add-ins. I shared step-by-step instructions for cooking, perfecting the texture, and boosting flavor. You learned about variations and how to store leftovers safely.
In the end, risotto is a versatile dish that you can customize. Try different ingredients to make it your own. Enjoy your cooking adventure!


![Creating a Grilled Peach Caprese Salad is simple and fun. Here’s what you need: - Ripe peaches - Fresh mozzarella - Mixed greens - Cherry tomatoes - Fresh basil leaves - Balsamic glaze - Extra virgin olive oil - Salt and black pepper Each ingredient plays a key role in this dish. Ripe peaches bring sweetness. Fresh mozzarella adds creaminess. Mixed greens provide a nice crunch. Cherry tomatoes add color and flavor. Fresh basil contributes a fragrant touch. The balsamic glaze adds a tangy finish. Extra virgin olive oil enhances the taste. Lastly, salt and pepper bring everything together. For the full recipe, check out the steps to make this tasty salad. Trust me, your taste buds will thank you! - Preheat the grill to medium-high heat. This helps create great grill marks. - Ensure your grill grates are clean and lightly oiled. This prevents sticking. - Start by cutting the peaches in half and removing the pit. - Brush the cut sides of the peach halves with olive oil. This adds flavor and helps them grill well. - Place the peach halves cut side down on the grill. Grill for about 3-4 minutes. You want those nice grill marks. - Once they soften slightly, remove them. Let them cool for a couple of minutes. - Grab a large serving platter. Create a bed of mixed greens in the center. - Place the grilled peach halves on top of the greens. Spread them out for a nice look. - Next, add slices of fresh mozzarella around the peaches. Then scatter halved cherry tomatoes. - Tear fresh basil leaves and sprinkle them over the salad. This adds a lovely aroma. - Finally, drizzle balsamic glaze over the salad. Add salt and black pepper to taste. - For the best flavor, serve the salad right away. You can chill it a bit if you prefer. For the complete recipe, check out the [Full Recipe]. To get perfect grill marks on your peaches, heat your grill to medium-high. Brush the cut sides of each peach half with olive oil. This helps prevent sticking and adds flavor. Look for ripe peaches that yield slightly when pressed. They should be fragrant and have a bright color. Presentation matters! Try arranging your salad in a spiral pattern. You can also layer the ingredients in single servings. This makes each plate look special. Pair your salad with a crisp white wine or a light red. Both will enhance the flavors of the dish. Want to mix things up? Try using different dressings like a lemon vinaigrette or honey mustard. Fresh herbs like mint or dill can add a twist. You could also sprinkle some chili flakes for a little heat. These simple changes will keep your salad exciting. For the full recipe, check here: [Full Recipe]. {{image_4}} You can change up your Grilled Peach Caprese Salad by swapping fruits. Try using ripe nectarines or plums instead of peaches. These fruits provide a sweet touch and work well on the grill. You can also use strawberries or even grilled pineapple for a fun twist. For cheese, fresh mozzarella is the classic choice. However, you can try burrata for a creamier texture. Feta cheese adds a salty punch, while goat cheese gives a tangy flavor. Each cheese brings its own flair to the dish. To make this salad vegan, skip the cheese and use a plant-based alternative. Cashew cheese or tofu can work well. Drizzle a vegan balsamic glaze for that sweet touch. If you need a gluten-free option, this salad is naturally gluten-free. Just make sure your balsamic glaze is gluten-free as well. Enjoy fresh ingredients without any worries. For the best flavor, pick peaches in late summer. They are sweet and juicy in this season. In spring, try using asparagus or snap peas for a fresh crunch. In winter, roasted root vegetables like beets can replace fresh greens. Add some nuts for extra texture and flavor. Adapt your salad to fit the season and enjoy a fresh taste year-round. For the complete recipe of Grilled Peach Caprese Salad, check the Full Recipe. To keep your Grilled Peach Caprese Salad fresh, store it properly. First, separate the components. This way, the flavors stay bright and fresh. - Peaches: Place grilled peaches in a sealed container. Store them in the fridge for up to three days. - Salad Greens: Keep mixed greens in a dry, airtight container. This keeps them crisp and fresh. - Cheese and Tomatoes: Store mozzarella and cherry tomatoes in separate containers. This helps prevent sogginess. - Balsamic Glaze: Keep the glaze in a small jar. It can last for weeks in the fridge. You might wonder if you should reheat grilled peaches. I recommend enjoying them cold. Their flavor shines best this way. But if you prefer warm peaches, here’s how to heat them: - Microwave: Place peaches on a microwave-safe plate. Heat for about 10-20 seconds. Check them often to avoid overheating. - Stovetop: Heat a non-stick pan over low heat. Add a dash of olive oil and warm the peaches for a minute. For other salad ingredients, like mozzarella and tomatoes, it’s best to enjoy them cold too. Mixing warm and cold can lead to a fun flavor contrast in your dish. To make this dish, follow these simple steps: 1. Preheat your grill to medium-high heat. 2. Brush cut sides of halved peaches with olive oil. 3. Grill peach halves cut side down for 3-4 minutes. 4. On a platter, spread mixed greens for a base. 5. Place grilled peaches on top of the greens. 6. Add mozzarella slices and halved cherry tomatoes around the peaches. 7. Scatter torn basil leaves over the salad. 8. Drizzle balsamic glaze on top, then season with salt and pepper. 9. Serve right away or chill slightly before serving. Fresh mozzarella is the classic choice for Caprese salad. Its creamy texture balances the sweetness of grilled peaches. You can also try burrata for extra creaminess. Feta adds a tangy twist, while goat cheese can give a bold flavor. Choose based on your taste preferences to enhance your salad. You can prep parts of the salad ahead of time. Grill the peaches and store them in the fridge. Wash and dry the greens and tomatoes, keeping them fresh. Assemble everything just before serving to maintain flavor and texture. This way, your salad stays fresh and tasty. Check the [Full Recipe] for more details. This blog shared how to make a Grilled Peach Caprese Salad. You learned about choosing ripe peaches, grilling them, and assembling the salad. Tips on serving and variations helped you create your own version. Remember to store leftovers properly to keep them fresh. With these insights, you can enjoy a delicious, refreshing salad anytime. Trust that your skills will shine. Enjoy experimenting with flavors and ingredients to make it uniquely yours. Your summer gatherings will never be the same!](https://dishtreats.com/wp-content/uploads/2025/06/c765deb6-47e2-46b1-bbfc-9b058c8c2a51-768x768.webp)