Creamy Lemon Chicken Piccata Simple Dinner Recipe

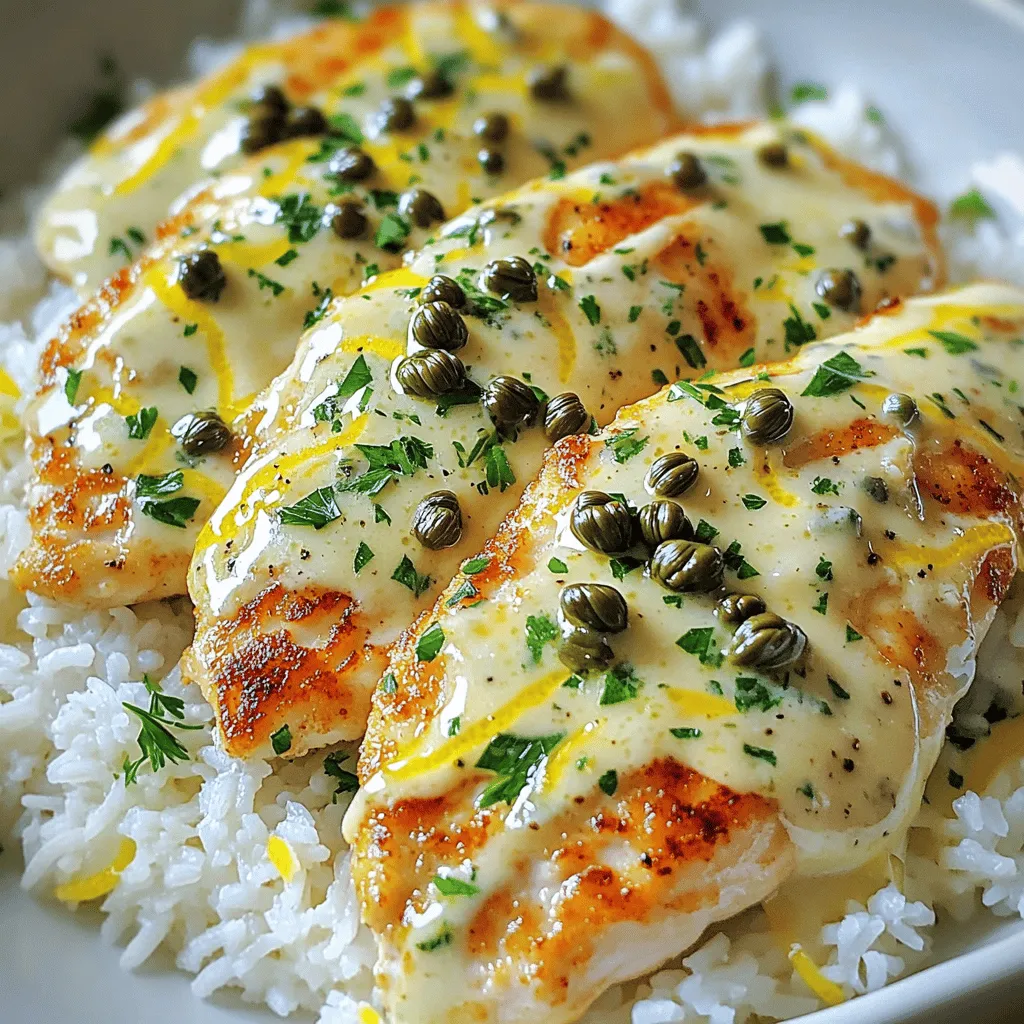
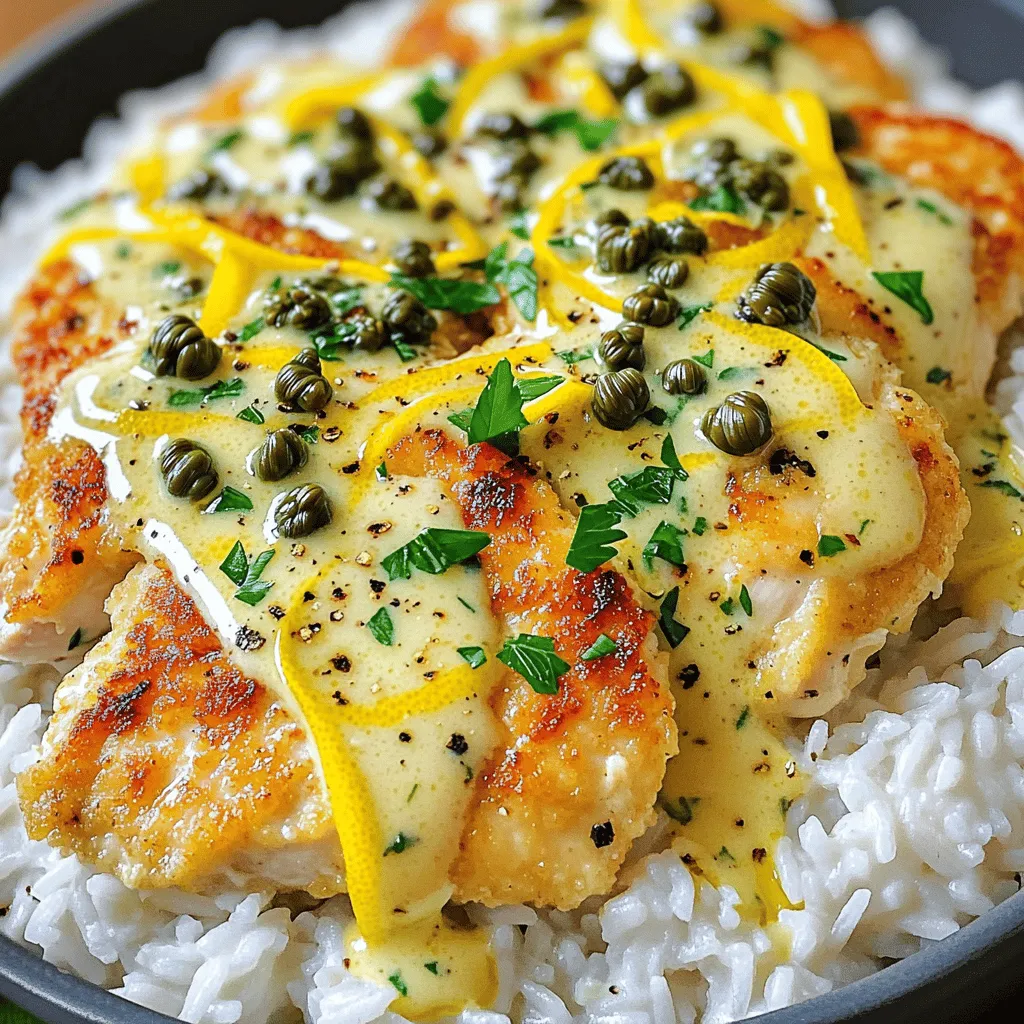
Are you ready to whip up a simple yet tasty dinner? My Creamy Lemon Chicken Piccata is the answer! This dish brings fresh flavors and a rich sauce that everyone will love. Plus, it’s easy to make, even on busy nights. Follow my step-by-step guide to prepare a meal that feels fancy but takes just minutes to create. Let’s dive into the delicious details!
Ingredients
List of Ingredients
To make Creamy Lemon Chicken Piccata, you will need:
- 2 boneless, skinless chicken breasts
- 1/2 cup all-purpose flour
- 1 teaspoon salt
- 1/2 teaspoon freshly ground black pepper
- 2 tablespoons olive oil
- 2 tablespoons unsalted butter
- 1 cup low-sodium chicken broth
- 1/4 cup freshly squeezed lemon juice
- 1 tablespoon capers, rinsed and drained
- 1/2 cup heavy cream
- Fresh parsley, finely chopped (for garnish)
Importance of Fresh Ingredients
Using fresh ingredients makes a big difference in flavor. Fresh chicken tastes better and has a nice texture. Fresh lemons give a bright taste that really shines through. Fresh herbs, like parsley, add color and a burst of flavor. When you use fresh items, your dish will taste more vibrant and appealing. Always try to pick the best and freshest ingredients you can find.
Substitutions for Key Ingredients
You might not have all the ingredients on hand, and that’s okay!
- Chicken: You can use thin pork chops instead of chicken.
- Flour: If you need a gluten-free option, try using almond flour.
- Heavy Cream: For a lighter sauce, use half-and-half or coconut milk.
- Capers: If you don’t have capers, try using green olives for a similar briny taste.
These swaps can help you make this recipe work with what you have.
Step-by-Step Instructions
Preparing the Chicken
Start by slicing each chicken breast in half. This will give you thinner cutlets. Place these cutlets between plastic wrap. Use a meat mallet to pound the chicken to about 1/2 inch thick. This step helps the chicken cook evenly and stay tender.
Cooking the Chicken
Next, dredge the chicken in a mix of flour, salt, and pepper. On a shallow plate, combine 1/2 cup flour, 1 teaspoon salt, and 1/2 teaspoon pepper. Coat each cutlet in the flour mix, shaking off excess flour. Heat a large skillet over medium-high heat. Add 2 tablespoons of olive oil and 1 tablespoon of butter. When the butter melts and the oil is hot, add the chicken cutlets. Cook for 3-4 minutes on each side. They should become golden brown and fully cooked. Once done, set the chicken aside on a plate.
Making the Creamy Lemon Sauce
In the same skillet, pour in 1 cup of chicken broth. Add 1/4 cup of lemon juice and 1 tablespoon of rinsed capers. Stir to mix and bring it to a simmer. Scrape any browned bits from the bottom of the pan. Let the sauce reduce for 2-3 minutes to boost the flavors. Then, lower the heat and add 1/2 cup of heavy cream. Stir continuously and let it cook for another 2 minutes until the sauce thickens slightly. Adjust the seasoning to your taste.
Combining Chicken and Sauce
Carefully place the cooked chicken cutlets back into the skillet. Spoon the creamy sauce over the chicken. Let it warm in the sauce for about 1 minute to soak in the flavors. For a richer taste, add the last tablespoon of butter. Stir until it melts into the sauce, creating a smooth texture.
Enjoy your homemade creamy lemon chicken piccata!
Tips & Tricks
Tips for Perfectly Cooked Chicken
To cook chicken just right, start with thin cutlets. Thin pieces cook faster and stay juicy. Use a meat mallet to pound the chicken until it is even. This helps it cook evenly. Heat your skillet to medium-high before adding oil and butter. Make sure the pan is hot before you add the chicken. This gives it a nice golden color.
Best Techniques for Thickening Sauce
To thicken your sauce, let it simmer to reduce. This helps the flavors come out. After adding cream, keep stirring. Allow the sauce to cook for a few minutes. If you want a thicker sauce, you can mix a bit of flour with water and stir it in. This adds body without changing the taste.
Flavor Enhancements
For more flavor, add fresh herbs like thyme or basil. They brighten up the dish. You can also use garlic for a richer taste. Just sauté it briefly before adding the broth. A splash of white wine adds depth too. Experiment to find your perfect flavor balance. For the best results, always use fresh lemon juice. It makes a big difference in taste.

Variations
Alternative Proteins
You can use various proteins for this dish. If you prefer fish, try using thinly sliced salmon or tilapia. These lighter options soak up the creamy lemon sauce well. You can also use turkey cutlets for a leaner choice. Just cook them the same way as chicken for the best results.
Vegetarian Option
For a vegetarian twist, swap the chicken for hearty mushrooms. Portobello mushrooms work perfectly here. Slice them thick and follow the same cooking steps. The mushrooms will absorb the sauce’s flavors, giving you a rich, savory dish without meat. You can also use eggplant or tofu as great substitutes.
Flavor Variations with Herbs and Spices
To change the flavor profile, consider adding herbs or spices. Fresh thyme or rosemary adds a lovely aroma. You can also sprinkle in some red pepper flakes for a bit of heat. If you like a Mediterranean touch, add olives or sun-dried tomatoes. These additions will elevate your creamy lemon chicken piccata and keep each meal unique.
Storage Info
Storing Leftovers
After enjoying your creamy lemon chicken piccata, store leftovers in an airtight container. The dish stays fresh for up to three days in the fridge. Make sure to let it cool before sealing to prevent condensation. This keeps the chicken tasty and safe.
Reheating Tips
When you’re ready to enjoy leftovers, reheating is key. Use a skillet on low heat. Add a splash of chicken broth or cream to keep it moist. Stir often to avoid sticking. You can also microwave it, but do so in short bursts. Cover with a damp paper towel to keep moisture.
Freezing for Future Meals
If you want to save it for later, freezing is a great option. Place cooled chicken piccata in a freezer-safe container. It can last up to three months in the freezer. To thaw, move it to the fridge overnight. Reheat gently on the stove or in the microwave for the best taste.
FAQs
What is Chicken Piccata?
Chicken piccata is a classic Italian dish. It features chicken breasts cooked in a tasty lemon sauce with capers. Traditionally, the chicken is thinly sliced, dredged in flour, and sautéed until golden. The sauce is bright and zesty, making the dish fresh and lively. It’s a great choice for dinner parties or a cozy night in.
How to Make Creamy Lemon Chicken Piccata Gluten-Free?
To make gluten-free creamy lemon chicken piccata, replace all-purpose flour with gluten-free flour or cornstarch. You can also use almond flour for a nutty flavor. Ensure that the chicken broth is gluten-free as well. This way, you keep the dish tasty while catering to gluten sensitivities.
Can I Substitute Cream with a Lighter Option?
Yes, you can use half-and-half or whole milk instead of heavy cream. For a dairy-free option, try coconut milk or cashew cream. These choices will change the flavor slightly but will still keep the sauce rich and creamy. Adjust the cooking time a bit to ensure it thickens well.
What to Serve with Creamy Lemon Chicken Piccata?
Creamy lemon chicken piccata pairs well with several sides. You can serve it over fluffy rice or pasta for a filling meal. Roasted vegetables or a green salad also make great choices. To add zing, include lemon wedges and extra capers on the side.
How to Reheat Creamy Lemon Chicken Piccata Without Drying it Out?
To reheat creamy lemon chicken piccata, use low heat on the stove. Add a splash of chicken broth or cream to keep it moist. Stir gently until warmed through, avoiding high heat which can dry it out. You can also use the microwave, but cover it to keep moisture in.
This blog post covered how to make creamy lemon chicken piccata from start to finish. We discussed the importance of fresh ingredients and offered substitutes where needed. I shared step-by-step instructions to prepare and cook the chicken, along with tips for perfect results. You learned about variations and proper storage methods too.
In closing, using fresh ingredients and proper techniques is key for great taste. Enjoy exploring this dish and its many options!


![For this dish, you need simple yet vibrant flavors. The essential ingredients are: - 2 lbs baby potatoes, halved - 1/4 cup extra virgin olive oil - 1/4 cup freshly squeezed lemon juice Baby potatoes are perfect because they cook evenly and taste great. Extra virgin olive oil adds rich flavor and helps the potatoes crisp up. Fresh lemon juice gives a bright, zesty kick that makes these potatoes shine. To boost the taste, we use a few key spices. They include: - 3 cloves garlic, finely minced - 2 teaspoons dried oregano - 1 teaspoon sea salt - 1/2 teaspoon freshly ground black pepper Minced garlic brings warmth and depth. Dried oregano adds an earthy note that pairs well with lemon. Sea salt and black pepper enhance all the flavors, making every bite delicious. When serving, a few garnishes can elevate the dish. Here are my favorites: - 1 tablespoon fresh parsley, finely chopped (for garnish) - Lemon wedges (for serving) Fresh parsley adds color and a hint of freshness. Lemon wedges let guests add more zing if they like. These simple touches make your Greek lemon potatoes look and taste even better. For the full recipe, check out the details above! - First, preheat the oven to 400°F (200°C). This helps the potatoes roast evenly. - Next, grab a large mixing bowl. Add the olive oil, lemon juice, minced garlic, oregano, salt, and black pepper. Whisk these together until mixed well. This marinade adds a zesty flavor that makes the potatoes shine. - Now, take your halved baby potatoes and add them to the bowl with the marinade. - Toss the potatoes gently in the mixture. Make sure each piece is coated well. This step is key for flavor. - Carefully transfer the coated potatoes to a large baking dish. Arrange them in a single layer. This helps them cook evenly and get that nice golden color. - Place the baking dish in the oven. Roast the potatoes for 40-45 minutes. Remember to toss them halfway through. This ensures they brown nicely. - Once they are golden and tender, take the dish out of the oven. Let the potatoes cool for a few minutes. Just before serving, sprinkle with chopped parsley. Serve with lemon wedges for a burst of flavor. For the full recipe, check the detailed instructions. To get that golden brown finish, choose small baby potatoes. Their skin crisps nicely, giving a great texture. After roasting for about half the time, toss the potatoes. This helps them brown evenly. Use a spatula to gently turn them. For added zest, consider mixing in lemon zest with your marinade. Lemon zest brightens the dish. You can also add fresh herbs, like thyme or rosemary, for depth. Balance the garlic and lemon by not using too much garlic. The garlic should enhance, not overpower. Serve the potatoes in a colorful bowl to catch the eye. Arrange lemon wedges around the edge. This not only looks nice but adds flavor. You can sprinkle fresh parsley on top for a pop of color. It makes the dish more appealing and fresh. For the complete process, refer to the Full Recipe. {{image_4}} You can add more flavor by using herbs. Fresh herbs bring a bright taste. Dried herbs are easy and still tasty. I love using fresh parsley and thyme. They add freshness and depth. You can also try rosemary for a bold flavor. Mix and match herbs to find your favorite combo. Want to change things up? Try adding different citrus fruits. Oranges or limes give a nice twist. You can also use vegetable broth instead of oil. This makes the dish lighter and adds a new taste. Feel free to experiment with flavors until you find what you love. You don’t have to roast your potatoes. You can cook them on the stovetop too. Just boil them first and then sauté in the lemon mix. This method makes them soft and flavorful. Grilling is another option. It adds a smoky flavor you’ll enjoy. Try grilling them for a fun twist on this classic dish. To store your leftover Greek lemon potatoes, let them cool. Once cooled, place them in an airtight container. Use a glass or plastic container with a tight lid for best results. Store them in the fridge. They will stay fresh for about 3 to 5 days. Label the container with the date to keep track. For reheating, the oven works best. Preheat your oven to 350°F (175°C). Spread the potatoes on a baking sheet in a single layer. Heat for about 10 to 15 minutes until warm. This keeps them crisp. You can also use a microwave, but it may make them soggy. If using the microwave, heat in short bursts. Check often to avoid overcooking. You can freeze Greek lemon potatoes if you want to save some for later. First, let them cool completely. Then, place the potatoes in a freezer-safe bag. Remove as much air as possible before sealing. They can last up to 2 months in the freezer. To thaw, move them to the fridge overnight. Reheat them in the oven as mentioned earlier for the best taste. For Greek lemon potatoes, I recommend using baby potatoes. They are small and tender, which makes them perfect for roasting. Their skin is thin, so you can enjoy the flavor without peeling. You can also use Yukon Gold potatoes for a creamy texture. These potatoes absorb the lemon and garlic well, enhancing the dish's flavor. Yes, you can make this recipe ahead of time. I suggest roasting the potatoes and storing them in an airtight container in the fridge. You can roast them a day in advance. To reheat, simply warm them in the oven at 350°F until heated through. This keeps the potatoes tasty and fresh for your meal. Easy Greek lemon potatoes pair well with many dishes. You can serve them with grilled chicken or lamb for a complete meal. They also go great with a fresh Greek salad, giving you a nice balance of flavors. For a lighter option, pair them with roasted vegetables. The bright lemon taste complements any dish beautifully. If you're looking for more details, you can check out the [Full Recipe] for step-by-step guidance. Greek lemon potatoes are a simple and refreshing dish to make. We explored essential ingredients, step-by-step instructions, and great tips. You can customize flavors with herbs or other citrus fruits. Don't forget how to store leftovers for later enjoyment. These potatoes are not just easy to prepare but also shine at any meal. Experiment and make this recipe your own! Enjoy the bold flavors and satisfying textures. You’ll love sharing this dish with family and friends.](https://dishtreats.com/wp-content/uploads/2025/06/9ec2dfc2-ebd8-4d91-9e7c-548975c099b6-768x768.webp)
![- Shrimp: Use 1 pound of large shrimp. Fresh shrimp works best. Look for shrimp that is pink and firm. Avoid shrimp that smells strong or has a slimy texture. - Honey: Use pure honey for the best flavor. Clover honey or wildflower honey both work well. They add the right sweetness without being too strong. - Lime Juice: Fresh lime juice is best. It gives a bright, zesty flavor. If you use bottled lime juice, choose one with no added sugars for a true taste. - Soy Sauce: Use low-sodium soy sauce. This keeps the dish from being too salty. It adds depth without overpowering other flavors. - Fresh Cilantro: This herb adds a fresh taste. If you don’t like cilantro, try parsley as a mild substitute. - Lime Wedges: Serving lime wedges with the dish boosts the flavor. Squeezing fresh lime juice on the shrimp adds a nice zing. For the full recipe, check the details above. Start by whisking together the marinade ingredients in a bowl. This mixture includes honey, lime juice, soy sauce, minced garlic, minced ginger, and crushed red pepper flakes. Blending these ingredients well is key. It helps the flavors combine and coat the shrimp evenly. The honey adds sweetness, while lime juice gives a zesty kick. Soy sauce brings depth, and garlic and ginger add warmth. This blend will make your shrimp burst with flavor. Once you have the marinade ready, add the peeled and deveined shrimp. Make sure each shrimp gets a good coat of the marinade. Cover the bowl with plastic wrap and let it sit. The best time for marinating is 15 to 20 minutes at room temperature. This allows the shrimp to soak up the flavors. If you let it sit too long, the acid from the lime juice can change the shrimp's texture. Now it's time to cook! Heat olive oil in a large skillet over medium-high heat. Wait until the oil shimmers before adding the shrimp. This heat ensures a good sear. Add the marinated shrimp to the skillet, but remember to save any leftover marinade. Cook the shrimp for about 2 to 3 minutes without stirring. You want one side to turn pink and opaque. Flip the shrimp and cook for another 2 minutes until done. To finish, pour the reserved marinade into the skillet and let it cook for one more minute. This step helps the flavors come together. Remove the skillet from heat and season with salt and pepper. Your spicy honey lime shrimp is now ready to serve. Enjoy it warm, garnished with fresh cilantro and lime wedges. For the full recipe, refer back to the beginning! To cook shrimp just right, avoid overcooking. Shrimp turns pink and opaque when done. Look for a firm texture. If it curls tightly, it may be overcooked. Using a meat thermometer helps ensure perfect shrimp. The ideal internal temperature is 120°F. This temperature keeps your shrimp juicy and tender. To spice things up, adjust the heat levels to your liking. If you enjoy more heat, add extra crushed red pepper flakes. Start with a little and add more if needed. Consider adding aromatics for extra flavor. Garlic and ginger bring warmth. You can also try adding cumin or smoked paprika for a new twist. Use your creativity to enhance flavors you love. {{image_4}} You can try different proteins for this dish. Chicken works well if you prefer it. Tofu is a great choice for a plant-based option, absorbing flavors nicely. Just cut them into bite-sized pieces and follow the same cooking steps. For sweeteners, honey is fantastic, but maple syrup can add a nice twist. Agave syrup is another option to consider. Both alternatives will still give you that sweet touch without losing flavor. Want to switch up the citrus? You can use lemon or orange juice for a fresh taste. Both add a unique zing that pairs well with shrimp. Adjusting the spice level is easy too. If you want more heat, add extra crushed red pepper flakes. For less spice, reduce the amount or leave it out. This way, you can make the dish just how you like it! For the full recipe, check [Full Recipe]. To keep your Spicy Honey Lime Shrimp fresh, follow these tips. - Refrigerator Storage: Place leftovers in an airtight container. Use glass or plastic containers that seal well. Store the shrimp in the fridge for up to three days. Make sure they cool down before sealing to avoid moisture buildup. - Freezing Options: If you want to save shrimp for later, freezing is a great choice. Lay the shrimp flat in a single layer on a baking sheet. Freeze until solid, then transfer to a freezer-safe bag. This method prevents clumping and keeps shrimp fresh for up to three months. Reheating shrimp can be tricky. Here’s how to do it right. - Best Methods: The microwave is quick but can make shrimp rubbery. Instead, use a skillet for better results. Heat a little oil in the skillet over medium heat. Add the shrimp and cook until warmed through. - Maintaining Texture: To avoid rubbery shrimp, don’t overheat them. Just warm until they are hot but still tender. Stir gently to keep them from sticking to the pan. Enjoy your shrimp like they were just cooked! For the full recipe, check out the [Full Recipe]. You can tell shrimp is done by its color and texture. Cooked shrimp turns pink and becomes firm. They should look opaque, not translucent. The safe internal temperature for shrimp is 120°F (49°C). Use a meat thermometer for the best results. Yes, you can prep this dish ahead. Marinate the shrimp and store it in the fridge. This can last for up to 2 hours. If you want to keep it longer, freeze the marinated shrimp. Thaw in the fridge before cooking. Pair this shrimp with rice or a fresh salad. Here are some great options: - Steamed jasmine rice - Quinoa salad - Grilled vegetables - Avocado slices These sides balance the shrimp's spice and sweetness. You can also serve warm tortillas for a fun twist. Check the Full Recipe for more details! You learned how to make Spicy Honey Lime Shrimp with fresh ingredients and easy steps. We talked about the best shrimp, types of honey, and the importance of lime juice. I shared tips on marinating and cooking to get shrimp just right. Remember to check for doneness and how to store leftovers. You can also try new flavors by changing ingredients. Enjoy your dish, share it, and impress your friends. Simple cooking can lead to big smiles!](https://dishtreats.com/wp-content/uploads/2025/07/32f525eb-631f-4155-a120-c5a025aaa712-768x768.webp)
![To make Indian-spiced chickpea stew, you need fresh and flavorful ingredients. This stew brings warmth and comfort to your table. Here’s what you’ll need: - Canned chickpeas: 2 cups, thoroughly drained and rinsed - Vegetables and aromatics: - 1 medium onion, finely chopped - 2 cloves garlic, minced - 1 tablespoon fresh ginger, grated - Spices and liquids: - 1 can (14 oz) diced tomatoes with juice - 1 can (14 oz) coconut milk - 2 cups vegetable broth - 1 tablespoon curry powder - 1 teaspoon ground cumin - 1 teaspoon turmeric powder - 1/2 teaspoon red chili powder (adjust according to your heat preference) - 1 tablespoon olive oil - Salt and freshly ground black pepper, to taste - Fresh cilantro, chopped (for garnishing) These ingredients create a rich base for your stew. The chickpeas provide protein and texture. The diced tomatoes add acidity and sweetness. Coconut milk gives a creamy touch. Each spice brings its own unique flavor. You can find the full recipe [here]. Enjoy cooking! 1. Sautéing the aromatics Start by heating olive oil in a large pot over medium heat. Add the chopped onion and cook until it turns soft and golden. This should take around five minutes. Then, mix in minced garlic and grated ginger. Cook for one more minute, stirring often. You want to smell the lovely aroma from the garlic and ginger. 2. Adding spices and liquids Next, sprinkle in the curry powder, ground cumin, turmeric powder, and red chili powder. Stir until the onion is coated with these spices. Let them cook for two minutes. This step makes the flavors pop! Now, pour in the diced tomatoes with their juice, followed by the creamy coconut milk and vegetable broth. Mix everything well to combine. 3. Simmering the stew Gently fold in the rinsed chickpeas. Add salt and black pepper to taste. Bring the stew to a gentle simmer. Once simmering, lower the heat, cover the pot, and let it cook for 20 to 25 minutes. Stir occasionally to keep it from sticking. After cooking, taste and tweak the seasoning. If you want it thicker, mash a few chickpeas against the pot. Garnish with fresh cilantro before serving. Enjoy your delicious Indian-spiced chickpea stew! For the full recipe, refer back to the ingredients section. - Ensuring the perfect texture: To get that creamy and thick stew, you should mash some chickpeas. This adds a nice body. Stir gently while mashing to keep some whole. - Adjusting spice levels: If you want more heat, add more red chili powder. Start with a little, then taste and add more if needed. For less spice, cut the chili powder in half. - Enhancing flavor with garnishes: Fresh cilantro adds color and brightness to the stew. Just chop it up and sprinkle it on top before serving. You can also add a squeeze of lime for extra zing. These tips will help you craft a comforting dish. For the complete cooking process, check the Full Recipe. {{image_4}} You can easily change this stew to fit your taste. - Using different legumes or vegetables: If you don’t have chickpeas, try black beans or lentils. You can also add sweet potatoes, carrots, or spinach for more nutrients. - Dairy-free options: The coconut milk gives a rich taste, but you can swap it with almond or soy milk. This keeps the stew creamy without dairy. - Additional spices to suit taste: If you want more heat, add cayenne pepper or fresh chili. For a different flavor, try garam masala or coriander. Play around with spices to find your perfect blend. Feel free to explore these options! Every change can make your stew unique and delicious. Want to try the original? Check out the Full Recipe for the classic dish. To keep your Indian-spiced chickpea stew fresh, let it cool first. This step is key. Place the pot on a cool surface. Give it about 30 minutes to reach room temperature. Use airtight containers for storage. Glass containers work well. They keep the flavors locked in. You can also use plastic containers, but make sure they are BPA-free. When ready to reheat, take the stew from the fridge. Pour it into a pot. Heat it on medium-low. Stir often to stop it from sticking. If it seems thick, add a splash of vegetable broth or water. Heat until it's warm, about 5 to 10 minutes. For safe eating, ensure it reaches at least 165°F. This way, you'll enjoy the stew's warmth and flavor again! For the full recipe, check out the Spicy Indian Chickpea Stew 🥘. Yes, you can freeze this stew. Let it cool first. Then, put it in a safe container. Leave some space at the top for expansion. It stays good for about three months. To thicken your stew, mash some chickpeas. Use the back of a spoon against the pot. You can also simmer it longer. This helps reduce the liquid and makes it thicker. You can serve this stew with rice or naan. Both soak up the flavors well. A side salad or yogurt adds a nice touch too. Enjoy experimenting with different pairings! For the complete recipe, check out the [Full Recipe]. This blog post covered how to make a tasty Indian-spiced chickpea stew. We explored key ingredients like canned chickpeas, various vegetables, and spices. I shared step-by-step instructions for cooking, along with helpful tips for texture and flavor. You learned about fun ingredient variations and how to store leftovers properly. In conclusion, this stew is simple to make and packed with flavor. Feel free to get creative with your ingredients. Enjoy your cooking!](https://dishtreats.com/wp-content/uploads/2025/06/561fcdd4-13bb-4dd2-b7b4-b44f6a9d9028-768x768.webp)