Skip to content
About
Contact
Cookie Policy
Copyright Policy
Disclaimer
Search
Home
Dinner
Appetizer
Desserts
Drinks
About
Contact
Privacy Policy
Toggle Menu
Home
/
Dinner
- Page 35
Dinner
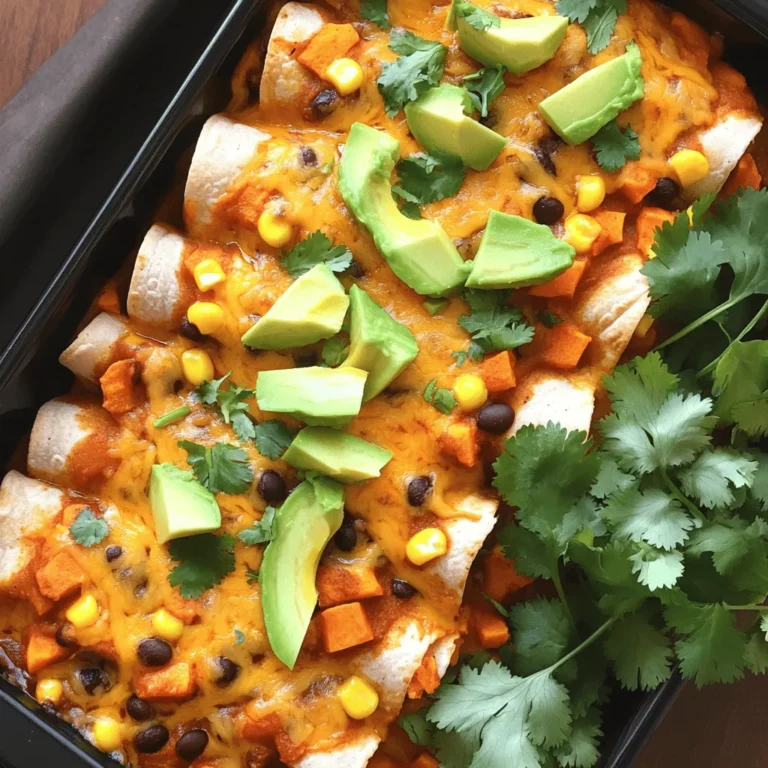
52. Sweet Potato Black Bean Chili Flavorful Meal Idea
Honey Garlic Shrimp Fried Rice Flavorful Easy Recipe
Flavorful 27. Jerk Chicken with Pineapple Salsa Recipe
24. Beef and Broccoli Stir-Fry Quick and Easy Recipe
Lemon Herb Grilled Vegetables Flavorful and Simple Dish
22. Spaghetti Aglio e Olio Flavorful and Simple Recipe
19. Classic Margherita Pizza Flavorful Cooking Guide
Garlic Butter Shrimp and Asparagus Tasty Dinner Dish
Savory 17. Sweet Potato and Black Bean Enchiladas
BBQ Chicken Stuffed Sweet Potatoes Flavorful Delight
Page navigation
Previous Page
Previous
1
…
33
34
35
36
37
…
42
Next Page
Next
Home
Dinner
Appetizer
Desserts
Drinks
About
Contact
Privacy Policy
Toggle Menu Close
Search for:
Search

. Yes, you can use fresh black beans. - Preparation: You must soak the beans overnight. This helps them cook evenly. - Cooking Time: Fresh beans take longer to cook. Boil them for about 1-1.5 hours before adding to the chili. Using fresh beans gives a great texture and taste, but it requires more time. To add spice, try these methods: - Chili Powder: Increase the amount of chili powder. - Jalapeños: Add diced jalapeños when you sauté the vegetables. - Hot Sauce: Drizzle hot sauce on top before serving. Feel free to adjust the spice level to fit your taste! This chili is packed with nutrients: - Sweet Potatoes: High in vitamins A and C. Great for your immune system. - Black Beans: A good source of protein and fiber. They help keep you full. - Vegetables: Onions and peppers add vitamins and minerals without many calories. Enjoying this chili means you get a tasty meal that’s also good for you. Yes, you can make this chili ahead of time. - Meal Prep: Cook the chili and let it cool. Store in a container. - Best Practices: Refrigerate for up to 3 days. For longer storage, freeze it in portions. Reheat in the microwave or on the stove before serving. Making it in advance saves time and enhances flavors! This blog post covered everything you need for Sweet Potato Black Bean Chili. We explored the main and optional ingredients, provided step-by-step instructions, and shared useful tips. Remember, using fresh ingredients boosts flavor and health benefits. Feel free to adjust spices or try different variations to make it your own. Enjoy this comforting dish, whether you serve it plain or dressed with toppings! Happy cooking!](https://dishtreats.com/wp-content/uploads/2025/06/d8445fbe-e2a0-4bb7-bab4-282b1fdf418c-768x768.webp)
![- 4 chicken thighs (bone-in, skin-on) - 2 tablespoons jerk seasoning - 1 tablespoon olive oil - Salt and pepper to taste - 1 ripe pineapple, peeled and diced into small cubes - 1 red bell pepper, diced into small pieces - 1 small red onion, finely chopped - 1 jalapeño, deseeded and minced (adjust for spice preference) - Juice of 1 fresh lime - Fresh cilantro, chopped (for garnish) For this jerk chicken with pineapple salsa recipe, use chicken thighs for their rich flavor. The jerk seasoning adds a spicy and smoky kick. The pineapple and vegetables bring freshness and sweetness to the dish. - Adjust spice levels: If you want less heat, skip the jalapeño or use less jerk seasoning. - Additional garnishes: Lime wedges and extra cilantro make great toppings. You can also add avocado for creaminess. Feel free to customize these ingredients according to your taste. The key is to balance heat, sweetness, and freshness. For the full recipe, check out the [Full Recipe]. Start by mixing the chicken thighs with jerk seasoning, olive oil, salt, and pepper. Use your hands to coat each piece well. This step is key for flavor. Cover the bowl with plastic wrap and place it in the fridge. Marinate for at least 1 hour, but overnight gives the best taste. In a clean bowl, combine diced pineapple, red bell pepper, red onion, and jalapeño. Squeeze the juice of one lime over it and add a pinch of salt. Stir gently to mix. Let this salsa rest for at least 15 minutes. This resting time allows the flavors to blend nicely. Heat your grill or grill pan to medium-high. Take the chicken out of the marinade and let any extra drip off. Grill the chicken for about 6-8 minutes on each side. Use a meat thermometer to check that it reaches 165°F (75°C). This ensures it is fully cooked and safe to eat. Arrange the grilled jerk chicken on a platter. Spoon the bright pineapple salsa over the top. For a finishing touch, sprinkle fresh cilantro on the dish. You can also serve it on a rustic wooden board with lime wedges and extra pineapple chunks. This adds a fun, tropical vibe to your meal. For the full recipe, check out the [Full Recipe]. The key to great jerk chicken is marinating well. Many people rush this step, but a good marinating time is essential. Aim for at least one hour, or overnight if you can. This allows the chicken to soak up the flavors deeply. Common mistakes to avoid: - Skipping the marinade: This makes the chicken bland. - Using too much heat: Jerk seasoning has a kick. Balance it with other flavors. - Not resting the chicken: Skipping this step makes the meat dry. Flavor enhancements: - Add some lime zest to your marinade for extra tang. - Try a bit of honey for a hint of sweetness. - Use smoked paprika for a deeper, richer flavor. The salsa adds brightness to the dish. Choosing ripe pineapples is key to great flavor. Tips for selecting ripe pineapples: - Look for pineapples with a sweet smell at the base. - The skin should be golden and slightly firm. - Press gently; it should give just a little. Variations for additional flavor: - Add diced mango for extra sweetness. - Mix in some chopped mint for a fresh twist. - Try a dash of cumin for a warm, earthy note. These tips will help you create a jerk chicken dish that shines. Don't forget to check out the Full Recipe for more details! {{image_4}} You can swap chicken for other meats. Try pork or turkey. Both soak up jerk flavor well. If you prefer seafood, shrimp or fish works too. Just keep an eye on cooking times. Seafood cooks quickly, so grill it for just a few minutes. Feel free to play with the vegetables. You can use different peppers like green or yellow. Red onions are great, but sweet onions add a nice touch too. Want to mix it up? Add diced mango or avocado to the salsa. Fresh herbs like mint or basil can add fun flavors too. For gluten-free options, check your jerk seasoning. Make sure it has no gluten. You can enjoy jerk chicken without any worries. If you're looking for low-carb choices, skip the sugar in the salsa. You can also serve the chicken with a salad instead of rice. This keeps it fresh and light. To store leftovers, place the jerk chicken in an airtight container. Let it cool to room temperature before sealing. This helps keep it fresh longer. Jerk chicken can stay in the fridge for up to three days. When you are ready to eat, reheat it in the oven or on the grill. Heat it to 165°F (75°C) for safe eating. Avoid reheating in the microwave if you want crispy skin. Yes, you can freeze jerk chicken. Wrap it tightly in plastic wrap and then place it in a freezer-safe bag. It can last up to three months in the freezer. For thawing, move the chicken to the fridge overnight. If you need it fast, you can also use the microwave on the defrost setting. After thawing, make sure to heat it well before serving. This keeps it tasty and safe to eat. For the full recipe, visit the [Full Recipe]. I suggest marinating the chicken for at least one hour. For the best flavor, try to marinate overnight. This allows the jerk seasoning to soak in deeply, making the chicken tasty and juicy. Jerk chicken pairs well with a variety of sides. Some great options are: - Rice and peas - Grilled vegetables - Coleslaw - Fried plantains - Cornbread These sides balance the rich flavors of the chicken. Yes, you can make the salsa ahead of time. I recommend preparing it a few hours before serving. This gives the salsa time to rest. The flavors will mix better, making it even more delicious. Jerk seasoning has a unique and bold flavor. It combines heat from peppers, sweetness from spices, and a hint of smokiness. Common ingredients include allspice, thyme, and garlic. This mix creates a savory and vibrant taste. The spice level of jerk chicken can vary. It depends on the amount of jalapeño you use. If you want less heat, remove the seeds. For more spice, add extra jalapeño or a hotter pepper. Adjusting the seasoning lets you enjoy the dish at your preferred heat level. You learned about making jerk chicken with easy steps and key ingredients. Focus on marinating the chicken and crafting the pineapple salsa for the best flavor. Enjoy grilling techniques to get that perfect char. Remember to avoid common mistakes while cooking. You can also try different proteins and flavor swaps for variety. Store leftovers properly to enjoy later. Your jerk chicken can impress anyone at the table. Now, it’s time to put this knowledge to use and enjoy your delicious creation!](https://dishtreats.com/wp-content/uploads/2025/06/27cc5104-89a5-4e73-8f97-3d018bc709fa-768x768.webp)

![- 300g spaghetti - 6 cloves garlic, thinly sliced - 1/2 teaspoon red pepper flakes - 1/4 cup extra-virgin olive oil - Zest and juice of 1 lemon - 1/2 cup fresh parsley, finely chopped - Salt, to taste - Freshly grated Parmesan cheese - 1 cup cherry tomatoes, halved The key to making Spaghetti Aglio e Olio is simplicity. You need just a few fresh items. Start with the spaghetti. It’s the heart of this dish. I recommend using high-quality spaghetti for the best texture. Garlic is next. Always slice it thinly. This way, it releases flavor quickly. The red pepper flakes add heat. You can adjust this to make it more or less spicy, depending on your taste. Extra-virgin olive oil is vital. It carries the garlic flavor and adds richness. The lemon zest and juice bring a bright note. Fresh parsley adds color and freshness. For optional toppings, consider salt for seasoning. Parmesan cheese adds a nice creaminess. Cherry tomatoes are great if you want a pop of sweetness. They also add color to your plate. For the full recipe, visit the section above. Enjoy making this classic dish with these simple ingredients! 1. Fill a large pot with water and add salt. 2. Bring the water to a rolling boil. 3. Add 300g of spaghetti to the pot. 4. Cook until it’s al dente, about 8-10 minutes. 5. Before draining, save 1 cup of the pasta water. 6. Drain the spaghetti and set it aside. 1. In a large skillet, pour in 1/4 cup of extra-virgin olive oil. 2. Heat the oil over medium flame. 3. Thinly slice 6 cloves of garlic and add them to the oil. 4. Cook for about 2 minutes, stirring often. 5. Stop cooking when the garlic turns golden, but not burnt. 1. Add 1/2 teaspoon of red pepper flakes to the skillet. 2. Stir in 1 cup of halved cherry tomatoes. 3. Cook for about 3-4 minutes until the tomatoes soften. 4. Gently add the drained spaghetti to the skillet. 5. Mix well to coat the pasta in the garlic oil. 6. Add the zest and juice of 1 lemon. 7. If it looks dry, add some reserved pasta water. 8. Mix in half of the chopped parsley. 9. Taste and season with salt as needed. Enjoy your flavorful Spaghetti Aglio e Olio! For the full details, check the [Full Recipe]. To ensure your Spaghetti Aglio e Olio shines, start with the red pepper flakes. Adjust the amount based on how spicy you like your food. If you want a mild kick, use less. For a fiery burst, add more. Next, the olive oil is key. Choose high-quality extra-virgin olive oil for better taste. The flavor difference is notable. It brings richness that enhances the whole dish. When sautéing garlic, keep a close eye. Garlic can burn quickly, and burnt garlic tastes bitter. Stir it often and cook it just until golden. This gives your dish a lovely flavor. Don’t forget to reserve that pasta water! It’s like liquid gold for your sauce. If your sauce seems too thick, add a bit of the pasta water. It helps create the perfect creamy texture. Serve your spaghetti in shallow bowls. This makes it look fancy and inviting. Top it with extra parsley for a pop of color. A drizzle of olive oil on top adds shine. Lemon wedges on the side invite guests to add a fresh burst. This little touch elevates the dish, making it even more enjoyable. {{image_4}} You can make Spaghetti Aglio e Olio even better. One simple way is to add sautéed spinach or kale. This boosts the dish’s nutrients. You can also mix in cooked shrimp or chicken to add protein. Both options make your meal heartier and more satisfying. If you need a gluten-free option, try using gluten-free pasta. It works well and tastes great. For a fresh twist, use lemon zest or herbs like basil. This adds a new layer of flavor to your dish. You can easily switch up the taste based on what you like. Want to give your spaghetti a global touch? Add a splash of soy sauce for an Asian influence. It changes the flavor profile in a fun way. You can also experiment with fresh herbs, like oregano. These small changes can transform your Spaghetti Aglio e Olio into a unique dish that excites your palate. After you enjoy your spaghetti, store leftovers in an airtight container. This keeps it fresh. Refrigerate it right away and consume within 3 days for the best taste. When you're ready to eat again, reheat on the stovetop. Just add a splash of reserved pasta water to keep it moist. This method helps maintain the pasta's texture. Avoid using the microwave, as it can make the pasta rubbery. If you want to save some for later, freeze the spaghetti without toppings. It stays good for up to 2 months. When you're ready to enjoy it, thaw it overnight in the refrigerator before reheating. This keeps the flavors intact. For the full recipe, check out the complete details. "Aglio e Olio" is Italian for "garlic and oil." This dish shines with just these two key ingredients. The garlic adds a rich, bold flavor. The olive oil serves as a smooth base, bringing everything together. It’s simple yet so satisfying. Yes, you can easily make it vegan. Just skip the Parmesan cheese. Use a good olive oil and make sure it's pure. You can also add more vegetables, like spinach or mushrooms. This keeps the dish fresh and filling without dairy. To add protein, you have many tasty choices. Cooked chicken or shrimp works well. For a vegan option, try chickpeas or tofu. Just sauté them along with the garlic. They will soak up all the great flavors. Absolutely! Spaghetti Aglio e Olio is great for meal prep. You can cook it in advance and store it in the fridge. Just keep the sauce separate if you can. This way, you can heat it up and enjoy it fresh later. This blog outlined a simple yet tasty Spaghetti Aglio e Olio. We covered ingredients, cooking steps, and helpful tips. Remember, adjust spices and add toppings to make it your own. You can even include proteins or veggies for variety. Storing and reheating the dish correctly keeps it fresh and delicious. So dive into this easy recipe and enjoy its flavors. It's a quick meal you can customize however you like. Happy cooking!](https://dishtreats.com/wp-content/uploads/2025/06/f6e5d00b-504d-4d52-a053-c2bbef60ee08-768x768.webp)