Skip to content
About
Contact
Cookie Policy
Copyright Policy
Disclaimer
Search
Home
Dinner
Appetizer
Desserts
Drinks
About
Contact
Privacy Policy
Toggle Menu
Home
/
Desserts
- Page 21
Desserts
25. Cinnamon Apple Oatmeal Bake Savory and Simple Dish
28. Pumpkin Spice Oatmeal Comforting Fall Breakfast Recipe
Cinnamon Roll Pancakes Delightful Breakfast Recipe
21. Chocolate Chip Banana Bread Irresistible and Simple
Chocolate Chip Cookie Bars Simple and Delicious Treat
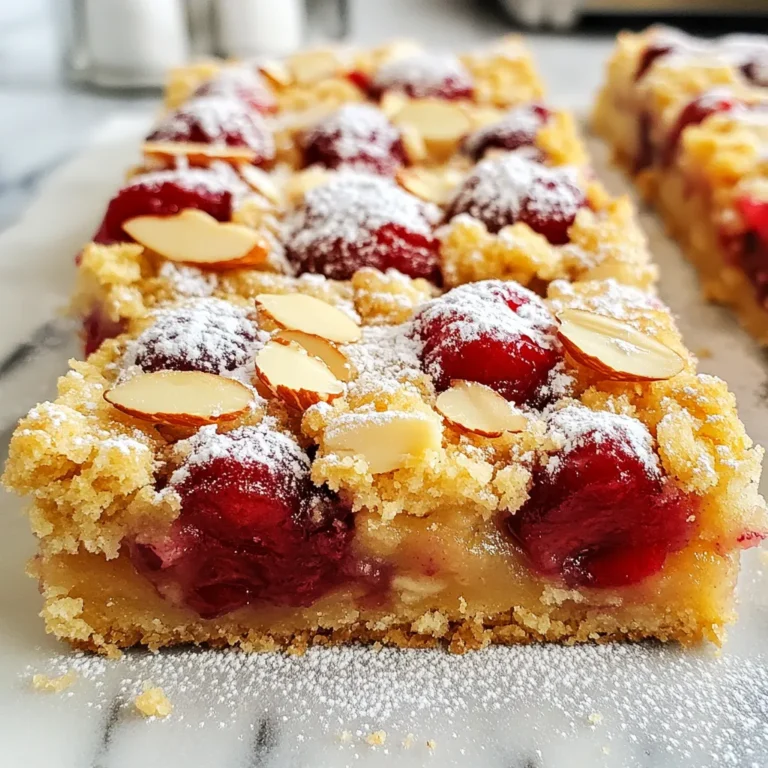
Cherry Almond Crumble Bars Tasty and Simple Treat
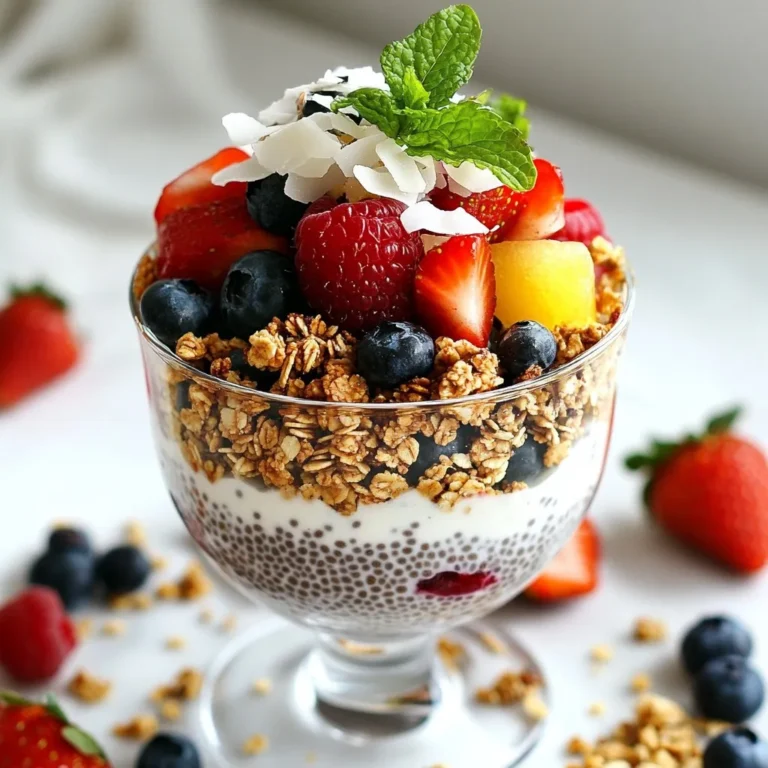
Berry Coconut Chia Parfait Simple and Flavorful Delight
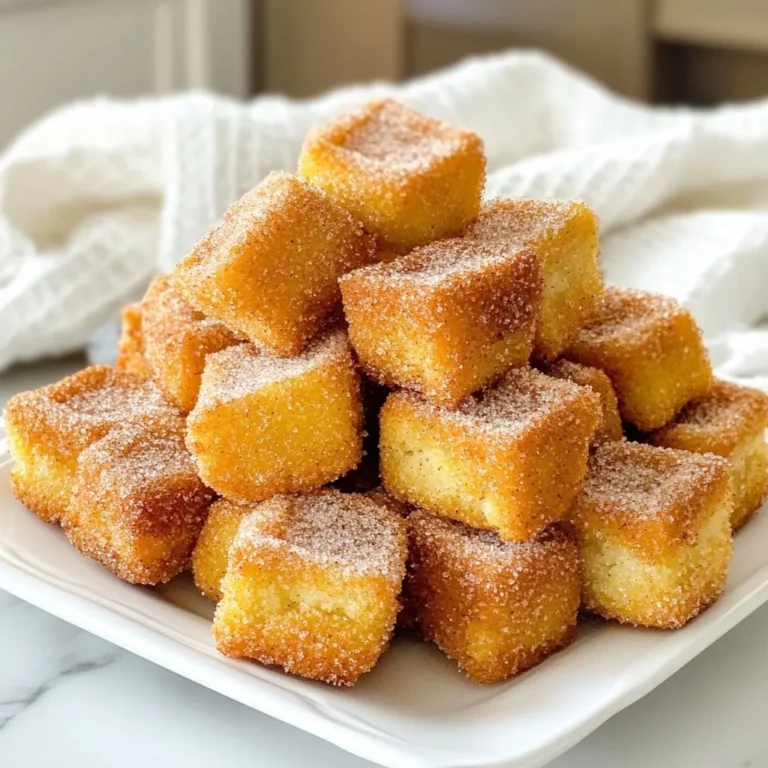
Air Fryer Churro Bites Easy and Delicious Treat
Strawberry Banana Oat Muffins Tasty and Healthy Snack
Strawberry Shortcake Trifle Delightful and Easy Treat
Page navigation
Previous Page
Previous
1
…
19
20
21
22
23
24
Next Page
Next
Home
Dinner
Appetizer
Desserts
Drinks
About
Contact
Privacy Policy
Toggle Menu Close
Search for:
Search


![To make pumpkin spice oatmeal, gather these simple ingredients: - 1 cup rolled oats - 2 cups milk (dairy or almond) - 1/2 cup pumpkin puree - 1 teaspoon pumpkin spice blend - 1 tablespoon maple syrup or honey - 1/4 teaspoon vanilla extract - Pinch of salt - Optional add-ins: - 1/4 cup chopped walnuts - 1/4 cup dried cranberries or raisins - Fresh apple slices or banana for garnish Each ingredient plays a key role in creating a warm and comforting breakfast. The rolled oats form the base, while the pumpkin puree adds rich flavor and nutrition. Pumpkin spice blend gives that cozy fall taste, and maple syrup or honey sweetens it just right. You can customize this dish by adding walnuts for a crunchy texture or dried fruit for a hint of sweetness. Fresh fruit on top is also a great way to brighten the dish. If you follow the Full Recipe, you will have a delightful breakfast to enjoy on chilly mornings. To start, grab a medium-sized saucepan. Combine the rolled oats, milk, and a pinch of salt. Stir gently to ensure the oats mix well with the milk. Place the saucepan over medium heat. You want to bring this to a gentle simmer. Stir occasionally. This should take about five minutes until the oats soften. Once the oats are soft, it’s time to add some flavor! Carefully add the pumpkin puree, pumpkin spice blend, maple syrup, and vanilla extract to the saucepan. Stir well to combine everything. Keep cooking for another two to three minutes. This step makes the oatmeal creamy and rich. If you like some crunch, fold in chopped walnuts. For added sweetness, toss in dried cranberries or raisins if you wish. Let the oatmeal sit for one to two minutes. This resting time helps it thicken nicely before serving. Now you’re ready to enjoy your cozy pumpkin spice oatmeal! If you want the full recipe, just check the details above. To get your oatmeal just right, you can adjust its texture. If it seems too thick, add more milk. If it feels too runny, cook it a bit longer. Using fresh pumpkin spice makes a big difference in taste. The aroma and flavor become richer and more vibrant. For a lovely presentation, top your oatmeal with apple slices or banana. These fruits add sweetness and texture. You can also create decorative swirls with pumpkin puree. This not only looks nice but also adds a bit more flavor. If mornings are busy, make a large batch of oatmeal. You can easily reheat leftovers for a quick breakfast. Store it in the fridge, and it will be ready when you are. This way, you can enjoy Pumpkin Spice Oatmeal any time without the fuss. {{image_4}} You can change up the flavor of your pumpkin spice oatmeal easily. If you want a different sweetness, try using agave or brown sugar instead of maple syrup. Each sweetener brings a unique taste. For extra crunch, mix in different nuts like almonds or pecans. Seeds like chia or flax can also add a fun texture. If you follow a vegan diet, you can make this oatmeal vegan. Simply swap dairy milk for almond milk and use maple syrup for sweetness. This way, you keep all the yummy flavors while sticking to your diet. If you need a gluten-free option, just choose certified gluten-free oats. This ensures that everyone can enjoy this tasty dish. As the holidays approach, you can add cranberries or raisins for a festive twist. These fruits not only give a nice burst of sweetness but also add a pop of color. This makes your pumpkin spice oatmeal even more inviting. You can feel the warmth of the season with each bite. To explore the full potential of this recipe, check out the [Full Recipe]. Store leftovers in an airtight container for up to 3 days. This keeps your oatmeal fresh. It’s a great way to enjoy a quick breakfast later in the week. Reheat on the stovetop or in the microwave with a splash of milk. This helps restore the creamy texture. If using the stovetop, heat gently over low heat. Stir often to avoid sticking. Freeze individual servings for easy breakfasts. To enjoy, thaw overnight in the fridge. Then, reheat as usual. This method makes mornings smoother when you’re in a rush. Leftovers can be stored for up to 3 days in the fridge. Make sure to use an airtight container. This keeps the oatmeal fresh and tasty for your next breakfast. Yes, you can adjust the amount of maple syrup. You can also use an alternative sweetener if you prefer. Honey, agave, or stevia work well. Make it as sweet as you like! Simply multiply the ingredients as needed. Keep the same cooking process for best results. This way, you can feed more people or have extra for later. It is packed with fiber from oats. The pumpkin adds vitamins, making it a nourishing breakfast option. This meal supports digestion and gives you energy to start your day. Yes, it’s easy to prepare in advance. You can reheat the oatmeal quickly for busy mornings. Just store it in the fridge and warm it up when you are ready to eat. For the full recipe, check out the complete guide! This blog post explored the simple and tasty ways to make Pumpkin Spice Oatmeal. We covered the key ingredients, step-by-step cooking instructions, and helpful tips for perfecting your recipe. You can also customize it with various add-ins and flavors. This dish is not only delicious but also nutritious and great for meal prep. Enjoy a warm bowl of pumpkin spice oatmeal and kick-start your day!](https://dishtreats.com/wp-content/uploads/2025/06/a752c53c-93b7-4877-b1fd-c59ff5d6dc49-768x768.webp)
![- 1 cup all-purpose flour - 2 tablespoons granulated sugar - 2 teaspoons baking powder - ½ teaspoon baking soda - ¼ teaspoon salt - 1 cup buttermilk - 1 large egg, lightly beaten - 2 tablespoons unsalted butter, melted - 2 teaspoons pure vanilla extract - 1 tablespoon ground cinnamon - 3 tablespoons brown sugar, packed - 1 cup powdered sugar - 3 tablespoons cream cheese, softened to room temperature - 2-3 tablespoons milk (to achieve desired icing consistency) When I make these pancakes, I always start with the dry ingredients. This step is key. I mix the flour, sugar, baking powder, baking soda, and salt in a bowl. It’s important to whisk these well. This ensures even rising and sweetness. Next, I move to the wet ingredients. I pour the buttermilk into a separate bowl. Then, I add the beaten egg, melted butter, and vanilla extract. Whisk until smooth. This mixture is crucial for the pancake’s fluffiness. Now, let's talk about the cinnamon filling. In a small bowl, I combine ground cinnamon and brown sugar. This mix gives the pancakes their sweet, spicy swirl. Finally, for the icing, I beat together powdered sugar and softened cream cheese. I add milk slowly until I reach the right consistency. Drizzling this icing over the warm pancakes is pure bliss. For the full recipe, check out the complete guide. Enjoy your cooking adventure! 1. In a mixing bowl, combine the all-purpose flour, granulated sugar, baking powder, baking soda, and salt. Mix well until the dry ingredients are blended. 2. Take another bowl and whisk together the buttermilk, the lightly beaten egg, melted butter, and vanilla extract. Make sure this mixture is smooth. 1. Gradually pour the wet ingredients into the bowl with the dry ingredients. Stir gently until just combined. It’s okay if there are a few lumps; this helps keep your pancakes fluffy. 2. Be careful not to overmix. Overmixing can make the pancakes tough. 1. In a small bowl, combine the ground cinnamon and packed brown sugar. Mix them well to combine. This mixture will create a sweet swirl in your pancakes. 1. Preheat a non-stick skillet or griddle over medium heat. Pour about ¼ cup of pancake batter onto the skillet for each pancake. 2. When the batter starts bubbling on the surface (about 1-2 minutes), sprinkle about a teaspoon of the cinnamon filling mixture onto the pancake before flipping it. 3. Flip the pancake carefully and cook for another 1-2 minutes, until golden brown. Repeat this process with the remaining batter and filling. 1. In a small bowl, mix the powdered sugar, softened cream cheese, and enough milk to reach your desired icing consistency. Blend until the mixture is smooth. Now you're ready to enjoy your delicious cinnamon roll pancakes! For precise measurements and more tips, check the Full Recipe. To make fluffy pancakes, avoid overmixing the batter. When you mix too much, the pancakes can turn tough. You want a few lumps in the batter; that is okay! Use fresh baking powder and baking soda. Old leavening agents may not make your pancakes rise well. Check the expiration date on the package to be sure. Heat is key when cooking pancakes. Adjust the heat as needed to prevent burning. If your skillet is too hot, the pancakes may burn on the outside and stay raw inside. A non-stick skillet helps with easy flipping. It also allows you to use less oil. Always preheat the skillet before pouring your batter. The icing makes these pancakes special. To achieve your desired thickness, adjust the milk quantity. Start with 2 tablespoons and add more if needed. Drizzle icing over warm pancakes for best results. The warmth helps the icing melt into the pancakes, making each bite delightful. {{image_4}} Cinnamon roll pancakes are fun! You can change them up in many ways. Let’s explore some tasty options. You can add chopped walnuts or pecans to the batter. This nutty addition gives a lovely crunch. It also adds healthy fats and protein. Just mix in about ½ cup of nuts before cooking. You will love the extra texture and flavor. Want a fruity twist? Add diced apples or berries to the batter. They add sweetness and freshness. Try using about 1 cup of fruit. Blueberries or chopped strawberries work great. Apples give a nice cinnamon flavor when cooked. Your pancakes will be more colorful and tasty! Feel free to experiment with spices. Adding nutmeg or cardamom can change the taste. Start with ¼ teaspoon of each spice. You will enjoy the new flavors. These spices pair well with cinnamon and make your pancakes special. For the complete recipe, check out the [Full Recipe]. Enjoy your cooking adventure! You can store leftover cinnamon roll pancakes in an airtight container. They will stay fresh in the refrigerator for up to 3 days. This keeps them moist and ready for a quick breakfast or snack. To freeze your pancakes, lay them in a single layer on a baking sheet. Once frozen, transfer them to a freezer-safe bag. This method keeps them from sticking together. You can pull out as many as you need later. When you are ready to enjoy your pancakes again, simply microwave or toast them. If you want to make them even better, add extra icing on top while they warm up. This gives them a fresh taste and makes them feel special again. Yes, you can use whole wheat or gluten-free flour. However, this may change the texture of your pancakes. Whole wheat flour adds a nutty flavor and denser texture. Gluten-free flour can make them lighter but may need extra moisture. To make these pancakes dairy-free, swap buttermilk for almond milk. Use a dairy-free butter alternative in the recipe. This ensures you keep the great taste while avoiding dairy. Cinnamon roll pancakes are delicious on their own. However, they pair well with fresh fruits, like strawberries or bananas. Whipped cream can add a light and fluffy touch. You can also drizzle on more maple syrup for added sweetness. For the full recipe, check out the details above. Cinnamon Roll Pancakes are simple and fun to make. We combined dry and wet ingredients with cinnamon filling for a tasty treat. Use tips for fluffiness, cooking, and icing to ensure success. You can customize these pancakes by adding nuts or fruits. Remember to store leftovers well for future enjoyment. Try new variations each time for a delightful twist. These pancakes can impress anyone and become a family favorite. Enjoy your cooking adventure!](https://dishtreats.com/wp-content/uploads/2025/06/80f0c7ad-2155-4787-b1f4-2bdd3b819c66-768x768.webp)
![To make your chocolate chip banana bread, you need these key ingredients: - 2 ripe bananas, thoroughly mashed - 1/3 cup coconut oil, melted - 1 teaspoon pure vanilla extract - 1/2 cup packed brown sugar - 1/4 cup granulated sugar - 2 large eggs at room temperature - 1 teaspoon baking soda - 1/4 teaspoon fine salt - 1 1/2 cups all-purpose flour - 1/2 cup semi-sweet or dark chocolate chips - 1/4 cup walnuts or pecans, chopped (optional) Each ingredient plays a vital role in crafting a moist and tasty loaf. Ripe bananas add sweetness and moisture. Coconut oil gives a rich flavor and a soft texture. The sugars create that perfect crust while the eggs help bind everything together. You can personalize your chocolate chip banana bread with fun add-ins. Here are some ideas: - Chopped nuts for crunch - Dried fruits like cranberries or raisins - A sprinkle of cinnamon for warmth - Peanut butter or nutella swirls for extra richness Feel free to mix and match! These add-ins can bring new flavors and textures to your bread. Using high-quality ingredients makes a big difference. Choose ripe bananas; they should be spotty and soft. Fresh eggs bring richness and flavor. Use pure vanilla extract for the best taste. For the oils, opt for organic coconut oil if possible. Quality flour helps create the right texture. Remember, great ingredients lead to great results! For the full recipe, check out the [Full Recipe]. Start by preheating your oven to 350°F (175°C). This step is crucial for even baking. Next, grab a 9x5 inch loaf pan. Lightly grease it with cooking spray or butter. You can also use parchment paper to line the pan. This makes removing the banana bread easier. In a large mixing bowl, take 2 ripe bananas and mash them well. You want them smooth with no lumps. Then, add 1/3 cup of melted coconut oil. Mix them together until they blend into a creamy base. This combination gives your bread moisture and flavor. Add 1 teaspoon of pure vanilla extract, 1/2 cup of packed brown sugar, and 1/4 cup of granulated sugar to the banana mix. Stir until it’s smooth. Now, crack in 2 large eggs. Mix well after each egg. Then, sprinkle 1 teaspoon of baking soda and 1/4 teaspoon of fine salt over the mix. Stir gently. Next, sift in 1 1/2 cups of all-purpose flour. Fold it in carefully. Don’t overmix; this keeps your loaf tender. Finally, gently fold in 1/2 cup of semi-sweet or dark chocolate chips. If you like, add 1/4 cup of chopped nuts too. Pour the batter into your prepared loaf pan. Smooth the top with a spatula. Place it in the oven and bake for 55-65 minutes. It’s done when a toothpick comes out clean or with a few crumbs. Let the bread cool in the pan for 10 minutes. Then, carefully move it to a wire rack to cool completely. This cooling step helps set the flavors. For the full recipe, refer to the section above. To get the best texture, use ripe bananas. The riper, the better! They must be soft and spotty. This way, you get a sweet and moist bread. Mash them well to avoid lumps. Mix ingredients gently after adding the flour. Over-mixing can make your bread tough. Aim for a light, fluffy loaf. Keep your banana bread fresh by wrapping it tightly. You can use plastic wrap or foil. Store it at room temperature for up to four days. If you want it to last longer, place it in the fridge for about a week. To keep it even longer, freeze it. Slice it before freezing for easy serving. Just make sure to wrap each slice well. Serve your chocolate chip banana bread warm. It tastes best right out of the oven! Add some butter on top for richness. You can also sprinkle powdered sugar for a sweet touch. For extra fun, top with fresh banana slices or more chocolate chips. This makes it look pretty and taste even better! For the complete recipe, check out the Full Recipe section in this article. {{image_4}} You can enjoy chocolate chip banana bread without gluten. Use a gluten-free flour blend. This blend works well as a one-to-one substitute. Make sure it has xanthan gum. This helps bind the ingredients. The flavor stays rich and delicious. Just follow the same steps as in the Full Recipe. You will love the texture and taste. For a vegan version, swap eggs for flax eggs. To make a flax egg, mix one tablespoon of flaxseed meal with three tablespoons of water. Let it sit for a few minutes to thicken. Use non-dairy milk and coconut oil as well. This keeps the bread moist and soft. You can still add chocolate chips, just choose dairy-free ones. You can add your favorite spices for extra flavor. Cinnamon and nutmeg pair well with bananas. A pinch of each can make a big difference. You can also try almond or coconut extract. These extracts add depth. Experiment to find your favorite combo. Each twist makes the bread unique and fun. To keep your chocolate chip banana bread fresh, store it at room temperature. Wrap it tightly in plastic wrap or foil. This helps keep moisture in. Place it in a cool, dry spot, away from direct sunlight. If you prefer, you can also use an airtight container. This will help maintain its soft texture and rich flavor. Freezing is a great option if you want to save some for later. First, let the banana bread cool completely. Then, wrap it tightly in plastic wrap, followed by aluminum foil. This extra layer prevents freezer burn. You can freeze it for up to three months. When you're ready to enjoy it, simply thaw it in the fridge overnight. Reheating banana bread can bring back its lovely warmth. You can use a toaster oven or a conventional oven. Preheat your oven to 350°F (175°C). Slice the bread and place it on a baking sheet. Heat for about 5-10 minutes. If you want a softer texture, cover it with foil. You can also pop a slice in the microwave for about 10-15 seconds. Enjoy it warm for a cozy treat! Your chocolate chip banana bread is done when a toothpick comes out clean. Insert it in the center. If it has a few crumbs, that is fine too. The bread usually bakes for 55-65 minutes. The top should look golden brown. Yes, you can substitute some ingredients. For example, use olive oil instead of coconut oil. You can also swap brown sugar for maple syrup. Make sure to adjust the amounts as needed for the best results. Chocolate chip banana bread lasts about 3-4 days at room temperature. Store it in an airtight container. For longer storage, keep it in the fridge for a week. You can also freeze it for up to 3 months. You can use applesauce or mashed bananas as egg substitutes. Use 1/4 cup of applesauce or 1/2 banana for each egg. Both options keep the bread moist and flavorful. This chocolate chip banana bread stands out because of its rich flavors. The combination of ripe bananas and chocolate chips creates a sweet treat. Using coconut oil adds a subtle depth to the taste. The option to add nuts gives extra texture. You can find the complete recipe in the Full Recipe section. This blog post covered how to make delicious chocolate chip banana bread. We discussed key ingredients, optional add-ins, and the importance of ingredient quality. I shared step-by-step instructions to guide you through the baking process. We explored tips for the perfect texture, storage methods, and fun variations like gluten-free and vegan options. With these insights, you can easily bake this treat and impress everyone. Enjoy your baking journey!](https://dishtreats.com/wp-content/uploads/2025/06/ff2d306f-7b8f-4bb2-a8a5-5e2882fba681-768x768.webp)
. Can I use dark chocolate instead of semi-sweet? Yes, you can use dark chocolate. It adds a richer flavor. Dark chocolate makes the bars less sweet. This change gives you a nice balance in taste. If you love dark chocolate, go for it! What can I substitute for eggs in this recipe? You can use applesauce or mashed bananas. Use 1/4 cup for each egg. This keeps the bars moist. It also adds a bit of natural sweetness. Another option is flaxseed meal mixed with water. Mix 1 tablespoon of flaxseed meal with 2.5 tablespoons of water. Let it sit for five minutes before using. How do I know when the cookie bars are done baking? Check the edges for a golden brown color. The center should look set but may be soft. Insert a toothpick in the center. If it comes out clean or with a few crumbs, they are done. Let them cool before cutting for the best results. You now know how to make delicious chocolate chip cookie bars from scratch. We covered essential ingredients, step-by-step instructions, and expert tips. You learned about gluten-free and vegan options, plus how to store them well. Remember, measuring accurately and not overmixing are key for the best results. Enjoy your baking journey. Share these tips with friends so everyone can enjoy these tasty treats!](https://dishtreats.com/wp-content/uploads/2025/05/88326a6b-fa01-43d4-bb00-6171d5f3f1c3-768x768.webp)