Skip to content
About
Contact
Cookie Policy
Copyright Policy
Disclaimer
Search
Home
Dinner
Appetizer
Desserts
Drinks
About
Contact
Privacy Policy
Toggle Menu
Home
/
Appetizer
- Page 17
Appetizer
Crispy Baked Tofu Nuggets Perfect for Quick Snacks
Teriyaki Chicken Lettuce Cups Flavorful Light Meal
Creamy Avocado Chicken Salad Delightful and Nutritious
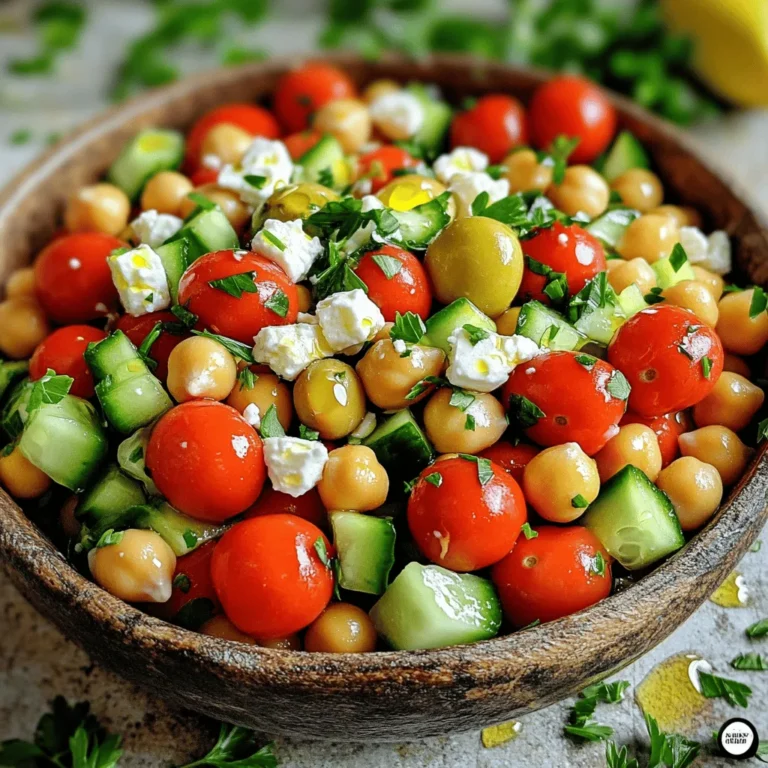
Mediterranean Chickpea Salad Fresh and Flavorful Dish
Honey Sriracha Brussels Sprouts Simple and Tasty Dish
Garlic Lemon Asparagus Quick and Tasty Side Dish
Grilled Veggie Kabobs Flavorful and Easy Recipe
Crispy Baked Falafel Flavorful and Nutritious Treat
Easy Garlic Shrimp Flavorful and Simple Meal
Classic Waldorf Salad Fresh and Flavorful Delight
Page navigation
Previous Page
Previous
1
…
15
16
17
18
19
…
25
Next Page
Next
Home
Dinner
Appetizer
Desserts
Drinks
About
Contact
Privacy Policy
Toggle Menu Close
Search for:
Search


![- 1 pound Brussels sprouts - 3 tablespoons extra virgin olive oil - 2 tablespoons honey - 2 tablespoons Sriracha sauce - 1 teaspoon garlic powder - Salt and pepper to taste - 1 tablespoon sesame seeds (optional) - 2 green onions (for garnish) Gather these ingredients to create a sweet and spicy dish. The Brussels sprouts are the star here. You’ll want to trim and halve them for even cooking. The olive oil helps the sprouts roast nicely, while honey adds sweetness. Sriracha gives it that kick, which you can adjust based on your taste. Garlic powder adds depth, and salt and pepper enhance the flavors. The sesame seeds add a nice crunch and the green onions bring freshness. You can skip any optional ingredients, but they do make the dish pop. For the full recipe, check out the detailed instructions that guide you through each step of cooking these tasty Honey Sriracha Brussels sprouts! - Preheat oven to 425°F (220°C). - Line baking sheet with parchment paper. Start by heating your oven. This step is key, as it helps the Brussels sprouts roast evenly and get that perfect crisp. Lining the baking sheet with parchment paper keeps the sprouts from sticking. Plus, it makes cleanup easy! - Combine Brussels sprouts with oil, honey, Sriracha, garlic powder, salt, and pepper. In a large bowl, toss the halved Brussels sprouts with olive oil, honey, Sriracha, garlic powder, salt, and pepper. Make sure every sprout gets a good coating. This mix brings out the best flavors. The sweet honey balances the heat from the Sriracha. - Arrange sprouts on baking sheet. - Roast for 20-25 minutes, stirring halfway. Spread the sprouts in a single layer on your baking sheet. Place them cut-side down for a nice caramelization. This helps them turn golden brown and crispy. Roast them for 20 to 25 minutes. Halfway through, stir the sprouts. This ensures they brown evenly. You're aiming for fork-tender sprouts with crispy edges. Once they are done, feel free to check the [Full Recipe] for extra tips! To make sure your Brussels sprouts roast well, follow these tips: - Cut Brussels sprouts for maximum crispiness. Halve them and make sure the cut side faces down. This helps them get that nice, crispy edge. - Check doneness with a fork. When the sprouts are soft inside and crispy outside, they are ready. A fork should easily poke through. You can play with the flavors to suit your taste: - Customize Sriracha amount for desired spice level. If you like it hot, add more Sriracha. If you prefer mild, use less. - Use different sweeteners for variety. You can swap honey for maple syrup or agave nectar to change the flavor. Each sweetener gives a unique taste to the dish. For a full guide on making this yummy dish, check the Full Recipe. {{image_4}} You can make Honey Sriracha Brussels sprouts even better. Try adding bacon or pancetta. The salty taste pairs well with the sweet and spicy sauce. Just cook the bacon first, then toss it in before serving. You can also include extra veggies. Bell peppers add color and sweetness. Cut them into strips and mix with the Brussels sprouts. This way, you get more flavor and texture in every bite. If you want to change the sweet flavor, use maple syrup instead of honey. It gives a different taste, but still sweet. This swap can make the dish a bit more unique. You can also try different chili sauces. Sriracha works great, but others can add interesting flavors. Look for sauces with different heat levels. This lets you control the spice to fit your taste. Store extra Honey Sriracha Brussels sprouts in an airtight container in the fridge. This keeps them fresh and tasty. You can enjoy them for up to 3 days. Make sure to cool them down before sealing the container. This helps avoid condensation and sogginess. For the best texture, reheat the sprouts in the oven. Preheat the oven to 350°F (175°C) and spread them out on a baking sheet. Bake for about 10 minutes or until they are warm and crispy. If you’re in a hurry, you can use the microwave. Just remember, they might lose their crunch this way. Enjoy your tasty dish again! For the full recipe, refer back to the main article. Yes, you can prep the sprouts and sauce ahead. Just trim and halve the Brussels sprouts. Mix the sauce with honey and Sriracha to keep flavors fresh. Store them in the fridge until you're ready to roast. This saves you time on busy nights. These sprouts pair well with grilled meats and rice dishes. The sweet and spicy taste enhances simple proteins like chicken or pork. You can also serve them alongside fried rice or quinoa for a tasty meal. Yes, but they are best consumed fresh for optimal taste. Freezing can change the texture of the sprouts. If you do freeze them, make sure to cool them first. Store in an airtight container and use within a month for the best flavor. In this post, we explored how to make Honey Sriracha Brussels sprouts. We covered the main ingredients, step-by-step instructions, and tips for perfect roasting. You learned how to customize the flavors, add extra ingredients, and store leftovers effectively. With this recipe, you can enjoy a spicy and sweet side dish that pleases any crowd. Try it out, and feel free to get creative with your own variations. Happy cooking!](https://dishtreats.com/wp-content/uploads/2025/06/e27bd237-cd9d-45ea-93fd-8494cb919a9a-768x768.webp)

![To make delicious grilled veggie kabobs, gather these fresh ingredients: - 1 bell pepper (any color), cut into 1-inch pieces - 1 zucchini, sliced into rounds - 1 yellow squash, sliced into rounds - 1 red onion, cut into wedges - 8 cherry tomatoes - 1 cup mushrooms, cleaned and stems removed - 3 tablespoons olive oil - 2 cloves garlic, finely minced - 1 teaspoon smoked paprika - 1 teaspoon dried oregano - Salt and freshly ground black pepper to taste - 8 skewers (wooden or metal) Fresh vegetables make a big difference in flavor. You can swap in seasonal veggies, like asparagus or eggplant, based on what you find at the market. This keeps your kabobs fresh and exciting. If you have frozen vegetables, use those too! Just remember to thaw and drain them well. Fresh veggies often taste better but frozen can be a great backup. Using fresh ingredients ensures better taste and texture. Fresh veggies hold their shape and crunch better on the grill. When you bite into a grilled kabob, you want that satisfying crunch. Plus, fresh produce packs more nutrients and flavor. So, always try to choose fresh when you can! For the full recipe, check the section above. Cutting vegetables evenly ensures they cook at the same rate. Aim for 1-inch pieces for bell peppers and wedges for onions. Slice zucchini and yellow squash into rounds. If using wooden skewers, soak them in water for at least 30 minutes. This step prevents burning and keeps them strong. Marinating vegetables adds rich flavor. Combine olive oil, minced garlic, smoked paprika, and oregano. Toss in salt and pepper, then mix well. Add your veggies and coat them with the marinade. Let them sit for 15 minutes to soak up the flavors. Preheat your grill to medium-high heat. A hot grill helps create nice grill marks and a good sear. Place the kabobs on the grill grates. Arrange them evenly for better cooking. Cook for about 10-15 minutes. Turn them occasionally to ensure even cooking. Look for tender veggies with nice grill marks. To serve kabobs, use a rustic platter for a warm touch. Garnish with fresh herbs for added color. Serve with tzatziki or yogurt dip for a creamy contrast. Pair with a light salad or grilled protein for a complete meal. Enjoy your delicious creation! For the full recipe, check out the Grilled Veggie Kabobs details above. To boost the taste of your grilled veggie kabobs, try different marinades. Balsamic vinegar adds a sweet tang. Citrus juices like lemon or lime give a bright kick. You can also add spices or herbs. Consider rosemary, thyme, or cayenne pepper for extra flavor. Smoking the veggies adds depth too. If you have a grill with a smoker box, use it. Wood chips like hickory or mesquite can make a big difference. When you assemble your kabobs, think about color and texture. Alternate your veggies for a pretty look. Start with a bell pepper, then add a mushroom, followed by a cherry tomato. This keeps the kabob interesting. To prevent veggies from falling apart, push them snugly together on the skewer. Avoid overloading them; a little space helps. You can also add proteins like chicken or shrimp, or even cheese cubes for variety. This makes your kabobs more filling and tasty. For a twist, try marinating the protein in the same mix as the veggies. If you want to dive deeper into the recipe, check out the Full Recipe for more details! {{image_4}} You can easily customize grilled veggie kabobs by using seasonal vegetables. Here are some ideas: - Summer: Try corn on the cob, eggplant, and asparagus. - Fall: Use butternut squash, Brussels sprouts, and sweet potatoes. - Winter: Consider root veggies like carrots, turnips, and beets. You can also grill fruits alongside your veggies. Fruits add sweetness and a nice contrast. Pineapple, peaches, and bell peppers work well. Skewer them together for fun color and taste. For a great look and texture, combine different colors and shapes. Mix round cherry tomatoes with long zucchini slices. Use bright peppers with earthy mushrooms. This creates visual interest on your plate. You can make grilled veggie kabobs vegan by omitting any animal products. The recipe is already plant-based, so it’s a perfect choice. If you want a gluten-free version, ensure your marinade is gluten-free. Most spices and oils are safe, but check labels. You can enhance nutrition by adding grains or legumes. Try adding cooked quinoa or chickpeas to your kabobs. This gives extra protein and fiber. If you follow a low-carb diet, focus on non-starchy vegetables. Zucchini, bell peppers, and mushrooms are great picks. You can skip the starchy veggies like corn or potatoes. Check out the Full Recipe for more ideas on how to adapt these kabobs! To keep your leftover kabobs fresh, store them in the fridge. Place them in an airtight container. They can last up to three days. For longer storage, freeze them. Wrap each kabob in plastic wrap, then place them in a freezer bag. They can stay frozen for up to three months. When reheating kabobs, use the oven or grill. Preheat the oven to 350°F. Place the kabobs on a baking sheet. Heat them for about 10 minutes. This method keeps the veggies tender. You can also grill them for 5 minutes on medium heat. Avoid microwaving, as it makes them soggy. The freshness of your ingredients matters. Bell peppers and zucchini last well in the fridge for about a week. Tomatoes and mushrooms are best if used within three days. Always check for signs of spoilage before using leftovers. You can prep veggies ahead of time for easy grilling. Cut your bell pepper, zucchini, and onion in advance. Store them in the fridge in sealed bags. This saves time when you're ready to grill. Kabobs are great for meal plans. You can mix and match different veggies throughout the week. Pair them with grains or salads for a full meal. They also work well for lunch boxes. Just make sure to keep them cool until you eat. If you have a gathering, kabobs are a hit! You can set up a kabob station. Guests can choose their favorite veggies. This adds fun and personalization to your meal. Kabobs not only taste great but also look colorful and inviting on the table. For the complete recipe, check out the [Full Recipe]. Can I make these kabobs in the oven? Yes, you can! Set your oven to 400°F. Place the kabobs on a baking sheet. Bake for about 20 minutes, turning halfway through. This gives you a tasty option when grilling isn't possible. What are the best vegetables for grilling? The best vegetables for grilling include: - Bell peppers - Zucchini - Yellow squash - Red onion - Cherry tomatoes - Mushrooms These veggies hold up well on the grill and taste great! How to know when the vegetables are done cooking? Look for nice grill marks and tenderness. You can pierce them with a fork. If they are soft but still firm, they are ready to eat. How to make grilled veggie kabobs more flavorful? Use a good marinade with olive oil, garlic, and spices. Let the veggies soak in the marinade for at least 15 minutes. This step really boosts their taste. Why should you marinate vegetables? Marinating adds flavor and helps keep them juicy. The oil and spices soak into the veggies, making each bite delicious. What type of skewers work best for grilling? Both wooden and metal skewers work well. If using wooden skewers, soak them first. This prevents burning. Metal skewers can be reused and do not need soaking. Can I use tofu or tempeh in veggie kabobs? Yes, tofu or tempeh can add protein. Cut them into cubes and marinate like the veggies. They grill nicely and taste great with the other flavors. How do I prevent vegetables from burning on the grill? Start with a clean grill and preheat it. Keep an eye on the kabobs while grilling. Turn them often to ensure even cooking and avoid burning. What can I serve alongside grilled veggie kabobs? Serve kabobs with dips like tzatziki or hummus. They also pair well with rice, quinoa, or a fresh salad. Adding some bread can complete the meal nicely. You now have all the tools to create delicious grilled veggie kabobs. We covered essential ingredients, preparation methods, grilling tips, and serving ideas. Remember, fresh ingredients make a big difference. You can also customize with various vegetables and flavors. Don’t forget to store leftovers properly for future meals. Enjoy your grilling adventure, and get creative with your kabob variations. With practice, you'll master this fun cooking method that delights everyone!](https://dishtreats.com/wp-content/uploads/2025/06/56cc5cbd-3bee-4e7d-a92f-dff27107e6fe-768x768.webp)
![- 2 cups canned chickpeas - Fresh herbs: parsley and cilantro - Key spices: cumin and coriander To make crispy baked falafel, start with the main ingredients. The base is 2 cups of canned chickpeas. They give falafel a wonderful texture. Fresh herbs like parsley and cilantro add bright flavors. Using both gives a fresh taste. Spices are key too. Ground cumin and coriander bring warmth and depth. They create a balance that makes falafel special. - Aromatics: onion and garlic - Binding ingredients: tahini and breadcrumbs - Optional: olive oil for drizzling Next, we have additional ingredients. Aromatics like onion and garlic make the falafel smell great. They add a savory note that enhances the dish. Binding ingredients are also important. Tahini helps hold everything together. Breadcrumbs add crunch and structure. If you want a golden and crispy finish, drizzle olive oil on top. It helps the falafel bake evenly and get that perfect crunch. For the full recipe, check out the detailed instructions provided. 1. Preheat your oven to 400°F (200°C). 2. Line a baking sheet with parchment paper. This helps prevent sticking and ensures even cooking. 3. In a food processor, add the drained chickpeas, chopped onion, minced garlic, parsley, cilantro, cumin, coriander, baking powder, salt, black pepper, lemon juice, and tahini. 4. Pulse the mixture. You want it well combined but still chunky, like a paste. 1. Transfer the mixture to a mixing bowl. 2. Fold in the breadcrumbs. If it feels wet, add more breadcrumbs until it holds together. 3. Use your hands to shape the mixture into small balls or patties, about the size of golf balls. 4. Place them evenly on the prepared baking sheet. 1. Drizzle a good amount of olive oil over the falafel balls. This helps them get crispy. 2. Bake in the oven for about 20 minutes. Flip them halfway through for even browning. 3. Look for a golden brown color and a crispy outside. 4. Let the falafel cool for a few minutes before serving. This enhances their flavor and texture. For the full recipe, check the detailed instructions provided earlier. To make your falafel crispy, olive oil plays a key role. It adds flavor and helps create a golden crust. I suggest drizzling olive oil on top of your falafel before baking. This not only enhances the taste but also promotes even cooking. Baking techniques matter too. Preheat your oven to 400°F (200°C) for the best results. Use parchment paper on your baking sheet to prevent sticking. This will help the falafel stay intact and crisp up nicely. Adjusting the breadcrumbs is also important. If your mixture feels too wet, add more breadcrumbs until it holds together. If you want extra crunch, consider using panko breadcrumbs. They give a delightful texture that enhances the overall experience. For a beautiful presentation, arrange your crispy baked falafel on a colorful platter. Pair it with a creamy tahini sauce and a fresh cucumber-tomato salad. This adds both flavor and visual appeal. You might also want to serve it with warm pita bread. Add a side of hummus or tzatziki for a fun dip. These flavors complement the falafel well and make for a tasty meal. One common mistake is not achieving the right consistency. If your falafel falls apart during baking, it may be too wet. Always ensure your mixture holds together well. Adjust breadcrumbs as needed to fix this. Another mistake is overcrowding the baking sheet. Give each falafel space to bake evenly. This helps them crisp up nicely. Flip them halfway through baking for even browning. Finally, don’t skip the cooling step. Let the falafel cool for a few minutes after baking. This enhances their flavor and texture, making your dish even more delightful. For the full recipe, you can refer to the detailed guide above. {{image_4}} You can make falafel even more exciting by adding spices. Try mixing in smoked paprika for a warm, smoky flavor. If you want a brighter taste, add some zest from a lemon. You might also enjoy using fresh herbs like mint or dill for a fresh twist. Each region has its own spin, so feel free to experiment! For those who need gluten-free options, you can swap breadcrumbs with ground oats or almond flour. Both work well and keep the falafel together. If you want to make it vegan, just skip the tahini or use sunflower seed butter instead. This way, everyone can enjoy these tasty bites! While baking gives falafel a nice crunch, you can try air frying them for a quicker option. Air-frying uses less oil and cooks them evenly. You can also pan-fry them in a little oil for golden-brown goodness. Just make sure to keep an eye on them so they don’t burn. For the full recipe, check out the detailed steps above to make your crispy baked falafel! To store leftover falafel, place them in an airtight container. This helps keep them fresh. If you have sauce, store it separately. Leftover falafel stays tasty for about three to four days in the fridge. For freezing, let the falafel cool completely first. Then, space them on a baking sheet and freeze until solid. Once frozen, transfer them to a freezer bag. This way, they won’t stick together. To reheat, bake them directly from the freezer. Heat at 375°F (190°C) for about 15-20 minutes until warm and crispy. In the fridge, your leftover falafel will last about three to four days. If frozen, they can last up to three months. Just remember to seal them well to avoid freezer burn. Enjoy your crispy baked falafel whenever you want with these easy storage tips. For the full recipe, check back to create these delicious bites! Crispy baked falafel pairs well with many sides. You can serve it with: - Hummus for a creamy dip - Tahini sauce for added flavor - Tzatziki sauce for a cool touch - Fresh salads like cucumber-tomato salad - Pita bread for a classic wrap These options enhance the meal and add fresh tastes. To achieve extra crispy falafel, follow these tips: - Use panko breadcrumbs instead of regular ones. They add more crunch. - Drizzle olive oil generously over the falafel before baking. This helps with browning. - Bake at 400°F (200°C) for the best crispiness. Flip them halfway for even cooking. These small changes can make a big difference in texture. Yes, you can use dried chickpeas! Here’s how: - Soak 1 cup of dried chickpeas overnight in water. This softens them. - Drain and rinse the chickpeas before using them in the recipe. - Cook them in boiling water for about 1 hour until tender. Using dried chickpeas gives a fresher taste but takes more time. For the complete details on making crispy baked falafel, check out the [Full Recipe]. Baked falafel is easy and fun to make. By using canned chickpeas, fresh herbs, and key spices like cumin, you create a tasty dish. Follow the steps for perfect shapes, timing, and crunch. Remember to use olive oil and adjust breadcrumbs for crispiness. Play with flavors and storage tips to maximize your enjoyment. With this guide, you can make falafel that delights and satisfies. Now, you're ready to impress friends and family with your delicious creation!](https://dishtreats.com/wp-content/uploads/2025/06/049364cc-9d10-4f08-b8d2-88a9c6614eda-768x768.webp)
![- 1 lb large shrimp, peeled and deveined - 4 cloves garlic, minced - 3 tablespoons olive oil - 1 teaspoon red pepper flakes (adjust to taste) - 1 tablespoon fresh lemon juice - 1 tablespoon fresh parsley, finely chopped - Salt and freshly ground black pepper to taste - Lemon wedges for serving For this easy garlic shrimp dish, you need just a few fresh ingredients. The shrimp should be large, peeled, and deveined. This helps them cook evenly and taste great. Fresh garlic is key. It gives the dish a strong flavor. Olive oil adds richness. Red pepper flakes bring heat, but you can adjust this to fit your taste. Adding lemon juice brightens the dish. Fresh parsley adds color and a hint of earthiness. Salt and black pepper finish the flavor. Serve with lemon wedges for that extra zing. You can find the complete recipe [Full Recipe]. This meal is quick to make and perfect for any night! - Rinse and dry shrimp - Mince garlic - Prepare lemon and parsley Start by rinsing the shrimp under cold water. Make sure to remove any dirt. Once rinsed, use paper towels to dry the shrimp. This helps achieve a nice sear later. Next, mince the garlic into small pieces. This adds flavor to the dish. Finally, cut the lemon in half and chop the parsley finely. Set these aside for later. - Heat olive oil - Sauté garlic - Cook shrimp In a large skillet, pour in the olive oil. Heat it over medium-high heat. Wait until the oil shimmers but does not smoke. Then, add the minced garlic. Sauté it for about 30 seconds. Stir it often to avoid burning. You will smell a great aroma when it’s ready. Now, add the shrimp in a single layer. Sprinkle red pepper flakes, salt, and black pepper on top. Cook the shrimp for 2-3 minutes on each side. They should turn pink and opaque. - Add lemon juice - Garnish with parsley - Serve with lemon wedges When the shrimp are done, take the skillet off the heat. Squeeze lemon juice over the shrimp and toss them gently. This adds a bright flavor. Next, sprinkle the chopped parsley on top for color. Lastly, transfer the shrimp to a serving plate and arrange lemon wedges around them. This makes the dish look nice and inviting. For the full recipe, check the detailed instructions above. Drying shrimp is key. It ensures a nice sear and prevents steaming. After rinsing, pat them dry with paper towels. This simple step makes a big difference in texture. Adjusting spice levels is easy. If you like heat, add more red pepper flakes. For a milder dish, reduce the amount. You control the flavor profile, making it your own. For presentation, use a large shallow dish. Arrange the shrimp and garnish with lemon wedges and parsley. This makes your meal look inviting and fresh. Pair this dish with crusty bread. It’s perfect for soaking up the flavorful garlic oil. A crisp salad or rice also works well. For drinks, try a chilled white wine. It complements the shrimp beautifully. You can find the full recipe in the earlier sections of this article. {{image_4}} You can change the flavor of your easy garlic shrimp by adding fresh herbs. Basil and cilantro bring a bright taste. Just chop them finely and sprinkle them in at the end. You can also mix in vegetables. Bell peppers add crunch and color. Spinach wilts down and adds nutrients. You can sauté these with the garlic to infuse their flavors into the shrimp. Grilling shrimp is fun and gives a smoky flavor. To grill, thread the shrimp on skewers and brush them with olive oil and seasoning. Grill them for about 2-3 minutes on each side until they are pink. If you prefer oven-baking, preheat your oven to 400°F. Place the shrimp in a single layer on a baking sheet. Drizzle with olive oil and season them. Bake for about 8-10 minutes. They will turn pink and cook through. Both methods keep the dish simple and delicious. For the full recipe, check out the Sizzling Garlic Shrimp Delight 🦐. To keep your garlic shrimp fresh, use airtight containers. Glass or plastic containers work well. Make sure they seal tightly to lock in flavor. Store the shrimp in the fridge. They will last for up to two days. After that, the quality may drop. When reheating, use low heat to keep the shrimp tender. A skillet is great for this. Add a splash of olive oil to help restore moisture. Stir gently to avoid overcooking. If you prefer the microwave, use a microwave-safe dish. Heat for short bursts, checking often. This way, you keep that tasty garlic flavor intact. Yes, you can use frozen shrimp. Just remember to thaw them first. To thaw shrimp properly, place them in the fridge overnight or run them under cold water for about 10-15 minutes. Make sure to dry them well with paper towels. This step ensures they cook evenly. To adjust the spice level, you can add or reduce red pepper flakes. For a milder dish, use less than a teaspoon. You can also add more garlic for flavor without heat. If you want more spice, add extra red pepper flakes or some sliced jalapeños while cooking. Garlic shrimp pairs well with many sides. Here are a few options: - Steamed rice or quinoa for a filling meal - Crusty bread to soak up the garlic oil - A fresh green salad for crunch and color - Roasted vegetables for extra flavor and nutrition These sides will enhance your garlic shrimp and make it a complete meal. For the full recipe, check out the section above. This blog post shared a simple and tasty garlic shrimp recipe. We covered key ingredients, easy steps, and useful tips. You learned how to cook shrimp perfectly and adjust flavors to your liking. We also explored variations and storage tips. Now you can enjoy this dish and impress friends at dinner. With your new skills, shrimp night will be a hit! Get creative and have fun with the recipe. Enjoy cooking and delighting your taste buds!](https://dishtreats.com/wp-content/uploads/2025/06/4ce86a88-9fc6-4710-ba94-882bfeda746c-768x768.webp)
![- 2 cups diced apples - 1 cup celery, thinly sliced - 1 cup red grapes, halved - 1/2 cup walnuts, chopped - 1/2 cup raisins or dried cranberries - 1 cup plain Greek yogurt - 1 tablespoon honey - 1/2 teaspoon fresh lemon juice - Salt and pepper to taste - Lettuce leaves for serving Fresh produce makes this salad shine. I love using crisp apples, like Granny Smith, for their tartness. They add a nice crunch. The celery brings a refreshing snap, while juicy red grapes add sweetness. Nuts and dried fruits give texture and flavor. Chopped walnuts are my go-to. Toast them for even more flavor. Raisins or dried cranberries add a touch of sweetness, balancing the dish well. For the dressing, I use plain Greek yogurt. It’s creamy and healthy. Honey adds sweetness, and a bit of lemon juice brightens the flavors. Season with salt and pepper to enhance everything. Finally, serve on fresh lettuce leaves. They make a great base and add color. This combination of ingredients creates a delightful Waldorf salad. You can find the full recipe at [Full Recipe]. - Start by adding 2 cups of diced apples to a large bowl. - Drizzle the apples with 1/2 teaspoon of fresh lemon juice. This keeps them fresh and bright. - Next, slice 1 cup of celery into thin pieces. Add this to the bowl. - Halve 1 cup of red grapes and toss them in too. - In the same bowl, mix the fruit with 1/2 cup of chopped walnuts. - Add 1/2 cup of raisins or dried cranberries for sweetness. Gently toss the mixture. - In a separate bowl, combine 1 cup of plain Greek yogurt with 1 tablespoon of honey. Stir until smooth. - Carefully fold the yogurt dressing into the fruit mixture. Make sure everything is coated. - Season with salt and pepper to taste, folding gently to mix. - Cover the bowl and chill it in the fridge for at least 30 minutes. This helps the flavors blend. - When ready, serve on fresh lettuce leaves for a beautiful presentation. Enjoy your Waldorf salad! - For the complete recipe, check out the Full Recipe. You can swap out fruits and nuts to suit your taste. Try pears or oranges for a fresh twist. For nuts, almonds or pecans work well, too. If you want a creamier texture, use Greek yogurt instead of mayonnaise. The yogurt adds protein and keeps the salad light. Toasting walnuts really boosts their flavor. Just place them in a dry pan over medium heat. Stir them until they smell nutty and are lightly browned. You can also adjust sweetness or tartness. If the salad is too sweet, add a dash of lemon juice. For more sweetness, drizzle in extra honey. Serve your Waldorf salad on crisp lettuce leaves for a vibrant look. Arrange the salad in a large bowl or individual cups. Garnish with mint leaves for a fresh pop of color. You can also sprinkle extra toasted walnuts on top for added crunch. These simple touches make your dish stand out. For the full recipe, refer to the Waldorf Wonderland Salad 🥗. {{image_4}} The classic Waldorf salad uses simple, fresh ingredients. It combines apples, celery, grapes, and walnuts in a creamy dressing. Modern twists can add new flavors. You might see variations like adding chicken or swapping yogurt for mayonnaise. These changes keep the dish fresh and fun. You can experiment with spices, too. A hint of cinnamon or nutmeg can add warmth. If you want a vegan Waldorf salad, swap Greek yogurt for a plant-based option. Silken tofu blended with lemon juice makes a great dressing. For a gluten-free version, check your nuts and dried fruits. Most are safe, but some brands add gluten. You can also cut calories by using low-fat yogurt. This keeps the creaminess while reducing fat. Seasonal fruits can enhance the Waldorf salad. In fall, add sliced pears for sweetness. In winter, pomegranate seeds add color and crunch. Fresh berries in summer create a bright, juicy contrast. Each season brings a new twist to this classic salad. Try different fruits to match the season and your taste. The full recipe allows you to mix and match as you please. To store leftover Waldorf salad, place it in an airtight container. This keeps the salad fresh. Use a lid or plastic wrap to seal it well. The salad can last up to 3 days in the fridge. After that, the texture and flavor may change. If you see any browning apples, it’s best to toss them out. You can prepare some ingredients in advance. Chop your apples, celery, and grapes a day before. Keep them in separate containers in the fridge. This saves time when you want to make the salad. If you want to freeze Waldorf salad, I suggest not freezing it whole. The fruits will lose their crunch. Instead, freeze just the nuts or dried fruits. This keeps them fresh longer. When you are ready, mix them in fresh, chilled salad. You can enjoy that fresh taste even after storage! For the full recipe, check out the Waldorf Wonderland Salad. Waldorf Salad dates back to the late 1800s. A chef at the Waldorf Astoria Hotel in New York created it. The original recipe had only apples, celery, and mayonnaise. Over time, people added more ingredients, like walnuts and grapes. This salad became popular at formal dinners and events. It has a classic, timeless appeal that many enjoy today. Yes, you can prepare Waldorf Salad ahead of time. Make it a few hours before serving for best results. Just follow the steps of mixing everything and keep it in the fridge. This helps the flavors blend well. If you plan to serve it the next day, be careful with the apples. They can brown, so use lemon juice to keep them fresh. Waldorf Salad is quite healthy! It features fresh fruits and nuts, which offer great nutrients. Apples provide fiber and vitamins, while walnuts add healthy fats. The Greek yogurt dressing gives protein and a creamy texture. This salad is a great choice for a light meal or side dish. Eating it can help you feel full and satisfied. You can find the full recipe for this delightful salad [here](#). Waldorf salad combines fresh produce, nuts, and a creamy dressing. You learned how to prepare it step-by-step. I shared tips to enhance flavor and presentation. Feel free to adjust ingredients based on your taste. You can also explore various dietary options and seasonal fruits. This salad is not only tasty but also healthy. With proper storage methods, you’ll enjoy it for days. Now, it's time to create your own delicious version!](https://dishtreats.com/wp-content/uploads/2025/06/24fb7af7-5454-4649-a19f-39fd463a867f-768x768.webp)