Skip to content
About
Contact
Cookie Policy
Copyright Policy
Disclaimer
Search
Home
Dinner
Appetizer
Desserts
Drinks
About
Contact
Privacy Policy
Toggle Menu
Home
/
Appetizer
- Page 15
Appetizer
Cheesy Zucchini Fritters Tasty and Simple Recipe
Baked Crispy Tofu Nuggets Healthy and Tasty Snack
Rainbow Fruit Skewers Tasty and Fun Summer Treat
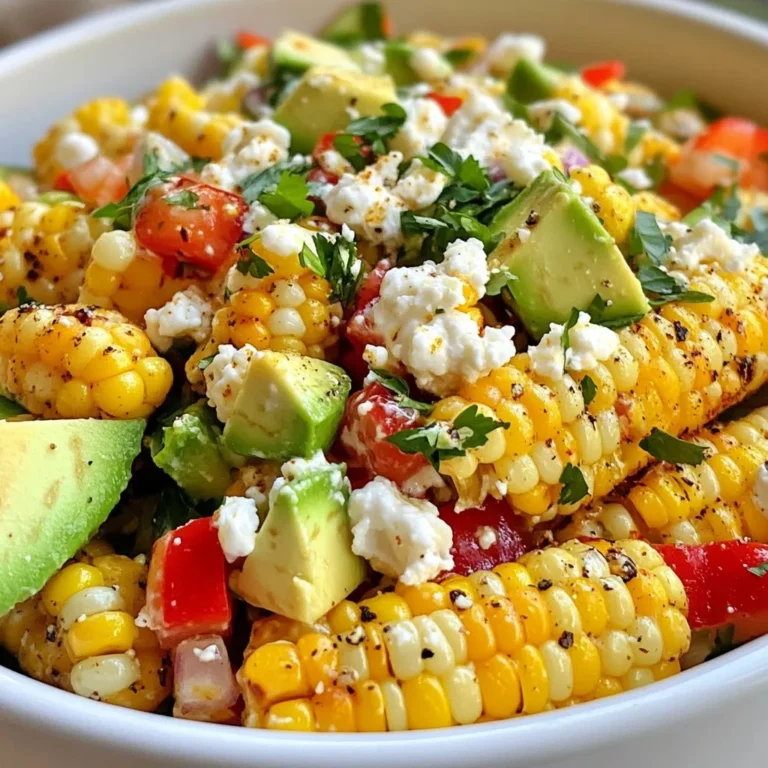
Mexican Street Corn Salad Fresh and Flavorful Dish
Buffalo Ranch Chicken Dip Creamy Flavorful Delight
Maple Glazed Brussels Sprouts Deliciously Roasted Dish
Roasted Garlic Parmesan Cauliflower Flavorful Delight
Fresh Pineapple Salsa Zesty and Flavorful Dish
Rainbow Fruit Skewers Vibrant and Fun Summer Snack
Loaded Greek Fries Flavorful and Easy Recipe Guide
Page navigation
Previous Page
Previous
1
…
13
14
15
16
17
…
25
Next Page
Next
Home
Dinner
Appetizer
Desserts
Drinks
About
Contact
Privacy Policy
Toggle Menu Close
Search for:
Search


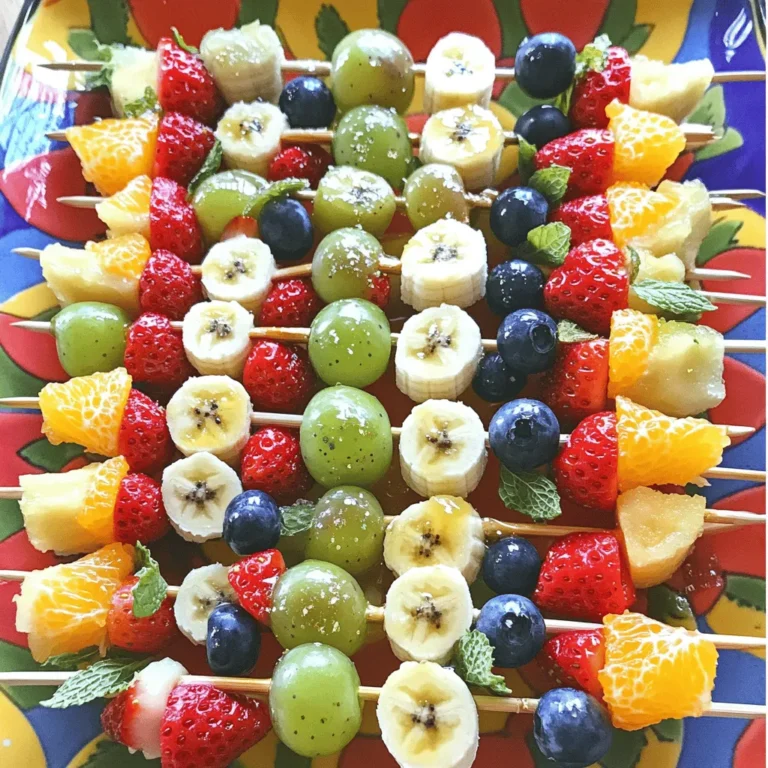
![To make Rainbow Fruit Skewers, you need a mix of fresh fruits. Here’s the list of what you’ll need: - Fresh strawberries (1 cup) - Juicy orange segments (1 cup) - Sweet pineapple chunks (1 cup) - Crisp green grapes (1 cup) - Plump blueberries (1 cup) - Deep purple grapes or blackberries (1 cup) - Optional: Honey (2 tbsp) for drizzling - Fresh mint leaves for garnish Each fruit brings a burst of color and taste. Fresh strawberries add a sweet tang. Juicy orange segments bring a citrusy pop. Sweet pineapple chunks add tropical flair. Crisp green grapes offer crunch. Plump blueberries add a mild sweetness. Deep purple grapes or blackberries provide a rich finish. Feel free to mix and match. Use your favorite fruits or whatever you have at home. The goal is to create a vibrant, tasty treat. You can also drizzle honey on top for added sweetness. Mint leaves add a nice touch. They make the dish look fancy and smell great. Remember, this is just a guide. You can adjust the amounts to fit your needs. For the full recipe, check out the complete instructions above. Enjoy your colorful creation! To start, wash all your fruits under cool running water. This step keeps them clean and safe to eat. For strawberries, remove the green tops. If they are big, slice them in half. Next, peel the oranges. Cut them into segments and toss out any seeds. Chop the pineapple into bite-sized chunks. Rinse the green grapes and blueberries to remove dirt and make them shine. Grab your wooden skewers. If you plan to grill them, soak the skewers in water for 10 minutes to prevent burning. Now, it’s time to thread the fruits onto the skewers! I like to start with one strawberry, then add one orange segment, a pineapple chunk, and a green grape. After that, toss on a few blueberries and finish with a purple grape or blackberry. This order gives you a bright, colorful look. Aim for a rainbow effect with every skewer! For a little extra sweetness, drizzle honey over the assembled skewers. This step is optional but adds a nice touch. If you want a chill treat, place the skewers in the fridge for about 30 minutes. Chilling helps the flavors pop and makes them extra refreshing. Enjoy these delicious Rainbow Fruit Skewers at your summer gatherings or as a fun snack! For the full recipe, check out [Full Recipe]. Picking ripe fruits is key for tasty skewers. Here are signs to watch for: - Strawberries: Look for bright red color without any green tops. - Oranges: Choose firm, heavy oranges with smooth skin. - Pineapple: Smell the bottom. A sweet aroma means it's ripe. - Green Grapes: Look for a vibrant green color and firm texture. - Blueberries: Pick plump blueberries with a deep blue hue. - Purple Grapes/Blackberries: Choose ones that are dark and slightly soft. Keep your fingers safe while making skewers. Here’s how: - Use wooden skewers that are at least 10 inches long. - Soak them in water for 10 minutes. This helps avoid burning. - Hold the fruit steady with one hand. Use the other to push it onto the skewer. - Start with firm fruits like strawberries. This helps stabilize softer fruits later. - Avoid using too much force. This can break the fruit apart. Make your skewers look as good as they taste. Try these tips: - Arrange skewers in a colorful pattern. Use a mix of all the fruits. - Place them on a bright platter. A white dish makes colors pop. - Garnish the platter with fresh mint leaves. They add a lovely aroma. - For extra flair, drizzle honey on top. It adds shine and sweetness. Explore more ideas in the [Full Recipe]. {{image_4}} You can switch up the fruits based on the season. In spring, use strawberries and blueberries for sweetness. In summer, opt for ripe peaches and cherries. Fall brings apples and pears, adding crunch. Winter is perfect for citrus like tangerines and pomegranates. Each season offers fresh flavors for your skewers. You can create fun themes for parties. For a summer BBQ, use red, white, and blue fruits for a patriotic look. For Halloween, add orange slices and blackberries for a spooky vibe. During the holidays, use red strawberries and green grapes for a festive feel. Matching colors makes your skewers pop! Adding protein can make your skewers more filling. You can thread cubes of cheese like cheddar or mozzarella between the fruits. Greek yogurt is another option—use it as a dip on the side. This adds taste and gives you energy for your summer fun. For the full recipe, check out Rainbow Fruit Skewers! To keep your rainbow fruit skewers fresh, store them in an airtight container. This helps keep moisture in and prevents the fruit from drying out. You can also cover them with plastic wrap if you don’t have a container. In the fridge, these skewers stay fresh for up to three days. After that, the fruit may start to lose its flavor and texture. You can make these skewers a few hours before your event. Just prepare the fruit and assemble the skewers. Store them in the fridge until you are ready to serve. If you want to save time, wash and cut the fruit a day ahead. Keep the pieces in separate containers. This way, you can quickly assemble your skewers when needed. Check out the Full Recipe for more tips on making and storing your rainbow fruit skewers! To scale this recipe, double or triple the ingredients. Use a mix of fruits to please all tastes. Prepare a large platter to display the skewers. Set up a fruit station where guests can make their own skewers. This way, everyone can choose their favorite fruits. You can use frozen fruit, but it may not look as good. Frozen fruit tends to be softer and can lose its shape. If using frozen fruit, let it thaw and drain any excess water. Fresh fruit gives a better texture and taste for skewers. Yes, Rainbow Fruit Skewers are very healthy! Each fruit offers vitamins and minerals. For instance, strawberries provide vitamin C. Oranges are high in fiber. Pineapple contains bromelain, which helps digestion. Grapes and blueberries are full of antioxidants. Enjoy these colorful treats guilt-free! If you want a vegan option, use maple syrup or agave nectar. You can also try yogurt or nut butter for creaminess. For a sugar-free choice, use a sugar-free syrup. These alternatives add sweetness and keep the skewers fun and tasty. To keep fruit fresh, soak apple or banana slices in lemon juice. This helps prevent browning. Store skewers in the fridge until serving. Keep them covered to avoid drying out. Fresh mint leaves also help keep everything looking bright and fresh. For a full recipe, check out the detailed steps in the earlier section! Rainbow fruit skewers combine fresh fruits for a colorful and tasty treat. We walked through selecting ripe fruits, skewering them, and adding sweet touches like honey. You can use fun themes for parties or add proteins for a snack. Keep them chilled and store them well to enjoy later. In the end, these skewers are fun to make and good for you. Enjoy creating your own rainbow of flavors!](https://dishtreats.com/wp-content/uploads/2025/06/1f4123b9-dd53-4d15-af26-e58167d567ef-768x768.webp)

![To make this dish, you will need: - 1 lb Brussels sprouts, trimmed and halved - 3 tablespoons extra virgin olive oil - 1/4 cup pure maple syrup - 1 tablespoon balsamic vinegar - 1 teaspoon garlic powder - Salt and freshly ground black pepper to taste These ingredients come together to create a sweet and savory glaze. The maple syrup adds sweetness, while the balsamic vinegar gives tanginess. The olive oil helps with roasting, making the sprouts tender and tasty. You can add these optional ingredients for extra flavor and texture: - 1/4 cup chopped walnuts - Fresh thyme leaves for garnish Walnuts add a nice crunch, while thyme gives a fresh aroma. Both options enhance the dish without overpowering it. This dish is not just tasty; it’s also good for you. Here’s a quick look at the nutrition per serving: - Calories: About 180 - Protein: 3g - Carbohydrates: 25g - Fat: 8g - Fiber: 4g Brussels sprouts are rich in vitamins C and K. The maple syrup provides natural sugars, making this dish a healthy choice. You get great flavors and health benefits in one meal. For the complete recipe, check the Full Recipe section above! First, we need to preheat the oven to 400°F (200°C). This heat is perfect for roasting. A hot oven ensures crispy edges and tender centers for your Brussels sprouts. Next, gather your ingredients. You will need: - 1 lb Brussels sprouts, trimmed and halved - 3 tablespoons extra virgin olive oil - 1/4 cup pure maple syrup - 1 tablespoon balsamic vinegar - 1 teaspoon garlic powder - Salt and freshly ground black pepper to taste - 1/4 cup chopped walnuts (optional for crunch) - Fresh thyme leaves for garnish (optional for aroma and color) In a large bowl, mix the halved Brussels sprouts with olive oil, maple syrup, balsamic vinegar, garlic powder, salt, and pepper. Toss everything well. Make sure every sprout gets coated in the sweet and savory sauce. This step is key for flavor. Prepare your baking sheet by lining it with parchment paper. This makes cleaning easy and helps prevent sticking. Spread the Brussels sprouts in a single layer on the sheet. Give them space to roast well. Now, place the baking sheet in the hot oven. Roast the sprouts for 25 minutes. Halfway through, stir them to promote even cooking. You want them to get tender and brown. If you add walnuts, toss them on the sheet during the last 5 minutes. This will give them a nice toast and extra crunch. Once done, take the Brussels sprouts out and let them cool for a minute. Transfer them to a serving dish. For a finishing touch, sprinkle fresh thyme leaves on top. This adds a nice pop of color and aroma to your dish. Enjoy this full recipe for a delicious treat! To get that perfect glaze, start with good maple syrup. Use pure maple syrup for the best flavor. Mix it well with olive oil and balsamic vinegar; this combo really shines. Make sure to coat the Brussels sprouts evenly. This helps each piece get that sweet, sticky glaze. Toss them well in the bowl before roasting. Roasting Brussels sprouts needs some care. First, preheat your oven to 400°F (200°C). This hot oven helps them caramelize. Spread the sprouts on a baking sheet in a single layer. If they are crowded, they won't brown well. Stir them halfway through cooking to ensure even roasting. You want them golden brown and tender, about 25 minutes in the oven. When ready to serve, think about how to make them look nice. Place the roasted sprouts on a large platter. You can arrange them in a circle for a pretty look. If you added walnuts, sprinkle them on top for crunch. Fresh thyme leaves also add color and smell great. This makes the dish not just tasty but beautiful too. For the full recipe, check out the details above. {{image_4}} You can switch up the sweetener for a twist. Try honey or agave syrup. These will add their own unique flavors. You can also use coconut sugar for a richer taste. If you like a kick, add some chili flakes for heat. A dash of orange juice can also brighten up the sweetness. This recipe is already vegetarian. To make it vegan, ensure the maple syrup is pure. You can also use almond oil instead of olive oil for a different flavor. For creaminess, add a dollop of vegan sour cream on top before serving. This adds a lovely tang that pairs well with the sweetness. Seasonal swaps can make this dish even better. In spring, add fresh peas for color and sweetness. During fall, toss in some diced apples for a sweet crunch. In winter, try adding roasted chestnuts for a nutty flavor. These changes keep the dish fresh and exciting every time you make it. For the full recipe, you can refer back to the detailed instructions provided. After enjoying your maple glazed Brussels sprouts, store any leftovers in an airtight container. This keeps them fresh and prevents odors. Let them cool first before sealing. Place the container in the fridge. They stay good for about 3 to 5 days. If you want to keep them longer, consider freezing. Reheating your Brussels sprouts can be quick and easy. You can use the oven or stovetop. If you use the oven, preheat it to 350°F (175°C). Spread the sprouts on a baking sheet and heat for about 10-15 minutes. Stir halfway through to ensure even warming. If you prefer the stovetop, heat a pan over medium heat. Add a bit of olive oil and toss the sprouts until warmed through. Freezing Brussels sprouts is a smart way to save them for later. First, blanch them in boiling water for 3 minutes. Then, cool them in ice water. This keeps their bright color and flavor. Drain and dry the sprouts, then place them in a freezer bag. Remove as much air as you can before sealing. They can last up to 6 months in the freezer. When you're ready to use them, just thaw and reheat! Enjoy your deliciously roasted maple glazed Brussels sprouts from [Full Recipe] and savor every bite! Yes, you can prep Brussels sprouts in advance. Trim and halve them a day before. Store them in an airtight container in the fridge. When you're ready, mix them with the other ingredients from the Full Recipe. This helps save time and makes cooking easier. Maple glazed Brussels sprouts pair well with many dishes. Here are some great options: - Roast chicken for a savory touch. - Grilled salmon for a healthy protein. - Quinoa salad for a hearty side. - Mashed potatoes for comfort food lovers. These options balance the sweet and savory flavors of the sprouts. To make this dish vegan, swap out the maple syrup for agave nectar. This keeps the sweetness intact. You can also use vegetable oil instead of olive oil if you prefer. Follow the Full Recipe as is, making those simple swaps. Enjoy the same great taste with a vegan twist! In this blog post, we covered how to make maple glazed Brussels sprouts. We discussed the key ingredients and provided step-by-step instructions. Tips helped you achieve the perfect glaze and roasting method. You also learned about variations, storage, and common questions. Now, you have all the tools to enjoy this dish. Experiment with flavors and enjoy your cooking!](https://dishtreats.com/wp-content/uploads/2025/06/8ccc11bb-56ad-4722-8e0d-cbebb28a9ca5-768x768.webp)
![- Medium head of cauliflower - Garlic cloves - Grated Parmesan cheese - Extra virgin olive oil - Garlic powder - Smoked paprika - Salt and pepper - Fresh parsley To convert cups to grams, remember that 1 cup of cauliflower is about 100 grams. For cheese, 1 cup of grated Parmesan is around 100 grams too. If you want more garlic flavor, you can add extra garlic cloves. Adjust the garlic powder to your taste. Using fresh ingredients makes a big difference. Fresh cauliflower offers better taste and texture. Fresh garlic gives a stronger flavor. For those with dietary needs, you can swap Parmesan cheese with a vegan version made from nuts or nutritional yeast. Always choose high-quality olive oil for a rich flavor. Quality ingredients lead to a better dish! First, break down the cauliflower. Remove the leaves and stem. Cut the head into bite-sized florets. Make sure they are all similar in size. This step helps them cook evenly. Next, take six cloves of garlic and finely mince them. You want the garlic to blend well with the cauliflower. Gather the other ingredients: olive oil, garlic powder, smoked paprika, salt, and pepper. Now, preheat your oven to 425°F (220°C). This temperature is perfect for roasting. While the oven heats, grab a large bowl. Add the cauliflower florets, minced garlic, olive oil, garlic powder, smoked paprika, salt, and pepper. Toss everything together with your hands or a spoon. Ensure each floret is well-coated. Line a large baking sheet with parchment paper for easy cleanup. Spread the cauliflower in a single layer on the sheet. Place the baking sheet in the preheated oven. Roast the cauliflower for about 20 to 25 minutes. Stir halfway through to achieve a nice golden brown. After roasting, take the baking sheet out of the oven. Sprinkle the grated Parmesan cheese over the hot cauliflower. The heat will melt the cheese beautifully. Return it to the oven for another five minutes. Wait until the cheese is bubbly and delicious. When it's done, let it cool for a few minutes. For a fresh touch, garnish with finely chopped parsley before serving. If you want to explore the full recipe, check it out here: [Full Recipe]. To ensure even roasting, spread the cauliflower in a single layer. This allows the hot air to circulate around each floret. Use a large baking sheet lined with parchment paper for easy cleanup. Keep an eye on your cauliflower as it roasts. Aim for a golden color and tender texture. Stir the florets halfway through the cooking time to promote uniform browning. You can boost the flavor with extra spices and herbs. Consider adding a pinch of cayenne for heat or thyme for an earthy touch. If you want deeper flavor, try marinating the cauliflower in olive oil and spices before roasting. This helps the flavors soak in, making each bite delicious. This roasted garlic Parmesan cauliflower pairs great with many main dishes. I love it with grilled chicken or fish. For best practices in garnishing, sprinkle fresh parsley on top before serving. This adds color and freshness to your dish. Serve it in a rustic bowl or a beautiful platter. A drizzle of olive oil enhances its appeal. Enjoy your flavorful roasted garlic Parmesan cauliflower as a delightful side dish! For the full recipe, check out the details. {{image_4}} You can easily change a few ingredients in this dish. If you're looking for a vegan option, use nutritional yeast instead of Parmesan. This swap gives you a cheesy flavor without dairy. For other veggies, try broccoli or Brussels sprouts. Both will roast nicely and absorb the garlic flavor. If you want a different taste, you can grill the cauliflower. Grilling brings a smoky flavor that pairs well with garlic. Another option is using an air fryer. It cooks faster and makes the cauliflower crispy. Both methods keep the dish delicious. You can adjust ingredients based on the season. In fall, add some pumpkin spice for warmth. In spring, include fresh herbs like dill or tarragon. For holiday meals, mix in some cranberries or nuts for a festive twist. These changes keep the recipe fresh and exciting. To store leftovers, place the cauliflower in an airtight container. This keeps it fresh and tasty. Use it within three days for the best flavor. Glass or BPA-free plastic containers work well for storage. They seal tightly and prevent moisture loss. For reheating, the oven is your best friend. Preheat it to 350°F (175°C). Spread the cauliflower on a baking sheet and bake for about 10 minutes. This method keeps it crispy. Microwaving works too, but it can make the cauliflower soggy. To avoid this, place a paper towel over the dish to absorb excess moisture. You can freeze the cauliflower before cooking. Just toss it with the oil and seasonings, then spread it in a single layer on a baking sheet. Freeze until solid, then transfer to a freezer bag. To cook from frozen, no need to thaw. Just roast it at 425°F (220°C) for 30-35 minutes, adding the cheese in the last five minutes. This method keeps the flavors locked in. How can I make this dish ahead of time? You can prepare the cauliflower ahead. Simply season it and spread it on a baking sheet. Cover the sheet tightly with plastic wrap. Store it in the fridge for up to a day. When ready, roast it as per the recipe. This saves time and keeps flavors fresh. What can I serve with roasted garlic Parmesan cauliflower? This dish pairs well with many meals. It complements grilled chicken or fish nicely. You can also serve it with a hearty salad. For a vegetarian option, try it with quinoa or rice. The flavors enhance any meal you create. Is this recipe gluten-free? Yes, this recipe is gluten-free. All the ingredients are safe for those on a gluten-free diet. Just ensure that the Parmesan cheese is labeled gluten-free. This makes it easy for everyone to enjoy. Can I make this dish low-carb? Absolutely! Cauliflower is a great low-carb choice. It’s naturally low in carbs and high in fiber. You can enjoy this dish without worry. It fits perfectly into a low-carb meal plan. What to do if it's too soggy? If your cauliflower is too soggy, it may need more roasting time. Make sure to spread the florets out on the baking sheet. This helps them roast evenly and stay crisp. You can also reduce the olive oil slightly for less moisture. Why isn’t the cheese melting properly? If the cheese isn’t melting, check the oven temperature. It should be hot enough at 425°F (220°C). Make sure to add the cheese right after roasting. This lets it melt smoothly over the hot cauliflower. If needed, give it a few extra minutes in the oven. This dish combines fresh ingredients and simple steps. You learned how to prepare, roast, and serve roasted garlic Parmesan cauliflower. I shared tips for enhancing flavor and ideas for swapping ingredients. Remember to store leftovers correctly to keep them fresh. Whether you want a quick snack or a tasty side, this recipe works well. You can easily adjust it to suit your tastes. Enjoy cooking and making this dish your own!](https://dishtreats.com/wp-content/uploads/2025/06/e2797ad0-ebfe-4fec-85bd-8200cd052b8d-768x768.webp)

![To make loaded Greek fries, you need fresh and tasty ingredients. Here’s what you need: - 4 large Russet potatoes - 1/4 cup olive oil - 1 teaspoon garlic powder - 1 teaspoon paprika - Salt and pepper to taste - 1 cup crumbled feta cheese - 1 cup cherry tomatoes, halved - 1/2 cup Kalamata olives, pitted and sliced - 1/2 cucumber, diced - 1/4 red onion, finely chopped - Fresh parsley, chopped for garnish - 1/2 cup tzatziki sauce You can get creative with your fries! Here are some tasty toppings to try: - Sliced jalapeños for heat - Chopped bell peppers for crunch - Grilled chicken or lamb for protein - Avocado for creaminess Season your fries to boost flavor! Here are some ideas: - Oregano adds a nice herbal flavor. - Lemon zest gives a fresh, zesty touch. - Red pepper flakes can spice things up. - Dill pairs well with tzatziki and adds brightness. These ingredients and toppings make loaded Greek fries a fun and easy dish. You can mix and match to fit your taste. Enjoy cooking with this Full Recipe! To start, wash four large Russet potatoes. Make sure to scrub them well. Next, cut the potatoes into thin fries, about 1/4 inch thick. This size helps them cook evenly. Place the cut fries in a large bowl. Drizzle 1/4 cup of olive oil over them. Add 1 teaspoon of garlic powder and 1 teaspoon of paprika. Sprinkle salt and pepper to taste. Toss the fries. Make sure every fry gets coated well. Now it's time to bake. Preheat your oven to 425°F (220°C). Spread the seasoned fries on a baking sheet lined with parchment paper. Try to keep them in one layer. This helps them get crispy. Bake for 25 to 30 minutes. Remember to flip them halfway through. Look for a golden brown color when they are done. While the fries bake, prepare the toppings. In a medium bowl, mix 1 cup of halved cherry tomatoes, 1/2 cup of sliced Kalamata olives, 1/2 diced cucumber, and 1/4 cup of finely chopped red onion. Drizzle a bit of olive oil over this mix. Add salt and pepper to taste, then gently combine. When the fries are ready, pull them out of the oven. Immediately sprinkle 1 cup of crumbled feta cheese on top. Next, add your prepared veggie mix. Finally, add a generous dollop of tzatziki sauce on top. For a nice finish, sprinkle chopped fresh parsley for color. Enjoy your Loaded Greek Fries! You can find the full recipe [here]. To make the best fries, start with the right potatoes. I prefer Russet potatoes for their starchiness. Cut your fries thin, around 1/4 inch thick. This helps them cook evenly and get crispy. Soak the cut fries in cold water for at least 30 minutes. This removes extra starch and aids crispiness. After soaking, dry them well with a towel. Coat the fries with olive oil and seasonings. Bake at 425°F (220°C) for 25-30 minutes. Remember to flip them halfway through for an even crunch. Great flavor makes all the difference. I love using garlic powder and paprika for a warm, savory taste. Add salt and pepper to taste. You can also try adding dried oregano or thyme for a Greek touch. Don't be afraid to experiment! Mix your favorite spices into the oil before coating the fries. This will infuse flavor right into the fries. For an extra kick, add some chili powder or cayenne pepper. Presentation matters when serving Loaded Greek Fries. Serve them on a large platter for a fun look. Drizzle extra Tzatziki sauce over the top for a creamy touch. Use fresh parsley to add color and freshness. You can also add slices of lemon for a pop of brightness. For easy serving, provide toothpicks or small forks. This makes it fun for guests to enjoy! For the full recipe, check out the detailed instructions above. {{image_4}} You can make Loaded Greek Fries vegetarian by skipping the meat toppings. The base is already rich with flavor. Use extra toppings like roasted red peppers or artichoke hearts. You can also add a variety of cheeses, like goat cheese or mozzarella, for a creamy twist. These options keep the dish hearty and satisfying. If you want to add protein, consider grilled chicken or shrimp. Both pair well with the Greek flavors. Gyro meat is another great choice. Cook it until it's crispy and flavorful. You can also try chickpeas for a plant-based protein. They add a nice crunch and boost the nutrition. Different regions of Greece offer unique flavors. From the island of Crete, you can add capers and mint for a fresh taste. In the north, try adding smoked paprika for depth. From the Peloponnese, olives and citrus zest can give a bright flavor. Mix and match these ingredients for your own twist on Loaded Greek Fries. For the full recipe, check out the complete guide on Loaded Greek Fries. To keep your loaded Greek fries fresh, let them cool first. Place them in an airtight container. If you have toppings like tomatoes or cucumbers, store them separately. This keeps everything crisp. When you want to enjoy your leftovers, preheat your oven to 375°F (190°C). Spread the fries on a baking sheet. Heat for about 10-15 minutes until hot and crispy. Avoid microwaving them, as this can make them soggy. These loaded Greek fries last about 2-3 days in the fridge. Make sure they are in an airtight container. If you notice any change in smell or texture, it’s best to toss them. Enjoy them fresh for the best taste! I recommend using Russet potatoes for Loaded Greek Fries. They are starchy and fluffy, which gives you that nice, crispy texture when baked. Their skin adds a great crunch, too. Yukon Gold potatoes also work well. They are creamier, which can add a different taste. Yes, you can prepare the fries ahead of time! Cut the potatoes and soak them in water to keep them fresh. This step removes some starch and helps them crisp up better. When you are ready to cook, just dry them off and season them. Bake them fresh for the best taste. Loaded Greek Fries go well with many dishes. They are great alongside grilled meats like chicken or lamb. You can serve them with a fresh Greek salad for a light meal. They also pair nicely with tzatziki, which adds a cool contrast to the warm fries. Enjoy them as a fun snack at gatherings or parties! For a complete experience, check out the Full Recipe to guide you through making these tasty fries. Loaded Greek fries are a fun dish packed with flavors. We explored key ingredients, optional toppings, and tasty seasonings. I shared step-by-step instructions to prepare and bake your fries, then assemble them perfectly. I offered tips for crispy fries and smart presentation ideas. You can even customize your dish with vegetarian options or protein toppings from various Greek regions. Finally, I outlined storage tips to keep leftovers fresh. Enjoy making these fries; they are sure to impress everyone!](https://dishtreats.com/wp-content/uploads/2025/06/9c6541bd-b31d-423a-b196-3f6ab3dd7c20-768x768.webp)