Lemon Herb Grilled Shrimp Flavorful and Easy Recipe

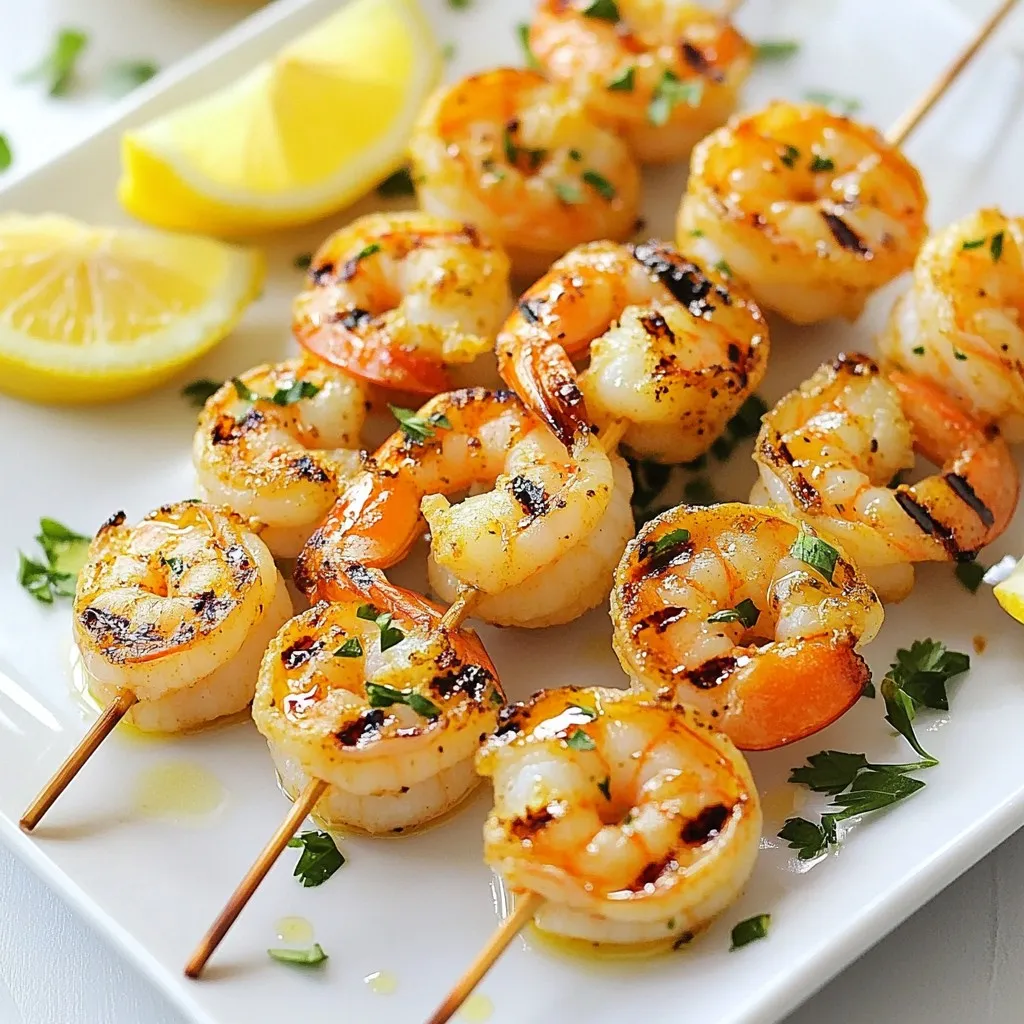
Are you ready to elevate your grilling game? My Lemon Herb Grilled Shrimp recipe is not only packed with flavor but also quick and simple to make. With fresh herbs and zesty lemon, this dish will have your taste buds singing. Perfect for a summer cookout or a quick weekday dinner, follow me for easy steps and expert tips. Let’s get cooking and impress your family and friends!
Why I Love This Recipe
- Bright and Zesty Flavor: The combination of lemon juice and zest with fresh herbs creates a refreshing and vibrant taste that elevates the shrimp.
- Quick and Easy: This recipe comes together in under an hour, making it perfect for weeknight dinners or last-minute gatherings.
- Grilled to Perfection: The grilling method adds a smoky flavor and a beautiful char, enhancing the overall eating experience.
- Versatile Dish: These lemon herb grilled shrimp can be served as an appetizer, in tacos, or over a fresh salad, making them a versatile addition to any meal.
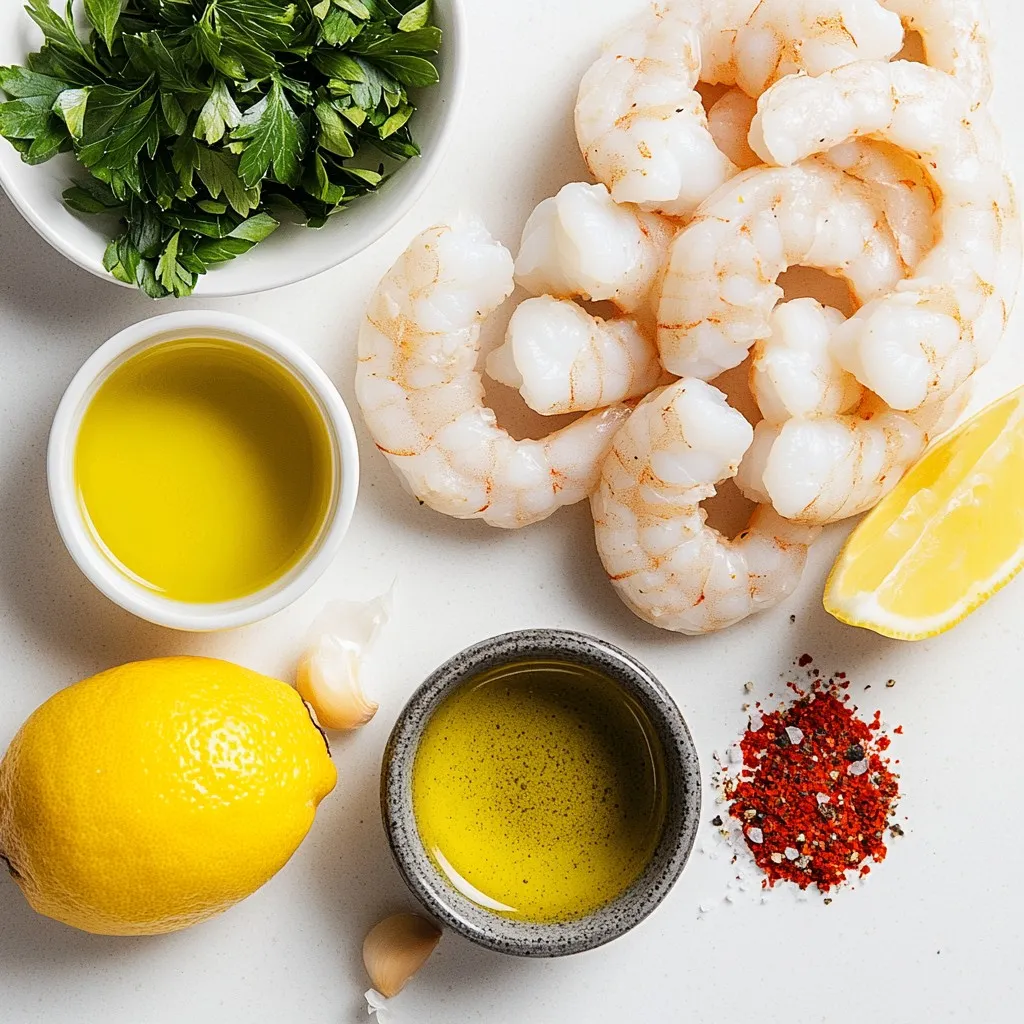
Ingredients
Key Ingredients for Lemon Herb Grilled Shrimp
For this recipe, you need fresh and simple ingredients. Here’s what you’ll need:
- 1 pound large shrimp, peeled and deveined
- 3 tablespoons high-quality olive oil
- 2 tablespoons freshly squeezed lemon juice
- Zest of 1 medium lemon
- 3 cloves garlic, finely minced
- 1 tablespoon fresh parsley, finely chopped
- 1 teaspoon dried oregano
- 1 teaspoon smoked paprika
- Sea salt and freshly ground black pepper to taste
- Lemon wedges for serving
These ingredients come together to create a bright and zesty flavor that enhances the shrimp.
Suggested Quality of Olive Oil
Using high-quality olive oil makes a big difference in taste. It adds richness and depth. Look for extra virgin olive oil. It has a fresh and fruity flavor. This oil is perfect for your marinade. The best oils come from the first cold pressing of olives. Always check for quality labels when you shop.
Importance of Fresh Herbs
Fresh herbs bring life to your dish. They add bright flavors that dried herbs cannot match. In this recipe, fresh parsley is key. It adds a crisp, green taste that complements the lemon. Always choose fresh herbs over dried when possible. They make your grilled shrimp not just tasty, but also beautiful.

Step-by-Step Instructions
Preparing the Marinade
To start, you need to make the marinade. Gather a medium mixing bowl. In this bowl, whisk together:
- 3 tablespoons high-quality olive oil
- 2 tablespoons freshly squeezed lemon juice
- Zest of 1 medium lemon
- 3 cloves garlic, finely minced
- 1 tablespoon fresh parsley, finely chopped
- 1 teaspoon dried oregano
- 1 teaspoon smoked paprika
- Sea salt and freshly ground black pepper to taste
Mix all the ingredients until they blend well. This step is key for rich flavor. You want each shrimp to soak up this delicious mix.
Marinating the Shrimp
Next, it’s time to marinate the shrimp. Carefully add 1 pound of large, peeled, and deveined shrimp into the bowl with the marinade. Toss them gently so every shrimp gets covered. This is where the magic begins.
Once coated, cover your bowl with plastic wrap. Place it in the fridge for 30 minutes to 1 hour. This allows the flavors to soak in, making your shrimp tasty and juicy.
Grilling Techniques for Perfect Shrimp
Before grilling, preheat your grill to medium-high heat. If you use a grill pan, heat it on the stovetop until hot. If you have wooden skewers, soak them in water for 30 minutes to stop them from burning.
Now, thread the marinated shrimp onto the skewers. Place them close, but don’t overcrowd.
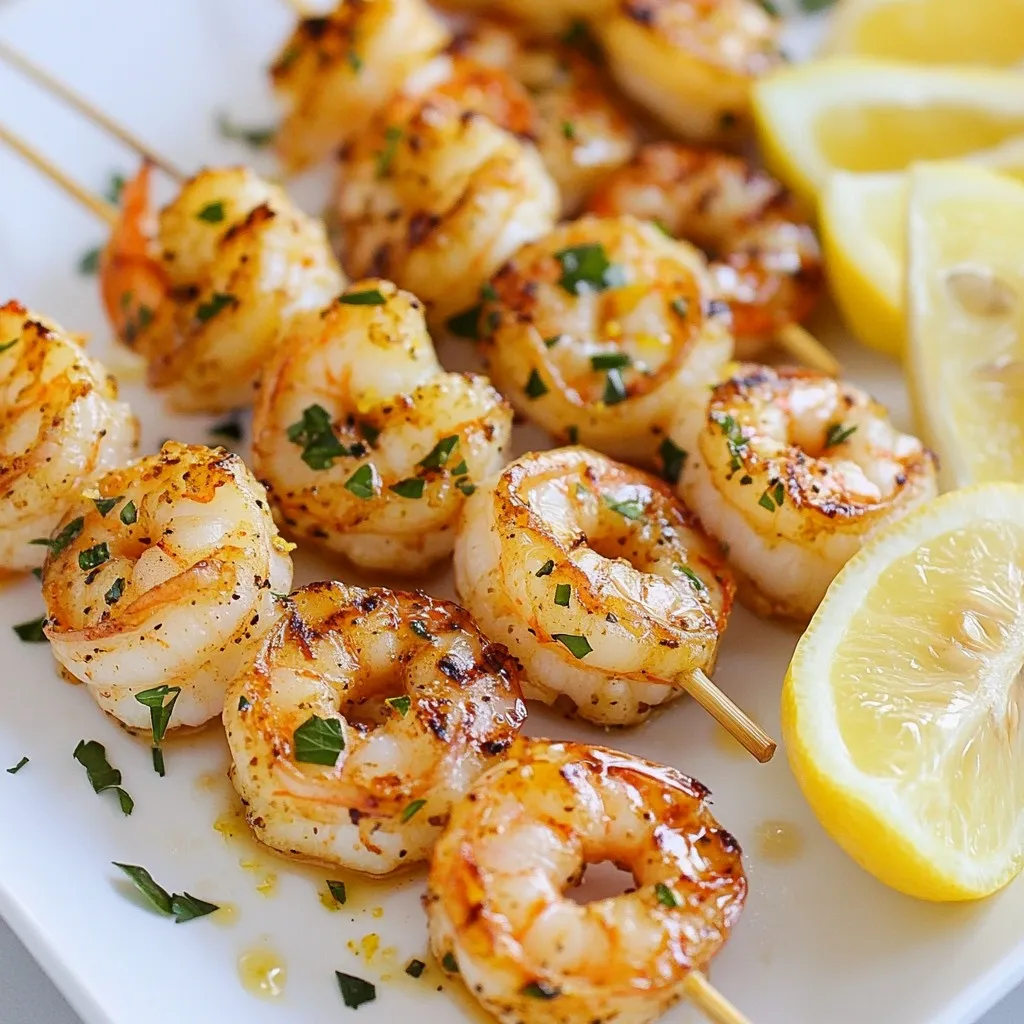
When your grill is ready, place the skewers on it. Cook the shrimp for about 3-4 minutes on each side. You want them to turn opaque and firm. Watch them closely to avoid overcooking, as shrimp can become rubbery quickly.
After grilling, take the skewers off the grill. Let them rest for a few minutes. This helps keep the shrimp juicy.
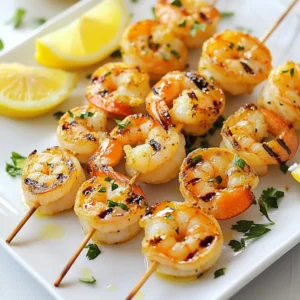
Serve your grilled shrimp hot, with lemon wedges on the side. The lemon adds a fresh, zesty kick that makes every bite even better.
Tips & Tricks
How to Prevent Shrimp from Overcooking
To keep shrimp tender, watch the cooking time closely. Shrimp cook fast, usually in just 3-4 minutes per side. When they turn opaque and firm, they are done. If you leave them on too long, they can get rubbery. This is a common mistake.
Choosing the Right Grill Temperature
Grilling shrimp at medium-high heat gives the best results. This temperature allows the shrimp to char nicely while cooking evenly. Too low, and they will steam; too high, and they may burn. To check the heat, hold your hand above the grill. If you can only hold it there for 2-3 seconds, it’s ready.
Skewering Shrimp for Even Cooking
Skewering shrimp helps them cook evenly. Use wooden or metal skewers. If using wooden skewers, soak them in water for 30 minutes first. This prevents burning. Thread the shrimp close together but not too tight. This helps heat circulate around them.
These small tips will make your Lemon Herb Grilled Shrimp perfect every time!
Pro Tips
- Marinate Longer for Flavor: For even more intense flavor, consider marinating the shrimp overnight in the refrigerator. This allows the garlic and herbs to infuse deeply into the shrimp.
- Use a Meat Thermometer: To ensure perfect cooking, use a meat thermometer. Shrimp are done when they reach an internal temperature of 120°F (49°C).
- Experiment with Herbs: Feel free to experiment with different fresh herbs like cilantro, basil, or dill to give a unique twist to the shrimp marinade.
- Serve with Dipping Sauces: Enhance your dish by serving the grilled shrimp with a variety of dipping sauces, such as garlic aioli or a spicy sriracha sauce, to elevate the flavors.

Variations
Adding Heat: Spicy Lemon Herb Shrimp
To add spice, mix in red pepper flakes. This gives your shrimp a kick. Start with a small amount. You can always add more if you like heat. Combine the flakes with your marinade before adding the shrimp. The spice and lemon will create a great flavor. You can also use a spicy sauce for dipping. This adds a fun twist to a classic dish.
Alternative Herbs for Different Flavor Profiles
While parsley is great, you can try other herbs. Basil adds a sweet touch. Cilantro gives a fresh, zesty taste. Chives can add a mild onion flavor. Mix and match to find your favorite. Each herb changes the dish’s taste. Experiment to see what you enjoy most. Use fresh herbs for the best flavor, but dried herbs work too.
Serving Suggestions: Sides and Dips
Serve your shrimp with tasty sides. A fresh salad pairs well with lemon shrimp. Try a cool cucumber salad or a light pasta salad. Grilled veggies also make a great side. They complement the shrimp perfectly. For dips, consider a garlic aioli or a spicy sauce. These dips add extra flavor and richness. Arrange everything on a platter for a colorful display. Your meal will look and taste amazing!
Storage Info
How to Store Leftover Grilled Shrimp
After enjoying your Lemon Herb Grilled Shrimp, you may have some left. To store it, let the shrimp cool first. Place the shrimp in an airtight container. This keeps them fresh. You can store them in the fridge for up to three days. Make sure to keep them covered to avoid drying out.
Freezing for Future Meals
If you want to keep your shrimp longer, freezing is a great option. Place the cooled shrimp in a freezer-safe bag. Squeeze out as much air as possible before sealing. This helps prevent freezer burn. You can freeze the shrimp for up to three months. When you’re ready to eat them, just thaw in the fridge overnight.
Reheating Tips for Best Texture
When reheating, avoid using the microwave. This can make shrimp rubbery. Instead, use a skillet on low heat. Add a splash of olive oil to the pan. Heat the shrimp gently for a few minutes, turning often. This keeps them moist and tasty. If you prefer, you can also reheat them in the oven at 350°F. Just place them on a baking sheet for about 5-7 minutes. Enjoy your shrimp just like new!
FAQs
Can I use frozen shrimp for this recipe?
Yes, you can use frozen shrimp. Just make sure to thaw them first. Place them in the fridge overnight or run them under cold water. Pat them dry before marinating. Frozen shrimp can still taste great when grilled.
What are the best sides to serve with Lemon Herb Grilled Shrimp?
Here are some of my favorite sides:
- Garlic bread: It pairs well with the shrimp’s flavors.
- Grilled vegetables: Zucchini, bell peppers, and asparagus complement the dish.
- Rice or quinoa: These add a nice base for the meal.
- Salad: A fresh green salad adds crunch and freshness.
You can mix and match these sides to create a balanced plate.
How can I tell when shrimp are done cooking?
Shrimp cook quickly, so keep an eye on them. They are done when they turn opaque and pink. The flesh will feel firm to the touch. If you notice they curl into a “C” shape, they may be overcooked. For the best results, aim for a cooking time of 3-4 minutes per side.
Lemon Herb Grilled Shrimp is simple and tasty. We explored key ingredients like fresh herbs and quality olive oil. You learned how to prepare the marinade and grill shrimp perfectly. I shared tips to prevent overcooking and variations for added flavor, including spicy options. Lastly, I covered storage and reheating for leftovers.
Cooking shrimp can be easy and fun. Use these steps to impress your guests. Enjoy every bit

Lemon Herb Grilled Shrimp
Ingredients
- 1 pound large shrimp, peeled and deveined
- 3 tablespoons high-quality olive oil
- 2 tablespoons freshly squeezed lemon juice
- 1 medium lemon zest
- 3 cloves garlic, finely minced
- 1 tablespoon fresh parsley, finely chopped
- 1 teaspoon dried oregano
- 1 teaspoon smoked paprika
- to taste sea salt and freshly ground black pepper
- as needed lemon wedges for serving
Instructions
- In a medium mixing bowl, whisk together the olive oil, lemon juice, lemon zest, minced garlic, chopped parsley, dried oregano, smoked paprika, sea salt, and freshly ground black pepper. Ensure all ingredients are well combined to create a flavorful marinade.
- Carefully add the peeled and deveined shrimp into the marinade, tossing gently to ensure each shrimp is thoroughly coated. Cover the bowl tightly with plastic wrap and refrigerate for 30 minutes to 1 hour.
- Preheat your grill to medium-high heat. If using a grill pan on the stovetop, allow it to heat up over medium-high as well until it's hot and ready.
- If you’re using wooden skewers, soak them in water for 30 minutes prior to grilling to prevent burning. Then, thread the marinated shrimp onto the skewers, placing them close together but not overcrowding.
- Carefully place the skewers on the preheated grill. Cook the shrimp for approximately 3-4 minutes on each side, or until they are opaque and firm to the touch.
- Once grilled to perfection, remove the shrimp from the grill and allow them to rest for a few minutes.
- Serve the grilled shrimp immediately, garnished with lemon wedges on the side for an extra burst of freshness and zesty flavor.


![- 2 cups cooked chicken, shredded - 1 cup black beans, rinsed and drained - 1 cup corn kernels (fresh or frozen) - 2 cups shredded Mexican cheese blend - 1 cup salsa (mild or spicy) - 8 large flour tortillas - 1 teaspoon ground cumin - 1 teaspoon chili powder - 1/2 teaspoon garlic powder - 1/2 teaspoon onion powder - Salt and pepper, to taste - 1/4 cup fresh cilantro, chopped - Sour cream and diced avocado for serving When I prepare this Chicken and Cheese Quesadilla Casserole, I love the bold flavors in every bite. The main ingredients create a hearty meal that feels special. Shredded chicken adds protein, while black beans and corn give it a nice texture. The Mexican cheese blend brings everything together with its melty goodness. I often choose salsa based on my mood. A mild salsa suits those who prefer less heat, while a spicy option adds an exciting kick. The seasonings are key to making this dish flavorful. Ground cumin and chili powder add warmth and depth. Garlic and onion powders give it that savory touch. Don’t forget to season with salt and pepper to elevate the taste. For garnishes, fresh cilantro brightens the dish. I like to add a dollop of sour cream and diced avocado on the side. They balance the flavors and add a creamy texture. This meal is so satisfying, and you can find the full recipe to make it yourself! - Preheat the oven to 350°F (175°C). - In a large bowl, mix the chicken, black beans, corn, cheese, salsa, cumin, chili powder, garlic powder, onion powder, salt, and pepper. Stir well until all ingredients are combined. - Grease a 9x13 inch baking dish with cooking spray or olive oil. - Place one tortilla at the bottom of the dish. Spoon some of the chicken and cheese mixture on top. Add another tortilla and repeat this layering. Finish with a tortilla and sprinkle remaining cheese on top. - Cover the dish with foil. Bake for 20 minutes. - After 20 minutes, remove the foil. Bake again for 10-15 minutes, until the top is golden and bubbling. For the full recipe, check out the detailed ingredients and tips! To boost the taste, pick a salsa that fits your spice level. For a kick, go for spicy salsa. If you prefer mild, a smooth, mild salsa works well. You can also mix salsas for layered flavors. For cheese, try different blends. While a Mexican cheese blend is great, cheddar or pepper jack adds unique taste. Mixing cheeses can create a delightful texture and flavor. Letting your casserole rest is key. This step helps the layers set. Cutting too soon can cause a messy serving. Wait about 5 minutes for the best results. To get a perfectly melted cheese crust, cover with foil while baking. Remove the foil near the end to let the cheese brown. This creates a crunchy top that contrasts the soft filling. Serving on colorful plates makes a big difference. Bright colors enhance the meal's appeal. After cutting the casserole, place each piece on a vibrant dish. For garnishing, fresh cilantro adds a pop of green. Diced avocado gives a creamy touch. A dollop of sour cream on the side adds a lovely finish. Try these tips for a beautiful and tasty presentation! For the full recipe, refer to [Full Recipe]. {{image_4}} You can easily make this dish fit your taste. For a vegetarian twist, try adding more veggies. Bell peppers, zucchini, or spinach work great. They add color and nutrients. You still get a hearty meal without meat. If you want more protein, use ground beef or turkey instead of chicken. Cook the meat first, then mix it into the filling. This change adds a different flavor. It's a fun way to switch things up! Cheese makes this casserole even better. While I love using a Mexican cheese blend, feel free to change it. Cheddar adds a sharp taste. Pepper jack gives a spicy kick. You can even mix different types for a rich flavor. Try combining mozzarella for creaminess and a touch of parmesan for depth. These options create layers of taste. The cheese pulls are so satisfying! You can adapt this recipe to a slow cooker. Just layer the ingredients as you would in the oven. Set it on low for about 4 hours. This method yields a warm, hearty casserole with a different texture. If you own an Instant Pot, you're in luck! Use the sauté function to cook your meat and veggies. Then add the rest of the ingredients. Seal the lid and cook on high pressure for 10 minutes. Quick and easy, this method saves time without losing flavor. For more details, check out the Full Recipe! To keep your Chicken and Cheese Quesadilla Casserole fresh, store it properly. First, let it cool down to room temperature. Then, place the leftovers in an airtight container. This helps lock in moisture and flavor. Use shallow containers for quicker cooling. I recommend glass or sturdy plastic containers. These work well for storage and reheating. You can freeze this casserole before or after baking. For freezing before baking, assemble the casserole in a freezer-safe dish. Cover it tightly with plastic wrap and aluminum foil. When you're ready to bake it, remove the wrap, and bake from frozen. It may take longer to cook. For freezing after baking, let it cool, then slice it into portions. Wrap each slice in plastic wrap and place in a freezer bag. For the best results, consume it within three months. Leftovers can last in the fridge for about 3-4 days. Always check for signs of spoilage before eating. Look for changes in color or texture. If it smells off, it’s best to discard it. When stored properly, frozen portions can stay safe for about three months. Always label the containers with the date for easy tracking. This way, you can enjoy your delicious casserole without worries. You can use low-carb tortillas if you want fewer carbs. Corn tortillas are also a great option. They add a nice flavor and texture to the dish. Yes, you can prep this casserole in advance. Just assemble it and cover it tightly. Store it in the fridge for up to 24 hours. When you are ready to bake, just add extra time if it's cold from the fridge. Look for bubbling cheese and a golden crust on top. You can also insert a knife in the center. If it comes out hot, the casserole is ready to serve. This blog post guides you through making a delicious chicken casserole. We covered the main ingredients, seasonings, and the steps to prepare and bake your dish. I shared tips and tricks for perfect results and ideas for variations based on your taste. Remember, cooking is about creativity. Don't hesitate to make this recipe your own! Enjoy the process, and savor every bite. Happy cooking!](https://dishtreats.com/wp-content/uploads/2025/06/5fb0e458-6070-46a1-b713-1d8a90ab3212-768x768.webp)


![- 1 large head of cauliflower, trimmed and cut into bite-sized florets - 1 cup shredded sharp cheddar cheese, divided - 1 cup cream cheese, softened to room temperature - 1 cup milk, preferably whole - 1/2 cup grated Parmesan cheese - 1 cup breadcrumbs (whole wheat or panko for extra crunch) - 2 garlic cloves, finely minced - 1 teaspoon onion powder - Salt and freshly cracked black pepper to taste - 2 tablespoons extra virgin olive oil - Fresh parsley, finely chopped (for garnish) - For cheese lovers, try gouda or mozzarella for a different taste. - If you want a dairy-free version, use cashew cream and dairy-free cheese. - Whole grain breadcrumbs work well. For gluten-free, use crushed nuts or gluten-free crumbs. This cheesy cauliflower casserole is perfect for a cozy meal. The rich flavors come from simple ingredients, making it easy to enjoy. You can find the full recipe above to guide you through the cooking process. First, set your oven to 375°F (190°C). Preheating is key. It ensures even cooking and helps achieve a golden crust. If you skip this step, your casserole may not cook right. Next, you will blanch the cauliflower. Fill a large pot with water and add a pinch of salt. Once it boils, gently add the cauliflower florets. Blanch them for about 5 minutes. They should be tender but still crunchy. Drain and let them cool. Keeping that crunch is important for the final dish. Now, let’s make the cheese mixture. In a big bowl, mix softened cream cheese with milk until smooth. Then add minced garlic and onion powder. Finally, fold in half of the shredded cheddar cheese. You want it creamy and well-blended. This mixture adds great flavor. Next, fold the blanched cauliflower into the cheese mixture. Make sure each floret gets coated well. This is where you can add salt and freshly cracked black pepper. Taste it to ensure it’s seasoned just right. Take a 9x13 inch casserole dish and grease it with olive oil or cooking spray. Pour the creamy cauliflower mixture into the dish. Spread it out evenly. This helps every bite to be delicious. Finally, bake your casserole. Place it in the oven for 25-30 minutes. Look for a golden brown top and bubbly cheese. When it’s done, let it cool for about 5 minutes before serving. This helps the flavors settle and makes it easier to serve. For the full recipe, check out the details above. To get creamy cauliflower, use softened cream cheese and whole milk. This mix gives a rich feel. Blanch the cauliflower just right, so it stays firm. If you want a crispy topping, use panko breadcrumbs. They add extra crunch and texture. Mixing the breadcrumbs with a bit of olive oil helps them brown. Try adding fresh herbs like thyme or rosemary for extra flavor. A pinch of smoked paprika can bring a nice twist too. If you like heat, consider some chili flakes. Always taste your mix before baking. Adjust salt and pepper to your liking. This will make sure every bite is just right. For a fun touch, serve the casserole in individual ramekins. This makes each serving special. You can also top each ramekin with fresh parsley for color. Using a sprinkle of extra Parmesan adds a nice look and taste. Remember, we eat with our eyes first. A pretty dish makes it more inviting! {{image_4}} To make a low-carb version, use cauliflower rice instead of whole florets. This change will keep the dish light and reduce carbs. You can also add other veggies like broccoli or spinach. These will boost the flavor and nutrition. For a vegan option, swap dairy cheese with dairy-free cheese alternatives. Look for brands made from nuts or soy that melt well. You can also use plant-based cream options like coconut cream or cashew cream. This keeps the creamy texture without dairy. If you like heat, add chili flakes or jalapeños. These will give your casserole a nice kick. You may also explore global twists. Try Mediterranean flavors with olives and feta cheese, or go for Mexican flavors by adding black beans and corn. Each twist makes this dish exciting! For the full recipe, check out the [Full Recipe]. To store leftovers, use an airtight container. Make sure to cool the casserole first. Place it in the fridge. It will stay fresh for about 3 to 5 days. Always check for signs of spoilage before eating. For reheating, the oven is best for keeping the texture. Preheat your oven to 350°F (175°C). Place the casserole in a baking dish. Cover it with foil to avoid drying out. Heat for about 20 minutes or until warm. Limit reheating to just once to keep it tasty. To freeze, let the casserole cool completely. Cut it into portions for easy use. Wrap each piece well in plastic wrap. Then place them in a freezer-safe bag. It can last up to 3 months. For thawing, place it in the fridge overnight for best results. This helps keep the quality. To make this cheesy cauliflower casserole, follow these easy steps: 1. Preheat the oven: Set it to 375°F (190°C). 2. Blanch the cauliflower: Boil water with salt, then add cauliflower florets for about 5 minutes. Drain and let cool. 3. Prepare the cheese mixture: In a bowl, mix cream cheese and milk until smooth. Add minced garlic, onion powder, and half the cheddar cheese. 4. Combine with cauliflower: Fold the blanched cauliflower into the cheese mixture. Season with salt and pepper. 5. Fill the casserole dish: Grease a 9x13 inch dish and pour the mixture in. 6. Prepare the topping: Combine breadcrumbs, Parmesan, remaining cheddar, and olive oil. Sprinkle on top. 7. Bake: Cook in the oven for 25-30 minutes until golden brown. 8. Cool and garnish: Let it cool for a few minutes and add parsley on top. You can find the full recipe above for more details. Yes, you can make this casserole ahead of time. Prepare it up to the baking step. Cover it and place it in the fridge for up to 24 hours. When ready to serve, bake it at 375°F (190°C) for about 30-35 minutes. You may need to add a few extra minutes if it’s cold from the fridge. This casserole pairs well with many dishes. Here are some great options: - Grilled chicken or fish for protein. - A fresh green salad for crunch. - Roasted vegetables for added nutrition. - Garlic bread for a comforting touch. These sides will balance the rich flavors of the casserole. Yes, it is perfect for meal prep. Store leftovers in airtight containers in the fridge for up to 4 days. Reheat in the microwave or oven. For best results, use the oven to keep the topping crispy. Cauliflower is a powerhouse of nutrients. Here are some key benefits: - Low in calories: This makes it great for weight management. - High in fiber: Promotes good digestion and keeps you full. - Rich in vitamins: Especially vitamin C and K, which support health. - Antioxidants: Help protect your body from damage. Including cauliflower in your diet can boost overall health while enjoying delicious meals. This cheesy cauliflower casserole is a blend of flavor and ease. We covered the key ingredients, preparation steps, and variations to make it your own. From storing leftovers to serving suggestions, this dish fits many needs. Whether you prefer it low-carb, vegan, or with a spicy kick, there's a version for everyone. Enjoy creating your own twist on this delightful dish. Cooking should be fun and tasty!](https://dishtreats.com/wp-content/uploads/2025/07/466b6563-f7cf-4c28-8259-a68bc212ec4f-768x768.webp)