
Chicken Fajita Quesadillas Tasty and Satisfying Meal


If you’re craving a meal that’s packed with flavor and easy to make, chicken fajita quesadillas are your answer. I’ll guide you through each step, from choosing the right spices to cooking techniques that guarantee tasty results. You’ll also find tips for making crispy quesadillas and fun variations to try. Let’s dive in and make a dish that will impress your taste buds and satisfy your hunger!
Why I Love This Recipe
- Flavorful Filling: The combination of spices and sautéed vegetables brings a burst of flavor that elevates every bite of these quesadillas.
- Quick and Easy: This recipe can be prepared in just 30 minutes, making it a perfect option for busy weeknights or last-minute gatherings.
- Customizable: You can easily swap out the chicken for beef, shrimp, or even make it vegetarian with beans and additional vegetables.
- Family-Friendly: Kids and adults alike love quesadillas, and this recipe is sure to be a hit at the dinner table!
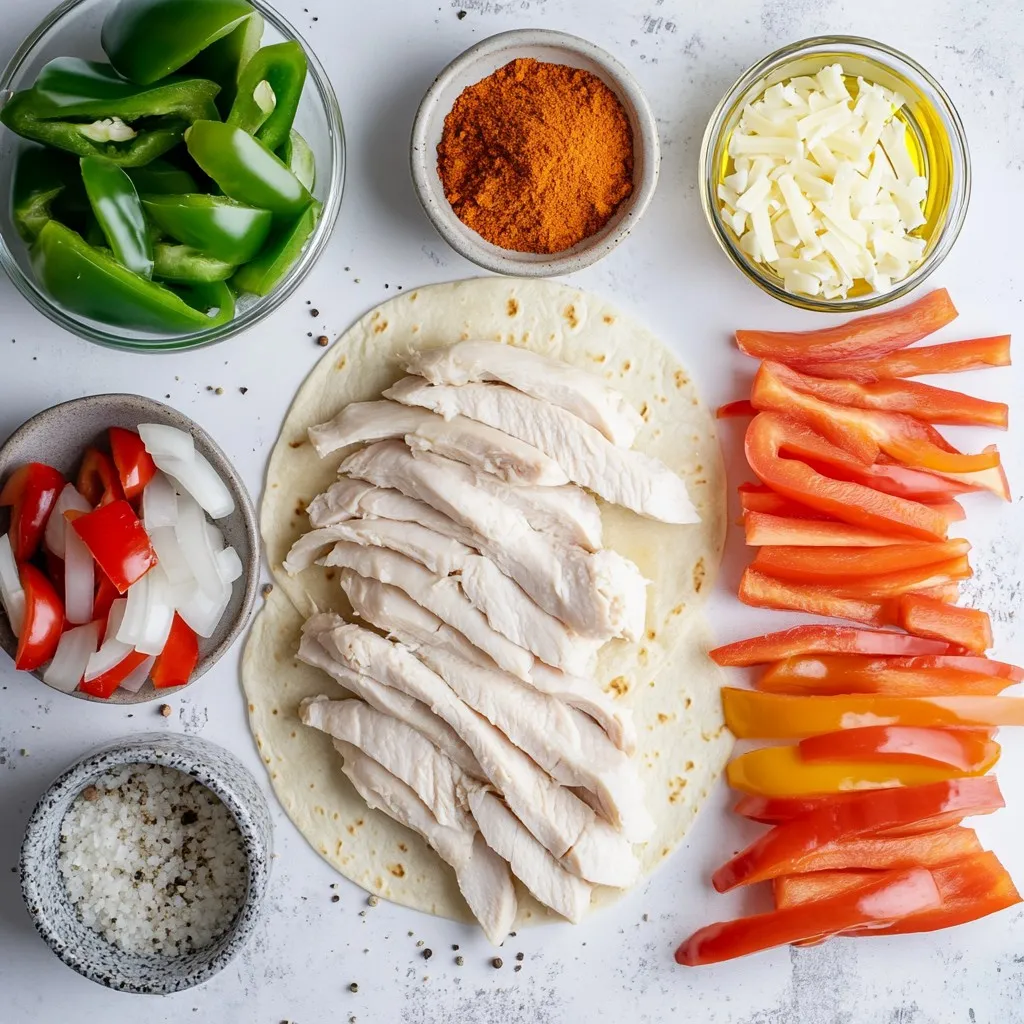
Ingredients
List of Essential Ingredients
To make chicken fajita quesadillas, you need these main items:
- 2 boneless, skinless chicken breasts, sliced thinly
- 1 bell pepper (red or green), julienned
- 1 medium onion, sliced into thin rings
- 2 cloves garlic, minced finely
- 1 tablespoon olive oil
- 4 large flour tortillas
- 2 cups shredded cheese (cheddar and Monterey Jack blend)
Suggested Seasonings and Spices
These spices bring flavor to your quesadillas:
- 2 teaspoons chili powder
- 1 teaspoon ground cumin
- 1 teaspoon smoked paprika
- Salt and pepper to taste
Optional Toppings and Serving Suggestions
Add these to enhance your meal:
- Sour cream for creaminess
- Salsa for a burst of flavor
- Fresh cilantro for a pop of color
- Avocado slices for added richness
These ingredients make your chicken fajita quesadillas tasty and satisfying. Enjoy the flavors!
Step-by-Step Instructions
Cooking the Chicken: Tips for Perfect Sautéing
To start, get your skillet hot over medium heat. Add one tablespoon of olive oil. Once the oil shimmers, it is time to add the sliced chicken breasts. Season the chicken with salt, pepper, chili powder, ground cumin, and smoked paprika. This mix adds depth and warmth. Cook the chicken for about 5-7 minutes. Stir it often to ensure even cooking. Look for the chicken to be golden brown and no longer pink in the center. This is key for juicy chicken.
Sautéing the Vegetables: Techniques for Optimal Flavor
Next, add the sliced bell pepper, onion, and minced garlic to the skillet. The chicken will still be hot, which helps cook the veggies. Stir the mixture for around 5 minutes. You want your veggies to be soft but still bright. A slight char gives them a nice flavor boost. This step enhances the overall taste of your quesadillas. Once cooked, take the skillet off the heat and set it aside.
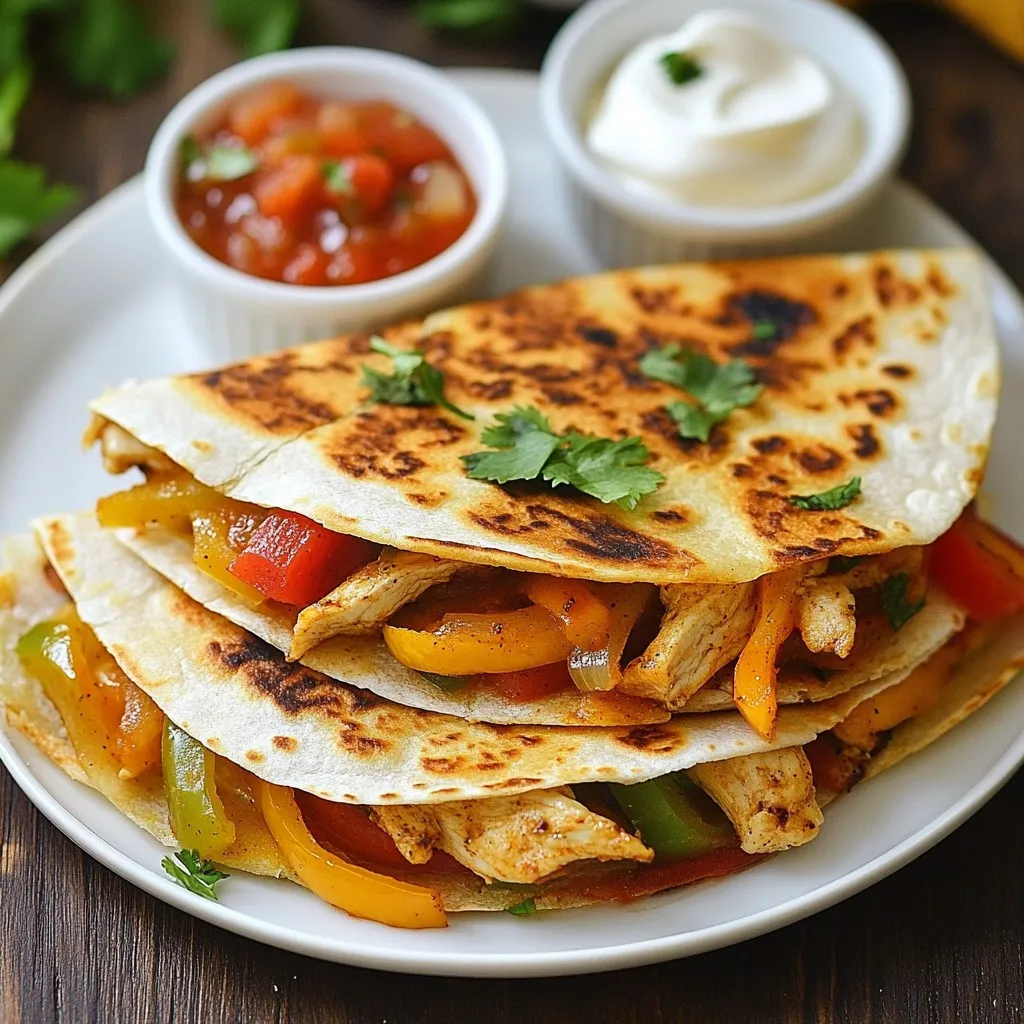
Assembling and Cooking the Quesadilla: A Guide to Crispiness
Now, let’s put it all together. Heat a clean skillet or griddle over medium-low heat. Place one large tortilla in the pan. Sprinkle half of the shredded cheese on top. Next, spoon half of your chicken and veggie mix over the cheese, followed by the rest of the cheese. Place a second tortilla on top. Cook this for about 3-4 minutes. You want the bottom to be golden brown and crispy. Carefully flip the quesadilla with a spatula. Cook it for another 3-4 minutes until it is evenly browned and the cheese is melted.
Once cooked, take the quesadilla out of the skillet and let it rest for a minute. This helps the cheese set. Use a sharp knife to cut it into wedges. Repeat the process for the remaining tortillas and filling. Enjoy this tasty meal with sour cream and salsa on the side!
Tips & Tricks
Best Practices for Flavorful Quesadillas
To make your chicken fajita quesadillas burst with flavor, follow these tips:
- Use fresh ingredients. Fresh chicken, veggies, and spices make a big difference.
- Sauté the chicken first. Cook it until it’s golden brown and fully cooked. This adds depth to the dish.
- Season well. Don’t be shy with salt and spices. It enhances the taste.
- Mix the veggies. Sauté bell peppers and onions together for a sweet and savory blend.
- Choose the right cheese. A blend of cheddar and Monterey Jack melts perfectly and adds creaminess.
Common Mistakes to Avoid
Many people make simple errors when cooking quesadillas. Here’s what to watch for:
- Overstuffing the quesadilla. Too much filling can make it hard to flip. Aim for balance!
- Using cold tortillas. Warm them first to prevent tearing when you fold.
- Not waiting for the cheese to melt. Give it enough time to melt for a gooey texture.
- Skipping the seasoning. Always season your chicken and veggies well. It’s the key to taste!
- Cooking on high heat. This can burn the tortillas without cooking the filling. Keep it medium-low.
How to Keep Quesadillas Crispy
Crispy quesadillas are a delight. Here’s how to achieve that crunch:
- Use a non-stick skillet. This helps prevent sticking and keeps the quesadilla intact.
- Add a little oil. Brush or spray the skillet with olive oil before cooking.
- Cook in batches. Don’t crowd the pan; this helps maintain heat and crispiness.
- Let them rest. After cooking, let them sit for a minute. This aids in crisping.
- Serve right away. Quesadillas taste best fresh off the skillet, so dig in quickly!
Pro Tips
- Choose the Right Tortilla: Opt for large, soft flour tortillas for a perfect fold and crispiness. Whole wheat or corn tortillas can add a different flavor profile.
- Don’t Overfill: Be careful not to overstuff your quesadillas to prevent them from bursting while cooking. A generous yet manageable amount of filling works best.
- Keep the Heat Moderate: Cooking on medium-low heat allows the cheese to melt thoroughly without burning the tortillas. It ensures a perfectly golden and crispy exterior.
- Experiment with Add-Ins: Feel free to add other ingredients like black beans, corn, or jalapeños for extra flavor and texture. Customize to your liking!
Variations
Vegetarian Alternatives: Ingredients and Suggestions
You can easily make vegetarian fajita quesadillas. Swap the chicken for beans or tofu. Use 1 can of black beans, drained and rinsed. You can also use grilled veggies like zucchini or mushrooms. Add some corn for sweetness. This keeps the dish filling and tasty.
Adding Heat: Spicy Variations for Heat Lovers
If you like spice, add sliced jalapeños or serrano peppers. Mix them in with the chicken while cooking. You can also use a spicy cheese blend. Pepper Jack cheese works great here. For an extra kick, add hot sauce to your quesadilla filling.
Cheese Choices: Best Combos for Flavor Profile
Cheese makes a big difference in flavor. I love using a mix of cheddar and Monterey Jack. You can also try Gouda or queso blanco for a unique taste. Mixing different cheeses adds depth. Use at least 2 cups for gooey goodness.
Storage Info
How to Store Leftover Quesadillas
To store leftover quesadillas, first let them cool down. Place them in an airtight container. Make sure to layer parchment paper between each quesadilla. This keeps them from sticking together. Store them in the fridge for up to three days. If you have more, consider freezing them.
Reheating Methods: Best Ways to Maintain Texture
Reheating quesadillas can be tricky. To keep them crispy, use a skillet. Heat it on medium-low. Place the quesadilla in the skillet without oil. Cover it with a lid. Heat each side for about three minutes. You can also use an oven. Preheat it to 350°F (175°C). Bake the quesadilla for about ten minutes. Both methods work well to keep the texture.
Freezing Quesadillas for Later Use
Freezing quesadillas is easy. Wrap each cooled quesadilla tightly in plastic wrap. Then, place them in a freezer bag. Make sure to squeeze out all the air. You can freeze them for up to three months. When you’re ready to eat, thaw them in the fridge overnight. Then, reheat them using the methods mentioned above for the best taste.
FAQs
How do you make chicken fajita quesadillas from scratch?
To make chicken fajita quesadillas from scratch, you need to cook the chicken and veggies first. Slice two boneless, skinless chicken breasts thinly. Sauté them in olive oil with spices like chili powder, cumin, and smoked paprika. Add sliced bell pepper and onion. Cook until tender. Then, layer this filling on a tortilla with cheese. Top with another tortilla and cook until crispy. Slice and serve with sour cream and salsa.
Can you use other meats or proteins in this recipe?
Yes, you can use other meats or proteins. Try beef, shrimp, or turkey. For a vegetarian option, use black beans, tofu, or mushrooms. Just make sure to adjust cooking times. Each protein has a unique flavor that pairs well with the spices.
What are the best sides to serve with chicken fajita quesadillas?
Great sides for chicken fajita quesadillas include chips with salsa or guacamole. A fresh salad adds a nice crunch. You could also serve rice or beans for a hearty meal. Each side can enhance the flavors of the quesadilla and make your meal more filling.
This guide walks you through making tasty chicken fajita quesadillas. We covered essential ingredients, spice suggestions, and tasty toppings. You learned tips for cooking chicken and sautéing veggies for the best flavor. Avoid common mistakes to keep your quesadillas crispy. Explore variations for different diets and how to store leftovers.
Quesadillas are fun to make and easy to customize. Enjoy experimenting with flavors! Try these ideas and share with friends. You will create crowd-pleasing meals every tim

Sizzling Chicken Fajita Quesadillas
Ingredients
- 2 pieces boneless, skinless chicken breasts, sliced thinly
- 1 piece bell pepper (red or green), julienned
- 1 medium onion, sliced into thin rings
- 2 cloves garlic, minced finely
- 1 tablespoon olive oil
- 2 teaspoons chili powder
- 1 teaspoon ground cumin
- 1 teaspoon smoked paprika
- to taste salt and pepper
- 4 large flour tortillas
- 2 cups shredded cheese (cheddar and Monterey Jack blend)
- for serving sour cream and salsa
Instructions
- In a large skillet, heat the olive oil over medium heat. Add the sliced chicken breasts and season with salt, pepper, chili powder, ground cumin, and smoked paprika. Sauté for about 5-7 minutes until fully cooked.
- Add the julienned bell pepper, sliced onion, and minced garlic to the skillet. Sauté for an additional 5 minutes until the vegetables are tender. Remove from heat.
- In a clean skillet, place one flour tortilla over medium-low heat. Sprinkle half of the shredded cheese across the tortilla.
- Spoon half of the chicken and vegetable mixture over the cheese, then layer the remaining cheese on top. Place another tortilla over the filling.
- Cook the quesadilla for about 3-4 minutes on one side until golden brown. Flip and cook for an additional 3-4 minutes until evenly browned and cheese is melted.
- Remove the quesadilla from the skillet and let it rest for a minute. Cut into wedges and repeat with remaining tortillas and filling.

. It will guide you through each step with details and tips. Enjoy cooking! In summary, we explored how to make delicious Roasted Garlic Parmesan Brussels Sprouts. I shared a full list of ingredients and options for substitutions. Fresh ingredients elevate taste and nutrition. You learned step-by-step instructions for perfect roasting, along with tips for flavor and presentation. Variations and storage tips help you customize and save leftovers. Remember to check FAQs for any lingering questions. Enjoy this simple yet tasty dish at your next meal!](https://dishtreats.com/wp-content/uploads/2025/08/f224f6d0-5adb-4fa1-b176-de066c43a5f2-3-768x768.webp)

![For these herb crusted zucchini sticks, you need a few simple yet tasty ingredients. Each one plays a key role in creating the perfect crunch and flavor. - Zucchini and Bread Crumb Base - 2 medium zucchinis, cut into uniform sticks - 1 cup whole wheat breadcrumbs - Seasonings and Cheese - 1/2 cup finely grated Parmesan cheese - 2 tablespoons fresh parsley, finely chopped - 1 tablespoon fresh basil, finely chopped - 1 teaspoon garlic powder - 1/2 teaspoon onion powder - Salt and black pepper, to taste - Egg Wash - 2 large eggs, beaten - Olive oil spray or 2 tablespoons extra virgin olive oil Each ingredient adds a layer of flavor. The zucchini brings a fresh crunch, while the breadcrumbs create that satisfying crisp. The herbs and cheese elevate the taste, making these sticks hard to resist. Don't forget the egg wash! It helps the coating stick, ensuring every bite is packed with flavor. For the full recipe, check out the detailed instructions. Prepping the Oven and Baking Sheet First, preheat your oven to 425°F (220°C). This step ensures the zucchini sticks cook evenly. Next, line a baking sheet with parchment paper. This helps prevent sticking and makes cleanup easy. Making the Breadcrumb Mixture In a shallow dish, combine the following: - 1 cup whole wheat breadcrumbs - 1/2 cup finely grated Parmesan cheese - 2 tablespoons fresh parsley, finely chopped - 1 tablespoon fresh basil, finely chopped - 1 teaspoon garlic powder - 1/2 teaspoon onion powder - Salt and black pepper, to taste Stir these ingredients together until they mix well. This mixture adds flavor and crunch to your zucchini sticks. Coating the Zucchini Sticks In a separate bowl, beat 2 large eggs until they are well mixed. This egg wash helps the coating stick. Take each zucchini stick and dip it in the egg wash. Let any excess egg drip off. Then, roll the stick in the breadcrumb mixture. Press gently to coat all sides evenly. Baking Process Place the coated zucchini sticks on your prepared baking sheet. Make sure to leave space between them. This allows them to cook and crisp up nicely. For extra crunch, spray the tops with olive oil or drizzle some over them. Bake the sticks in the oven for 20-25 minutes. Flip them halfway through to ensure even browning. When they are golden brown and crispy, take them out and let them cool for a few moments before serving. Enjoy your crunchy and flavorful snack! For detailed instructions, check the Full Recipe. To get that perfect crunch, the egg wash is key. The egg helps the coating stick well. Without it, the crumbs may fall off. Dip each zucchini stick fully in the egg, then let the extra drip off. This step makes a big difference. Choosing the right olive oil can also help. You can use extra virgin olive oil or an olive oil spray. Both options add flavor and help the zucchini crisp up in the oven. If you use a spray, make sure to coat the sticks lightly. Baking tips are important for even browning. Make sure to leave space between each zucchini stick on the baking sheet. This allows hot air to circulate. Halfway through baking, flip the sticks for a nice, even brown on both sides. For the full recipe, check out the detailed instructions above. Enjoy your crispy zucchini sticks! {{image_4}} You can switch up the recipe to fit your needs. Here are some ideas: - Alternative Breadcrumbs: If you want a gluten-free option, use crushed cornflakes or almond flour. Both give a nice crunch. Try panko breadcrumbs for a lighter, airier texture. - Vegan Option: Replace eggs with a flaxseed mixture. Mix 1 tablespoon of flaxseed meal with 3 tablespoons of water. Let it sit for five minutes until it thickens. This works well to stick the coating. - Additional Seasoning Ideas: You can add a kick with spices like paprika or cayenne. A sprinkle of Italian seasoning can give it a nice herby flavor. Crushed red pepper flakes can add some heat, too. These substitutes keep your herb crusted zucchini sticks tasty and fun. You can play with flavors to make them your own! If you’re looking for the full recipe, check the detailed instructions. Refrigeration Instructions After enjoying the herb-crusted zucchini sticks, let them cool. Place any leftovers in an airtight container. Store them in the fridge for up to three days. This keeps them fresh and tasty for later snacking. Reheating Tips To get that crunch back, reheat the zucchini sticks in the oven. Set your oven to 375°F (190°C). Bake them for about 10 minutes. This will warm them up and restore their crispiness. Avoid using the microwave, as it can make them soggy. Freezing Zucchini Sticks You can freeze the zucchini sticks for longer storage. First, bake them as directed in the Full Recipe. Let them cool completely. Then, place them in a single layer on a baking sheet and freeze for a few hours until firm. After that, transfer them to a freezer bag. They will keep well for up to two months. When ready to eat, bake from frozen, adding a few extra minutes to the cooking time. To keep your zucchini sticks crispy, follow a few key steps. First, cut the zucchini into even sticks. This helps them cook at the same rate. Second, make sure to pat the zucchini dry before coating. Removing excess moisture is very important. Lastly, use the egg wash to help the crumbs stick well. This will create a nice crispy layer while baking. Yes, you can use other vegetables! Carrots, eggplant, and sweet potatoes work great. Just remember to cut them into similar shapes and sizes. This helps them cook evenly. You might need to adjust the cooking time based on the vegetable you choose. Herb-crusted zucchini sticks taste great with many dips. Marinara sauce gives a nice tangy flavor. You can also try ranch dressing for a cool, creamy taste. If you want something lighter, a yogurt dip with herbs is a good choice. It adds freshness and complements the zucchini well. For the full recipe, check out the [Full Recipe]. You learned how to make crispy zucchini sticks using simple ingredients. I shared tips for perfecting your baking process and variations to suit your taste. Storing leftovers or substituting ingredients can keep things fresh. Remember, the right egg wash and oil play key roles in crispiness. Enjoy experimenting with your flavors. Try new dips and veggies next time to keep things exciting. Now, you have the tools to make this dish your own!](https://dishtreats.com/wp-content/uploads/2025/07/e6e4c2e6-85fe-4d28-829b-ce9ad5e19088-768x768.webp)