Mediterranean Orzo Salad Fresh and Flavorful Dish

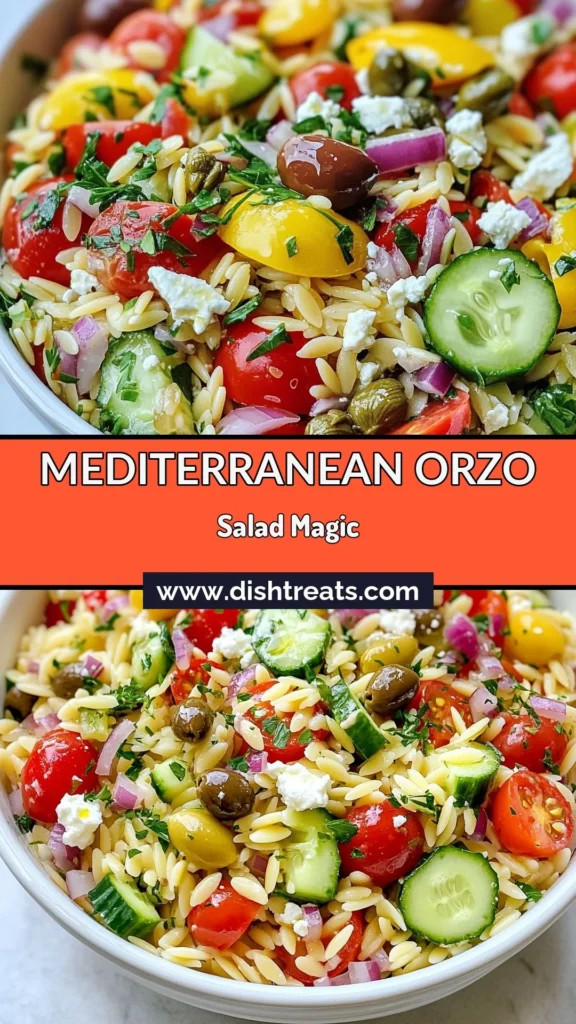
Looking for a dish that bursts with flavor and is easy to make? I’m excited to share my Mediterranean Orzo Salad recipe! This salad is fresh, vibrant, and packed with healthy ingredients. Whether you want a light lunch or a side for dinner, this salad fits the bill. Stick around to learn how to whip it up in no time, and I’ll give you tips to make it your own!
Why I Love This Recipe
- Fresh and Vibrant Ingredients: This salad bursts with the flavors of fresh vegetables and herbs, making every bite a delightful experience.
- Quick and Easy Preparation: With minimal cooking time and straightforward instructions, this recipe is perfect for busy weeknights or last-minute gatherings.
- Versatile and Customizable: You can easily modify this salad by adding or substituting your favorite ingredients, such as grilled chicken or different cheeses.
- Perfect for Meal Prep: This dish keeps well in the fridge, making it an ideal option for meal prepping and enjoying throughout the week.
Ingredients
List of Ingredients
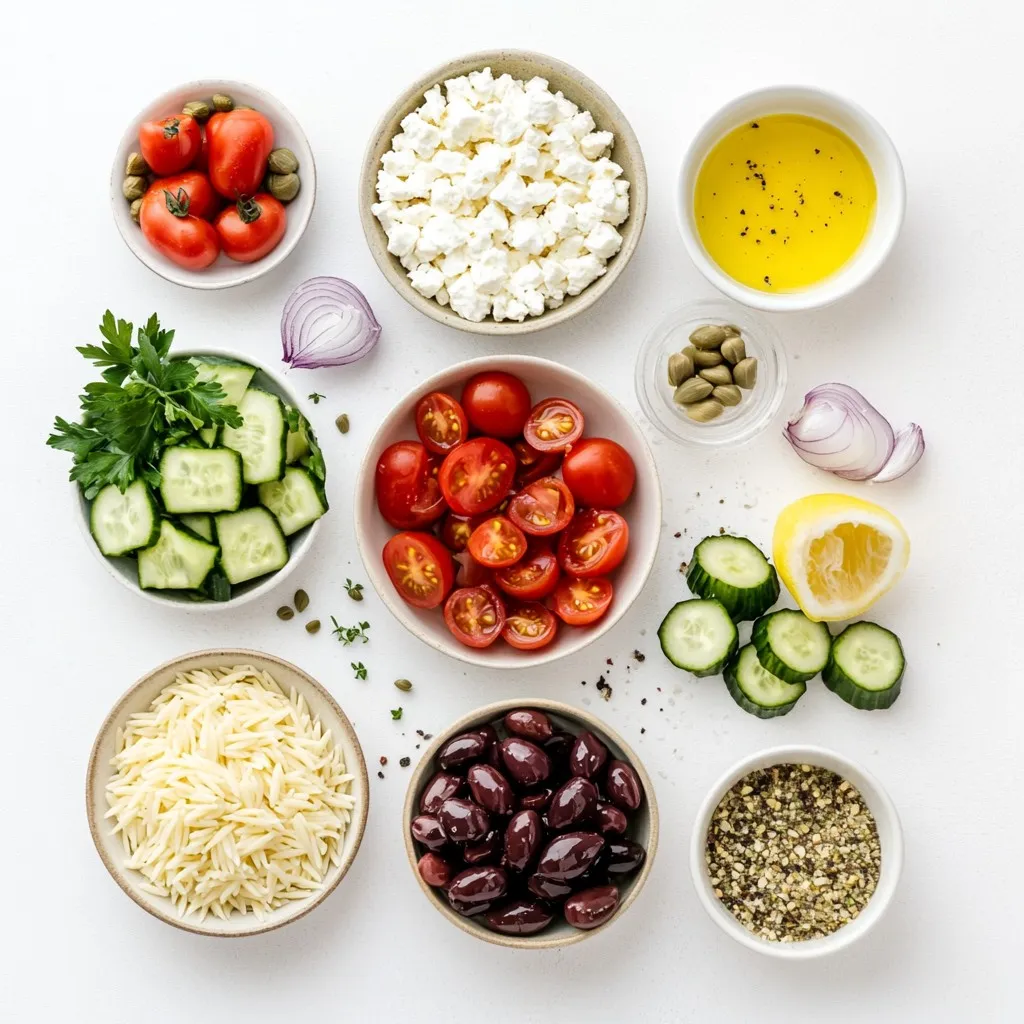
To make a tasty Mediterranean Orzo Salad, gather these ingredients:
- 1 cup orzo pasta
- 1 ½ cups cherry tomatoes, halved
- 1 cup cucumber, diced
- ½ cup red onion, finely chopped
- 1 cup Kalamata olives, pitted and sliced
- 1 cup feta cheese, crumbled
- ½ cup fresh parsley, chopped
- 2 tablespoons capers, rinsed and drained
- ¼ cup extra virgin olive oil
- 2 tablespoons freshly squeezed lemon juice
- 1 teaspoon dried oregano
- Salt and black pepper, to taste
Ingredient Substitutions
You can swap some ingredients to fit your taste. Here are a few ideas:
- Use quinoa instead of orzo for a gluten-free option.
- Swap cherry tomatoes for diced bell peppers for a crunch.
- Try black olives if you cannot find Kalamata olives.
- Use goat cheese instead of feta for a different cheese flavor.
- Fresh basil can replace parsley for a twist.
Nutritional Information
This salad is not just tasty; it’s also healthy. Here’s a quick look:
- Calories: About 250 per serving
- Protein: Approximately 8g
- Carbohydrates: Around 30g
- Fat: About 12g
- Fiber: Roughly 3g
This dish provides great energy and nutrients, making it a smart choice for meals. Enjoy your fresh and flavorful Mediterranean Orzo Salad!
Step-by-Step Instructions
Cooking the Orzo
Start by boiling salted water in a large pot. Once it bubbles, add 1 cup of orzo pasta. Cook it for about 8 to 10 minutes. You want it to be al dente, firm but not hard. When done, drain the orzo in a colander. Rinse it under cold water to stop the cooking.
Mixing the Vegetables
In a big mixing bowl, toss together the fun ingredients. Add 1 ½ cups of halved cherry tomatoes, 1 cup of diced cucumber, and ½ cup of finely chopped red onion. Next, include 1 cup of sliced Kalamata olives and 1 cup of crumbled feta cheese. Don’t forget ½ cup of chopped fresh parsley and 2 tablespoons of rinsed capers. Gently mix everything to blend the colors and flavors.
Preparing the Dressing
Grab a small bowl to make the dressing. Whisk together ¼ cup of extra virgin olive oil and 2 tablespoons of freshly squeezed lemon juice. Then, sprinkle in 1 teaspoon of dried oregano. Add salt and black pepper to taste. Taste it to make sure it has a good flavor.
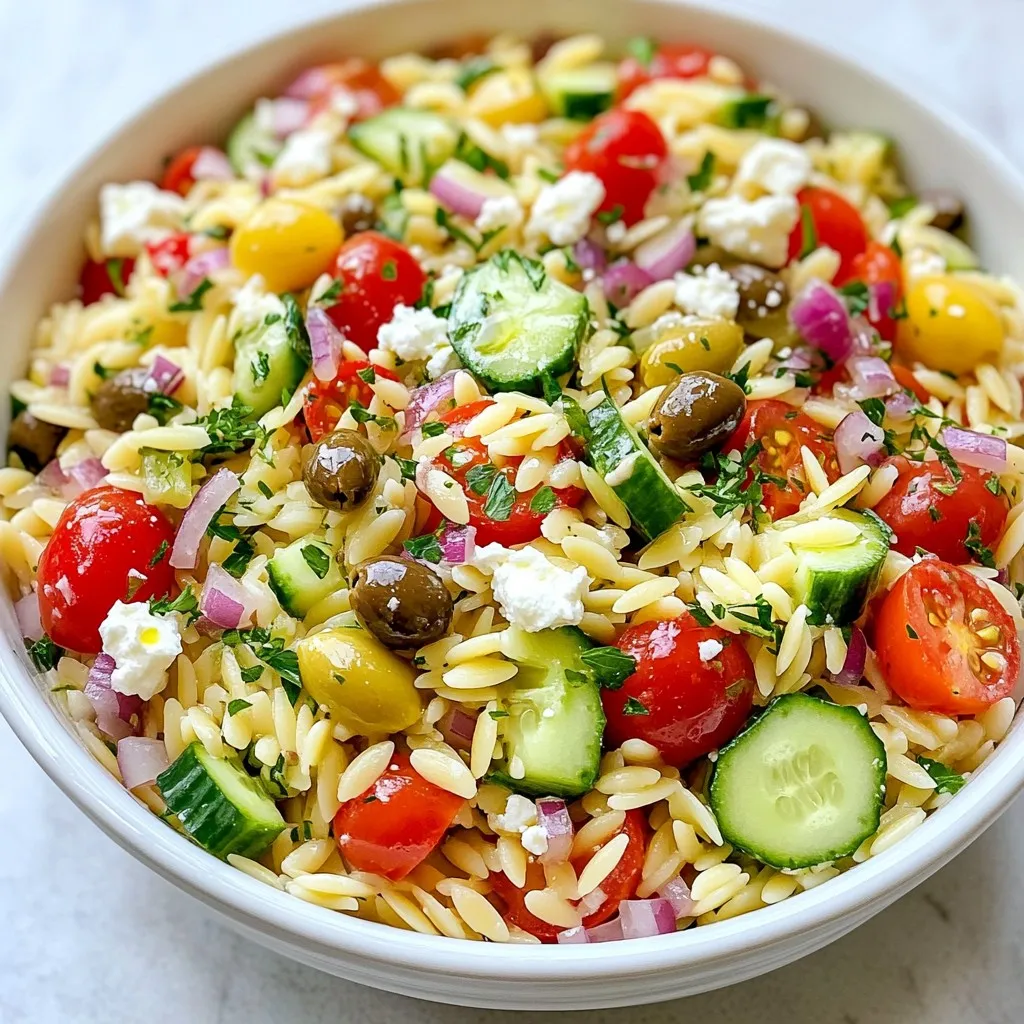
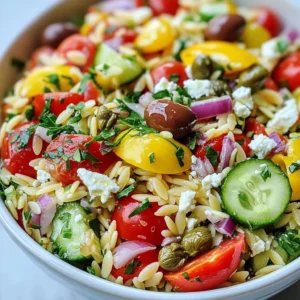
Combining the Ingredients
Now, it’s time to bring it all together. Add the cooled orzo to the bowl with the mixed veggies and feta. Drizzle the dressing over the top. Toss everything gently until the salad looks colorful and well mixed.
Chilling the Salad
Cover the salad and place it in the fridge. Let it chill for at least 30 minutes. This waiting time helps the flavors blend together perfectly.
Serving Suggestions
Serve the Mediterranean Orzo Salad in a large bowl. For a pop of color, sprinkle extra chopped parsley and some feta on top. If you want a fun way to serve it, try putting the salad in mason jars. Layer the ingredients for a lovely look!
Tips & Tricks
How to Perfectly Cook Orzo
To cook orzo well, start with a large pot. Bring salted water to a boil. Add the orzo and stir gently. Cook it for 8 to 10 minutes. You want it al dente, so taste as you go. Once done, drain the orzo in a colander. Rinse it under cold water to stop the cooking. This keeps it firm and perfect for your salad.
Flavor Enhancements
To boost the flavor of your Mediterranean Orzo Salad, consider these tips. Use fresh herbs like basil or mint for extra taste. A splash of balsamic vinegar can add depth. You can also mix in some diced bell peppers for crunch. If you like a bit of heat, add some red pepper flakes. Don’t forget to taste as you go, adjusting salt and pepper for balance.
Make Ahead and Storage Tips
You can make this salad ahead of time. Prepare it a day in advance for the best flavor. Store it in an airtight container in the fridge. The flavors blend well when chilled. If you have leftovers, keep them in the fridge for up to three days. Just give it a good stir before serving again. If it seems dry, add a splash of olive oil and lemon juice.
Pro Tips
- Cooking Orzo Perfectly: To achieve the perfect al dente texture, ensure you follow the package instructions precisely and taste-test a minute before the suggested time is up.
- Flavorful Dressing: For an extra layer of flavor, consider adding a teaspoon of Dijon mustard or a pinch of red pepper flakes to the dressing.
- Ingredient Variations: Feel free to customize your salad by adding other ingredients like bell peppers, artichokes, or even grilled chicken for added protein.
- Make-Ahead Magic: This salad tastes even better the next day, so feel free to prepare it a day in advance for optimal flavor blending.
Variations
Adding Protein (Chicken, Tuna, etc.)
You can easily boost this salad with protein. Grilled chicken adds great flavor. Simply chop it into bite-sized pieces and mix it in. Canned tuna is another fantastic option. Just drain it well and flake it into the salad. If you want a seafood twist, try adding shrimp. Cook the shrimp in olive oil until pink, then toss them in. Each of these proteins makes the salad filling and tasty.
Vegetarian/Vegan Alternatives
To make this salad vegetarian, simply leave out the feta cheese. You can replace it with tofu or a creamy vegan cheese. For a vegan option, use chickpeas for protein. They add a nice texture and flavor. You can also add more veggies, like bell peppers or zucchini, to keep it vibrant and fresh. This way, you still get a nutritious meal without animal products.
Seasonal Ingredient Swaps
Seasonal swaps keep this salad exciting. In spring, add fresh peas or asparagus for a pop of green. In summer, try ripe peaches or strawberries for sweetness. Autumn brings the chance to add roasted pumpkin or butternut squash. In winter, think about using kale or Brussels sprouts. These changes help you enjoy the best ingredients all year round. Plus, it makes the dish more colorful and tasty!
Storage Info
Best Practices for Storing Leftovers
To keep your Mediterranean Orzo Salad fresh, store it in an airtight container. This helps keep the flavors intact. Make sure to refrigerate the salad right after serving. The salad can last up to three days in the fridge. If you notice any excess liquid, drain it before serving again. This keeps the salad from getting soggy.
Freezing Instructions
I do not recommend freezing Mediterranean Orzo Salad. The texture of the orzo and fresh veggies changes when frozen. If you freeze it, the salad may become mushy when thawed. If you want to save a portion, store it in the fridge instead.
Shelf Life of Ingredients
- Orzo pasta: Uncooked, it lasts for about two years in a cool, dry place.
- Cherry tomatoes: Fresh tomatoes can stay good for up to a week in the fridge.
- Cucumber: It lasts about one week in the fridge.
- Red onion: Whole, it can last for one to two months in a cool, dark area.
- Kalamata olives: Stored in their brine, they can last up to a year.
- Feta cheese: It stays good for about five days after opening, if kept in the fridge.
- Fresh parsley: It stays fresh for about one week in the fridge.
- Capers: They can last up to a year when stored properly in the fridge.
- Olive oil: It stays fresh for about six months after opening, if stored in a cool, dark place.
- Lemon juice: Fresh juice lasts for about three to four days in the fridge.
By following these storage tips, you can enjoy your Mediterranean Orzo Salad longer!
FAQs
What is Orzo Pasta?
Orzo is a small, rice-shaped pasta. It cooks quickly and has a soft bite. You can find it in many dishes, especially in salads. Its unique shape makes it fun to eat and easy to mix with other ingredients.
Can I make Mediterranean Orzo Salad in advance?
Yes, you can prepare this salad ahead of time. Making it a few hours early allows the flavors to blend well. Just keep it in the fridge until you’re ready to serve. If you make it the night before, the taste will be even better.
What can I serve with Mediterranean Orzo Salad?
This salad pairs well with grilled chicken or fish. You can also serve it with pita bread and hummus. A light soup can make a great starter too. It’s a perfect side for summer picnics or barbecues.
Is this salad suitable for meal prep?
Absolutely! Mediterranean Orzo Salad is great for meal prep. It stores well in containers and stays fresh for several days. Just remember to keep the dressing separate if you want it crisp. You can easily grab it for lunch or dinner throughout the week.
This blog post showed you how to make Mediterranean Orzo Salad. We covered the ingredients, how to cook orzo, and mix in vegetables. You learned how to prepare a tasty dressing and tips for perfecting the dish. We explored variations to fit your taste and shared storage tips to keep leftovers fresh.
In short, this salad is simple to make and full of flavor. Enjoy your cookin
Mediterranean Orzo Salad Delight
Ingredients
- 1 cup orzo pasta
- 1.5 cups cherry tomatoes, halved
- 1 cup cucumber, diced
- 0.5 cup red onion, finely chopped
- 1 cup Kalamata olives, pitted and sliced
- 1 cup feta cheese, crumbled
- 0.5 cup fresh parsley, chopped
- 2 tablespoons capers, rinsed and drained
- 0.25 cup extra virgin olive oil
- 2 tablespoons freshly squeezed lemon juice
- 1 teaspoon dried oregano
- to taste Salt and black pepper
Instructions
- In a large pot, bring salted water to a rolling boil. Add the orzo pasta and cook according to the package directions, typically around 8-10 minutes, until al dente. Once cooked, drain the orzo in a colander and rinse under cold water to halt the cooking process and cool it down.
- In a spacious mixing bowl, combine the halved cherry tomatoes, diced cucumber, finely chopped red onion, sliced Kalamata olives, crumbled feta cheese, chopped parsley, and rinsed capers. Gently fold the ingredients together to ensure an even mix.
- In a separate small bowl, whisk together the rich olive oil, fresh lemon juice, dried oregano, and season with salt and black pepper. Adjust the seasoning to your taste, ensuring a well-balanced flavor.
- Add the cooled orzo to the bowl of mixed vegetables and feta. Drizzle the prepared dressing all over the salad and carefully toss until everything is beautifully combined and uniformly coated.
- Sample the salad and adjust the seasoning as needed. You can add a pinch more salt, a dash of pepper, or a splash of lemon juice depending on your flavor preference.
- To allow the flavors to meld seamlessly, cover the salad and refrigerate for at least 30 minutes before serving. This chilling time will enhance the taste of the dish.
![- Cooked chicken - Creamy mayonnaise - Dill pickle relish - Ranch seasoning mix - Green onions - Celery - Salt and black pepper - Buttery croissants - Lettuce leaves - Dill pickle slices To make the Pickle Ranch Chicken Salad Croissants, you need a few simple ingredients. Start with cooked chicken. Shredded chicken works best, and you can use leftover rotisserie chicken if you like. Next, grab creamy mayonnaise, which adds richness and binds everything together. You will also need some dill pickle relish. This gives the salad a tangy kick. For flavor, add a packet of ranch seasoning mix. It brings a burst of taste to the dish. Then, you will need green onions and celery. They add crunch and freshness to the chicken salad. Don’t forget salt and black pepper to season your salad to your liking. For the base, use buttery croissants. They are soft and flaky, perfect for holding the chicken salad. You’ll also need lettuce leaves to line the croissants and keep them from getting soggy. Lastly, you can add dill pickle slices on the side for extra crunch and flavor. You can find the full recipe [Full Recipe] in the next section. First, we mix the chicken salad. Start with two cups of cooked chicken, shredded. Add half a cup of creamy mayonnaise and a quarter cup of dill pickle relish. Then, mix in one tablespoon of ranch seasoning. Stir until everything is well combined. Next, we season the mixture. Taste your chicken salad and add salt and black pepper to your liking. This step is key for great flavor. Now, we assemble the croissants. Carefully slice each croissant in half. Place a lettuce leaf on the bottom half. This keeps the croissant from getting soggy. Let’s combine the base ingredients. In a large bowl, mix the chicken, mayonnaise, relish, and ranch seasoning. Use a spatula to blend well. Now, we add vegetables for crunch. Toss in a quarter cup of finely chopped green onions and celery. Mix until all the veggies are evenly spread throughout. Finally, we make the chicken salad shine. After seasoning, ensure everything is properly mixed. This is the moment when you can adjust the flavor if needed. For the finishing touch, scoop the chicken salad onto the lettuce-covered croissant halves. Pile it high for a tasty bite! Don't forget to garnish with extra dill pickle slices for added flavor. For the full recipe, refer to the beginning section. To get the best texture for your chicken salad, start with shredded chicken. It's key to keep the pieces small and evenly shredded. This helps each bite feel tender and smooth. Use cooked chicken that’s still warm, as it mixes better with the other ingredients. When it comes to seasoning, don’t hold back. The ranch seasoning mix adds a great taste. I always suggest starting with a tablespoon. You can adjust to your liking. Taste as you mix. Add salt and pepper, a little at a time, until it’s just right. Presentation can make your croissants stand out. Arrange them neatly on a platter. You can serve them whole or cut in half for easy grabbing. Place a small bowl of extra dill pickles next to them. This adds a nice touch and makes it easy for guests. For sides, consider serving fresh fruit or a light salad. A simple green salad pairs nicely. You can even add some crunchy chips for texture. This makes for a fun and tasty meal that everyone will enjoy. {{image_4}} You can change this recipe to suit your taste. Here are some ideas. - Alternative proteins to try: Instead of chicken, use turkey or canned tuna. Both work well and give a new twist. For a meat-free option, try chickpeas or tofu for a healthy plant-based salad. - Different seasoning blends: Swap the ranch mix for other blends, like garlic or lemon pepper. You can also add some hot sauce for a spicy kick. If you seek healthier choices, here are some easy swaps. - Low-calorie alternatives: Use Greek yogurt instead of mayonnaise. This keeps the creamy texture but cuts calories. You can also use less chicken or add more veggies to lighten it up. - Gluten-free options for croissants: Look for gluten-free croissants at your local store. You can also use lettuce wraps or gluten-free bread for a crunchy and satisfying meal. Explore these variations to make your Pickle Ranch Chicken Salad Croissants even more exciting. For the full recipe, check the recipe section above. To keep your pickle ranch chicken salad croissants fresh, store any leftovers in an airtight container. This helps prevent drying out. You can place a paper towel in the container to absorb moisture. The best time to eat them is within three days for optimal taste. After that, the croissants may become soggy or lose flavor. You might want to enjoy your croissants warm. To reheat them, use an oven or toaster oven. Heat at 350°F for about 5-7 minutes. This keeps the croissants crisp. Avoid using a microwave, as it can make them chewy. If you have extra chicken salad, you can use it in wraps or on a bed of greens. This way, you can create a new meal with the leftovers that is just as tasty! Can I use rotisserie chicken? Yes, rotisserie chicken works great in this recipe. It saves time and adds flavor. Simply shred the chicken and mix it in. How do I make this salad ahead of time? You can make the salad a day in advance. Store it in an airtight container in the fridge. Just assemble the croissants when you’re ready to serve. What are some good sides to serve with these croissants? Some tasty sides include fresh fruit, chips, or a simple green salad. These pair well and add color to your plate. Where can I buy ready-made chicken salad? You can find ready-made chicken salad at grocery stores or deli counters. Look for local options for the freshest taste. Can I substitute the croissants with other bread? Yes, you can use any bread you like. Try using bagels, pita, or even lettuce wraps for a low-carb option. This blog post covered how to make a tasty chicken salad for croissants. You learned the key ingredients and the steps for mixing and assembling. I shared tips to get the best flavors and textures. You can also try different proteins or seasonings to make it your own. Store any leftovers properly to keep them fresh. This dish is great for gatherings or a simple meal at home. Enjoy making your delicious chicken salad and impress your friends and family!](https://dishtreats.com/wp-content/uploads/2025/07/dff408d1-932c-47c7-977b-b0a9332b2143-768x768.webp)

![To make Crispy Parmesan Ranch Potato Skins, gather these simple ingredients: - 4 large russet potatoes - 1 cup shredded sharp cheddar cheese - 1/2 cup grated Parmesan cheese - 1/4 cup sour cream - 2 tablespoons ranch seasoning mix - 1/4 cup green onions, chopped - 3 tablespoons olive oil - Salt and pepper to taste - Optional: hot sauce for serving These items will help you create a tasty snack that everyone loves. The russet potatoes give a sturdy base, while the cheese brings flavor and creaminess. The ranch seasoning mix adds a punch of taste that makes these skins special. I always keep a few extra green onions on hand for garnish. They add color and a mild onion flavor that enhances the dish. I recommend using fresh ingredients for the best results. Fresh potatoes will give you a crispier skin. The cheese should be high-quality for a richer flavor. If you like spice, have hot sauce ready for a kick! For the full recipe, visit the [Full Recipe] section. 1. Preheat your oven to 400°F (200°C) to get it ready for baking. 2. Scrub the russet potatoes under cold running water. Dry them completely with a clean towel. 3. Prick each potato with a fork six to eight times. This helps steam escape while they bake. 1. Rub each potato with olive oil. Make sure they are well-coated. 2. Sprinkle salt on the potatoes for extra flavor. 3. Place the potatoes on the middle rack of the oven. Bake for 45-60 minutes. Check their doneness by piercing with a fork. 1. Once baked, let the potatoes cool for about 10 minutes. This makes them easier to handle. 2. Slice each potato in half lengthwise. Now you have boat-like shapes! 3. Scoop out a bit of the flesh, leaving about 1/4 inch intact along the skin. 1. Brush the insides of each potato skin with olive oil. Season with salt and pepper for taste. 2. Add a generous amount of shredded cheddar cheese in each skin. Then sprinkle the remaining Parmesan cheese on top. 3. Put the filled skins back in the oven, cut-side up. Bake for an extra 10-15 minutes. The cheese should melt and the edges should crisp. 4. While baking, mix the remaining Parmesan cheese, ranch seasoning, and chopped green onions in a bowl. 5. When the potato skins are crispy, take them out. Top each skin with the ranch mix. 6. Return the potato skins to the oven for 5 more minutes. This lets the flavors meld beautifully. Enjoy your Crispy Parmesan Ranch Potato Skins hot, served with sour cream and optional hot sauce! For complete details, refer to the Full Recipe. To make your potato skins crispy, follow these simple steps: - Bake at a high temperature: Set your oven to 400°F (200°C). High heat gets the skins nice and crisp. - Use olive oil: Coat the skins well in olive oil. This helps them crisp up and adds flavor. - Season well: Don’t skip the salt and pepper. Seasoning is key for great taste. You can switch up the cheese for your potato skins. Here are some ideas: - Monterey Jack: This cheese melts well and adds a creamy texture. - Gouda: It gives a smoky flavor that pairs nicely with ranch. - Feta: For a tangy twist, sprinkle some crumbled feta on top. Balancing flavors is important. Use milder cheeses with stronger toppings. Adding more flavor is easy! Here are some tips: - Spices: Try adding paprika or garlic powder for extra kick. - Herbs: Fresh herbs like parsley or chives brighten up the dish. - Toppings: Consider adding crispy bacon bits or diced tomatoes for extra texture. These tips help you make the best crispy Parmesan ranch potato skins. For the complete recipe, check out the Full Recipe section. {{image_4}} For a twist, try different spice blends. You can use garlic powder, onion powder, or smoked paprika. Each adds a unique taste. You can also switch the ranch seasoning for taco seasoning. It gives a fun and zesty flavor. - Garlic powder - Onion powder - Smoked paprika - Taco seasoning Explore different flavor profiles. For a spicy kick, add cayenne pepper or chili powder. If you like fresh herbs, try dill or parsley. These choices keep your potato skins exciting and tasty. Get creative with toppings to suit your taste. You can add crispy bacon bits for a savory crunch. If you're vegan, top with dairy-free cheese or avocado. - Crispy bacon bits - Dairy-free cheese - Avocado slices For a fresh touch, add chopped tomatoes or jalapeños. You can also sprinkle some fresh cilantro or green onions. This way, everyone can enjoy their potato skins just how they like them. Pair your potato skins with a hearty soup or salad. A warm chili or creamy broccoli soup works well. These sides make a filling meal. - Hearty chili - Creamy broccoli soup - Fresh garden salad You can also serve them with grilled chicken or fish. This gives a nice balance to your meal. The crispy potato skins shine as a fun side dish. For more ideas, check out the full recipe. To keep your crispy potato skins fresh, store them in the fridge. Place them in an airtight container. They will stay good for about 3 days. Make sure they cool completely before sealing. This helps prevent excess moisture. When you want to enjoy your leftovers, use an oven for the best taste. Preheat it to 350°F (175°C). Place the potato skins on a baking sheet. Heat them for about 10-15 minutes. This keeps them crispy. Avoid using a microwave, as it can make them soggy. Yes, you can freeze potato skins! To freeze, let them cool completely. Place them in a single layer on a baking sheet. Freeze them for about 1-2 hours. After that, transfer them to a freezer bag. Remove as much air as possible. For thawing, place the skins in the fridge overnight before reheating. The best potatoes for potato skins are large russet potatoes. They have thick skin and a fluffy interior. This makes them perfect for holding toppings. Their size allows for a good amount of filling. Plus, they get crispy when baked, which is what we want. Yes, you can prepare them ahead of time. Bake the potatoes and scoop out the flesh. Store the skins in the fridge until you're ready to bake. Just add cheese and toppings before the final bake. This saves time and makes serving easier. To keep potato skins crispy, follow these tips: - Ensure you coat the skins with olive oil. - Bake them at a high temperature. - Avoid overcrowding the baking sheet. - Don't cover them while they cool. These steps help maintain crunchiness and flavor. Crispy Parmesan Ranch Potato Skins go well with several sauces. Here are some tasty pairings: - Sour cream - Ranch dressing - Hot sauce - Guacamole - Salsa These sauces add flavor and enhance your snack experience. Yes, you can freeze potato skins for later use. Bake the skins and let them cool completely. Then, store them in airtight containers. They can last a couple of months in the freezer. When ready to enjoy, bake them directly from frozen. This way, you get to savor that crispy goodness again! This blog post guides you on making Crispy Parmesan Ranch Potato Skins, covering every step. You learned about needed ingredients and how to prepare them. I shared tips for achieving crispy skins and creative topping ideas. You also discovered ways to store and reheat leftovers. Enjoy making this tasty treat! With your new skills, you can impress friends and family. These potato skins are simple and delicious.](https://dishtreats.com/wp-content/uploads/2025/07/2d854721-5686-49a1-8fc7-db971342c8a3-768x768.webp)