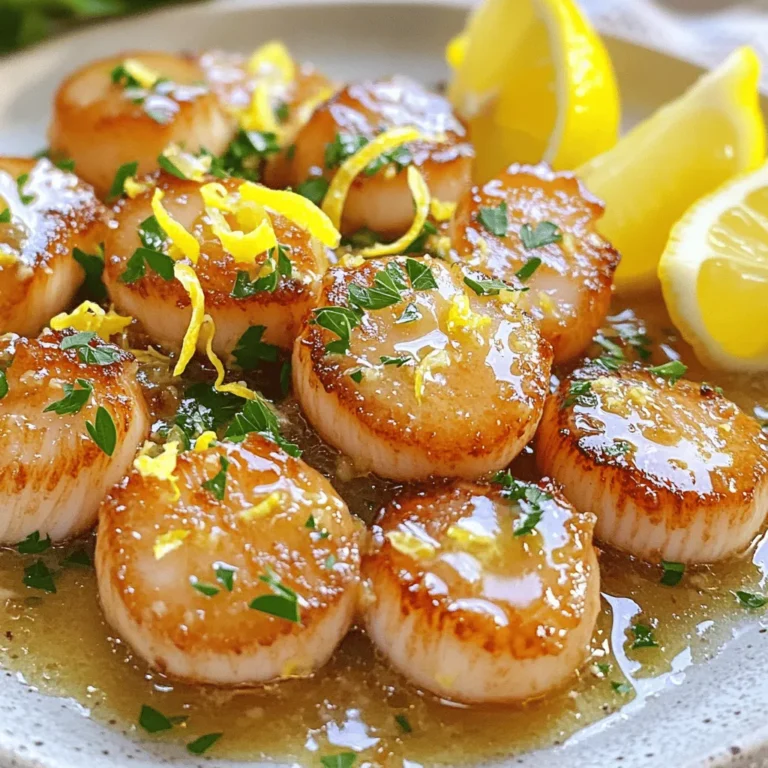
Instant Pot Lemon Garlic Chicken Thighs Simple Recipe


Ready to impress your family with a tasty dinner? Let’s make Instant Pot Lemon Garlic Chicken Thighs! This simple recipe will fill your home with delicious smells and keep your prep time minimal. With juicy, tender chicken thighs and a zesty lemon garlic sauce, you’ll have a meal everyone loves. Let’s dive into the ingredients and get cooking!
Why I Love This Recipe
- Bold Flavors: The combination of lemon and garlic brings a vibrant zest that elevates the chicken, making each bite a delight.
- Quick and Easy: Using the Instant Pot cuts down cooking time significantly, allowing you to enjoy a delicious meal in just 30 minutes.
- One-Pot Wonder: With everything cooked in the Instant Pot, cleanup is a breeze, leaving you more time to savor your meal.
- Healthy and Nutritious: This recipe uses bone-in, skin-on chicken thighs, providing rich flavor while still being packed with protein and nutrients.
Ingredients
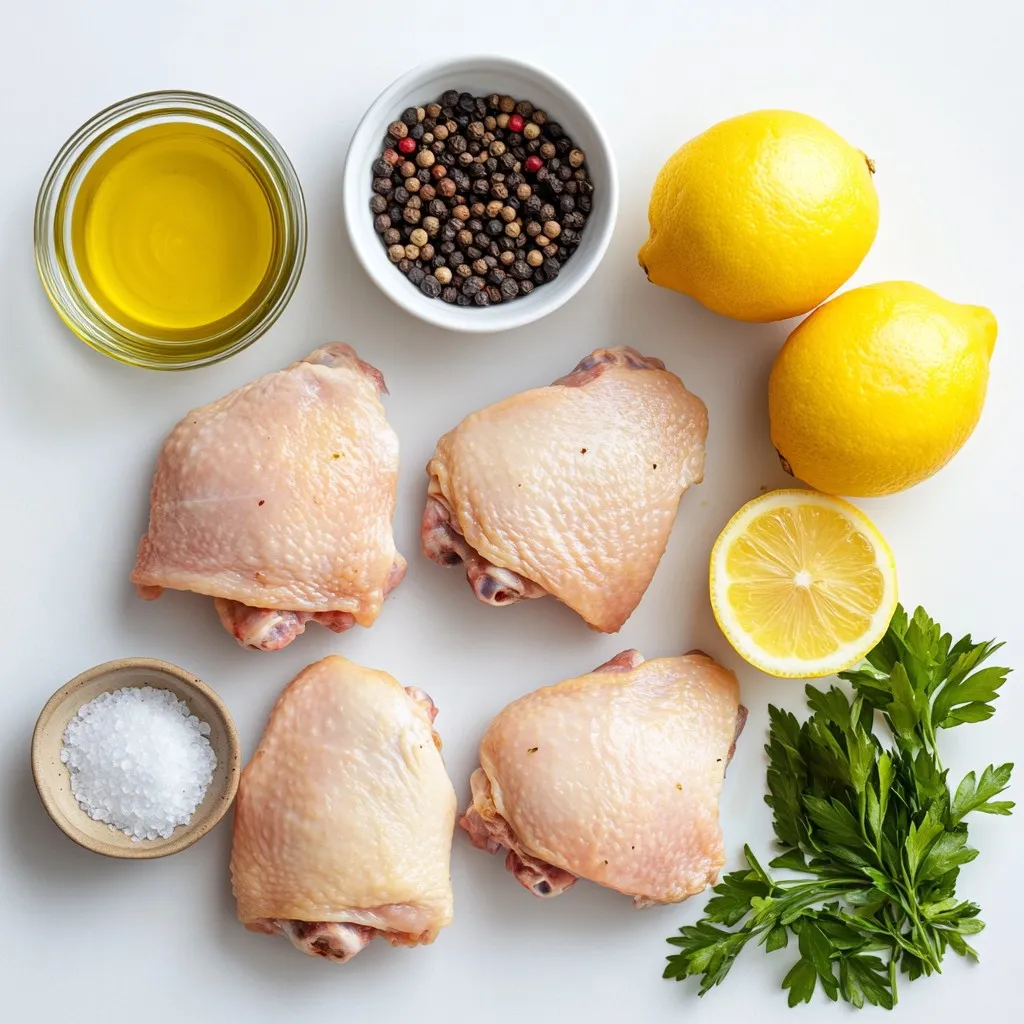
List of Required Ingredients
- 4 bone-in, skin-on chicken thighs
- 1 teaspoon salt
- 1 teaspoon freshly ground black pepper
- 2 tablespoons extra virgin olive oil
- 4 cloves garlic, finely minced
- 1 teaspoon dried oregano
- Zest and juice from 2 fresh lemons
- 1 cup low-sodium chicken broth
- 2 tablespoons fresh parsley, finely chopped (for garnish)
For this recipe, I like to use bone-in, skin-on chicken thighs. They stay juicy and flavorful. You need salt, pepper, and oregano for basic seasoning. The addition of minced garlic gives a lovely aroma. Fresh lemons add a burst of zest and tang. Low-sodium chicken broth enhances the flavor without being too salty. Lastly, fresh parsley brightens the dish and adds color.
Gathering these ingredients is simple, and they work perfectly together. Each item plays an important role in making this meal delicious. Be sure to use fresh ingredients for the best taste. This combination makes the chicken tender and juicy while packing a punch of flavor.
Step-by-Step Instructions
Preparing the Chicken
- Seasoning the chicken thighs: Start by rubbing each chicken thigh with salt, black pepper, and dried oregano. Make sure every side has a good amount of seasoning. This helps boost the flavor.
- Searing the chicken in the Instant Pot: Turn on your Instant Pot and choose the “Sauté” mode. Add olive oil and let it get hot. Once it’s shimmering, place the chicken thighs skin-side down in the pot. Sear them for about 5 minutes until the skin is crispy and golden. Flip the thighs and brown the other side for another 5 minutes. When done, remove the chicken and set it aside.
- Sautéing the garlic for flavor: In the same pot, add minced garlic. Sauté for about 30 to 60 seconds while stirring. You want it fragrant but not burnt. Burnt garlic can ruin the flavor.
Building the Sauce
- Deglazing the pot with chicken broth: Pour in the chicken broth. Use a wooden spoon to scrape up the tasty bits stuck to the bottom. These bits add a lot of flavor to your dish.
- Adding lemon juice and zest: Stir in the fresh lemon juice and zest. Mix it well with the broth. This gives the sauce a bright and fresh taste.
Cooking the Chicken
- Pressure cooking instructions: Return the seared chicken thighs to the pot, making sure they are in the liquid. Close the lid, set the valve to sealing, and select “Manual” or “Pressure Cook.” Set the timer for 12 minutes.
- Natural release process: After the cooking time ends, let the pressure release naturally for about 10 minutes. Then, switch the valve to venting to release any remaining steam safely.
Serving Recommendations
- Removing and plating the chicken: Once it’s safe, take the chicken thighs out of the pot. Let them rest on a plate for a few minutes.
- Thicken sauce if desired: If you want a thicker sauce, switch the Instant Pot back to “Sauté” mode. Let the sauce simmer until it reduces to your liking.
Tips & Tricks
Perfecting the Recipe
To make the skin crispy, sear the chicken well. Start on high heat and don’t rush it. This helps lock in juices and adds flavor. Flip the chicken only once for the best result.
To avoid burnt garlic flavor, keep an eye on the garlic while it cooks. Sauté it for only 30 to 60 seconds. Stir it constantly and remove it as soon as it smells fragrant. This step adds a nice depth without the bitter taste.
Cooking Tips
If you have thicker chicken thighs, you might need to adjust the cooking time. Add a few extra minutes to ensure they cook through. Use a meat thermometer to check if they reach 165°F.
For a different texture, try the quick-release method after cooking. This helps keep the chicken juicy and tender. If you prefer a firmer texture, let it naturally release for a few minutes before venting.
Pro Tips
- Perfectly Crispy Skin: For an extra crispy skin, broil the chicken thighs for a few minutes after cooking. This will give them that golden-brown finish you desire.
- Flavor Boost: Marinate the chicken thighs in olive oil, lemon juice, and garlic for at least an hour before cooking. This allows the flavors to penetrate the meat more deeply.
- Reduce Sauce Wisely: If you prefer a thicker sauce, remember to simmer the sauce on “Sauté” mode after cooking, but keep an eye on it to prevent burning.
- Serving Suggestions: Serve the chicken thighs over a bed of rice, quinoa, or alongside roasted vegetables to create a well-rounded meal.

Variations
Flavor Variations
You can easily change the taste of lemon garlic chicken thighs. Here are some fun ways to do that:
- Adding herbs or spices: Try fresh thyme, rosemary, or basil. These herbs add a rich taste. You can also add a pinch of red pepper flakes for spice.
- Incorporating vegetables: Toss in veggies like bell peppers, carrots, or even green beans. Add them to the pot during pressure cooking. They soak up the flavors and make the dish colorful.
Alternative Cooking Methods
If you want to try different cooking methods, here are two great options:
- Baking lemon garlic chicken thighs: Preheat your oven to 400°F. Place the seasoned chicken thighs in a baking dish. Bake for about 35-40 minutes. This gives you crispy skin and juicy meat.
- Grilling instead of using an Instant Pot: Marinate the chicken thighs in lemon juice and garlic. Heat your grill to medium-high. Grill the thighs for about 6-7 minutes on each side. This adds a nice smoky flavor to the dish.
These variations let you customize your meal. Enjoy experimenting!
Storage Info
Storing Leftovers
To keep your lemon garlic chicken thighs fresh, use airtight containers. Glass or plastic containers work well. Store the chicken in the fridge for up to three days. If you want to keep it longer, freeze it. The chicken can last up to three months in the freezer. Just make sure to thaw it in the fridge before reheating.
Reheating Suggestions
When reheating chicken thighs, the oven is best. Preheat it to 350°F (175°C). Cover the thighs with foil to keep them moist. Heat for about 15 to 20 minutes. You can also use the microwave. Place the chicken on a plate and cover it. Heat on medium for about 2 to 3 minutes.
To keep the flavor, add a splash of chicken broth or lemon juice while reheating. This will help retain the zesty taste of the dish.
FAQs
Can I use boneless chicken thighs?
Yes, you can use boneless chicken thighs. They will cook faster than bone-in thighs. Adjust the pressure cooking time to about 8 minutes. Always check for doneness.
How can I make this dish spicy?
To add heat, include red pepper flakes or diced jalapeños. You can also use spicy seasoning blends. Mix them into the seasoning before rubbing on the chicken.
What side dishes pair well with lemon garlic chicken thighs?
Great sides include:
- Rice pilaf
- Roasted vegetables
- Mashed potatoes
- A fresh green salad
These complement the bright lemon and garlic flavors.
How do I know when the chicken is fully cooked?
Use a meat thermometer. The chicken should reach an internal temperature of 165°F. Check the thickest part of the thigh. The meat should be juicy and no longer pink.
This blog post covered how to make delicious lemon garlic chicken thighs using an Instant Pot. We talked about the key ingredients, step-by-step cooking instructions, and helpful tips. You can also explore flavor variations and different cooking methods.
In the end, this dish is simple and tasty. Try it out and enjoy the burst of flavors! Cooking can be fun and rewarding, so get creative with your meals. Happy cookin

Zesty Instant Pot Lemon Garlic Chicken Thighs
Ingredients
- 4 pieces bone-in, skin-on chicken thighs
- 1 teaspoon salt
- 1 teaspoon freshly ground black pepper
- 2 tablespoons extra virgin olive oil
- 4 cloves garlic, finely minced
- 1 teaspoon dried oregano
- 2 pieces fresh lemons (zest and juice)
- 1 cup low-sodium chicken broth
- 2 tablespoons fresh parsley, finely chopped (for garnish)
Instructions
- Generously rub each chicken thigh with salt, black pepper, and dried oregano. Ensure all sides are evenly coated for maximum flavor.
- Power on your Instant Pot and select the 'Sauté' mode. Add the olive oil, allowing it to heat until shimmering. Carefully place the seasoned chicken thighs skin-side down into the pot. Sear for about 5 minutes until the skin is crispy and golden brown. Flip the thighs and continue browning the other side for an additional 5 minutes. Once browned, remove the chicken from the pot and set aside on a plate.
- With the pot still on, add the minced garlic to the leftover oil and sauté for approximately 30 to 60 seconds. Stir constantly until fragrant, taking care not to let it burn as this can impart a bitter flavor.
- Pour in the chicken broth, using a wooden spoon to scrape up any browned bits stuck to the bottom. These bits are packed with flavor, so make sure they are incorporated into the broth.
- Stir in the fresh lemon juice and zest, mixing thoroughly with the broth. This will infuse the sauce with a bright, zesty flavor.
- Return the seared chicken thighs to the Instant Pot, ensuring they are submerged in the flavorful liquid. Close the lid, set the valve to sealing, and select 'Manual' or 'Pressure Cook' mode. Set the timer for 12 minutes.
- After the cooking time has elapsed, let the pressure release naturally for about 10 minutes. Then, carefully switch the valve to venting to release any remaining steam.
- Once safe to do so, remove the chicken thighs from the pot. Allow them to rest on a plate for a few moments. For a thicker sauce, you can switch the Instant Pot back to 'Sauté' mode and let the sauce simmer until reduced to your desired consistency.
- Plate the chicken thighs and generously drizzle them with the aromatic sauce from the pot. Sprinkle with freshly chopped parsley for a touch of color and flavor.

![- 1 pre-made pizza dough - 1/2 cup fresh basil pesto - 1 cup shredded mozzarella cheese - 1 medium lemon (zested and juiced) - 1 cup cherry tomatoes, halved - 1/4 cup finely grated Parmesan cheese - 1 tablespoon extra-virgin olive oil - Salt and freshly ground black pepper to taste - Fresh basil leaves for garnish - Additional toppings (e.g., olives, peppers) - Alternative cheese options (feta, goat cheese) To make a great Lemon Basil Pesto Pizza, you need these ingredients. They work together to create a fresh, bright flavor. First, the pre-made pizza dough saves time and makes this recipe easy. You can find it in stores. Fresh basil pesto adds a rich, herby taste. It’s the star of this dish. Shredded mozzarella cheese melts beautifully. It gives that familiar cheesy texture we love. The lemon zest and juice bring a tangy punch. Cherry tomatoes add sweetness and color. Grated Parmesan cheese gives a nutty, salty flavor. The olive oil helps everything blend well. Salt and pepper round out the taste. For those who want to mix things up, you can add more toppings. Olives and peppers are great choices. You might also try different cheeses like feta or goat cheese for a twist. With these simple and tasty ingredients, you’re on your way to making a delightful pizza. For the full recipe and step-by-step guide, check out the [Full Recipe]. 1. Preheat your oven to 475°F (245°C). If you have a pizza stone, place it in the oven. This helps the crust cook evenly. If not, use a baking sheet. 2. Lightly flour a clean surface. Roll out the pizza dough to your desired thickness. Make sure it fits your baking surface. 3. Once rolled out, move the dough onto parchment paper. This will help you transfer the pizza later. 1. Spread the fresh basil pesto over the dough. Leave a half-inch border for the crust. 2. Sprinkle the shredded mozzarella cheese over the pesto. Make sure it covers the whole pizza. 3. Add the halved cherry tomatoes on top of the cheese. This adds color and flavor. 4. Drizzle the extra-virgin olive oil over everything. Season with salt and freshly ground black pepper to taste. 5. Zest the lemon and sprinkle it evenly on the pizza. This adds a fresh citrus aroma. 1. Slide the parchment paper with the pizza onto the preheated pizza stone or baking sheet. 2. Bake for about 12-15 minutes. Look for a golden brown crust and bubbling cheese. 3. Carefully take the pizza out of the oven. Drizzle fresh lemon juice over the top. 4. Sprinkle grated Parmesan cheese over the warm pizza. Add fresh basil leaves for garnish. 5. Use a sharp knife or pizza cutter to slice the pizza into wedges. Serve hot for the best taste. You can find the Full Recipe for this delicious Lemon Basil Pesto Pizza above. To get the best crust, I recommend using a pizza stone. It heats up and gives your pizza a crispy base. If you don’t have one, a baking sheet works too. Just make sure you preheat it well. Roll your pizza dough to the right thickness. Aim for about a quarter-inch thick. This allows for a nice rise and crunch without being too thin. For flavor, balance the saltiness with fresh lemon juice. A squeeze of lemon brightens up the taste. It makes the pizza feel fresh and lively. Use only fresh ingredients. Fresh basil, ripe tomatoes, and good cheese make a big difference. They add depth and vibrancy to your dish. When serving, place the pizza on a rustic wooden board. It adds a nice touch. You can also use a colorful platter for a fun look. Garnish with whole basil leaves and a lemon wedge. This makes it visually appealing and invites your guests to dig in. Serve it hot for the best taste! For the full recipe, check out the complete details above. {{image_4}} You can switch up the sauce for your pizza. Tomato sauce works well if you want a classic taste. You can also try a creamy white sauce. This adds a rich flavor that pairs nicely with lemon. Seasonal pesto is another fun option. You can make it with fresh herbs like parsley or cilantro. This gives a new twist to your dish. If you need a gluten-free pizza, several dough options are available. Many stores sell gluten-free pizza crusts. You can also make your own using almond flour or cauliflower. For those who follow a vegan diet, you can skip the cheese. There are many tasty vegan cheese substitutes. Look for brands made from nuts or soy for a creamy texture. Toppings can make your pizza unique. Popular choices include pepperoni, mushrooms, and bell peppers. Try mixing and matching your favorites. Seasonal vegetables add color and flavor. In summer, fresh zucchini or bell peppers work well. In winter, roasted butternut squash or kale can be a great choice. Don't be afraid to get creative with your toppings! To keep your Lemon Basil Pesto Pizza fresh, let it cool to room temperature. This step is key to avoid moisture buildup. Wrap each slice in plastic wrap or aluminum foil. You can also place them in an airtight container. This helps retain flavor and texture. Store the pizza in the fridge for up to three days. For best results, enjoy it within this time frame. When it's time to eat leftovers, you can use either an oven or a microwave. The oven is best for maintaining crispiness. Preheat your oven to 375°F (190°C). Place the pizza on a baking sheet and heat for about 10 minutes. This warms it up well without making it soggy. If you choose the microwave, place a slice on a microwave-safe plate. Add a cup of water next to it. This helps keep the crust from getting too chewy. Heat in 30-second intervals until warm. But remember, the microwave won't keep it crispy. For the best taste, the oven is your friend! Use these tips to enjoy your pizza even after the first delightful slice. For the full recipe, check out the complete article. To make your own basil pesto, you need a few simple ingredients. Combine fresh basil, garlic, pine nuts, Parmesan cheese, and olive oil in a food processor. Blend until smooth. Adjust the taste with salt and pepper. This mix adds great flavor to your pizza. Yes, you can freeze lemon basil pesto pizza. First, let the pizza cool completely. Then, wrap it in plastic wrap and place it in a freezer bag. It can last for up to three months. When you are ready to eat, bake it straight from the freezer. This makes a quick meal! Several side dishes pair well with lemon basil pesto pizza. Here are some of my favorites: - A light green salad with vinaigrette - Garlic bread for a crunchy side - Roasted vegetables for added flavor These sides balance the pizza's taste and make for a complete meal. To cut your pizza into even slices, use a sharp pizza cutter or knife. Start by cutting it in half, then cut each half into smaller sections. Aim for 8 slices for a standard pizza. This way, everyone gets a fair share! You can find high-quality pre-made pizza dough at many grocery stores. Look in the refrigerated section or the freezer aisle. Some local pizzerias also sell their dough. If you want a special option, check out artisan bakeries. They often have fresh dough made with quality ingredients. In this pizza guide, we covered essential ingredients, step-by-step instructions, and useful tips. You learned how to customize your pizza and store leftovers. Remember, fresh ingredients make a big difference in taste. If you try different toppings or variations, have fun with it! I believe cooking should be enjoyable and creative. Follow these steps, and you’ll create delicious pizza every time. Enjoy your cooking adventure!](https://dishtreats.com/wp-content/uploads/2025/06/c2cede7a-626b-4fd1-91be-1b09c425b287-768x768.webp)