S’mores No-Bake Cookies Simple and Tasty Treat
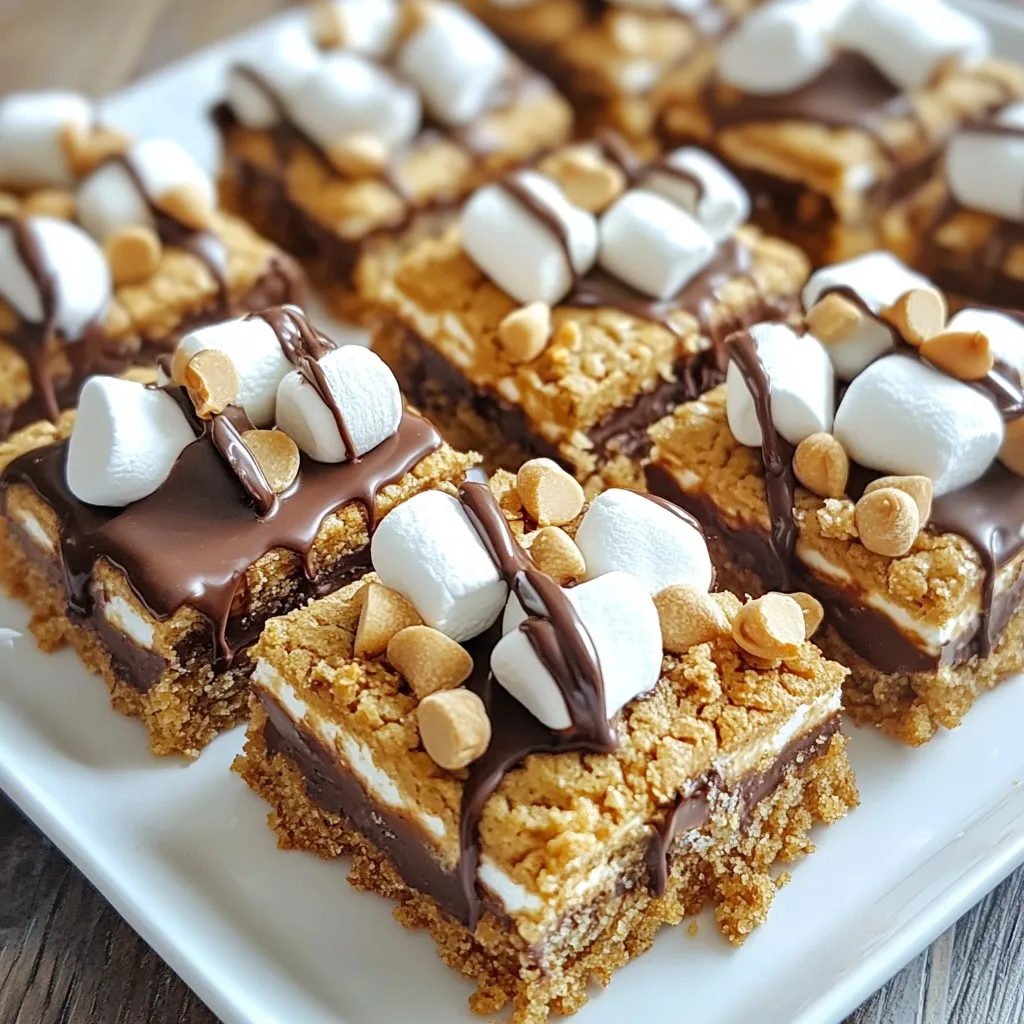
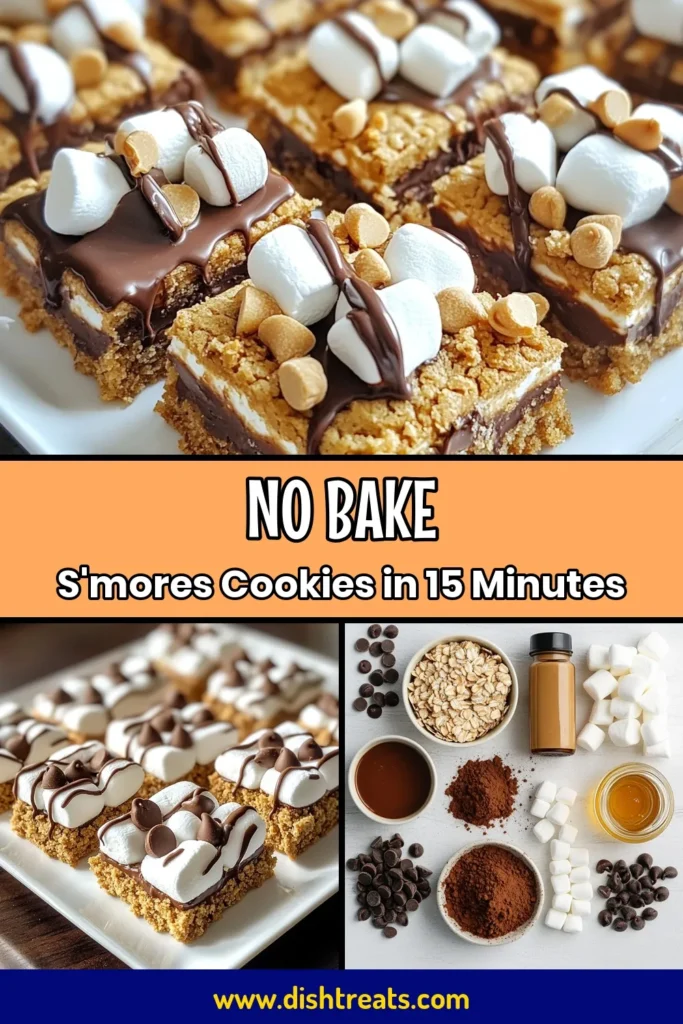
If you love s’mores but want a quicker way to enjoy them, I have the perfect treat for you—S’mores No-Bake Cookies! These simple cookies combine all the classic flavors of s’mores without the fuss of a campfire. You’ll mix up some easy ingredients and chill them to perfection. Get ready to impress family and friends with this tasty, no-bake delight that’s sure to satisfy your sweet tooth! Let’s dive into the recipe!
Why I Love This Recipe
- Easy to Make: This recipe requires no baking, making it a quick and simple treat to whip up any time of the year.
- Deliciously Indulgent: The combination of chocolate, marshmallows, and graham crackers brings the classic S’mores flavor without the campfire hassle.
- Customizable: You can easily swap out ingredients like the nut butter or sweetener to cater to your dietary preferences or what you have on hand.
- Perfect for Sharing: These cookie squares are great for parties, potlucks, or just enjoying with family, making them a crowd-pleaser.
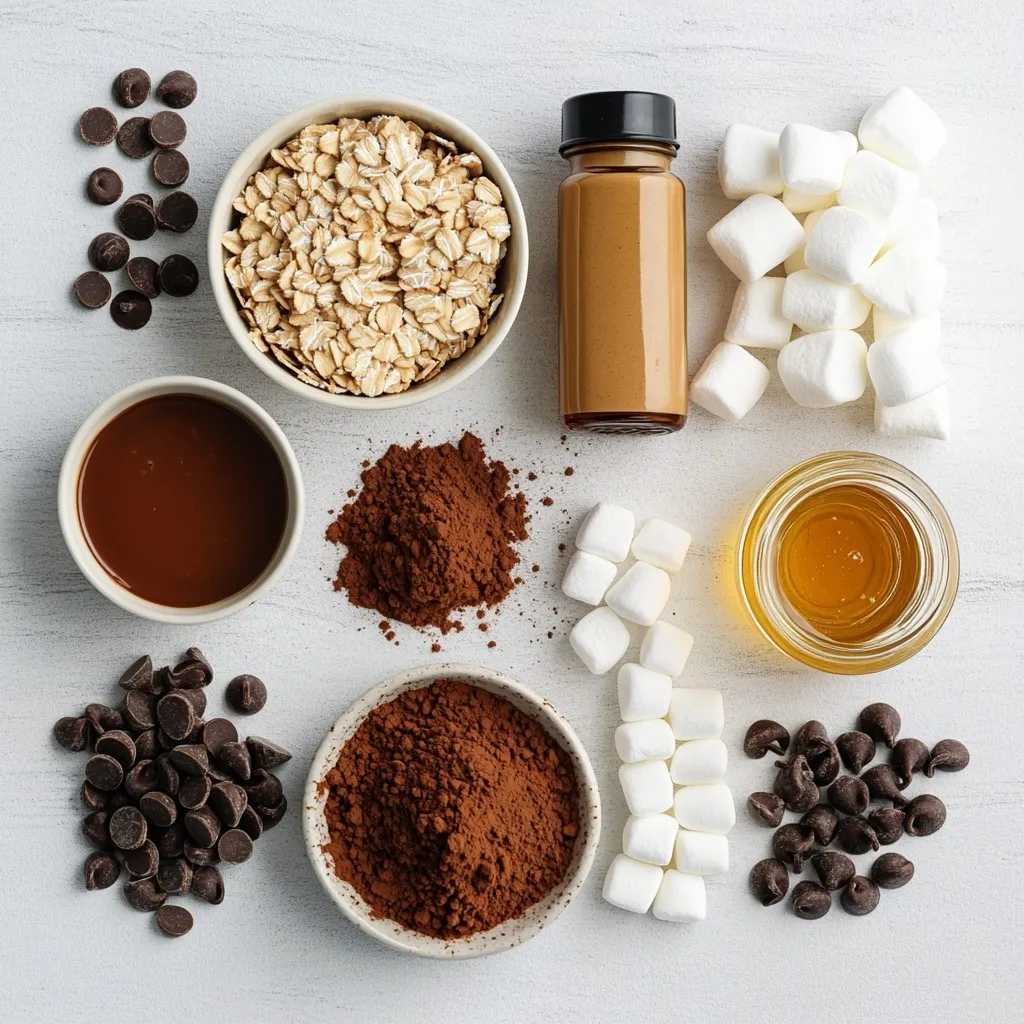
Ingredients
Complete List of Ingredients
To make S’mores No-Bake Cookies, gather these simple ingredients:
- 1 cup graham cracker crumbs
- 1 cup rolled oats
- 1/2 cup unsweetened cocoa powder
- 1/2 cup peanut butter (or almond butter for a nutty twist)
- 1/4 cup honey or maple syrup
- 1/2 teaspoon vanilla extract
- 1/2 cup mini marshmallows
- 1/2 cup chocolate chips
Measurement Conversions
If you need to convert measurements, here are some handy tips:
- 1 cup equals 8 fluid ounces.
- 1/2 cup is 4 fluid ounces.
- 1/4 cup is 2 fluid ounces.
- 1 teaspoon equals 5 milliliters.
Use these conversions for easy ingredient adjustments based on your needs or tools.
Suggested Replacements
If you have allergies or preferences, try these swaps:
- For nut-free, use sun butter or soy nut butter instead of peanut butter.
- Swap honey with agave syrup for a vegan option.
- Use gluten-free graham crackers if you need a gluten-free treat.
These replacements still keep the cookies tasty and fun!
Step-by-Step Instructions
Mixing Dry Ingredients
Start by grabbing a large mixing bowl. In this bowl, add 1 cup of graham cracker crumbs, 1 cup of rolled oats, and 1/2 cup of unsweetened cocoa powder. Make sure to mix these dry ingredients well. You can use a whisk or fork for this task. The goal is to blend them evenly, so every bite is tasty.
Preparing the Peanut Butter Mixture
Now, take a microwave-safe bowl. Add 1/2 cup of peanut butter and 1/4 cup of honey or maple syrup. Warm this mixture in the microwave for about 20-30 seconds. This step makes it easier to stir. Once it’s warm, mix in 1/2 teaspoon of vanilla extract. Stir until it’s smooth and well combined.
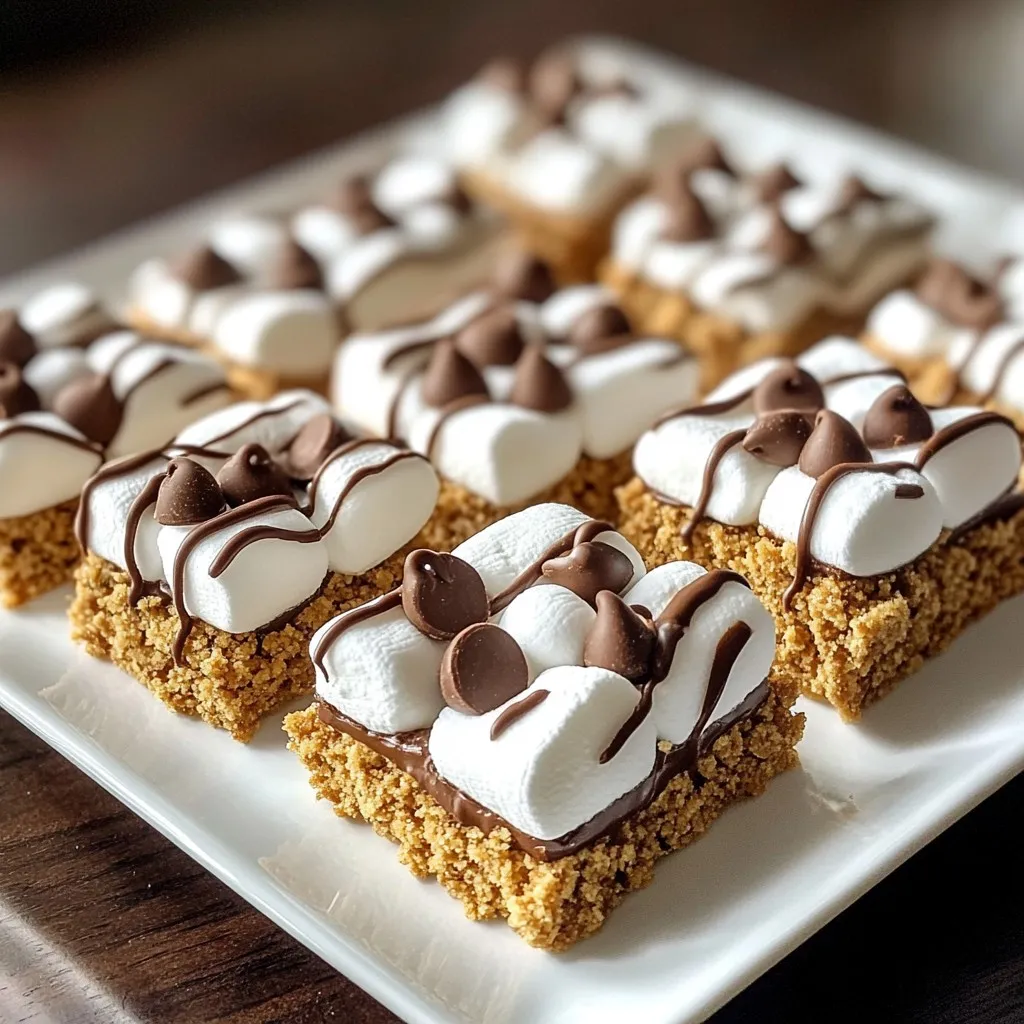
Forming and Chilling the Cookie Dough
Next, pour the warm peanut butter mixture into your dry ingredients bowl. Mix everything together until all the dry parts are coated. You want a sticky dough, but not too dry. If it feels dry, add a little more honey or peanut butter. Then, gently fold in 1/2 cup of mini marshmallows and 1/2 cup of chocolate chips.
Prepare an 8×8 inch baking dish by lining it with parchment paper. Let the paper hang over the edges for easy removal later. Spread the cookie mixture evenly in the dish. Press it down firmly to create a solid layer.
Now, place the dish in the fridge. Let it chill for at least 30 minutes. This step helps the cookies set and become firm. Once set, lift the cookies out using the parchment paper. Cut them into squares or bars, based on your choice.
Tips & Tricks
Best Practices for Mixing
Start by blending the dry ingredients well. Use a whisk or fork for even mixing. This helps the flavors mix better. You want the graham cracker crumbs, oats, and cocoa to combine fully. This step ensures every bite has a uniform taste.
How to Achieve the Right Texture
To get a good texture, warm the peanut butter and honey. This makes it easier to mix. If your dough feels too dry, add a bit more honey or peanut butter. The mixture should feel sticky but still hold together. Don’t over-mix when adding the marshmallows and chocolate chips. Gently fold them in to keep their shape.
Presentation Suggestions for Serving
For a beautiful display, place the cookie squares on a nice plate. Drizzle melted chocolate on top for extra flair. You can also sprinkle graham cracker crumbs and mini marshmallows for a fun touch. This makes your cookies look as good as they taste!
Pro Tips
- Chill for Best Texture: Allow the cookie mixture to chill longer than 30 minutes if you want a firmer texture. This will help them hold their shape better when sliced.
- Mix It Up: Experiment with different nut butters or sweeteners to customize the flavor. Almond butter adds a nice nuttiness, while agave syrup can be used for a vegan option.
- Keep It Fresh: Store these cookies in an airtight container in the refrigerator to maintain their freshness. They can last up to a week!
- Presentation Matters: For a fun twist, serve with a side of chocolate or marshmallow dip. Guests will love the interactive element!
Variations
Gluten-Free S’mores No-Bake Cookies
To make gluten-free S’mores no-bake cookies, swap the graham cracker crumbs for gluten-free crumbs. Many brands offer a great gluten-free version that tastes just as good. You can also check for oats labeled gluten-free. This ensures that your cookies stay safe for those with gluten allergies.
Vegan-Friendly Options
For a vegan twist, replace the honey with maple syrup. This keeps the sweet taste while making it plant-based. Use almond butter or peanut butter without added oils for a clean vegan option. Make sure your chocolate chips are dairy-free too. Many brands offer vegan chocolate that works perfectly in this recipe.
Flavor Add-Ins
You can add fun flavors to your cookies. Nuts like walnuts or almonds give a nice crunch. Dried fruits like cranberries or raisins offer a sweet touch. Try adding a pinch of cinnamon or a dash of sea salt to enhance the flavor. Just mix these extras into the dough when you combine the wet and dry ingredients. This makes each bite even more exciting!
Storage Info
How to Store Leftover Cookies
To keep your S’mores No-Bake Cookies fresh, place them in an airtight container. Stack the cookies with parchment paper between layers. This helps prevent them from sticking together. Store the container in a cool, dry place. If you keep them this way, they last for about 4 to 5 days.
Freezing Instructions
You can freeze these cookies for later enjoyment. First, cut the cookies into squares. Wrap each square in plastic wrap. Then, place the wrapped cookies in a freezer-safe bag or container. They can stay frozen for up to 2 months. When you’re ready to eat them, just pull them out and let them thaw at room temperature.
Best Practices for Maintaining Freshness
To maintain the best taste and texture, avoid exposing the cookies to air. Always seal the container tightly after each use. If you notice any condensation inside the container, dry it off before sealing. For added flavor, you can also store them with a slice of bread. The bread helps keep the cookies soft and fresh!
FAQs
Can I use other nut butters?
Yes, you can use different nut butters. Almond butter works well. Sunflower seed butter is a great nut-free choice. Each option adds a unique taste. They all mix well with the other ingredients. Just keep the same amount as the recipe says.
How long will these cookies keep?
These cookies can last up to one week in the fridge. Store them in an airtight container. If you want them to last longer, freeze them. They can stay fresh for up to three months in the freezer. Just remember to wrap them well to avoid freezer burn.
Can I add different toppings?
Absolutely! You can get creative with toppings. Try adding crushed nuts for crunch. Drizzle with melted chocolate for extra sweetness. Mini chocolate bars make a fun addition too. You can even sprinkle extra marshmallows on top. The options are endless!
In this post, we covered essential ingredients and their measurements. I shared tips on mixing and preparing your cookie dough for the best results. You learned about cooling, storing, and varying your cookie recipes.
When you try these methods, I hope you enjoy your cookies more. With practice, you’ll master these treats and impress your friends and family. Happy bakin

S'mores No-Bake Cookies
Ingredients
- 1 cup graham cracker crumbs
- 1 cup rolled oats
- 0.5 cup unsweetened cocoa powder
- 0.5 cup peanut butter (or almond butter for a nutty twist)
- 0.25 cup honey or maple syrup
- 0.5 teaspoon vanilla extract
- 0.5 cup mini marshmallows
- 0.5 cup chocolate chips
Instructions
- In a large mixing bowl, combine the graham cracker crumbs, rolled oats, and cocoa powder. Use a whisk or a fork to mix these dry ingredients thoroughly until well blended.
- Take a microwave-safe bowl and warm the peanut butter along with honey (or maple syrup) for about 20-30 seconds in the microwave, or until it becomes more fluid and easy to stir. Once warm, stir in the vanilla extract until fully incorporated.
- Pour the warm peanut butter mixture into the bowl with the dry ingredients. Mix everything together until all the dry ingredients are well-coated, forming a sticky but manageable dough. If you find the mixture too dry, add a touch more honey or peanut butter until you reach the desired consistency.
- Carefully fold in the mini marshmallows and chocolate chips, ensuring they are evenly distributed throughout the cookie dough without overly crushing them.
- Prepare an 8x8 inch baking dish by lining it with parchment paper, making sure it hangs over the edges for easy removal later. Transfer the cookie mixture into the dish, spreading it evenly and pressing down firmly to create a cohesive layer.
- Place the baking dish in the refrigerator and allow the cookies to chill for at least 30 minutes, or until they are set and firm to the touch.
- Once set, carefully lift the parchment paper to remove the cookies from the dish. Cut them into squares or bars, depending on your preference.