Cheesy Cauliflower Au Gratin Easy Comfort Food Dish


Are you looking for a warm, cheesy dish that will bring comfort to your table? My Cheesy Cauliflower Au Gratin is the perfect fix! This easy recipe mixes tender cauliflower with rich cheeses and a crispy topping. It’s delicious, satisfying, and ideal for a family meal or cozy night in. Let’s dive into how to whip up this creamy dish that will have everyone asking for seconds!
Why I Love This Recipe
- Deliciously Cheesy: This recipe features a rich, creamy cheese sauce that envelops the cauliflower, making every bite indulgently flavorful.
- Healthy Twist: Substituting traditional potatoes with cauliflower not only lowers the carbs but also adds a nutritious element to this classic dish.
- Easy to Prepare: With simple ingredients and straightforward steps, this recipe is perfect for both novice cooks and seasoned chefs alike.
- Customizable: You can easily adjust the cheeses and spices to suit your taste, allowing for endless variations of this comforting dish.
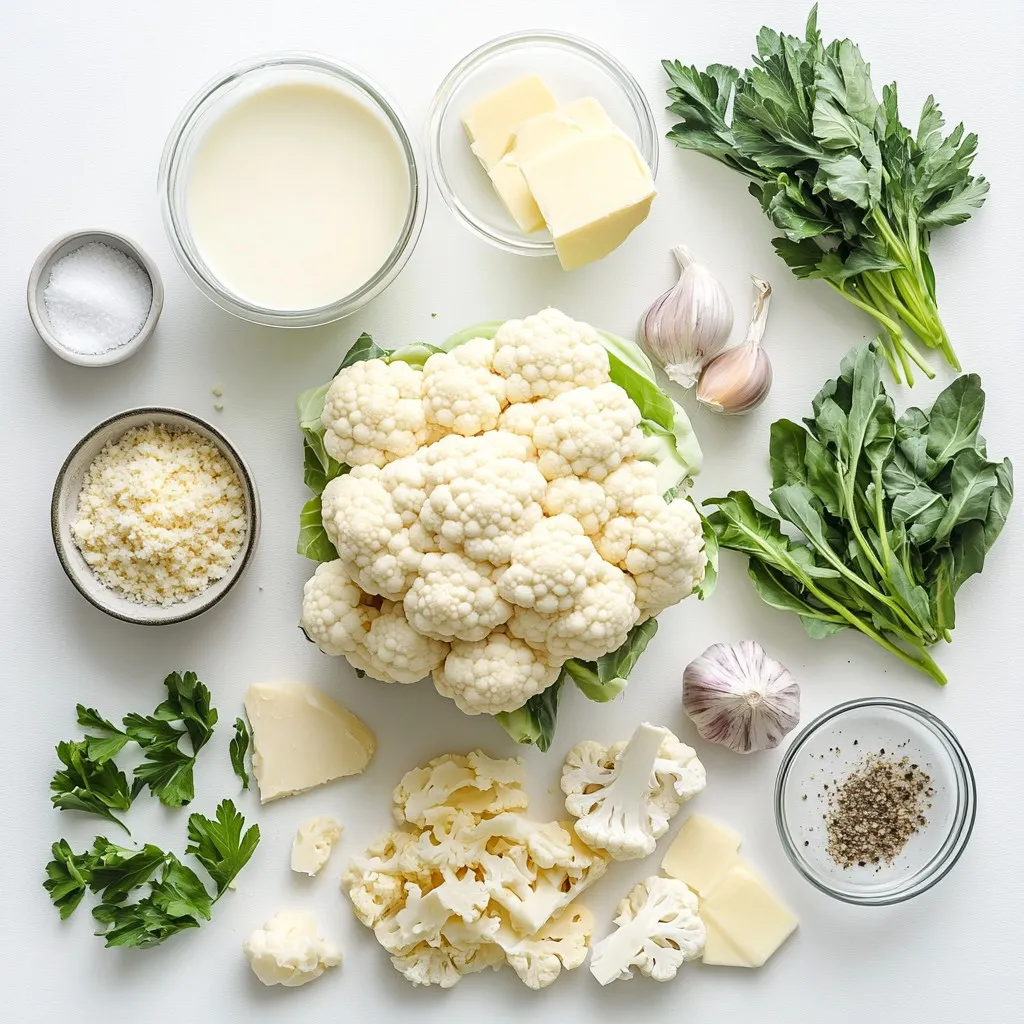
Ingredients
Main Ingredients for Cheesy Cauliflower Au Gratin
- 1 large head of cauliflower, broken into bite-sized florets
- 2 cups shredded sharp cheddar cheese, divided
- 1 cup grated Parmesan cheese
- 1 cup heavy cream
- 2 tablespoons unsalted butter
The main stars of this dish are cauliflower, cheese, cream, and butter. Cauliflower gives a nice crunch. Cheddar and Parmesan offer rich flavors. Heavy cream makes the sauce smooth and creamy. Butter adds a rich taste to the mix.
Seasonings and Add-Ins
- 3 cloves garlic, finely minced
- 1 teaspoon Dijon mustard
- 1/2 teaspoon freshly grated nutmeg
- Salt and freshly cracked pepper to taste
Garlic brings a nice aroma. Dijon mustard adds a bit of tang. Nutmeg gives depth to the dish. Salt and pepper are key for flavor balance.
Topping Ingredients
- 1/2 cup breadcrumbs
- A drizzle of olive oil
- Fresh parsley, finely chopped (for garnish)
Breadcrumbs help create a crispy top. Olive oil adds flavor and helps the crumbs brown. Fresh parsley adds a pop of color and freshness for serving.
Step-by-Step Instructions
Preparation Steps
1. Preheat your oven to 375°F (190°C). This helps cook the dish evenly.
2. Blanch the cauliflower: Bring a large pot of salted water to a boil. Add the cauliflower florets. Cook for 5 minutes. They should be tender but crisp. Drain and set aside.
3. Make the cheese sauce: In a medium saucepan, melt 2 tablespoons of unsalted butter over medium heat. Add 3 minced garlic cloves. Sauté for 1 minute until it smells great.
4. Gradually stir in 1 cup of heavy cream. Then add 1 teaspoon of Dijon mustard and 1/2 teaspoon of freshly grated nutmeg. Mix in 1 cup of shredded sharp cheddar cheese. Stir until the cheese melts and the sauce is smooth. Season with salt and pepper to taste.
Assembling the Dish
1. Fold the cauliflower: In a large mixing bowl, gently mix the blanched cauliflower with the cheese sauce. Make sure all pieces are coated well.
2. Layer the dish: Transfer the mixture to a greased 9×13 inch baking dish. Spread it out evenly.
3. Add more cheese: Sprinkle the remaining 1 cup of sharp cheddar cheese and all of the grated Parmesan cheese over the top.
4. Prepare the topping: In a small bowl, mix 1/2 cup of breadcrumbs with a drizzle of olive oil. Toss until well-coated. Spread this on top of the cheese layer.
Baking Instructions
1. Bake the dish: Place it in the preheated oven for 25-30 minutes. It’s done when the top is golden brown and bubbling.
2. Finishing touches: After baking, let the dish cool for a few minutes. Before serving, sprinkle fresh parsley on top for a pop of color.
Tips & Tricks
Perfecting the Cheese Sauce
To make a cheese sauce that is smooth and creamy, start by melting the butter. Add the minced garlic and let it cook for just a minute. Then, slowly stir in the heavy cream. This keeps the sauce from curdling. When the cream is warm, add the cheese. The heat helps it melt better. If the sauce feels thick, add a bit more cream.
For flavor, season with salt and pepper. Taste the sauce as you mix. Adjust the seasoning to your liking. A dash of nutmeg adds warmth and depth to the flavor.
Achieving the Perfect Bake
To get a golden crispy topping, sprinkle the breadcrumbs evenly over the cheese. Toss the breadcrumbs with olive oil before adding them. This helps them brown nicely while baking.
Bake the gratin for 25 to 30 minutes. Check it at the 25-minute mark. Look for a bubbly top with a golden color. If it needs more time, let it bake for a few more minutes.
Serving Suggestions
For the best presentation, serve the au gratin right from the baking dish. It looks rustic and inviting. If you want a fancier touch, spoon it onto individual plates. A sprig of parsley adds a pop of color.
Pair this dish with a fresh salad or roasted veggies for a complete meal. The crispness of the salad balances the rich cheese. Enjoy your comfort food dish!
Pro Tips
- Blanching Technique: Ensure your cauliflower is perfectly blanched by timing it carefully; it should be tender yet retain a slight crunch.
- Cheese Selection: For a more complex flavor, experiment with a mix of cheeses; Gruyère or fontina can add an extra layer of richness.
- Breadcrumb Topping: For added crunch, consider using panko breadcrumbs instead of regular ones; they create a lighter, crispier topping.
- Serving Suggestion: Pair this dish with a light salad or roasted vegetables to balance the richness of the cheese sauce.

Variations
Ingredient Swaps
You can change the cheese in this dish easily. Try using Gouda for a smoky taste or mozzarella for a milder flavor. Mixing different cheeses can make the gratin even more exciting. Add-ins like broccoli or spinach can boost nutrition. Both vegetables work well with the cheese sauce. You can also add cooked mushrooms for an earthy touch.
Dietary Modifications
If you need gluten-free options, skip the breadcrumbs. Use almond flour or crushed gluten-free crackers instead. For low-carb needs, you can swap cauliflower with zucchini. If you want a vegan version, use cashew cream instead of heavy cream. Nutritional yeast can replace cheese for a cheesy flavor without dairy.
Flavor Enhancements
Herbs and spices can elevate this dish. Try adding thyme or rosemary for extra aroma. A pinch of cayenne can add heat. If you enjoy meat, consider adding cooked bacon or ham. These meats add a savory touch. You can also mix in shrimp for a seafood twist. Both options make the dish heartier and more filling.
Storage Info
Storing Leftovers
To keep your Cheesy Cauliflower Au Gratin fresh, let it cool first. Place it in a clean container. I recommend using an airtight glass container. This helps prevent smells from other foods.
Reheating Instructions
When you want to eat leftovers, the best way to reheat is in the oven. Preheat the oven to 350°F (175°C). Warm it for about 15-20 minutes. This keeps the dish creamy and delicious. To avoid drying it out, cover it with foil while reheating.
Freezing Tips
If you want to freeze your au gratin, cool it completely first. Use a freezer-safe container. When ready to eat, thaw it overnight in the fridge. Reheat in the oven at 350°F (175°C) until hot. This way, you can enjoy it later without losing flavor.
FAQs
What can I substitute for heavy cream in this recipe?
You can use whole milk or half-and-half. These options create a lighter dish. For a dairy-free version, try unsweetened almond milk with a bit of coconut milk. This adds creaminess without the heaviness.
Can I use frozen cauliflower for this dish?
Yes, you can use frozen cauliflower. First, thaw it and drain excess water. This step keeps the dish from becoming too watery. Adjust the baking time, as frozen florets may need longer to cook through.
How long does Cheesy Cauliflower Au Gratin last in the fridge?
This dish lasts about three to five days in the fridge. Look for signs of spoilage like an off smell or mold. Store it in an airtight container to keep it fresh longer.
Cheesy Cauliflower Au Gratin is a delightful dish made with simple ingredients. We covered how to prepare the creamy cheese sauce and bake everything to golden perfection. Remember to experiment with different cheeses or add veggies for a twist. Storing leftovers carefully helps keep the dish tasty for later. Enjoy this dish alongside your favorite meals or make it a star on your table. With these tips, you’re ready to impress and enjoy a comforting, cheesy treat. Happy cookin

Cheesy Cauliflower Au Gratin
Ingredients
- 1 large head cauliflower, broken into bite-sized florets
- 2 cups shredded sharp cheddar cheese, divided
- 1 cup grated Parmesan cheese
- 1 cup heavy cream
- 2 tablespoons unsalted butter
- 3 cloves garlic, finely minced
- 1 teaspoon Dijon mustard
- 0.5 teaspoon freshly grated nutmeg
- to taste salt and freshly cracked pepper
- 0.5 cup breadcrumbs
- for garnish fresh parsley, finely chopped
Instructions
- Preheat your oven to 375°F (190°C).
- Bring a large pot of salted water to a rolling boil. Carefully add the cauliflower florets and blanch for 5 minutes until they are just tender but still crisp. Drain the florets and set them aside.
- In a medium saucepan, melt the unsalted butter over medium heat. Once melted, add the minced garlic and sauté for about 1 minute, or until fragrant but not browned.
- Gradually stir in the heavy cream, followed by the Dijon mustard and freshly grated nutmeg. Add half of the shredded sharp cheddar cheese (1 cup) and mix continuously until the cheese has melted and the sauce is smooth and creamy. Season the sauce with salt and pepper to your liking.
- In a large mixing bowl, gently fold the blanched cauliflower florets into the cheesy sauce, ensuring each piece is well-coated with the mixture.
- Transfer the cauliflower and cheese mixture into a greased 9x13 inch baking dish. Spread it out evenly for uniform cooking.
- Evenly sprinkle the remaining sharp cheddar cheese and all of the grated Parmesan cheese over the top of the cauliflower.
- In a small bowl, combine the breadcrumbs with a drizzle of olive oil, tossing until the breadcrumbs are evenly coated. Sprinkle this breadcrumb mixture generously over the cheese layer to create a crispy topping.
- Place the dish into the preheated oven and bake for 25-30 minutes. The gratin is ready when the top is golden brown and bubbling.
- After baking, let the dish cool for a few minutes. Before serving, garnish with finely chopped parsley for a fresh touch.
![To make a delicious Sweet Potato and Kale Hash, gather the following ingredients: - 2 medium sweet potatoes, peeled and diced into 1/2-inch cubes - 1 tablespoon extra virgin olive oil - 1 small onion, finely chopped - 2 cloves fresh garlic, minced - 1 bell pepper of your choice (red, green, or yellow), diced - 4 cups fresh kale, stems removed and leaves chopped - 1 teaspoon smoked paprika for a smoky flavor - 1/2 teaspoon ground cumin for warmth - Salt and freshly cracked pepper to taste - 2 large eggs (optional, for added protein) - Fresh parsley, chopped, for garnish These ingredients combine to create a hearty, flavorful dish. The sweet potatoes provide natural sweetness, while kale adds nutrition and color. The spices bring warmth and depth to the meal. If you choose to add eggs, they can make your hash more filling. This recipe celebrates whole, fresh foods that everyone will enjoy. For the full recipe, be sure to check out the detailed instructions! - Heating the oil: Start by placing a large skillet over medium heat. Add 1 tablespoon of extra virgin olive oil. Let the oil warm for about one minute. - Cooking sweet potatoes: Once the oil shimmers, add 2 medium sweet potatoes, peeled and diced into 1/2-inch cubes. Season them with salt and pepper. Sauté for 10-12 minutes. Stir occasionally until the sweet potatoes become tender and golden brown. - Sautéing onions and peppers: Next, add 1 small onion, finely chopped, and 1 bell pepper, diced. Cook for another 5 minutes. Stir often until the onion turns soft and translucent. - Adding aromatics: Stir in 2 cloves of minced garlic, 1 teaspoon of smoked paprika, and 1/2 teaspoon of ground cumin. Let this cook for 1-2 minutes. Stir frequently until the garlic smells fragrant and the spices blend well. - Incorporating kale: Add 4 cups of chopped kale to the skillet. Mix it well with the other ingredients. Cook for about 2-3 minutes until the kale wilts and softens. - Cooking eggs (optional): If you want to add protein, create small wells in the hash using the back of a spoon. Crack 2 large eggs into each well. Cover the skillet. Cook for 4-5 minutes, or until the egg whites are set but the yolks remain runny. - Finishing touches: Remove the skillet from heat. Taste the hash and adjust the seasoning with more salt and pepper if needed. Serve warm, garnished with fresh parsley. This dish is a wholesome meal in itself, packed with flavors and nutrients. For the full recipe, check out the detailed instructions above. - Ensuring even cooking for sweet potatoes Cut the sweet potatoes into even 1/2-inch cubes. This helps them cook at the same rate. When you sauté them, keep the heat at medium. Stir them occasionally to prevent sticking and promote browning. - Using fresh versus dried spices Fresh spices give a brighter taste. Try to use fresh garlic and smoked paprika for the best flavor. If you only have dried spices, use them but adjust the amount. Dried spices are stronger, so use less. - Best practices for sautéing kale Add the kale last, as it cooks quickly. Stir it in with the other ingredients for a couple of minutes. Cook until it wilts but remains bright green. This keeps the nutrients intact and enhances the dish's visual appeal. - Suggested pairings for the hash Serve the sweet potato and kale hash with toasted whole-grain bread. A slice of avocado on the side adds creaminess. You can also top it with salsa for a fresh kick. - Combining with proteins for a full meal Add eggs for protein. Cook them sunny-side up directly in the hash. You can also serve it with grilled chicken or turkey sausage for a hearty breakfast or brunch. For the complete recipe, check out the [Full Recipe]. {{image_4}} You can easily switch up the vegetables in this hash. Instead of sweet potatoes, try using: - Butternut squash for a sweeter taste. - Zucchini for a lighter option. - Mushrooms for added umami flavor. If you want a vegan dish, skip the eggs. You can still enjoy a hearty meal by adding: - Avocado for creaminess. - Tofu for protein. - Chickpeas for a filling option. The spices in this dish can change the whole flavor. You can adjust the seasoning to suit your taste: - Use curry powder for an Indian twist. - Try Italian herbs like oregano and basil for a Mediterranean flavor. If you like heat, you can add: - Red pepper flakes for a gentle kick. - Hot sauce for a bold flavor boost. These swaps keep your sweet potato and kale hash exciting and new each time! For the full recipe, check out the detailed instructions above. To keep your sweet potato and kale hash fresh, store it in an airtight container. This helps prevent moisture loss and keeps the flavors intact. The hash will stay good in the fridge for about 3 to 5 days. Make sure it cools down before sealing it. This way, it won’t steam inside the container. When it's time to reheat, you have a few good options. The best way is to use a skillet over medium heat. Add a touch of olive oil or water to keep it moist. Stir gently as it warms up. This method helps keep the texture just right. If you're in a hurry, you can use the microwave. Place the hash in a microwave-safe bowl. Cover it loosely with a paper towel to trap steam. Heat in short bursts, stirring in between, until warm. To refresh the dish, consider adding a squeeze of lemon or a sprinkle of fresh herbs. This adds brightness and makes the flavors pop again. Enjoy your meal! Yes, you can prepare this dish in advance. Cook the hash, let it cool, and store it in an airtight container. It will stay fresh in the fridge for up to three days. When you're ready to eat, just reheat it on the stove or in the microwave. Kale is a superfood packed with vitamins A, C, and K. It has lots of fiber, which helps digestion. Eating kale can boost your immune system and keep your bones strong. It also contains antioxidants, which help fight inflammation. To enhance the flavor of your hash, try adding different spices. A bit of chili powder can add heat. Fresh herbs like thyme or cilantro add freshness. You can also squeeze some lemon juice on top for a zesty kick. Consider using smoked salt for a deeper flavor. Absolutely! This hash works great for meal prep. You can make a big batch and separate it into containers. It’s easy to heat up for breakfast or lunch throughout the week. Plus, it tastes just as good reheated! For the full recipe, check out Savory Sweet Potato and Kale Hash. This blog post detailed how to create a tasty sweet potato and kale hash. I outlined the key ingredients and shared step-by-step cooking instructions. I also provided helpful tips and variations to fit your taste. In the end, this dish is simple and offers great nutrition. You can easily adjust it to suit your needs. Enjoy making this hash and feel free to get creative!](https://dishtreats.com/wp-content/uploads/2025/06/6b9629fe-c0a6-4f89-abcf-b289cc15d1fb-768x768.webp)

![- 1 lb (450g) chicken breast, thinly sliced - 1 cup fresh Thai basil leaves, packed - 3 cloves garlic, minced - 2 red Thai chili peppers, thinly sliced (adjust based on your spice preference) For this dish, I prefer chicken breast. It cooks quickly and stays juicy. Fresh Thai basil gives this meal its unique flavor. Garlic adds a nice aroma, and Thai chili peppers bring heat. You can control the spice by adding more or less chili. - 2 tablespoons soy sauce - 1 tablespoon oyster sauce (or substitute with mushroom sauce for vegetarian) - 1 tablespoon fish sauce (or an extra tablespoon of soy sauce for vegetarian) - 1 teaspoon sugar (to balance flavors) - 1 tablespoon vegetable oil (for frying) These sauces are key to great taste. Soy sauce offers saltiness, while oyster and fish sauces add depth. Sugar balances the salty flavors, making everything taste better. - 1 bell pepper, sliced (your choice of color for visual appeal) - 1 small onion, sliced into thin wedges - Optional: other vegetables for added nutrition I like using bell pepper and onion for color and crunch. You can add other veggies like carrots or snap peas. They bring more nutrition and flavor, making the dish more vibrant. For the full recipe, refer to the [Full Recipe]. To start, you need to combine the chicken with the sauces. In a medium bowl, add the sliced chicken breast, soy sauce, oyster sauce, fish sauce, and sugar. Mix these ingredients well so the chicken gets all the flavor. Let it marinate for 15 minutes. This short time helps the chicken absorb the tasty sauces. Next, heat the vegetable oil in a large skillet or wok over medium-high heat. You want the oil to shimmer before adding anything. Then, add the minced garlic and sliced Thai chili peppers. Stir-fry them for about 30 seconds until they smell amazing. Be careful not to burn the garlic. Now, add the marinated chicken to the pan. Spread it out evenly for even cooking. Stir-fry for about 5 to 7 minutes. Cook until the chicken is no longer pink and has a nice brown color. After that, toss in the sliced bell pepper and onion. Stir-fry for another 3 to 4 minutes. This will make the vegetables tender but still crisp. Once the chicken and veggies are done, take the skillet off the heat. Gently fold in the fresh Thai basil leaves. They will wilt quickly from the heat and add a lovely aroma. Serve the dish hot, over a bed of fluffy jasmine rice. This rice complements the stir-fry well. Enjoy your Thai Basil Chicken Stir-Fry! For the full recipe, check out the details above. Using fresh ingredients makes a big difference. Fresh Thai basil gives a sweet and fragrant flavor to the dish. Always choose bright green basil leaves. They should smell strong and sweet. The chicken should be fresh, too. This keeps your stir-fry tasty and safe to eat. For the best flavor, cook on high heat. A hot pan helps to sear the chicken. This adds a nice caramel color and enhances the taste. When you add garlic and chili, cook them quickly. This brings out their strong flavors without burning them. You can change the heat level easily. If you want it milder, remove the seeds from the chili peppers. You can also use fewer peppers or substitute with sweet bell peppers. If you like a kick but want it less spicy, try adding sugar. It balances the heat. You can also use a bit of honey for sweetness without heat. Pair your Thai basil chicken stir-fry with jasmine rice. The rice absorbs the sauce well. You can also add a side of steamed veggies for extra nutrition. For garnishes, consider adding lime wedges or crushed peanuts. They add color and crunch. Fresh cilantro or extra basil leaves also make it pop. Enjoy your meal with these simple touches! For the full recipe, check out the details above. {{image_4}} For a vegetarian or vegan version, you can swap chicken for tofu or tempeh. These options give a nice texture. Use mushroom sauce instead of oyster sauce. It brings depth and umami flavor. For the fish sauce, simply add an extra tablespoon of soy sauce. This keeps the taste bold. To maintain flavor, marinate the tofu or tempeh just like chicken. Allow it to soak up the sauces. When cooking, make sure to press out excess moisture. This helps achieve that nice, crispy texture we all love. If you want to try something new, switch the chicken for shrimp or beef. Shrimp cooks quickly, so cut down the cooking time to about 3-4 minutes. Beef takes longer. Slice it thin and cook it for about 6-8 minutes. Remember, cooking times change based on what protein you use. Always make sure your protein is fully cooked before adding in the veggies. Want to shake things up? Add sauces like teriyaki or sriracha for an exciting twist. Teriyaki gives a sweet flavor, while sriracha adds heat. You can even mix both for a sweet and spicy kick. Feel free to experiment with herbs and spices too. Adding cilantro or mint can brighten the dish. Try a sprinkle of lime juice for an extra zest. These tiny changes can create a whole new taste experience. For the full recipe, check the section above. Enjoy cooking! To keep your Thai basil chicken stir-fry fresh, store it in an airtight container. Refrigerate the leftovers within two hours of cooking. If you want to save it longer, freeze the stir-fry. Make sure to cool it completely before freezing. This method helps retain flavor and texture. When you reheat your stir-fry, use a skillet for the best results. Heat it over medium warmth and stir often. This keeps the chicken juicy and prevents it from drying out. For rice, add a splash of water and cover it. This helps the rice steam and become fluffy again. In the fridge, your Thai basil chicken stir-fry lasts up to four days. If frozen, it can last for about three months. Always check for off smells or changes in color. If you see these, it's best to discard it for safety. Thai Basil Chicken Stir-Fry has roots in Thai street food. This dish reflects the vibrant flavors of Thai cuisine. It showcases fresh herbs, bold spices, and simple cooking techniques. Thai basil, known for its unique flavor, is key to this dish. It adds a sweet and slightly spicy note that enhances the chicken. This meal represents the balance of sweet, salty, and spicy tastes typical in Thai dishes. Each bite transports you to bustling markets in Thailand. Yes, you can prepare Thai basil chicken stir-fry in advance. Cook and store it in the fridge for up to three days. To keep it fresh, store it in an airtight container. When you are ready to eat, simply reheat it on the stove. This dish tastes even better the next day as flavors meld. Serve it over freshly cooked jasmine rice for a quick meal. If you cannot find Thai basil, you have options. Sweet basil or holy basil works well as a substitute. Sweet basil offers a milder flavor, while holy basil is spicier. You can also mix in a bit of mint for a fresh twist. While these substitutes change the taste slightly, they still create a tasty dish. Just remember, the flavor will differ from the original recipe. The spice level of Thai Basil Chicken Stir-Fry can vary. It depends on the number of Thai chili peppers you use. Typically, this dish has a mild to medium heat. If you prefer a milder dish, use fewer chilis or remove the seeds. For those who love heat, add extra chilis or a dash of hot sauce. Adjusting spice levels allows everyone to enjoy this flavorful meal. Thai Basil Chicken Stir-Fry is a simple yet flavorful dish. You learned about the key ingredients, like fresh basil and chicken. The step-by-step instructions make cooking easy, even for beginners. We explored tips to enhance flavor and adjust spice levels to suit your taste. You can even try fun variations with different proteins or herbs. Enjoy making it your own, and savor the fresh flavors. Every bite will bring joy to your table.](https://dishtreats.com/wp-content/uploads/2025/06/20a2f9de-1755-4b6a-ade1-393123d10e24-768x768.webp)
. It takes about 20 minutes to cook garlic butter steak bites. You spend 10 minutes prepping the ingredients and another 10 minutes cooking them. This quick cook time makes it easy to enjoy a tasty meal in no time. Yes, you can use other cuts of steak. Ribeye, filet mignon, or flank steak work well. Just remember to adjust the cooking time based on the cut you choose. Each cut has its own flavor and texture, so pick one you like best. You can serve garlic butter steak bites with various sides. Here are some great options: - Creamy mashed potatoes - Sautéed vegetables like green beans or broccoli - Fresh salad with light dressing - Crispy garlic bread These sides add flavor and balance to your meal. You can also use toothpicks for easy serving at parties or gatherings. For more ideas, check out the Full Recipe for garlic butter steak bites. It offers tips on presentation and other serving suggestions. In this post, we covered how to make garlic butter steak bites using simple ingredients. You learned about the key steps, from preparing the steak to combining it with garlic butter. We also shared tips for cooking and presented flavor variations to try. Finally, we discussed storage tricks and answered common questions. Keep this recipe handy for a quick and tasty meal. Enjoy your cooking and the delicious bites you create!](https://dishtreats.com/wp-content/uploads/2025/06/daf37226-e56f-491f-87e9-6665894a306e-768x768.webp)