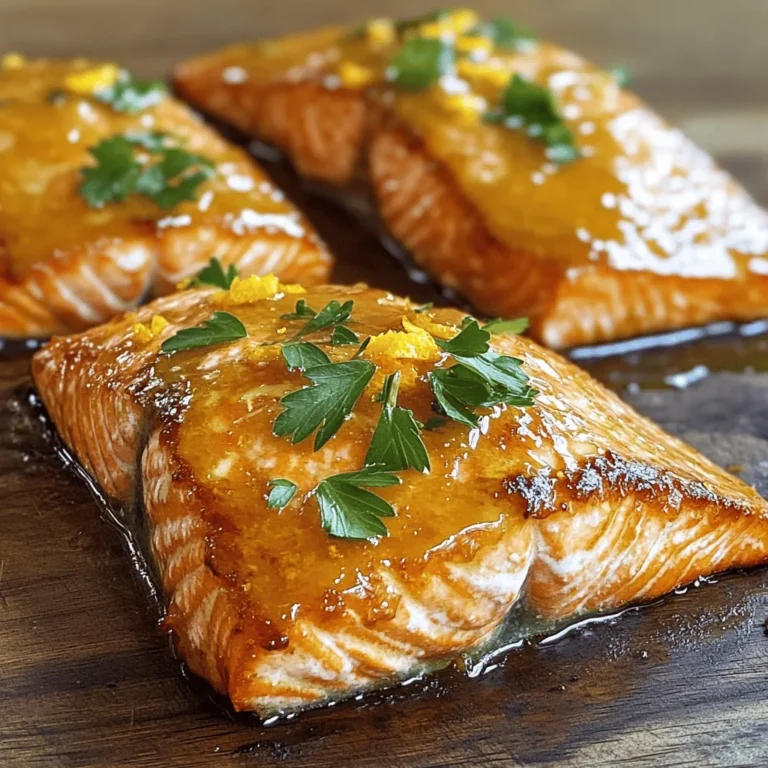
Sheet Pan Lemon Garlic Chicken Delight Recipe


Ready to savor a meal that’s easy and full of flavor? My Sheet Pan Lemon Garlic Chicken Delight Recipe combines juicy chicken thighs with crisp veggies and zesty lemon. It’s a one-pan wonder that saves time on cooking and cleanup. Whether you’re a busy parent or a first-time cook, this dish will impress and satisfy. Let’s dive into the simple steps to create this tasty dinner!
Why I Love This Recipe
- Easy One-Pan Meal: This recipe simplifies dinner prep by combining protein and veggies on a single sheet pan, making cleanup a breeze.
- Zesty Flavor Profile: The combination of lemon, garlic, and herbs creates a bright and delicious flavor that elevates the chicken and vegetables.
- Customizable Veggies: Feel free to swap in your favorite seasonal vegetables, making this dish versatile for any time of the year.
- Family-Friendly: With its simple ingredients and appealing presentation, this dish is sure to please both kids and adults at the dinner table.
Ingredients
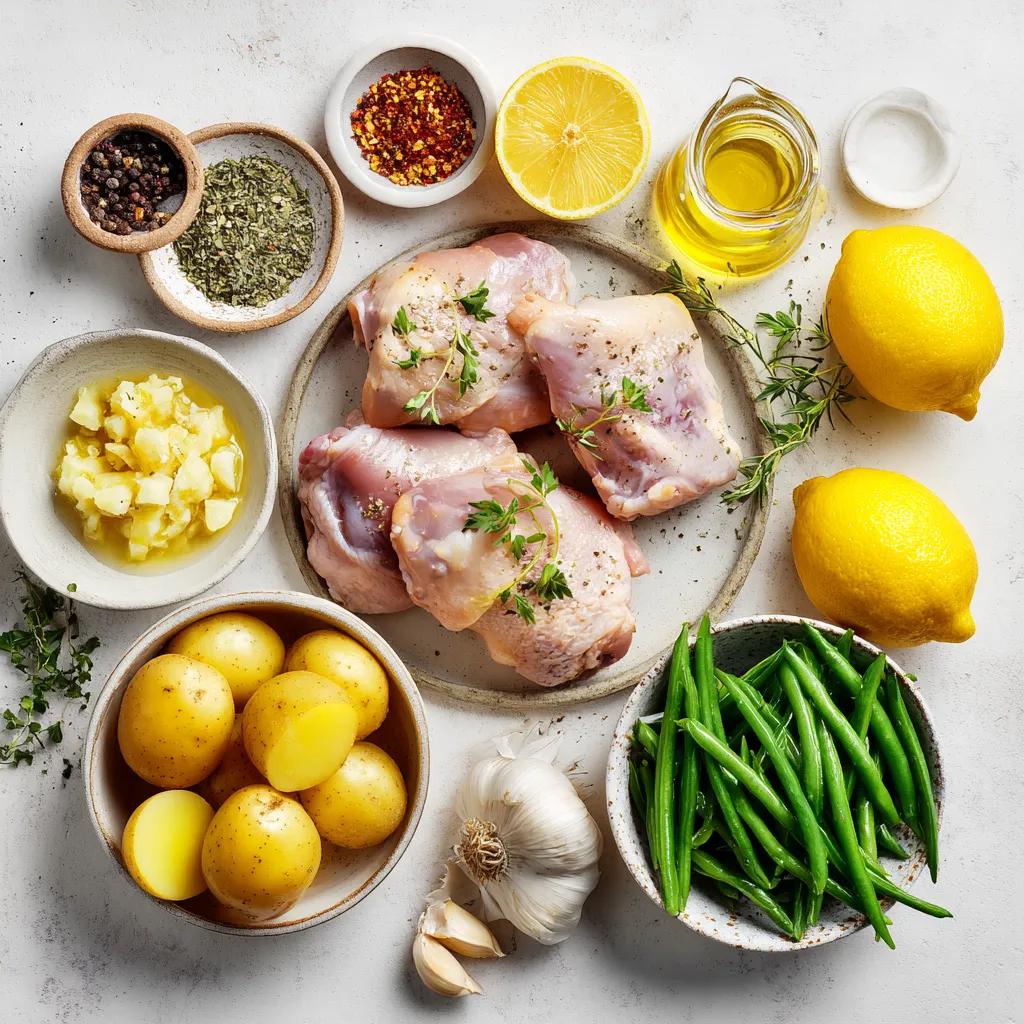
Complete List of Ingredients
- 4 boneless, skinless chicken thighs
- 2 lemons (1 for juice and 1 for slicing)
- 6 cloves garlic, minced
- 1 teaspoon dried oregano
- 1 teaspoon paprika
- ½ teaspoon red pepper flakes (optional, for a spicy kick)
- 3 tablespoons olive oil
- Salt and pepper to taste
- 1 pound baby potatoes, halved
- 1 cup green beans, trimmed
- Fresh parsley, chopped (for garnish)
Kitchen Tools Needed
- Large mixing bowl
- Whisk
- Sheet pan
- Knife
- Cutting board
- Measuring spoons
- Meat thermometer
Measuring Tips
When measuring ingredients, use dry measuring cups for solids and liquid measuring cups for liquids. For spices, level off with a knife for accuracy. If you want fresh lemon juice, roll the lemon on the counter before cutting. This helps release more juice. Always taste as you go; it’s the best way to adjust flavors!
Step-by-Step Instructions
Preheating the Oven and Marinating the Chicken
Start by preheating your oven to 425°F (220°C). This step is key for even cooking. While the oven heats, grab a big bowl. In it, mix the juice of 1 lemon, minced garlic, oregano, paprika, red pepper flakes, olive oil, and a pinch of salt and pepper. This marinade is full of flavor.
Add the chicken thighs to the bowl. Make sure they are well coated in the marinade. For the best taste, let them sit for at least 15 minutes. If you have time, two hours is even better.
Prepping the Vegetables
While the chicken marinates, it’s time to prep your veggies. Take 1 pound of baby potatoes and cut them in half. Also, trim 1 cup of green beans. In a separate bowl, toss the potatoes and green beans with a splash of olive oil, salt, and pepper. This helps them cook evenly and adds flavor.
Assembling the Sheet Pan Dish
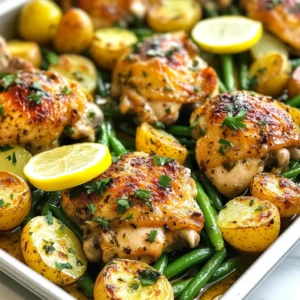
Grab a large sheet pan. Place the marinated chicken thighs in the center. Surround the chicken with the seasoned baby potatoes and green beans. Spread them out so they can cook well. Now, slice the second lemon into thin rounds. Place these lemon slices on top of the chicken and among the veggies. This adds flavor and makes the dish look pretty.
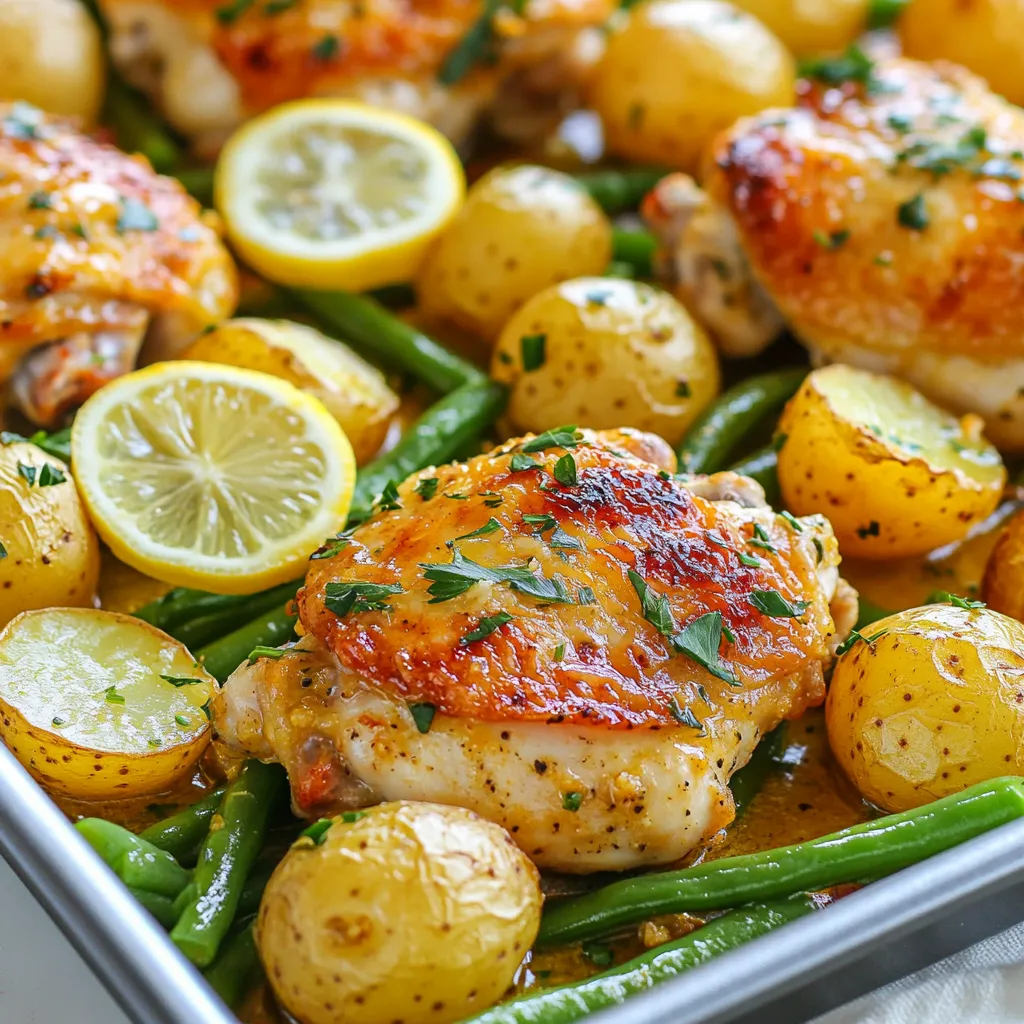
Baking the Chicken and Vegetables
Now it’s time to bake! Slide the sheet pan into your preheated oven. Bake for about 25 to 30 minutes. The chicken should reach 165°F (75°C) when done, and the potatoes should be tender. Once baked, carefully take the pan out. Let it rest for a few minutes. This helps the juices settle.
Before serving, sprinkle fresh parsley on top for a pop of color and taste. Enjoy your meal!
Tips & Tricks
Marinating for Maximum Flavor
For the best taste, marinate the chicken. Use the juice from one lemon and mix it with garlic, olive oil, and spices. Let the chicken sit in this mixture for at least 15 minutes. If you have more time, aim for two hours. This extra time helps the flavors soak in deeply, making your chicken juicy and tasty.
Ensuring Even Cooking
To make sure everything cooks well, spread the vegetables out on the sheet pan. Place the chicken in the center, surrounded by the potatoes and green beans. This setup allows the heat to circulate. Keep the pieces apart, so they don’t steam each other. Check the chicken’s internal temperature at 165°F for safety and best flavor.
Alternative Herbs and Seasonings
Feel free to switch up the herbs and spices. If you want a different taste, try fresh thyme or rosemary. You can also use lemon zest for extra zing. For a unique twist, add some cumin or curry powder. These changes can bring new life to your sheet pan dish. Experiment and find what you love!
Pro Tips
- Marinate Longer: For deeper flavor, marinate the chicken thighs for at least 2 hours, or overnight if possible.
- Use Fresh Herbs: Fresh parsley or other herbs can elevate the dish; consider adding thyme or rosemary for an aromatic twist.
- Uniform Vegetable Cutting: Cut the baby potatoes and green beans to similar sizes to ensure even cooking and tenderness.
- Check Doneness with a Thermometer: Always use a meat thermometer to ensure the chicken reaches an internal temperature of 165°F (75°C) for safety.
Variations
Substituting Chicken Cuts
You can switch up the chicken cuts for this recipe. If you prefer, use chicken breasts instead of thighs. Breasts cook faster, so check for doneness at 20-25 minutes. Skin-on cuts add a nice crispiness, but use a bit more oil to balance the flavors.
Vegetable Options
Feel free to mix in different veggies. Zucchini, bell peppers, or asparagus work well. Just chop them into similar sizes to ensure even cooking. If you use heartier vegetables like carrots, add them to the pan first, as they take longer to cook.
Adding Different Spices
Experiment with spices to change the flavor. Try cumin for a warm taste, or rosemary for a fresh twist. If you like heat, add more red pepper flakes. You can also use lemon zest for extra brightness. Mix and match spices to find your perfect blend!
Storage Info
Best Practices for Storing Leftovers
Store your leftover lemon garlic chicken in an airtight container. Make sure the chicken and veggies cool down before sealing. This keeps them fresh. You can store it in the fridge for up to three days. If you want to keep it longer, freezing is a great option.
Reheating Instructions
To reheat, take the chicken and veggies out of the fridge. Preheat your oven to 350°F (175°C). Place the food in an oven-safe dish. Cover it with foil to keep it moist. Heat for about 20 minutes, or until warm. You can also use a microwave if you’re short on time. Just heat in short bursts to avoid drying it out.
Freezing Tips and Tricks
For freezing, make sure the chicken and veggies cool completely. Place them in freezer-safe bags or containers. Remove as much air as possible to prevent freezer burn. You can freeze the dish for up to three months. When ready to eat, thaw it overnight in the fridge. Then, follow the reheating instructions above. Enjoy the flavors even after freezing!
FAQs
How long does it take to cook sheet pan lemon garlic chicken?
Cooking sheet pan lemon garlic chicken takes about 25 to 30 minutes in a preheated oven at 425°F (220°C). Make sure the chicken reaches an internal temperature of 165°F (75°C) to ensure it’s safe to eat. The baby potatoes should also be tender for the best taste.
What can I serve with this dish?
You can serve many things alongside this dish. A fresh salad pairs well, adding crunch and color. Rice or quinoa can soak up the lemony juices. For a hearty meal, garlic bread or crusty rolls work great too. Feel free to get creative with your sides!
Can I use boneless chicken breasts instead of thighs?
Yes, you can use boneless chicken breasts in this recipe. They may cook faster, so check them earlier, about 20 to 25 minutes. Chicken breasts are leaner, so they might dry out quicker than thighs. To keep them juicy, marinate well and watch the cooking time.
How can I make this recipe healthier?
To make this recipe healthier, you can do a few things. Swap baby potatoes for sweet potatoes or cauliflower for lower carbs. Use less olive oil in the marinade. Add more vegetables, like bell peppers or zucchini, for extra fiber and nutrients. These tweaks keep the dish tasty and nutritious!
This blog post covered everything you need for delicious sheet pan lemon garlic chicken. You learned about the right ingredients and kitchen tools. The step-by-step guide makes cooking easy. Tips for flavor and cooking help you get the best results. You can even explore variations with different vegetables or spices.
Remember to store leftovers safely and follow reheating tips. Enjoy cooking this dish and make it your ow
Zesty Sheet Pan Lemon Garlic Chicken
Ingredients
- 4 pieces boneless, skinless chicken thighs
- 2 pieces lemons (1 for juice and 1 for slicing)
- 6 cloves garlic, minced
- 1 teaspoon dried oregano
- 1 teaspoon paprika
- 0.5 teaspoon red pepper flakes (optional)
- 3 tablespoons olive oil
- to taste salt and pepper
- 1 pound baby potatoes, halved
- 1 cup green beans, trimmed
- for garnish fresh parsley, chopped
Instructions
- Begin by preheating your oven to 425°F (220°C) to ensure it's hot and ready for baking.
- In a spacious mixing bowl, whisk together the juice of 1 lemon, minced garlic, dried oregano, paprika, red pepper flakes (if using), olive oil, and a generous pinch of salt and pepper.
- Once combined, add the chicken thighs to the bowl, ensuring they are thoroughly coated in the marinade. Allow them to marinate for a minimum of 15 minutes, ideally 2 hours.
- During the marinating time, prep your veggies. Toss the halved baby potatoes and trimmed green beans in a drizzle of olive oil, along with a sprinkle of salt and pepper.
- On a large sheet pan, arrange the marinated chicken thighs in the center. Surround the chicken with the seasoned potatoes and green beans.
- Slice the second lemon into thin rounds and nestle these lemon slices on top of the chicken and among the vegetables.
- Place the sheet pan in the preheated oven and bake for 25-30 minutes until the chicken reaches an internal temperature of 165°F (75°C) and the potatoes are tender.
- Once baked to perfection, carefully remove the sheet pan from the oven and allow it to rest for a few moments.
- Before serving, garnish the dish with freshly chopped parsley.