Mexican Street Corn Salad Fresh and Flavorful Recipe

Are you ready to delight your taste buds with a vibrant dish? Mexican street corn salad is fresh and full of flavor. In this recipe, I’ll show you how to make this crowd-pleasing salad step by step. Learn about the best ingredients, tips for cooking corn, and so much more. Let’s dive into this delicious recipe that will transform your meals, from picnics to dinner parties!
Why I Love This Recipe
- Fresh Flavors: This salad combines the sweetness of fresh corn with zesty lime and creamy dressing, creating a burst of flavor in every bite.
- Easy Preparation: With just a few simple steps, you can whip up this delicious salad in no time, making it perfect for quick meals or gatherings.
- Customizable Heat: Add jalapeño for a spicy kick or leave it out for a milder version, making this dish adaptable to everyone’s taste preferences.
- Perfect for Any Occasion: This vibrant salad is not only a crowd-pleaser at barbecues and parties but also makes a great side dish for any meal.
Ingredients
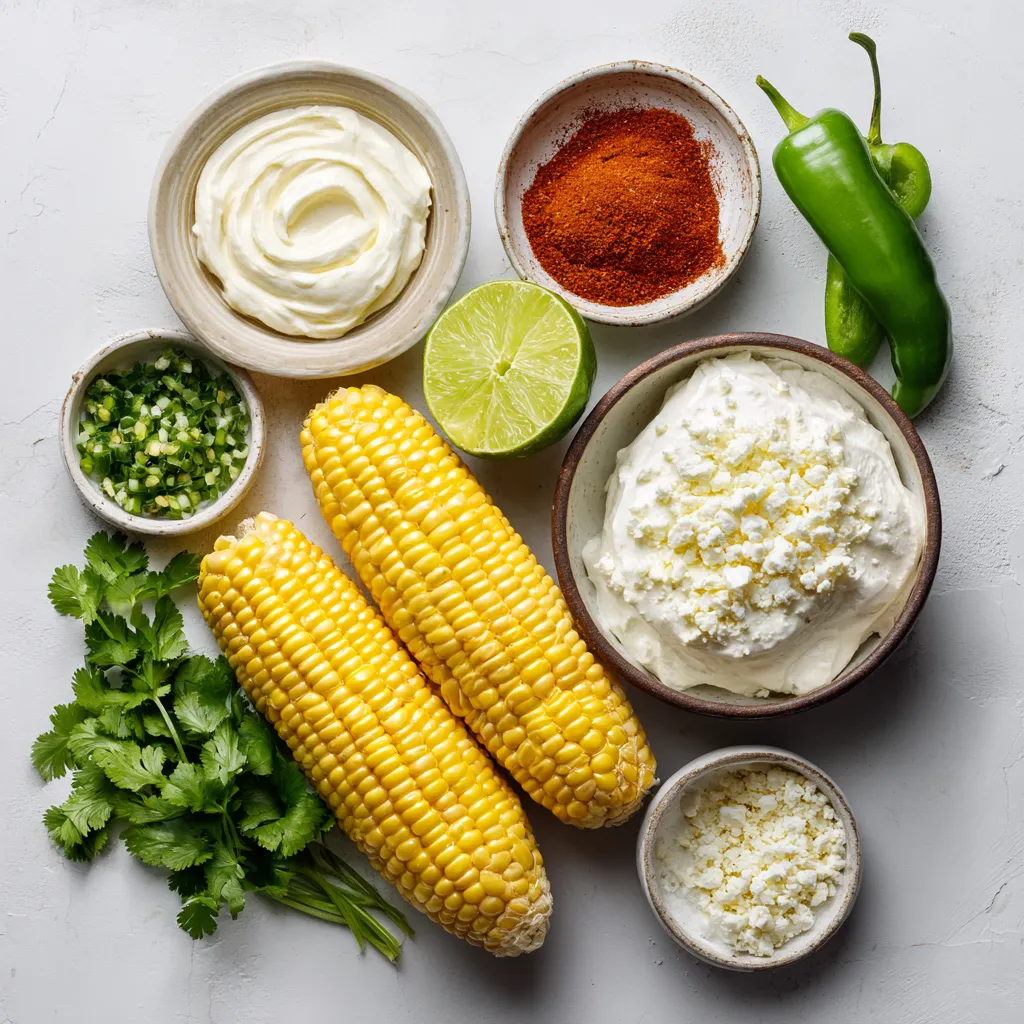
List of Ingredients for Mexican Street Corn Salad
- 4 fresh ears of corn, husked
- 1/2 cup creamy mayonnaise
- 1/4 cup sour cream
- 1 teaspoon chili powder
- 1/2 teaspoon smoked paprika
- Juice of 1 lime
- 1/2 cup Cotija cheese, crumbled
- 1/4 cup fresh cilantro, chopped
- Salt and freshly ground pepper to taste
- 1 jalapeño, finely diced (optional)
Description of Each Ingredient and Its Role
- Fresh corn brings sweetness and crunch. It is the star of the salad.
- Mayonnaise adds creaminess and binds all the flavors together.
- Sour cream gives a tangy taste and smooth texture.
- Chili powder adds warmth and a hint of spice.
- Smoked paprika enhances the flavor with a subtle smokiness.
- Lime juice brings brightness and balances the creaminess.
- Cotija cheese contributes a salty kick and creamy texture.
- Fresh cilantro adds a burst of freshness and color.
- Salt and pepper enhance all the flavors in the dish.
- Jalapeño adds heat for those who like a spicy kick.
Recommended Freshness for Ingredients
Use fresh corn for the best flavor. Look for bright yellow kernels. The mayonnaise and sour cream should be fresh and well within their expiration dates. Always choose firm and bright green cilantro. If you use jalapeño, pick one that is firm with smooth skin. Fresh ingredients make a big difference in taste.

Step-by-Step Instructions
Detailed Cooking Steps for Preparing the Corn
Start by boiling water in a large pot. Once the water bubbles, add the husked corn. Cook it for about 5 to 7 minutes. You want the corn tender but still crisp. After cooking, remove the corn and let it cool on a plate. When it’s cool enough, use a sharp knife to cut off the kernels. Let the kernels fall into a big mixing bowl.
Instructions for Making the Dressing
In a different bowl, mix the mayonnaise and sour cream. Add in the chili powder, smoked paprika, lime juice, salt, and pepper. Whisk everything together until it’s smooth and creamy. This dressing is key to the salad’s flavor. You want it to coat every kernel well.
Tips for Combining Ingredients Properly
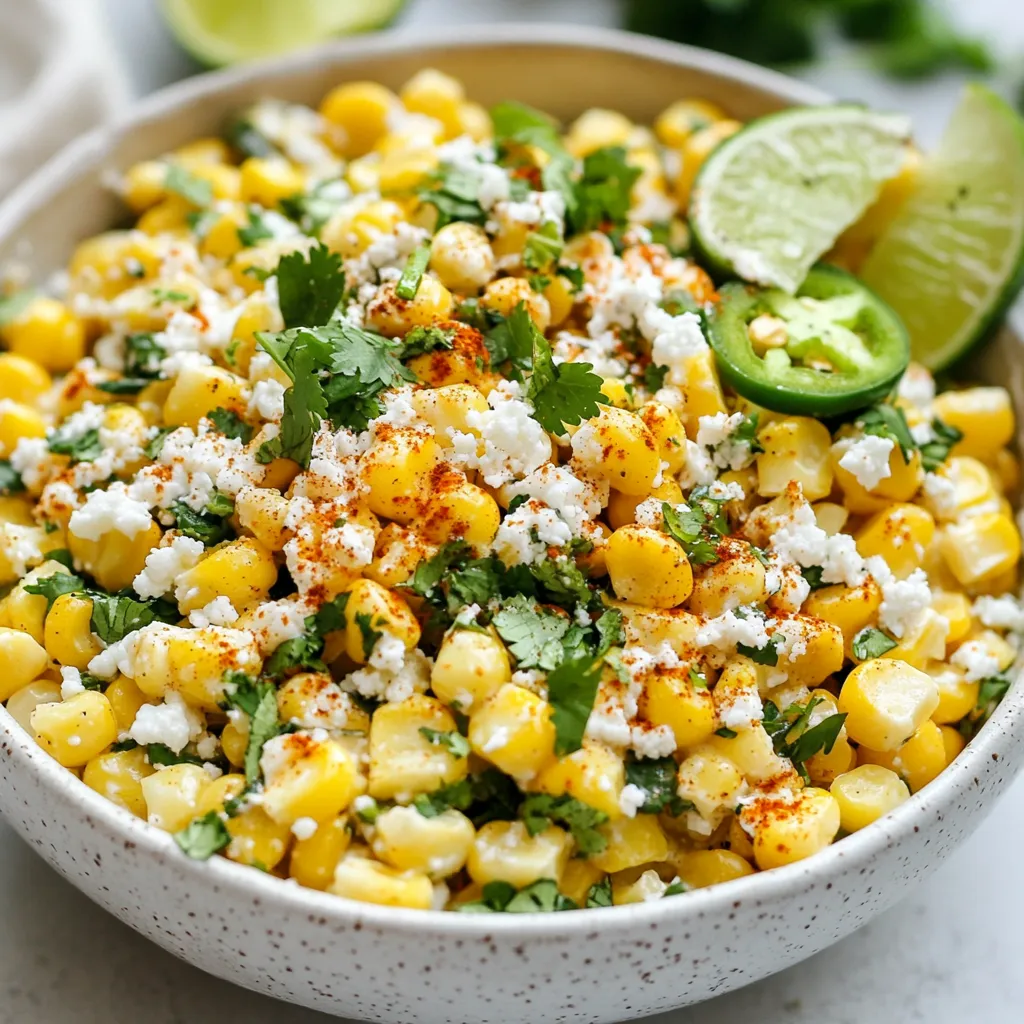
Now, pour the dressing over the corn kernels. Use a spatula or wooden spoon to gently toss them. Make sure every kernel gets coated. Next, fold in the Cotija cheese, chopped cilantro, and diced jalapeño if you like heat. Be careful not to over-mix; just combine until everything is evenly mixed. Taste the salad and adjust the seasoning, adding more lime juice or salt if needed. Cover the bowl and refrigerate for at least 30 minutes. This helps all the flavors blend nicely.
Tips & Tricks
Perfecting Grilled vs Boiled Corn
Grilling corn adds a smoky flavor. To grill, soak the corn in water for 30 minutes. Then, grill it for about 10 minutes. Turn it often until it is charred. Boiling is simpler and retains the corn’s sweetness. Boil for 5 to 7 minutes until tender. Both methods are great for this salad. Choose based on your taste preference.
Enhancing Flavor with Additional Seasoning
Chili powder and smoked paprika are key spices in this salad. They give it a warm, spicy kick. You can add garlic powder for depth or cumin for an earthy taste. If you love spice, try adding cayenne pepper or extra jalapeño. Always taste as you go to find the right balance.
How to Achieve the Best Texture
For the best texture, use fresh corn. Fresh corn has a crisp bite that canned or frozen corn cannot match. When cutting the kernels, be careful not to over-mix. This keeps the corn intact and crunchy. Also, refrigerate the salad for at least 30 minutes. This helps the flavors blend and improves texture.
Pro Tips
- Fresh Corn is Key: Always use fresh corn for the best flavor. Frozen corn can be a substitute, but fresh corn will provide that sweet, juicy crunch that makes this salad special.
- Customize the Heat: If you’re unsure about spice levels, start with half the jalapeño and gradually add more to taste. You can also use different types of peppers for varied heat profiles.
- Let it Chill: Allowing the salad to sit in the fridge for at least 30 minutes enhances the flavors. It allows the dressing to soak into the corn, resulting in a more delicious dish.
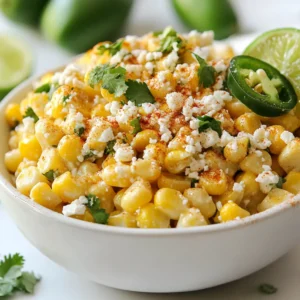
- Garnish for Impact: Elevate your presentation by garnishing with additional Cotija cheese and a sprinkle of chili powder. Fresh lime wedges on the side add a pop of color and a burst of freshness.

Variations
Adding Different Cheeses for Unique Flavor
You can swap Cotija cheese for others. Try feta for a tangy taste. Use queso fresco for a milder flavor. Each cheese brings its own twist. You can also mix cheeses for more depth. A blend of Cotija and cheddar adds creaminess and sharpness. Experiment and find your favorite!
Spice Level Adjustments and Alternatives
Want more heat? Add diced jalapeño to the mix. For a different kick, try diced serrano peppers. You can also use hot sauce in the dressing. Start with a few drops and taste as you go. If you prefer mild flavors, skip the jalapeño. The salad still tastes great without it.
Substitutions for Dietary Needs
Need a dairy-free option? Use vegan mayo and a plant-based sour cream. For gluten-free, all ingredients are safe! If you can’t find corn on the cob, use canned corn instead. Just drain it well before mixing. These swaps keep the salad tasty while meeting dietary needs.
Storage Info
How to Store Leftovers Properly
To keep your Mexican Street Corn Salad fresh, use an airtight container. This helps stop air from getting in. Make sure to cool the salad before sealing it. If you have a lot left, divide it into smaller portions. This way, you can grab just what you need.
Best Practices for Keeping Ingredients Fresh
Store all ingredients in the fridge until you are ready to use them. Keep the corn in its husk until you cook it. For the Cotija cheese, wrap it tightly in plastic wrap. This will keep it moist. The cilantro should stay in a damp paper towel inside a bag. This keeps it fresh longer.
Recommended Duration for Refrigeration
You can store the salad in the fridge for up to three days. After that, the flavors may change. If you notice any off smells or flavors, it’s best to toss it out. Enjoy it while it’s fresh for the best taste!
FAQs
What is the origin of Mexican Street Corn Salad?
Mexican Street Corn Salad, or Elote Salad, comes from Mexico. It takes inspiration from elote, which is grilled corn on the cob. Vendors often coat the corn in creamy sauces, chili powder, and cheese. This salad version mixes those flavors into a fresh dish. You get the same great taste but in a fun, easy-to-eat way.
Can I make this salad ahead of time?
Yes, you can make this salad ahead of time. In fact, it tastes better after chilling for a while. I recommend preparing it a few hours before serving. Just keep it covered in the fridge until you are ready to eat. The flavors blend nicely this way.
What can I serve with Mexican Street Corn Salad?
You can serve this salad with many dishes. Here are a few ideas:
- Grilled chicken or shrimp for a protein boost.
- Tacos or burritos for a full Mexican meal.
- A side of rice or quinoa for a hearty option.
- Chips and salsa for a fun snack to enjoy.
Each of these pairs brings out the fresh flavors in the salad. Enjoy your meal!
Mexican Street Corn Salad combines fresh ingredients, easy steps, and handy tips for great flavor. Remember, using the right corn and dressing enhances your dish’s taste. You can customize it with different cheeses and spices to suit your needs. Store leftovers properly, and enjoy this salad for days. This meal is not just tasty; it’s also fun to make. Try it out and impress your family with this delicious recip

Mexican Street Corn Salad Delight
Ingredients
- 4 ears fresh corn, husked
- 0.5 cup creamy mayonnaise
- 0.25 cup sour cream
- 1 teaspoon chili powder
- 0.5 teaspoon smoked paprika
- 1 lime Juice of
- 0.5 cup Cotija cheese, crumbled
- 0.25 cup fresh cilantro, chopped
- to taste Salt and freshly ground pepper
- 1 jalapeño finely diced (optional)
Instructions
- Begin by bringing a large pot of water to a rolling boil. Once boiling, carefully add the husked corn. Cook the corn for about 5 to 7 minutes, or until it’s tender yet crisp. Once cooked, remove the corn from the pot and allow it to cool slightly on a plate.
- After the corn has cooled enough to handle, use a sharp knife to carefully slice the kernels off the cob, letting them fall into a large mixing bowl.
- In a separate bowl, combine the mayonnaise and sour cream. Then, sprinkle in the chili powder, smoked paprika, lime juice, salt, and pepper. Whisk these ingredients together until the mixture is smooth and creamy.
- Pour the dressing mixture over the freshly cut corn kernels. Using a spatula or wooden spoon, gently toss the corn until every kernel is well coated in the dressing.
- Next, fold in the crumbled Cotija cheese, chopped cilantro, and diced jalapeño (if you’re looking for that extra heat). Be careful not to over-mix, just combine until everything is evenly distributed.
- Taste the salad and adjust the seasonings as necessary. You can add more lime juice for acidity or sprinkle in additional salt and pepper according to your preference.
- Once prepared, cover the bowl with plastic wrap and refrigerate the salad for at least 30 minutes. This step will allow the flavors to meld beautifully.
- When you’re ready to serve, take the salad out of the refrigerator. Serve it chilled or at room temperature, and for a beautiful presentation, top with extra Cotija cheese and a light dusting of chili powder for garnish.


![To make roasted garlic hummus, gather these essential ingredients: - 1 cup canned chickpeas, rinsed and drained - 1/4 cup tahini - 1/4 cup extra virgin olive oil - 1 whole head of garlic - 2 tablespoons freshly squeezed lemon juice - 1/2 teaspoon ground cumin - Sea salt, to taste - Water, as needed These ingredients work together to create a creamy and delicious hummus. The chickpeas provide a smooth base, while tahini adds richness. Roasted garlic brings a sweet, mellow flavor that transforms the dish. To elevate your hummus, consider these optional garnishes: - Chopped fresh parsley - Smoked paprika Adding these garnishes gives your hummus a pop of color. Fresh parsley adds a touch of brightness, while smoked paprika contributes a subtle warmth. You will need a few key tools to prepare your hummus: - Food processor - Aluminum foil - Baking sheet A food processor is essential for achieving a smooth texture. Aluminum foil helps roast the garlic evenly, while a baking sheet supports the garlic in the oven. For the full recipe, check out the complete guide to making roasted garlic hummus. Enjoy the process and get ready for a tasty treat! To start, I preheat my oven to 400°F (200°C). This heat helps the garlic roast well. Next, I take a whole head of garlic and cut off the top. I make sure to expose the tops of the cloves. Then, I drizzle a little olive oil over the cloves. This step helps the garlic stay moist. I wrap the garlic in aluminum foil tightly and place it in the oven. I roast it for about 30-35 minutes. The cloves should turn soft and golden brown. After roasting, I let it cool for a few minutes. In my food processor, I add 1 cup of rinsed chickpeas and 1/4 cup of tahini. Then, I squeeze in 2 tablespoons of lemon juice and add 1/2 teaspoon of ground cumin. I also sprinkle in some sea salt. Next, I squeeze the roasted garlic cloves from their skins into the bowl. I usually use three to four cloves for a great flavor. I blend everything until it becomes smooth and creamy. While blending, I slowly drizzle in 1/4 cup of extra virgin olive oil. If the hummus feels too thick, I add water by the tablespoon until I like the texture. Once my hummus is smooth, I taste it to check if it needs more salt or lemon juice. This step is key for flavor balance. I then transfer the hummus to a serving bowl. I drizzle a bit of olive oil on top to add richness. For a pop of color, I garnish it with chopped parsley and a sprinkle of smoked paprika. To serve, I love pairing the hummus with fresh pita bread or sliced veggies. This makes for a great snack or appetizer. You can find the Full Recipe [here]. To get the right texture, start with good chickpeas. Use canned chickpeas for ease. Rinse and drain them well to remove excess salt. When blending, add olive oil slowly. If your hummus is too thick, add water a bit at a time. This makes it smooth and creamy. Roasted garlic is the star here, but you can add more flavor. Try adding herbs like fresh parsley or basil. A pinch of smoked paprika gives a nice kick. For a zestier taste, add more lemon juice. Taste as you go—this is key! One big mistake is not roasting the garlic enough. Soft, golden cloves bring the best flavor. Another common error is adding too much water at once. This can make your hummus runny. Lastly, don’t forget to taste your blend. Adjusting salt and lemon juice helps create a balanced dip. For the full recipe, refer to the main article. {{image_4}} You can change the flavor of your hummus easily. Adding herbs like basil or cilantro gives a fresh taste. For a warm twist, try adding spices like smoked paprika or chili powder. Just a pinch can turn your dip into a flavor explosion. Mix in fresh herbs or spices after blending for the best taste. While chickpeas are classic, other beans work well too. White beans, like cannellini, add creaminess. Black beans offer a rich, earthy flavor. You can even use lentils for a different texture. Each bean brings its own taste. Feel free to swap them out and explore new flavors. If you love heat, this spicy hummus is for you. Start with the full recipe and add heat! After blending, mix in chopped jalapeños or a splash of hot sauce. You can also use crushed red pepper for a milder kick. This spicy version pairs well with crunchy veggies or pita chips, making your snack time exciting. To keep your roasted garlic hummus fresh, store it in an airtight container. This helps prevent exposure to air, which can lead to spoilage. Always let the hummus cool completely if you just made it. Once cooled, cover it tightly and place it in the fridge. You can freeze hummus for later use. Portion it into smaller containers. This makes it easy to thaw only what you need. Leave a little space at the top of the container. Hummus expands when frozen. When you’re ready to eat it, thaw it in the fridge overnight. Stir well before serving. Homemade roasted garlic hummus lasts about five to seven days in the fridge. Check for any off smells or changes in color. If you see any mold, it’s best to throw it away. Fresh hummus should have a smooth texture and rich aroma. Keeping these tips in mind helps you enjoy your hummus at its best. Don't forget to check the [Full Recipe] for the perfect hummus experience! Roasted garlic can last about one week in the fridge. Store it in a sealed container. If you want to keep it longer, you can freeze it. Roasted garlic freezes well and can last up to three months. Yes, you can use fresh garlic, but the flavor will be different. Fresh garlic is sharp and strong, while roasted garlic is sweet and mild. If you want a more intense garlic taste, add a small amount of fresh garlic to your hummus. Start with one clove and adjust to your taste. Roasted garlic offers many health benefits. It can help boost your immune system. It also may lower blood pressure and improve heart health. Roasted garlic is rich in antioxidants, which fight free radicals. Plus, it can aid digestion and add flavor to meals without extra fat or salt. Enjoying roasted garlic in hummus gives you these benefits in a tasty way. This blog covered all you need for tasty roasted garlic hummus. We explored key ingredients, helpful tools, and the easy steps for making hummus. You learned tips to get the right texture and boost flavor. We shared fun variations to try, plus essential storage advice. Roasted garlic hummus is simple and fun to make. Enjoy the process and don't hesitate to get creative with your flavors! Remember, practice makes perfect.](https://dishtreats.com/wp-content/uploads/2025/06/4ccbc263-5457-4179-8ada-bd86b908b6b9-768x768.webp)


![- 1 can (15 oz) chickpeas, thoroughly drained and rinsed - 1 cup cherry tomatoes, halved - 1 cucumber, diced into bite-sized pieces - 1 bell pepper (any color), diced - 1/4 red onion, finely chopped - 1/4 cup fresh basil leaves, roughly chopped - Juice of 1 large lemon (about 2 tablespoons) - 3 tablespoons high-quality extra-virgin olive oil - Salt and black pepper to taste - 1/4 teaspoon garlic powder - 1/4 teaspoon red pepper flakes (optional, for a bit of heat) In this Lemon Basil Chickpea Salad, the key ingredients make all the difference. Chickpeas are the star of the show. They add protein and a nice bite. The fresh produce items like cherry tomatoes, cucumbers, and bell peppers bring color and crunch. The red onion adds a mild zing. Fresh basil gives that lovely aroma and flavor. The dressing components are just as important. The lemon juice adds brightness, while the olive oil provides richness. Garlic powder adds depth, and the optional red pepper flakes can give it a kick. This mix creates a delightful balance of flavors. - Additional vegetables - Herbs and spices You can easily customize this salad. Feel free to add more vegetables. Some great options are carrots, radishes, or even avocado. These extras can add different textures and flavors. You can also play with herbs and spices. Try adding cilantro for a fresh twist or cumin for an earthy note. The beauty of this salad lies in its versatility. You can make it your own while keeping it fresh and vibrant. For the full recipe, check out the details above. First, gather your ingredients. Grab a large mixing bowl. Add the chickpeas that you drained and rinsed. Next, toss in the halved cherry tomatoes. After that, add the diced cucumber, diced bell pepper, and finely chopped red onion. Now, it's time for the fresh basil. Gently mix the chopped basil leaves into the bowl. This adds a bright, fresh flavor. For the dressing, take a small bowl. Combine the lemon juice, extra-virgin olive oil, garlic powder, salt, and black pepper. If you like heat, add red pepper flakes. Whisk these together until smooth. This zesty dressing will tie everything together nicely. Drizzle the dressing over your salad in the mixing bowl. Now, use clean hands or a large spoon to toss everything together. Make sure all the ingredients get coated with the dressing. After tossing, taste your salad. Adjust the seasoning if needed. You might want more salt, pepper, or lemon juice for extra flavor. Let the salad sit for at least 10 minutes. This resting time helps the flavors blend. You can serve it chilled or at room temperature, whichever you prefer. For presentation, serve your salad in a large, shallow bowl. You can also use individual plates if you like. Garnish with a sprinkle of chopped basil and a few whole cherry tomatoes. This makes a beautiful display. Consider pairing this salad with crusty bread or pita chips. These sides add nice texture and balance to the meal. For the full recipe, check the earlier section. Enjoy! To keep your Lemon Basil Chickpea Salad fresh, store it in an airtight container. This helps prevent air from spoiling the flavors. Place it in the fridge right after serving. It will stay good for about three days. If you notice extra liquid forming, drain it before serving again. This keeps the salad from getting soggy. To maintain the crispness of the veggies, avoid mixing in the dressing until you're ready to eat. Prepping this salad ahead of time is easy and smart. You can chop the veggies and rinse the chickpeas a day before. Just store them separately in the fridge. This saves time when you're ready to serve. Allowing the salad to rest for at least 10 minutes before serving enhances the flavors. Letting the chickpeas soak up the lemon dressing makes each bite burst with taste. For the best results, try to make it a few hours in advance. The flavors will only get better! For the Full Recipe, visit the main article. {{image_4}} You can make your Lemon Basil Chickpea Salad even better with protein. For vegetarians, great options include: - Tofu: Firm tofu adds a nice texture. - Quinoa: This grain packs protein and adds a nutty taste. - Edamame: These young soybeans give a pop of color and flavor. If you want to add meat or seafood, here are some ideas: - Grilled Chicken: Slice it thin for easy mixing. - Shrimp: Cooked shrimp adds a sweet and savory twist. - Tuna: Canned tuna is a quick and tasty option. You can change the flavor of your salad with different dressings. Try these options: - Balsamic Vinaigrette: Sweet and tangy, it pairs well with veggies. - Honey Mustard: Adds a sweet zing that brightens the salad. - Avocado Dressing: Creamy and rich, it makes the salad feel special. Consider adding seasonal ingredients too. Use: - Corn: Fresh corn is sweet and crunchy in summer. - Avocado: Creamy avocados add richness in spring. - Roasted Squash: Perfect for fall, it adds warmth and flavor. For more recipes, check out the Full Recipe! The Lemon Basil Chickpea Salad packs a punch of nutrients. Each serving has about 200 calories. Most of these calories come from healthy fats and proteins. The salad offers: - Protein: Chickpeas are a great source. You get about 10 grams per serving. - Carbohydrates: The salad contains around 25 grams, mostly from chickpeas and veggies. - Fats: With olive oil, you’ll find about 9 grams of healthy fats. This dish also shines with vitamins and minerals: - Vitamin A: From bell peppers and tomatoes, good for your vision. - Vitamin C: The lemon juice and tomatoes boost your immune system. - Iron: Chickpeas provide iron, helping with blood health. This salad is very friendly for many diets. - Vegan-friendly attributes: The recipe uses no animal products. All ingredients are plant-based. This makes it perfect for vegans. - Gluten-free status: All the ingredients are gluten-free. You can enjoy this salad without worry if you have gluten sensitivity. Enjoy this fresh and colorful salad knowing it supports a healthy lifestyle! For the complete recipe, check out the [Full Recipe]. Lemon Basil Chickpea Salad lasts about 3 to 5 days in the fridge. To store it, place it in an airtight container. This keeps the salad fresh and safe to eat. Make sure to check for any changes in smell or color before eating leftovers. Yes, you can use dried chickpeas! First, soak 1 cup of dried chickpeas in water for 8 hours or overnight. After soaking, drain and rinse them. Then, cook them in a pot with water for about 1 to 1.5 hours, or until tender. Drain and let them cool before adding to your salad. This salad pairs well with many dishes. Consider serving it with grilled chicken or fish for protein. You can also add pita bread or crusty bread for a complete meal. For a lighter option, enjoy it with a fresh fruit salad. To add some heat, mix in red pepper flakes. Start with 1/4 teaspoon, then taste and adjust. You can also add diced jalapeños or hot sauce for extra kick. This will give your salad a nice spicy twist! For the full recipe, check the [Full Recipe]. This blog post covered how to make a Lemon Basil Chickpea Salad. We discussed key ingredients like chickpeas and fresh veggies, plus optional add-ins. You learned step-by-step instructions for mixing and tossing the salad. I shared storage tips and variations to suit your taste. In closing, this salad is simple, healthy, and flexible. Enjoy experimenting with flavors and combinations to make it your own!](https://dishtreats.com/wp-content/uploads/2025/07/d3747d36-0043-45e0-9a82-fe789303a34f-768x768.webp)
