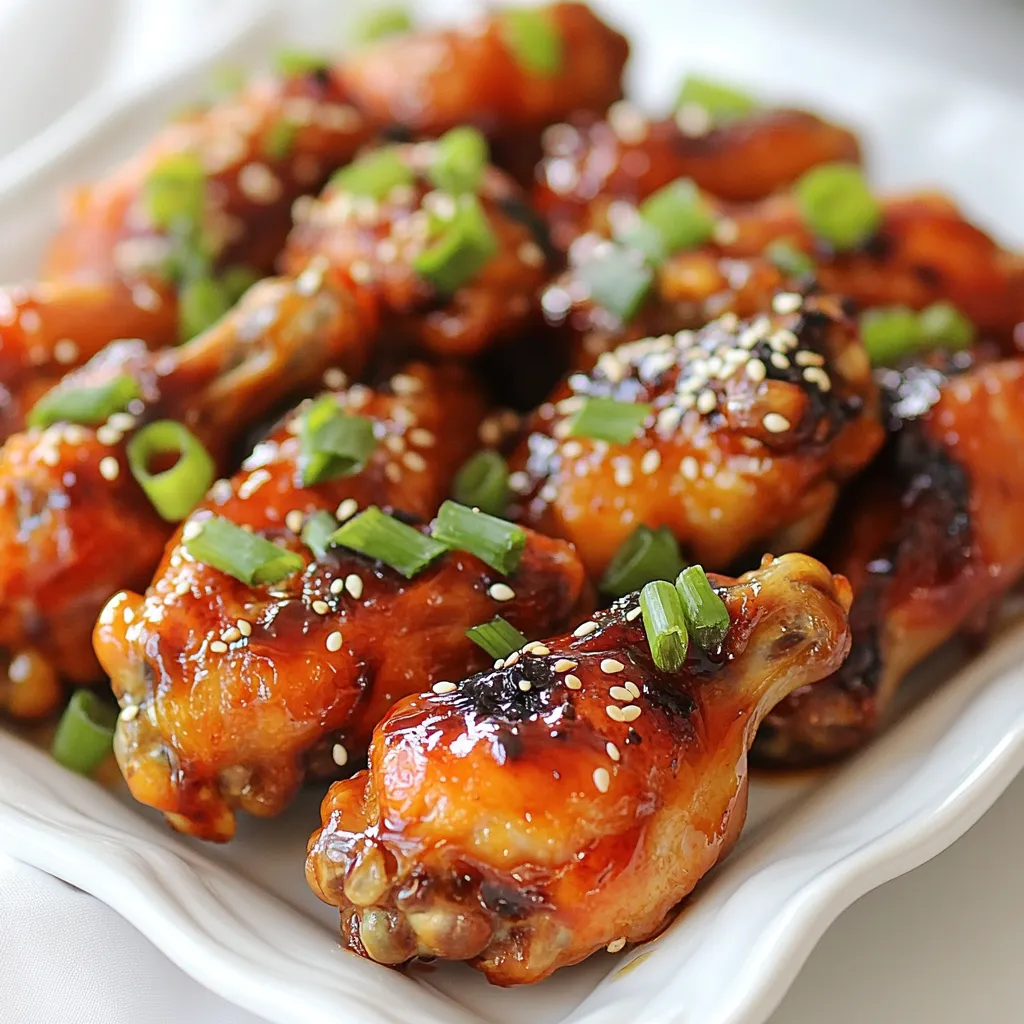
Sriracha Honey Chicken Wings Irresistible Flavor Hit


Are you ready to elevate your game-day snacks? Sriracha Honey Chicken Wings deliver an irresistible blast of flavor that will leave everyone coming back for more. In this article, I’ll guide you through making these sticky, sweet, and spicy wings, from ingredients to cooking tips. Trust me—your taste buds will thank you! Let’s dive into this simple and delicious recipe that’s perfect for any occasion!
Why I Love This Recipe
- Bold Flavor Combination: The blend of Sriracha and honey creates a perfect balance of heat and sweetness that tantalizes the taste buds.
- Easy Preparation: With simple ingredients and straightforward steps, these wings are quick to marinate and bake, making them perfect for weeknight dinners or game day gatherings.
- Crispy Texture: Baking the wings on a wire rack allows for air circulation, ensuring that each wing turns out crispy and delicious without the need for frying.
- Customizable Heat Level: Adjust the amount of Sriracha in the marinade to suit your spice preference, allowing everyone to enjoy their wings just the way they like them.
Ingredients
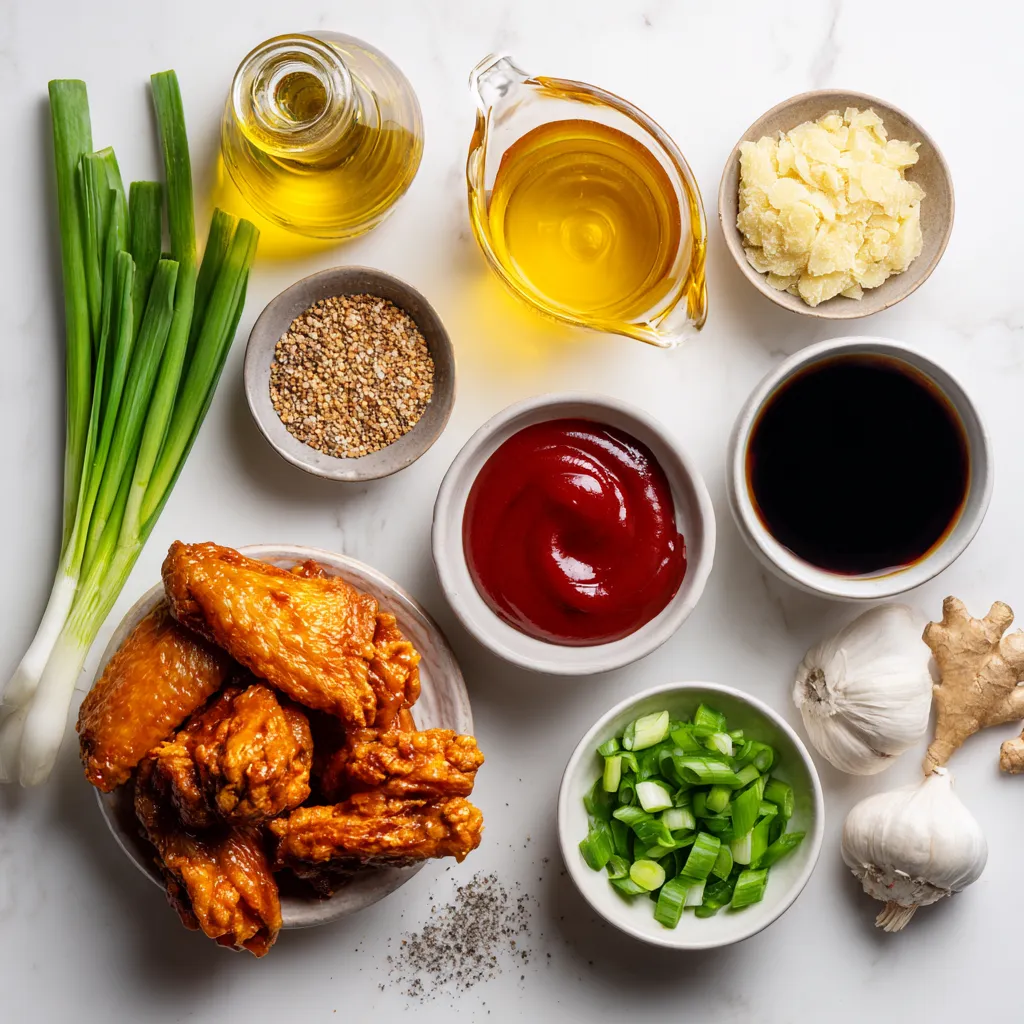
List of Ingredients
- 2 lbs chicken wings
- 1/4 cup Sriracha sauce
- 1/4 cup honey
- 2 tablespoons soy sauce
- 2 tablespoons olive oil
- 3 cloves garlic, finely minced
- 1 teaspoon fresh ginger, grated
- 1 teaspoon salt
- 1/2 teaspoon freshly ground black pepper
- 1 tablespoon sesame seeds (for garnish)
- 2 green onions, finely chopped (for garnish)
To make Sriracha honey chicken wings, you need fresh chicken wings. They form the base of this tasty dish. Sriracha sauce adds heat and flavor. Honey brings a sweet touch to balance the spice. Soy sauce gives depth and umami. Olive oil keeps the wings moist and helps them crisp up.
Next, we have garlic and ginger. Both add a nice kick. Salt and pepper are key for seasoning. Finally, sesame seeds and green onions make great garnishes. They add color and texture.
Gather these ingredients before you start cooking. It makes the process smooth and fun. Trust me, these wings will be a hit at your next gathering!
Step-by-Step Instructions
Preparing the Marinade
To start, grab a large mixing bowl. In this bowl, mix 1/4 cup of Sriracha sauce and 1/4 cup of honey. These two ingredients create the sweet and spicy taste we love. Next, add 2 tablespoons of soy sauce and 2 tablespoons of olive oil. These help to tenderize the chicken and add depth. Then, finely mince 3 cloves of garlic and grate 1 teaspoon of fresh ginger. Add these to the bowl. Finally, sprinkle in 1 teaspoon of salt and 1/2 teaspoon of black pepper. Whisk everything together until it is smooth and well combined.
Marinating the Chicken Wings
Now it’s time to marinate the wings. Take 2 pounds of chicken wings and place them into the bowl with the marinade. Make sure each wing gets a good coat of that delicious mix. Cover the bowl with plastic wrap or a lid. Let the wings sit in the fridge for at least 1 hour. If you can wait longer, let them marinate overnight. This step is key to making the wings full of flavor.
Baking Tips and Techniques
When you’re ready to cook, preheat your oven to 400°F (200°C). This temperature helps the wings turn crispy. Line a baking sheet with aluminum foil to make cleanup easy. Place a wire rack on top of the baking sheet. This allows hot air to circulate around the wings, giving them a great texture. Lay the marinated chicken wings on the rack in a single layer. Bake them for about 40 to 45 minutes. Flip the wings halfway through to ensure they cook evenly. For a final touch, brush the wings with extra marinade during the last 5 minutes of baking. This adds an extra layer of flavor. Once done, let the wings rest a few minutes before serving.
Tips & Tricks
Achieving Maximum Crispiness
To get your chicken wings crispy, use a wire rack. This allows air to flow around the wings. Bake them in the oven at 400°F (200°C) for the best results. Flip the wings halfway through baking. This helps both sides crisp up evenly. Avoid overcrowding the baking sheet. Space between wings lets heat circulate better.
Flavor Boosting Techniques
For a deeper flavor, marinate your wings overnight. The longer they sit in the marinade, the more they absorb the tasty mix. You can also add more garlic or ginger for a stronger kick. A splash of lime juice can brighten the flavors, too. Before serving, brush on more marinade. This adds a glossy layer and extra taste.
Alternative Cooking Methods
If you want a different approach, try frying the wings. Heat oil to 350°F (175°C) and fry in batches until golden. This gives a crunchy outside and juicy inside. You can also use an air fryer for a healthier option. Cook at 375°F (190°C) for about 25 minutes. No matter the method, keep an eye on the wings to avoid overcooking.
Pro Tips
- Marinate for Maximum Flavor: The longer you marinate the wings, the deeper the flavors will penetrate the meat. Aim for at least 1 hour, but overnight is ideal.
- Use a Wire Rack: Elevating the wings on a wire rack allows hot air to circulate around them, resulting in a crispier exterior without the need for frying.
- Brush with Marinade: For an extra layer of flavor, brush the wings with leftover marinade during the last few minutes of baking to create a sticky, caramelized glaze.
- Serve with Accompaniments: Enhance your wing experience by serving with lime wedges for a fresh zing and extra Sriracha for those who enjoy a spicy kick.
Variations
Spicy Sriracha Honey Chicken Wings
For those who crave extra heat, I recommend adding more Sriracha. Try 1/2 cup instead of 1/4 cup. This change gives the wings a bold kick. You can also add crushed red pepper flakes for more spice. Mix these into the marinade for a fiery flavor. The sweet honey will balance the spice, making each bite amazing.
BBQ Sriracha Honey Chicken Wings
If you love BBQ flavors, swap out the honey for your favorite BBQ sauce. Use 1/4 cup of BBQ sauce and mix it with Sriracha. This blend gives the wings a smoky, tangy taste. You can add a touch of apple cider vinegar for added zest. Brush the wings with more BBQ sauce before serving for that sticky goodness.
Baked vs. Fried Options
Baking the wings gives a healthier option. You still get crispy wings without too much oil. However, frying them makes them ultra-crispy and juicy. If you fry, use a deep fryer or a large pot with oil. Cook them until golden brown. Both methods taste great, so choose based on your mood!
Storage Info
How to Store Leftover Wings
To keep leftover wings fresh, place them in an airtight container. Make sure they cool down first. Store them in the fridge for up to three days. If you want to keep them longer, freezing is a great option.
Freezing Instructions
For freezing, wrap the wings in plastic wrap or foil. Place them in a freezer-safe bag or container. They can last for up to three months in the freezer. Always label your bags with the date. This way, you’ll know when to use them.
Reheating Tips
To reheat the wings, preheat your oven to 350°F (175°C). Place the wings on a baking sheet. Heat them for about 15-20 minutes or until they are warm. You can also microwave them, but this might make them less crispy. To keep that crunch, the oven is best!
FAQs
Can I use other types of chicken?
Yes, you can use other chicken parts. Thighs or drumsticks work well too. Just adjust the cooking time. Thighs may take longer to cook, while drumsticks are similar to wings. Always check that the chicken reaches 165°F for safe eating.
How long should I marinate the wings?
I suggest marinating the wings for at least one hour. For the best taste, marinate them overnight. This time allows the flavors to soak into the chicken. The longer you marinate, the better it will taste.
What side dishes pair well with Sriracha honey chicken wings?
Many sides go great with Sriracha honey chicken wings. Here are some ideas:
- Coleslaw: The crunch and creaminess balance the heat.
- Rice: White or fried rice soaks up the sauce well.
- Vegetable sticks: Carrots and celery add a fresh crunch.
- Potato wedges: They are crispy and fill you up.
Try one or mix a few sides to enhance your meal!
You now have the tools to make amazing chicken wings at home. We covered key ingredients, step-by-step instructions, and clever tips. You learned how to achieve maximum crispiness and boost flavors. Don’t forget the fun variations, like spicy Sriracha honey wings. Store leftovers properly and follow easy reheating tips for the best taste. With these skills, you can impress friends and family with delicious chicken wings every time. Enjoy your cooking adventur

Sizzling Sriracha Honey Chicken Wings
Ingredients
- 2 lbs chicken wings
- 0.25 cup Sriracha sauce
- 0.25 cup honey
- 2 tablespoons soy sauce
- 2 tablespoons olive oil
- 3 cloves garlic, finely minced
- 1 teaspoon fresh ginger, grated
- 1 teaspoon salt
- 0.5 teaspoon freshly ground black pepper
- 1 tablespoon sesame seeds (for garnish)
- 2 green onions finely chopped (for garnish)
Instructions
- Prepare the Marinade: In a spacious mixing bowl, combine the Sriracha sauce, honey, soy sauce, olive oil, minced garlic, grated ginger, salt, and black pepper. Whisk thoroughly until all ingredients are evenly integrated, creating a harmonious blend of flavors.
- Marinate the Wings: Add the chicken wings to the marinade, ensuring each wing is generously coated. Cover the bowl with plastic wrap or a lid, and refrigerate for a minimum of 1 hour, allowing the flavors to permeate the chicken. For the best results, marinate overnight.
- Preheat the Oven: Preheat your oven to 400°F (200°C) to ensure optimal cooking conditions for the wings.
- Bake the Wings: Line a baking sheet with aluminum foil for easy cleanup, then place a wire rack on top of the baking sheet. This setup allows for air circulation, helping to achieve that crispy texture. Arrange the marinated chicken wings on the rack in a single layer. Bake them in the preheated oven for 40-45 minutes, flipping them halfway through the cooking time to ensure even crisping and caramelization.
- Glaze the Wings: For an irresistible finishing touch, during the last 5 minutes of baking, brush the wings with any remaining marinade to create a beautiful glaze and enhance the flavor profile.
- Serve: Once the wings are cooked to perfection, remove them from the oven and let them rest for a few minutes to lock in the juiciness. Garnish with a sprinkle of sesame seeds and a scattering of finely chopped green onions for a vibrant presentation before serving.
![- 1 lb boneless, skinless chicken breasts, cut into bite-sized pieces - 1 cup dill pickle juice - 1 cup all-purpose flour - 1 teaspoon onion powder - 1 teaspoon garlic powder - 1 teaspoon paprika - 1 teaspoon black pepper - 1/2 teaspoon salt - 2 large eggs, beaten - 1 cup breadcrumbs (use panko for added crunch) - 1/2 cup ranch dressing - Fresh dill, for garnish (optional) These ingredients create a tasty flavor mix. The chicken gets a nice tang from the dill pickle juice. The spices add warmth and depth. The ranch dressing gives a creamy finish. You will need some basic tools for the best results. Here’s what I suggest: - Mixing bowls for marinating and breading - A whisk for beating the eggs - A baking sheet lined with parchment paper or greased - Measuring cups and spoons for accuracy These tools help streamline your cooking process. They ensure that each step flows smoothly and efficiently. If you want to change things up, here are some easy swaps: - Use chicken thighs instead of breasts for more flavor. - Swap out ranch dressing for blue cheese dressing for a bolder taste. - Try gluten-free flour if you need a gluten-free option. - Use crushed cornflakes instead of breadcrumbs for extra crunch. These substitutions can make the recipe your own. You can keep it fun and exciting while still enjoying the core flavors. For the complete recipe, check the [Full Recipe]. To start, grab a mixing bowl. Place the bite-sized chicken pieces into it. Pour in the dill pickle juice, making sure the chicken is fully submerged. Cover the bowl with plastic wrap or a lid. Now, let it chill in the fridge. For best results, marinate for at least one hour. If you have time, overnight is even better. This step adds so much flavor to the chicken! Next, let’s set up a breading station. You will need three bowls. In the first bowl, mix the all-purpose flour with onion powder, garlic powder, paprika, black pepper, and salt. Stir well until everything is combined. In the second bowl, pour in the beaten eggs. Whisk them until they are smooth. In the third bowl, fill it with breadcrumbs, preferably panko. Panko gives a nice crunch to the bites. After marinating, take the chicken out of the fridge. Gently pat the chicken pieces dry with paper towels. Start by dredging each piece in the flour mix. Make sure to shake off any extra flour. Next, dip the chicken into the beaten eggs. Finally, coat the chicken well with the breadcrumbs. Now, preheat your oven to 400°F (200°C). Prepare a baking sheet by lining it with parchment paper or greasing it lightly. Arrange the breaded chicken bites in a single layer. Bake for 15-20 minutes. They should turn golden brown and crispy. Check that the internal temperature reaches 165°F (75°C). Once cooked, move the chicken bites to a serving platter. Drizzle ranch dressing on top and sprinkle with fresh dill if you like. This adds a lovely touch! For the full recipe, be sure to check the details. To get crispy chicken bites, follow a few key steps. First, make sure to marinate the chicken in dill pickle juice. This adds flavor and helps keep the meat moist. Next, dry the chicken pieces well before breading. Excess moisture can lead to soggy bites. When coating, use seasoned flour first, then dip in egg, and finally cover with breadcrumbs. I recommend using panko breadcrumbs for extra crunch. Bake at 400°F (200°C) until golden brown and fully cooked. Avoid common mistakes for the best results. Do not rush the marination process; it is crucial for flavor. Skipping the drying step can lead to less crispy bites. Also, ensure you do not overcrowd the baking sheet. Leave space between each piece to allow hot air to circulate. Lastly, check the internal temperature. Chicken should reach 165°F (75°C) to be safely eaten. For tailgating or parties, serve these bites with extra ranch dressing for dipping. This adds a nice creamy touch. You can also pair them with fresh pickle slices for added crunch. For a fun twist, consider setting up a dipping station. Include various sauces, like buffalo sauce or honey mustard. This lets guests customize their bites. {{image_4}} Want some heat? Add hot sauce to the marinade. This gives your chicken bites a spicy kick. You can also mix cayenne pepper into the flour. Adjust the amount to your taste. This adds flavor without overwhelming the pickle taste. If you enjoy heat, this variation is for you! Looking for a lighter option? Use an air fryer to cook your chicken bites. This method cuts down on oil and keeps them crisp. Preheat your air fryer to 400°F (200°C). Place the breaded chicken in a single layer. Cook for about 12-15 minutes. Check that they reach an internal temperature of 165°F (75°C). You get a crunchy texture without deep frying! Want a veggie twist? Try using cauliflower instead of chicken. Cut cauliflower into bite-sized florets. Marinate them in the dill pickle juice for the same time. Follow the same breading and cooking steps. Bake or air fry until golden and crispy. This gives you a tasty, plant-based snack that everyone will love. You can find the full recipe for Pickle Ranch Chicken Bites and try these fun variations! To keep your leftover chicken bites fresh, place them in an airtight container. Make sure they cool down to room temperature before sealing. This method helps prevent moisture, which can make them soggy. Store the container in the fridge for up to three days. When you're ready to enjoy your chicken bites again, reheating properly is key. I recommend using an oven or an air fryer for the best results. Preheat the oven to 375°F (190°C). Place the chicken bites on a baking sheet and heat for about 10-15 minutes. This method helps restore their crispy texture. If using an air fryer, set it to 350°F (175°C) and heat for about 5-7 minutes. If you want to save some chicken bites for later, freezing is a great option. First, let them cool completely. Then, arrange the bites in a single layer on a baking sheet and freeze for about an hour. Once frozen, transfer them to a freezer-safe bag or container. They can last up to three months in the freezer. When you're ready to eat, just reheat them from frozen, following the tips above for that perfect crunch. For the full recipe, check out the details above. The best way to marinate chicken is to use a flavorful liquid. For Pickle Ranch Chicken Bites, you will soak the chicken in dill pickle juice. This juice adds a zesty kick and keeps the meat juicy. Place the cut chicken in a bowl and cover it with the pickle juice. Make sure all pieces are fully submerged. Cover the bowl and refrigerate for at least an hour. For even better flavor, let it marinate overnight. This method works well for any chicken dish. Yes, you can use frozen chicken for this recipe. However, it is best to thaw the chicken first. Place it in the fridge overnight or submerge it in cold water for quicker thawing. Once thawed, cut the chicken into bite-sized pieces. After that, follow the marination steps as usual. Using frozen chicken may change the texture slightly, but it will still taste great. To make a low-carb version of Pickle Ranch Chicken Bites, you can skip the breadcrumbs. Instead, coat the chicken pieces in crushed pork rinds or almond flour. Both options give a nice crunch without the carbs. You can also use a low-carb ranch dressing for dipping. This way, you keep the flavor and texture while making it suitable for a low-carb diet. Enjoy your tasty bites without the guilt! In this post, we explored how to make Pickle Ranch Chicken Bites. We discussed key ingredients, cooking essentials, and helpful substitutions. I shared step-by-step instructions for marinating, breading, and baking. You learned tips for crispy bites and common mistakes to avoid. We covered variations like spicy bites and vegetarian options. Finally, I provided storage tips and answered FAQs. Try these bites for your next gathering. They’re fun, easy, and full of flavor! Enjoy your cooking adventure!](https://dishtreats.com/wp-content/uploads/2025/07/7f7f749c-ecc1-4920-b674-4460a511463b-768x768.webp)
![- 2 cups cooked chicken, shredded - 1 cup shredded cheddar cheese - 1 cup shredded Monterey Jack cheese - 4 large flour tortillas - 1 small onion, diced - 1 bell pepper, diced - 2 tablespoons olive oil - 1 teaspoon ground cumin - 1 teaspoon smoked paprika - ½ teaspoon garlic powder - Salt and black pepper to taste - Fresh cilantro, chopped - Sour cream - Salsa To make the Chicken and Cheese Quesadilla Skillet, gather these simple ingredients. The chicken gives it a hearty base. Cheese adds that melty goodness we all love. Using flour tortillas helps hold everything together. You can pick your favorite bell pepper color to add a pop of brightness. The spices elevate the flavor. Ground cumin offers a warm, earthy taste. Smoked paprika adds a hint of smokiness. Garlic powder gives a nice kick. Don’t forget the salt and black pepper to enhance all the flavors. Finally, for garnishes, fresh cilantro provides a burst of freshness. Serving it with sour cream and salsa makes each bite even better. You can find the full recipe at the beginning of this article. Enjoy your cooking! - Heat the skillet with olive oil - Add diced onion and bell pepper First, grab a large skillet and set it over medium heat. Pour in two tablespoons of olive oil and let it warm up. You want the oil to shimmer, which shows it's ready. Next, toss in the diced onion and bell pepper. Sauté them for about five minutes. Stir occasionally until they are soft and fragrant. This step builds a great flavor base for your quesadilla. - Mix in shredded chicken - Season with spices and cook until heated Now it's time to add the star of our dish: shredded chicken. Stir it in with the veggies. Sprinkle in one teaspoon of ground cumin, one teaspoon of smoked paprika, and half a teaspoon of garlic powder. Add salt and black pepper to taste. This mix brings out all the flavors. Cook everything for another three to five minutes. You want the chicken to heat up and soak in those tasty spices. - Distribute cheese and layer tortillas - Cover and cook until golden brown, flipping carefully Next, lower the heat to a gentle simmer. Grab half of your shredded cheddar and Monterey Jack cheese. Spread it evenly over the chicken and veggies. Place two tortillas on top, pushing them down gently. Now, add the rest of the cheese, followed by the other two tortillas. Cover the skillet with a lid and let it cook for four to five minutes. This will make the bottom crispy and let the cheese melt. When the bottom turns golden brown, carefully flip the quesadilla with a spatula. Cook for another four to five minutes until the second side is also golden and the cheese is gooey. For the complete recipe, check out the Full Recipe section! To get crispy tortillas, heat your skillet well. Use medium heat and add enough olive oil. Let the oil shimmer before adding your tortillas. Cook until golden brown on each side, about 4-5 minutes. For gooey cheese, use a mix of cheddar and Monterey Jack. These cheeses melt nicely together. Layer the cheese between tortillas and cover the skillet. This helps the cheese melt evenly and creates a delicious pull when you slice. To boost flavors, add spices like chili powder or cayenne pepper. These spices add a nice kick. You can also mix in fresh herbs, such as cilantro or parsley, for freshness. Pair your quesadilla with sides like guacamole or pico de gallo. These add extra flavor and texture. A squeeze of lime juice brightens up the dish too. For the best results, use a non-stick skillet. This helps avoid sticking and makes flipping easier. Cast iron skillets are also great for even heat. Use a wide spatula for flipping the quesadilla. This helps keep it intact. A pizza cutter is perfect for slicing your quesadilla into wedges. For the full recipe, check out the detailed instructions above. {{image_4}} You can easily change up the protein in your quesadilla. If you want beef, use ground beef or steak strips. For a seafood twist, shrimp works great too. If you're feeling vegetarian, try black beans or mushrooms. These options keep the dish fresh and fun. Want more heat? Add sliced jalapeños or diced green chilies to bring spice. You can also change the cheese for different flavors. Try pepper jack for a kick or gouda for a smokier taste. Mixing cheeses adds depth and makes every bite exciting. You can serve quesadillas in stacks or as traditional wedges. Stacking them makes a fun dinner party dish. For dips, consider guacamole, ranch, or a zesty salsa. These enhance the meal and let everyone personalize their bites. Enjoy exploring these variations while making your own Chicken and Cheese Quesadilla Skillet Delight! For the full recipe, check out the [Full Recipe]. To store leftovers, let your quesadilla cool first. Then, wrap each piece tightly in plastic wrap. This keeps them fresh. Place the wrapped quesadillas in an airtight container. I recommend using glass or BPA-free plastic containers for safety. They can last in the fridge for about three days. For reheating quesadillas, the best method is using a skillet. Heat your skillet over medium heat. Place the quesadilla in the skillet and cover it with a lid. This will help the cheese melt evenly. You can also use an oven at 350°F (175°C) for about 10 minutes. This keeps the tortilla crispy. Avoid using a microwave, as it can make the quesadilla soggy. To freeze leftovers, wrap each quesadilla in plastic wrap. Then, place them in a freezer-safe bag or container. Make sure to remove as much air as possible. They can stay frozen for up to three months. When you are ready to eat, thaw them in the fridge overnight. Reheat as mentioned before to enjoy a tasty meal again. Making a Chicken and Cheese Quesadilla Skillet is quick and easy. It takes about 10 minutes to prep and around 20 minutes to cook. In total, you can enjoy this dish in about 30 minutes. Yes, you can make this dish gluten-free. Simply swap the flour tortillas for corn tortillas or gluten-free tortillas. Both options work well and keep the flavors intact. For sides, I suggest fresh guacamole, a light salad, or refried beans. These add a nice touch to your meal. For drinks, a cold lemonade or a light beer works well with the flavors. You could also try a refreshing iced tea. This blog post covered everything you need for a tasty Chicken and Cheese Quesadilla Skillet. I shared the key ingredients, step-by-step cooking tips, and even fun variations. Remember to store leftovers well and try reheating them for that crunch. With these tips, you can enjoy a delicious meal anytime. Experiment and make it your own! Make cooking fun and tasty with these simple ideas. Enjoy your next quesadilla adventure!](https://dishtreats.com/wp-content/uploads/2025/06/644c33a7-6eb8-49b0-b6be-df01f2332de8-768x768.webp)