Spicy Garlic Butter Shrimp Tasty and Quick Dinner Dish
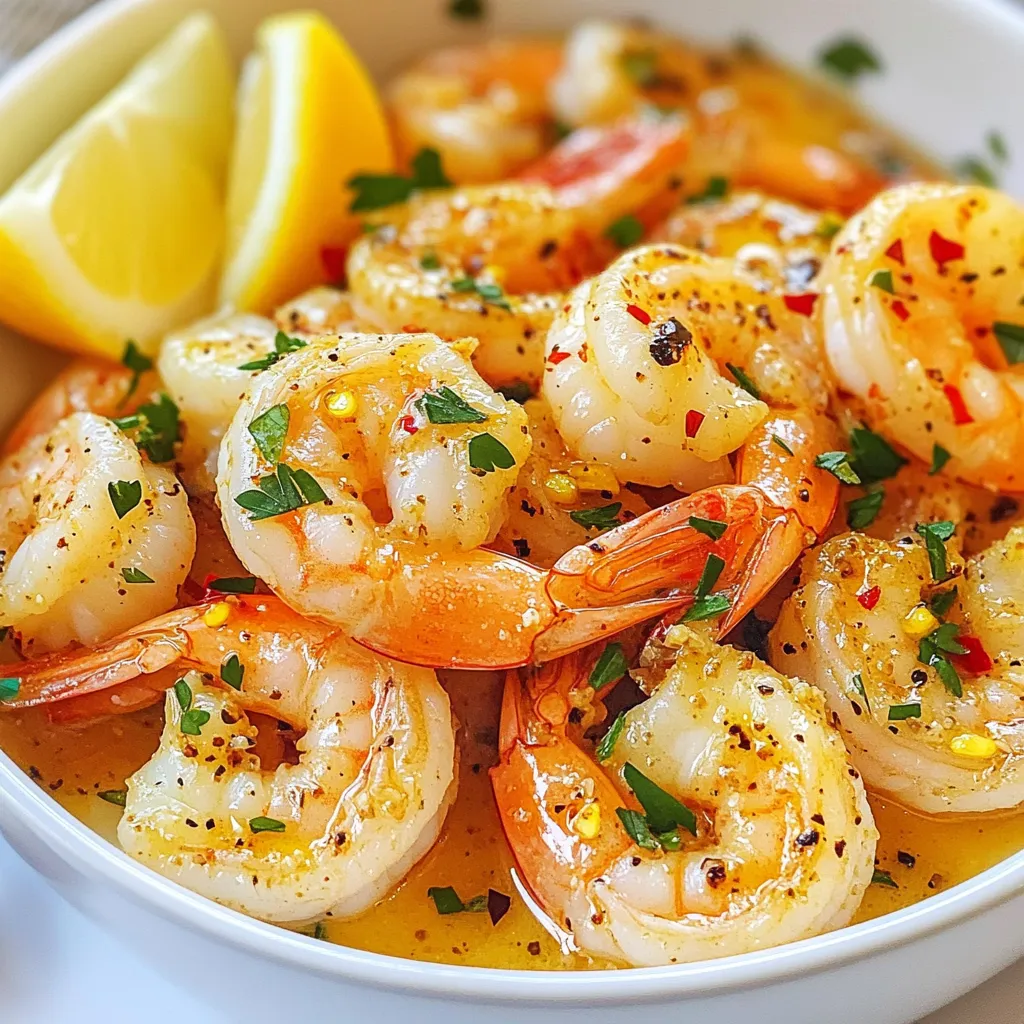
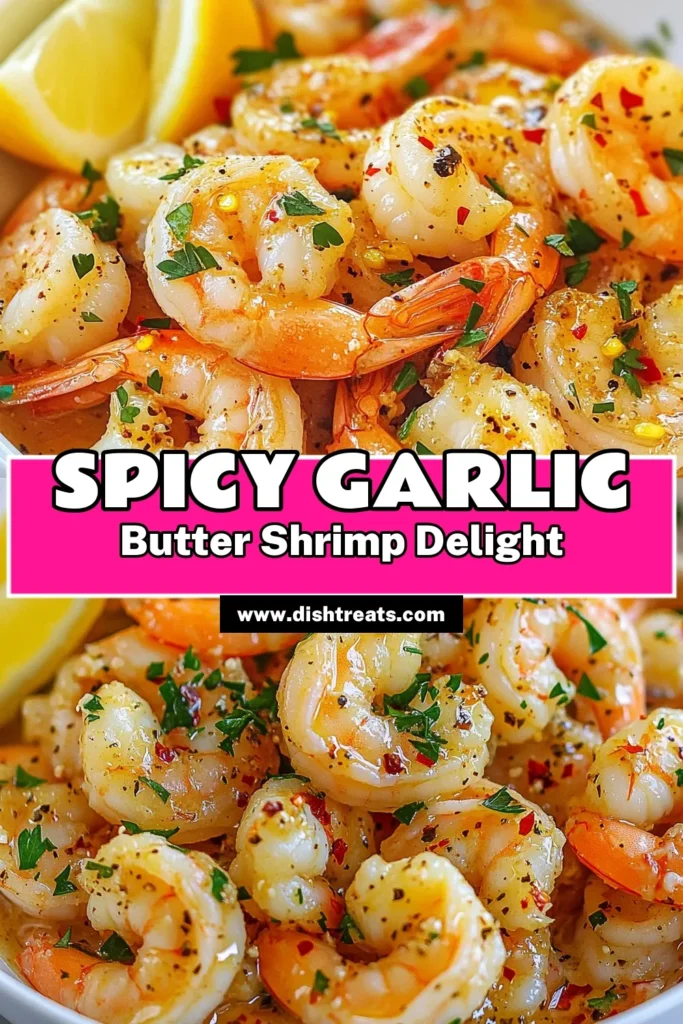
Craving a quick and tasty dinner? Spicy Garlic Butter Shrimp is your answer! This dish is packed with flavor and takes just minutes to prepare. Whether you’re an experienced cook or a kitchen newbie, I’ll guide you step-by-step through this easy recipe. Ready to impress your family or friends? Let’s dive into the world of zesty shrimp that will leave everyone wanting more!
Why I Love This Recipe
- Quick and Easy: This recipe comes together in just 15 minutes, making it perfect for a busy weeknight dinner or a last-minute gathering.
- Flavor Packed: The combination of garlic, butter, and red pepper flakes creates a rich and spicy flavor that elevates the shrimp to a whole new level.
- Customizable Heat: You can easily adjust the amount of red pepper flakes to suit your spice tolerance, making this dish suitable for everyone.
- Impressive Presentation: Serving the shrimp with lemon wedges not only adds brightness to the dish but also makes it look restaurant-worthy!
Ingredients
List of Required Ingredients
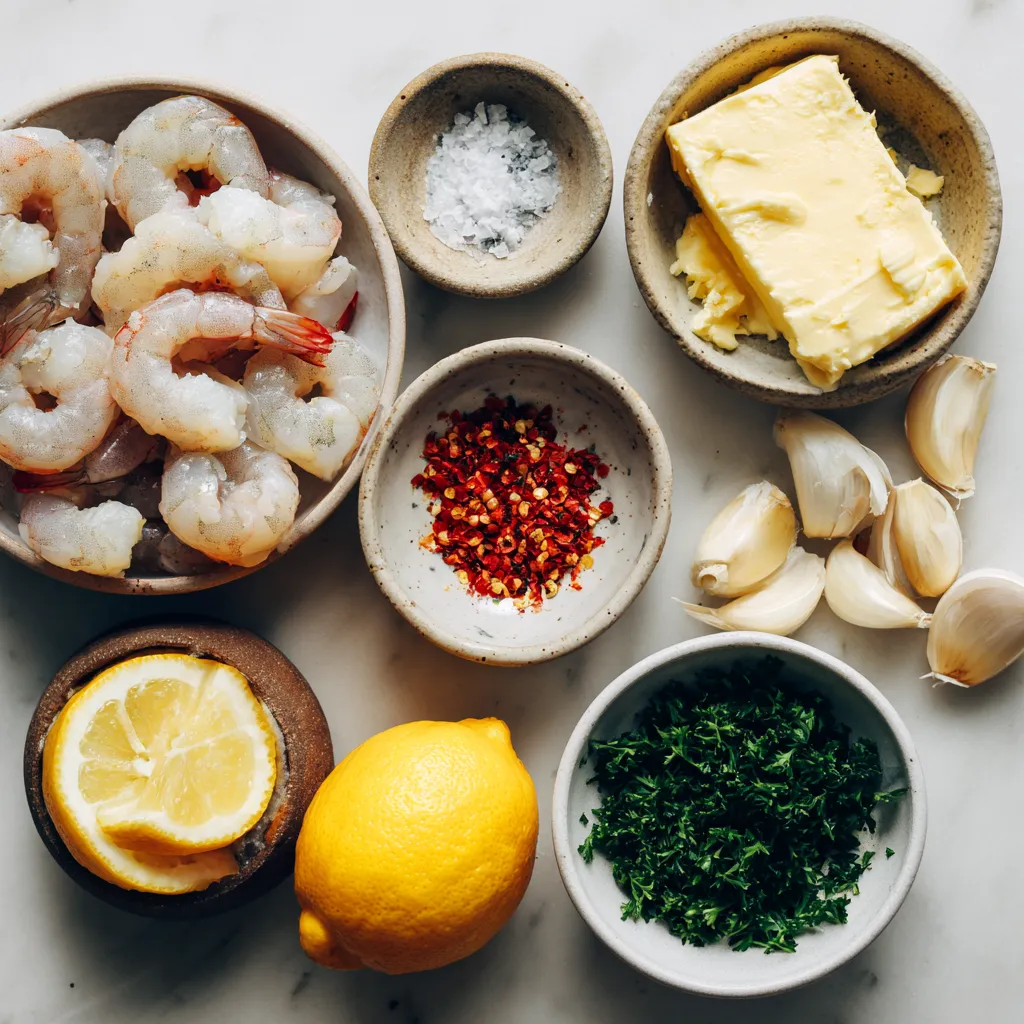
To make Spicy Garlic Butter Shrimp, gather these ingredients:
- 1 pound large shrimp, peeled and deveined
- 4 tablespoons unsalted butter
- 4 cloves garlic, minced
- 1 teaspoon red pepper flakes (adjust for desired heat)
- 1 tablespoon fresh lemon juice
- 1 tablespoon freshly chopped parsley
- Salt and freshly ground pepper to taste
- Lemon wedges for serving
Optional Ingredients for Customization
You can change the flavor of your shrimp with these options:
- Add a splash of white wine for depth.
- Use fresh herbs like cilantro or basil for a different taste.
- Substitute lime juice if you prefer a zesty twist.
Tips for Selecting Fresh Shrimp
When buying shrimp, follow these tips:
- Look for shrimp with a firm texture.
- Check for a mild, fresh smell.
- Choose shrimp that are pink or pale gray, not discolored.
- If buying frozen, ensure the packaging is intact and sealed.
With these tips, you can enjoy a quick and tasty dinner!
Step-by-Step Instructions
Prepping the Shrimp
First, rinse 1 pound of shrimp under cold water. This step removes any leftovers. Next, pat them dry with paper towels. Dry shrimp sear better, giving you a nice crust when cooked. Make sure they are peeled and deveined for the best texture.
Cooking the Garlic and Butter
In a large skillet, add 4 tablespoons of unsalted butter. Heat it over medium heat until it melts. Watch for bubbles, but don’t let it brown. When it’s bubbly, add 4 minced garlic cloves. Cook for about 1 minute until the garlic smells good but stays light in color.
Adding Spice and Cooking the Shrimp
Now, stir in 1 teaspoon of red pepper flakes. This adds heat to the dish. Cook this mixture for about 30 seconds to let the flavors blend. Next, add the shrimp in a single layer. Cook for 2 to 3 minutes on one side. Look for a pink color and slight opacity. Flip the shrimp over, season with salt and pepper, and cook for another 1 to 2 minutes. They should be fully opaque and cooked through.
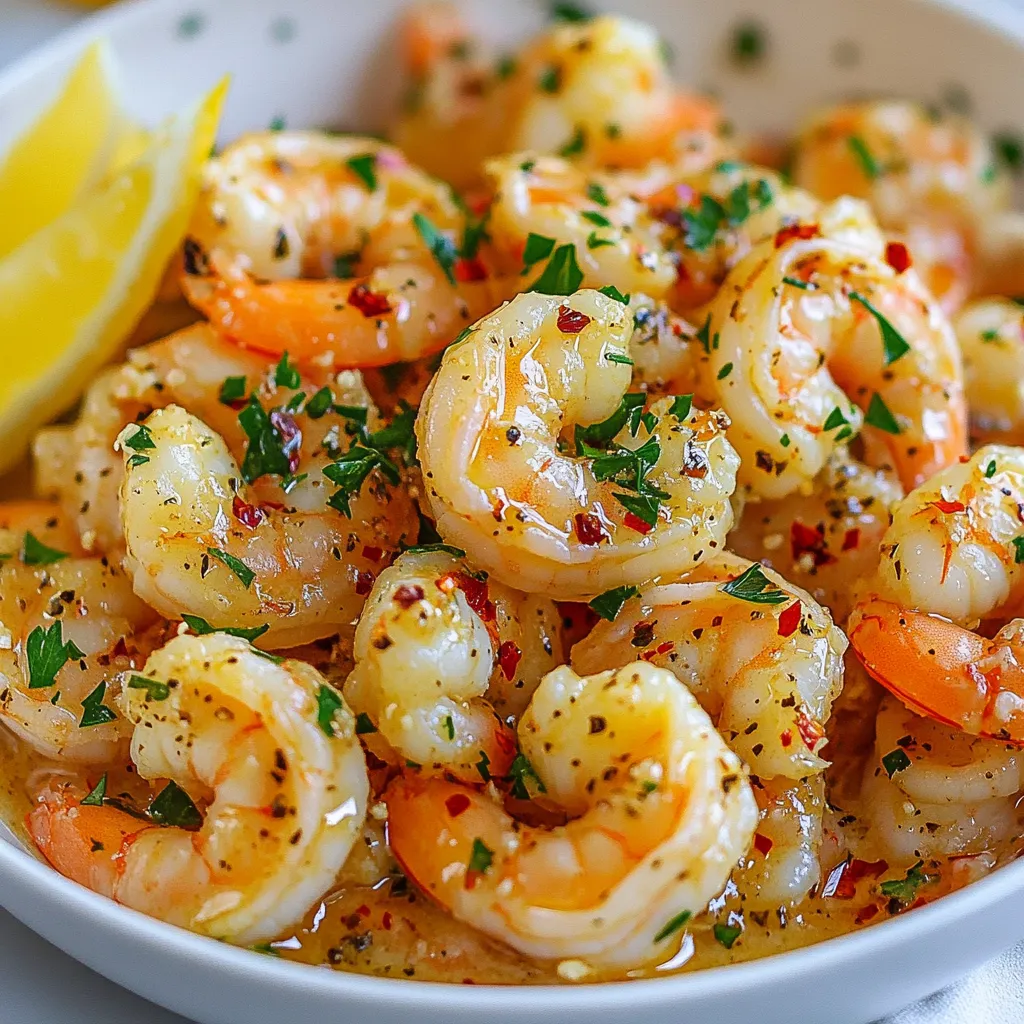
Final Seasoning and Serving Suggestions
Once the shrimp are done, squeeze 1 tablespoon of fresh lemon juice over them. Toss in 1 tablespoon of chopped parsley for freshness. Mix everything well in the pan to coat the shrimp with the garlic butter sauce. Serve hot on a platter, and add lemon wedges for extra zing. Enjoy your meal!
Tips & Tricks
How to Avoid Overcooking Shrimp
To keep shrimp juicy, stick to cooking time. Cook shrimp for just 2-3 minutes on one side. Look for a pink color and slight opacity. When you flip them, cook for another 1-2 minutes. Remove them from heat as soon as they turn fully opaque. This way, they won’t get tough or rubbery.
Best Practices for Searing Shrimp
Start with dry shrimp. Pat them with paper towels before cooking. This helps them sear nicely. Use a hot skillet with melted butter. The butter should bubble but not brown. Arrange the shrimp in a single layer. Crowding the pan can lower the heat and lead to steaming, not searing.
Enhancing Flavor Profiles
To boost the flavor, use fresh garlic and lemon juice. Fresh herbs like parsley add brightness. You can also adjust the red pepper flakes for your heat preference. Consider adding a splash of white wine for depth. Remember, balancing flavors is key: salty, spicy, and sour all work well together.
Pro Tips
- Perfectly Cooked Shrimp: Cook shrimp just until they turn pink and opaque; overcooking can make them tough and rubbery.
- Adjusting Heat: Customize the spiciness by adding more or less red pepper flakes according to your taste preference.
- Use Fresh Ingredients: Fresh garlic and parsley will enhance the overall flavor of the dish, making it more vibrant and aromatic.
- Serving Suggestion: Serve the shrimp immediately while they are still hot and sizzling, paired with crusty bread to soak up the delicious garlic butter sauce.
Variations
Keto-Friendly Modifications
If you follow a keto diet, you can still enjoy this dish! Use cauliflower rice instead of regular rice. This keeps the meal low in carbs. You can add more butter for extra flavor. Also, skip any bread or starchy sides. Focus on the shrimp and garlic butter for a satisfying meal.
Gluten-Free Ingredients and Options
This recipe is naturally gluten-free. All the ingredients, like shrimp and butter, are safe to use. Just make sure your red pepper flakes don’t have added gluten. Serve the shrimp with gluten-free sides. Think of salad or grilled veggies. These options will keep your meal light and fresh.
Additional Spices and Flavor Additions
Want to spice things up? Try adding some smoked paprika or cayenne pepper. These spices will add a nice kick. You can also mix in fresh herbs like basil or cilantro. For a sweeter touch, consider a dash of honey or a splash of soy sauce. These changes make the dish versatile and fun!
Storage Info
How to Store Leftover Shrimp
To store leftover shrimp, let them cool down first. Place the shrimp in an airtight container. This helps keep them fresh. Store them in the fridge. They will last for up to two days. If you want to keep them longer, freeze them.
Reheating Instructions
When it’s time to reheat, use a skillet for the best results. Heat the skillet on low. Add a bit of butter to prevent sticking. Place the shrimp in the skillet and warm them for about 2-3 minutes. Flip them once so they heat evenly. You can also microwave them, but be careful not to overcook. This could make them tough.
Freezing Shrimp for Future Meals
To freeze shrimp, first, ensure they are fully cooked. Let them cool completely before freezing. Place shrimp in a freezer-safe bag. Remove as much air as possible before sealing. Label the bag with the date. You can freeze shrimp for up to three months. When ready to use, thaw them in the fridge overnight.
FAQs
What can I serve with Spicy Garlic Butter Shrimp?
You can pair Spicy Garlic Butter Shrimp with many tasty sides. Here are a few ideas:
- Steamed rice, which soaks up the sauce well.
- Pasta, for a quick and filling meal.
- A fresh green salad, adding crunch and color.
- Garlic bread, perfect for dipping in butter sauce.
These options balance the shrimp’s flavors and add variety to your plate.
Can I use frozen shrimp for this recipe?
Yes, frozen shrimp work well in this recipe. Just remember to thaw them first. Place them in the fridge overnight or run them under cold water. After thawing, rinse and pat them dry before cooking. This helps keep the shrimp juicy and flavorful.
How do I adjust the spice level in this dish?
To change the spice level, simply adjust the red pepper flakes. For less heat, use half a teaspoon or omit them. If you love spice, add more flakes or include a dash of hot sauce. You can also try adding sliced jalapeños for extra heat.
What are the nutritional benefits of this recipe?
This dish offers several health benefits:
- Shrimp is low in calories and high in protein.
- Garlic has antioxidants and may boost your immune system.
- Healthy fats from butter add flavor while providing energy.
- Lemon juice adds vitamin C, enhancing your immune health.
These ingredients make this meal not just tasty, but also nutritious!
This blog post covered everything you need for making Spicy Garlic Butter Shrimp. We explored the key ingredients, how to prep and cook, plus tips to avoid overcooking. You learned about tasty variations, storage tips, and common questions.
As you try this recipe, remember to enjoy it. Experiment with flavors and make it your own. The goal is to create a dish you love! Happy cookin

Spicy Garlic Butter Shrimp
Ingredients
- 1 pound large shrimp, peeled and deveined
- 4 tablespoons unsalted butter
- 4 cloves garlic, minced
- 1 teaspoon red pepper flakes
- 1 tablespoon fresh lemon juice
- 1 tablespoon freshly chopped parsley
- to taste salt
- to taste freshly ground pepper
- for serving lemon wedges
Instructions
- Start by rinsing the shrimp thoroughly under cold water to remove any residue. After rinsing, gently pat them dry with paper towels to eliminate excess moisture, ensuring a better sear when cooked.
- In a large skillet, place the unsalted butter over medium heat. Allow the butter to melt, letting it bubble gently – you want it to foam but be careful not to let it brown or burn.
- Once the butter is melted and bubbly, add the minced garlic to the skillet. Sauté the garlic for about 1 minute, or until it becomes fragrant but remains pale in color; avoid browning it to keep the flavor mild.
- Introduce the red pepper flakes to the skillet, stirring them into the butter-garlic mixture for about 30 seconds. This step will help release their heat and infuse the butter with a spicy kick.
- Carefully add the shrimp to the skillet, arranging them in an even, single layer. Cook for 2-3 minutes on one side until the shrimp turn pink and shift to a slightly opaque appearance.
- Flip the shrimp using tongs or a spatula. Season them generously with salt and freshly ground black pepper. Cook for an additional 1-2 minutes until the shrimp are completely cooked through and opaque all the way.
- Upon finishing cooking, squeeze fresh lemon juice over the perfectly cooked shrimp. Sprinkle the chopped parsley generously on top, then toss everything together in the pan to ensure the shrimp are well-coated with the garlic butter sauce.
- Serve the sizzling shrimp immediately on a platter, garnished with lemon wedges for guests to squeeze additional juice over their portions, enhancing the flavor even further.