Honey Garlic Turkey Meatballs Savory and Easy Recipe
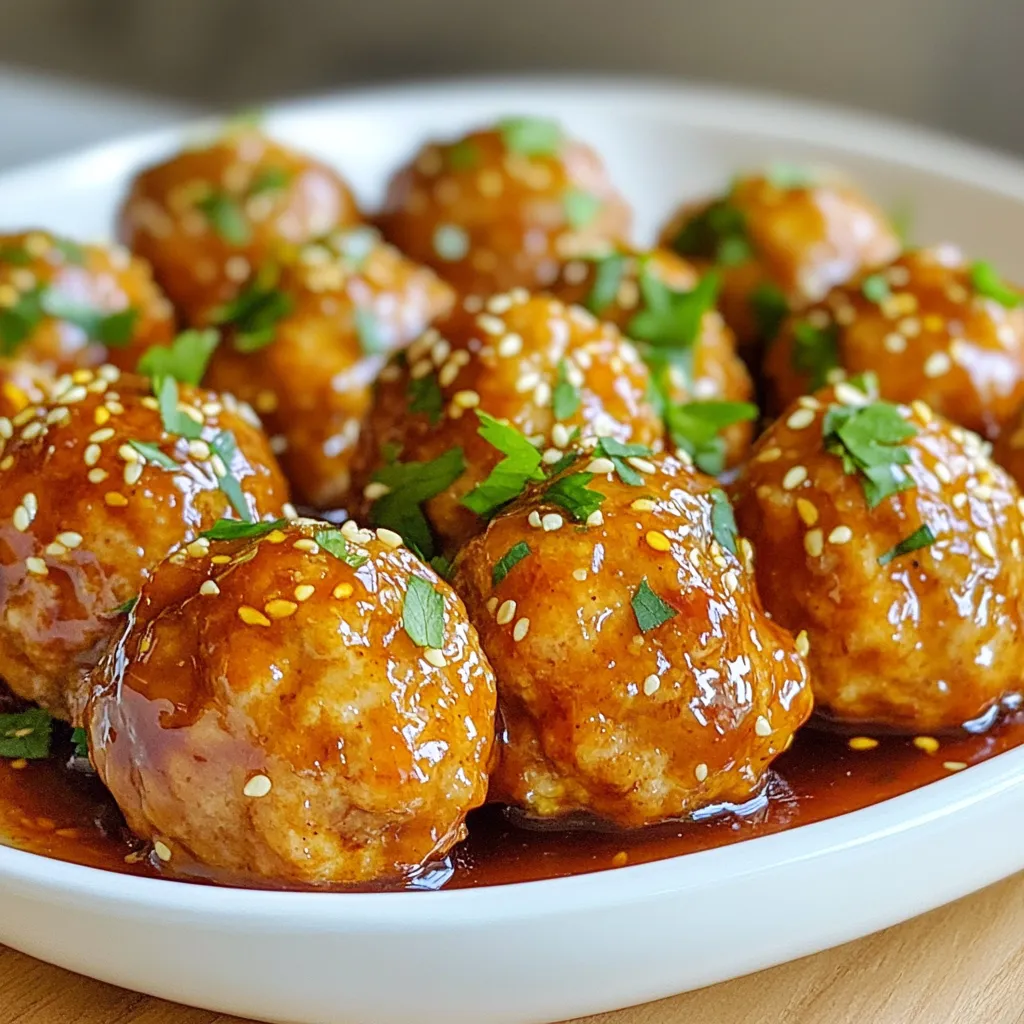
If you’re looking for a simple yet mouthwatering dish, these Honey Garlic Turkey Meatballs are for you! With just a few ingredients and easy steps, you can create a savory meal that everyone will love. I’ll walk you through mixing, baking, and drenching these meatballs in a sweet and sticky honey garlic sauce. Let’s dive into this quick recipe that’s perfect for any night of the week!
Why I Love This Recipe
- Healthy and Delicious: These turkey meatballs are a healthier alternative to traditional meatballs, packed with lean protein and flavor.
- Quick and Easy: With a prep time of just 15 minutes, this recipe is perfect for busy weeknights or last-minute gatherings.
- Versatile Dish: These meatballs can be served as an appetizer, main dish, or even tossed in a salad, making them a versatile addition to any meal.
- Sweet and Savory Flavor: The honey garlic sauce adds a delightful balance of sweetness and savory depth that elevates the overall dish.
Ingredients
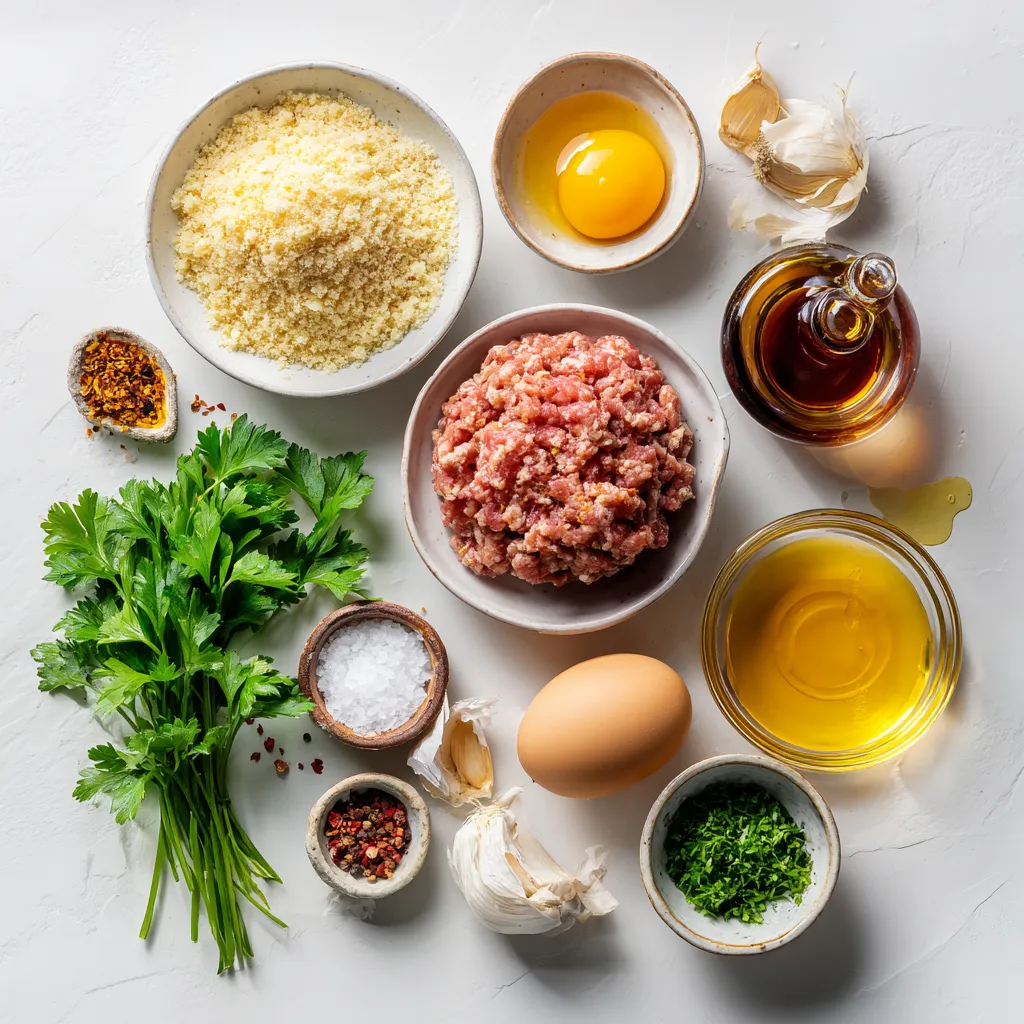
To make honey garlic turkey meatballs, you need a mix of tasty ingredients. Here’s a list to help you gather everything:
- 1 lb ground turkey
- 1/2 cup breadcrumbs
- 1/4 cup freshly grated Parmesan cheese
- 1/4 cup fresh parsley, finely chopped
- 2 cloves garlic, minced
- 1 large egg
- 1 teaspoon kosher salt
- 1/2 teaspoon freshly cracked black pepper
- 1/4 teaspoon red pepper flakes (optional, for a kick)
- 1/2 cup honey
- 1/4 cup soy sauce (low sodium recommended)
- 1 tablespoon apple cider vinegar
- 1 teaspoon sesame oil
- Toasted sesame seeds, for garnish
Each ingredient plays a key role in building flavor. Ground turkey keeps the meatballs light. Breadcrumbs add texture and help bind the mix. Parmesan cheese lends a savory touch. Fresh parsley brightens the dish. Garlic gives it a warm, rich flavor. The egg helps hold everything together.
Salt and pepper enhance the taste, while red pepper flakes give a hint of heat. Honey, soy sauce, apple cider vinegar, and sesame oil create a sweet and tangy sauce. Finally, sesame seeds make for a nice garnish, adding crunch and style.
With these ingredients, you can create a dish that is both savory and satisfying. Enjoy the cooking process as you bring these flavors together!
Step-by-Step Instructions
Mixing the Meatball Mixture
To start, grab a large mixing bowl. Add 1 pound of ground turkey. Then, toss in 1/2 cup of breadcrumbs, 1/4 cup of freshly grated Parmesan cheese, and 1/4 cup of finely chopped fresh parsley. Next, add 2 cloves of minced garlic, 1 large egg, 1 teaspoon of kosher salt, 1/2 teaspoon of black pepper, and 1/4 teaspoon of red pepper flakes if you want a little heat.
Mix well using your hands or a spatula. It’s key to blend all the ingredients evenly. This helps ensure every meatball has the same great taste. You want to feel the texture shift as you mix. The goal is a firm yet moist mixture that holds together nicely.
Shaping and Baking the Meatballs
Now, let’s shape the meatballs. Aim for a size of 1 to 1.5 inches in diameter. Try to make them as uniform as possible. This helps them cook evenly. Line a baking sheet with parchment paper before placing the meatballs on it. Leave some space between them to avoid sticking.
Preheat your oven to 400°F (200°C). Bake the meatballs for about 20 minutes. They should reach an internal temperature of 165°F and look golden brown.
Preparing the Honey Garlic Sauce
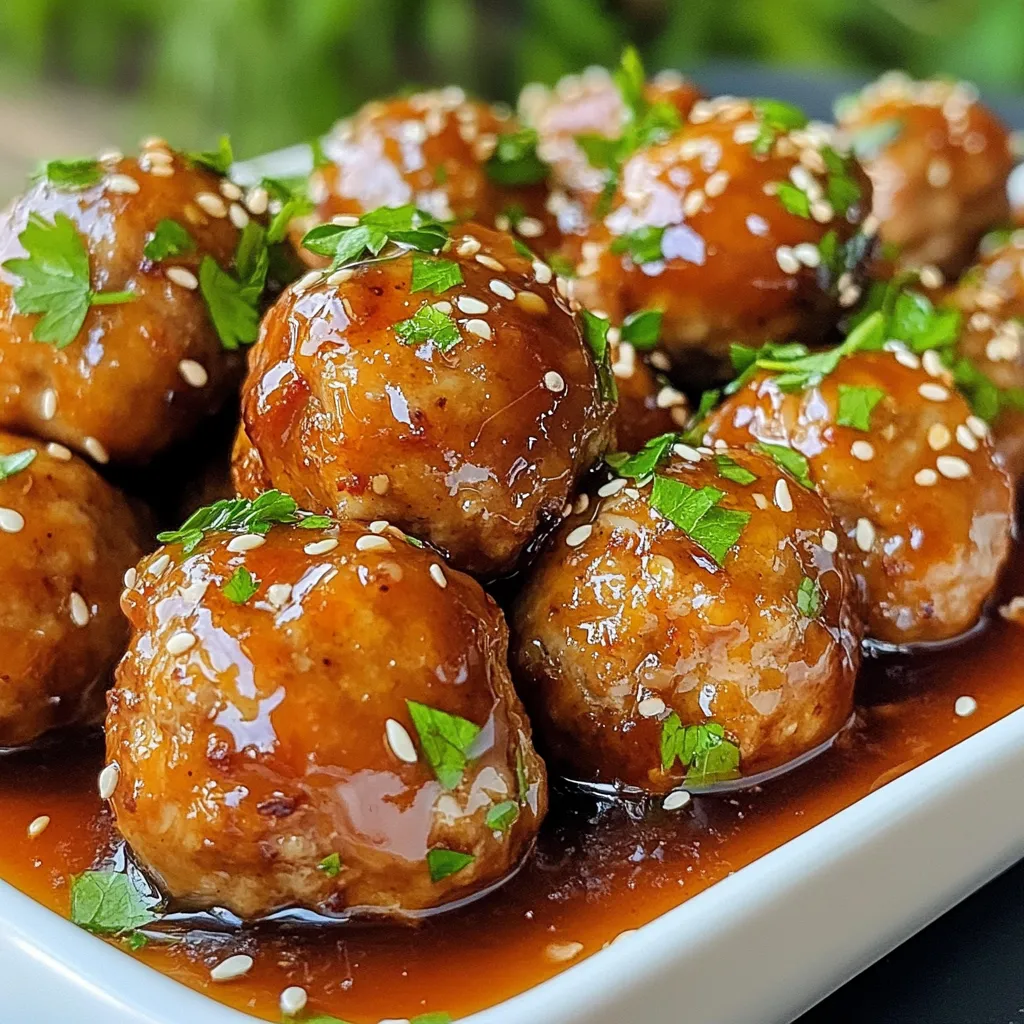
While your meatballs bake, it’s time to make the honey garlic sauce. In a small saucepan, mix 1/2 cup of honey, 1/4 cup of soy sauce, 1 tablespoon of apple cider vinegar, and 1 teaspoon of sesame oil. Heat this over medium until it simmers. Stir it occasionally. You want it to thicken a bit, which takes about 5 minutes.
Once your meatballs are done, transfer them to a large bowl. Drizzle the sauce over them and gently toss to coat each meatball. This adds lots of flavor. Then, return them to the baking sheet for another 5 minutes. This last step caramelizes the sauce, giving a nice glaze.
Tips & Tricks
Cooking Tips for Perfect Meatballs
- Maintaining moisture in turkey meatballs: To keep your meatballs juicy, add breadcrumbs and grated cheese. They soak up moisture and add flavor.
- How to avoid dry meatballs: Don’t overmix the turkey. Mix until just combined. If you feel it’s too dry, add a splash of milk.
- Ensuring even cooking: Shape meatballs the same size. This helps them cook evenly. Aim for 1 to 1.5 inches in diameter.
Serving Suggestions
- Best sides to pair with honey garlic turkey meatballs: Serve with fluffy rice or a fresh salad. Steamed veggies also complement the sweet sauce well.
- Creative ways to serve meatballs: You can serve them in a wrap or over pasta. Try them in a sub sandwich for a fun twist.
- Garnishing tips for presentation: Sprinkle toasted sesame seeds and chopped parsley on top. It adds color and a nice crunch.
Ingredient Substitutions
- Alternatives for ground turkey: You can use ground chicken or lean beef if you prefer. Both options work well with the honey garlic sauce.
- Gluten-free breadcrumbs options: Use crushed rice cereal or gluten-free oats. They bind the meatballs without gluten.
- Low-sodium soy sauce alternatives: Try coconut aminos or tamari. They give a similar flavor with less salt.
Pro Tips
- Use Lean Ground Turkey: Opt for lean ground turkey to keep the meatballs moist while reducing fat content. This ensures a healthier dish without sacrificing flavor.
- Chill the Mixture: After mixing the meatball ingredients, refrigerate the mixture for about 30 minutes. This makes it easier to shape the meatballs and helps them hold their shape during baking.
- Adjust the Sauce Sweetness: Taste the honey garlic sauce as it simmers and adjust the sweetness by adding more honey or a splash of soy sauce if needed. This allows you to customize it to your preference.
- Perfect Baking Time: Keep an eye on the meatballs during the last few minutes of baking. This ensures they don’t overcook and lose their juiciness while allowing the sauce to caramelize beautifully.
Variations
Spicy Version
If you love heat, you can make a spicy version of these meatballs. Start by adding more red pepper flakes. Use one teaspoon instead of a quarter teaspoon. This change gives a nice kick. You can also mix in chopped jalapeños for extra spice.
Suggested ingredients for a spicy kick:
- 1 teaspoon red pepper flakes
- 1-2 jalapeños, finely chopped
- Hot sauce of your choice
Vegetarian Option
For a meat-free version, you can swap out the turkey. Use plant-based ground meat or lentils as a base. Lentils cook well and add fiber. You can also use black beans, mashed into a paste.
Suitable substitutes for turkey:
- 1 lb plant-based ground meat
- 1 cup cooked lentils
- 1 can black beans, mashed
Asian-Inspired Twist
To give these meatballs an Asian flair, add sesame seeds and green onions. They enhance flavor and crunch. You can also mix in soy sauce with ginger and garlic for a rich taste. Consider using hoisin sauce for a sweet twist.
Suggested herbs and sauces:
- 2 tablespoons minced ginger
- 1/4 cup green onions, chopped
- 2 tablespoons hoisin sauce
Storage Info
How to Store Leftover Meatballs
To keep your leftover meatballs fresh, place them in an airtight container. This helps prevent them from drying out. Store them in the fridge immediately after they cool down. You can safely enjoy your meatballs for up to three days. If you want them to last longer, consider freezing.
Freezing Instructions
You can freeze meatballs both before and after cooking. If you freeze them raw, shape the meatballs and place them on a baking sheet. Freeze them for a few hours until firm, then transfer to a freezer bag. This way, they won’t stick together. If you freeze them after cooking, let them cool first. Store them in a container or a freezer bag.
To thaw, move the meatballs to the fridge for a few hours or overnight. You can also use the microwave for quick thawing. When ready to eat, heat them in the oven or on the stovetop until hot. This keeps the flavors intact.
Meal Prep Ideas
These turkey meatballs are great for meal prepping. You can make a large batch and use them in different meals. Try adding them to pasta, salads, or grain bowls. They also work well in wraps or sandwiches.
For a quick meal, pair meatballs with rice and steamed veggies. You can even toss them in a stir-fry for a delicious twist. Store meatballs in the fridge and enjoy them throughout the week.
FAQs
Can I use chicken instead of turkey?
Yes, you can use chicken instead of turkey. Chicken makes a lean meatball. It can be just as tasty. However, turkey often has more flavor. Chicken may need more seasoning to match turkey’s depth.
How long should I cook the meatballs?
Cook the meatballs for about 20 minutes at 400°F. This time helps them get golden brown. Make sure they reach an internal temperature of 165°F. Use a meat thermometer for accuracy.
Can I make the sauce ahead of time?
Yes, you can make the sauce ahead of time. It saves time on busy days. Store it in the fridge for up to five days. Use an airtight container to keep it fresh. When you’re ready, heat it on the stove.
You learned how to make tasty honey garlic turkey meatballs from start to finish. We covered the key ingredients, mixing tips, and baking methods. You also got advice on sauce prep and storage. Remember, the right mixture and cooking tips keep the meatballs moist. Feel free to try different variations to suit your taste. Whether you want spice or a vegetarian option, get creative. These meatballs can be a great meal prep choice too. Enjoy your cooking adventur
Honey Garlic Turkey Meatballs
Ingredients
- 1 lb ground turkey
- 0.5 cup breadcrumbs
- 0.25 cup freshly grated Parmesan cheese
- 0.25 cup fresh parsley, finely chopped
- 2 cloves garlic, minced
- 1 large egg
- 1 teaspoon kosher salt
- 0.5 teaspoon freshly cracked black pepper
- 0.25 teaspoon red pepper flakes (optional)
- 0.5 cup honey
- 0.25 cup soy sauce
- 1 tablespoon apple cider vinegar
- 1 teaspoon sesame oil
- to taste toasted sesame seeds, for garnish
Instructions
- In a sizable mixing bowl, combine the ground turkey, breadcrumbs, grated Parmesan cheese, chopped parsley, minced garlic, egg, kosher salt, black pepper, and optional red pepper flakes. Use your hands or a spatula to mix thoroughly until all ingredients are well incorporated.
- Preheat your oven to 400°F (200°C).
- Shape the turkey mixture into meatballs, aiming for a size of approximately 1 to 1.5 inches in diameter. Arrange the formed meatballs on a parchment-lined baking sheet, ensuring they are spaced apart.
- Bake the meatballs in the preheated oven for about 20 minutes, or until they reach an internal temperature of 165°F and develop a golden brown exterior.
- While the meatballs bake, create the honey garlic sauce. In a small saucepan over medium heat, combine the honey, soy sauce, apple cider vinegar, and sesame oil. Stir occasionally until it thickens slightly.
- Once the meatballs are finished baking, transfer them to a large mixing bowl. Drizzle the prepared honey garlic sauce over the meatballs and gently toss to coat.
- Place the coated meatballs back onto the baking sheet and return them to the oven for an additional 5 minutes.
- After the final baking, remove the meatballs from the oven and let them cool for a few minutes before serving.


 and [Tzatziki Recipe 2](#). Serve gyros with crispy fries or a fresh Greek salad. You can also add pickled vegetables for extra crunch. A glass of refreshing lemonade pairs well too. In this post, we explored making Greek Chicken Gyros. We looked at key ingredients like chicken thighs and fresh toppings. Following easy steps, you learned how to marinate and cook chicken perfectly. We shared tips for grilling and serving for the best taste. You can even try different proteins or vegetarian options. Now, you’re ready to make delicious gyros. Enjoy sharing this tasty dish with others!](https://dishtreats.com/wp-content/uploads/2025/07/f3d3865c-0788-4b9a-9d14-bf25eefe6fbb-768x768.webp)
![To make Chicken Pesto Pasta Salad, you need fresh and tasty ingredients. Here’s what you will use: - 2 cups penne pasta - 1 cup cooked chicken breast, shredded - 1/2 cup cherry tomatoes, halved - 1/2 cup mozzarella balls, drained - 1/4 cup fresh basil leaves, chopped - 1/4 cup pesto sauce - 2 tablespoons extra virgin olive oil - Juice of 1 fresh lemon - Salt and black pepper to taste - Optional: 1/4 cup pine nuts, toasted Each ingredient brings its own flavor. The penne pasta serves as a great base. The chicken adds protein. Tomatoes give freshness, while mozzarella adds creaminess. You can change things up with add-ins. Here are some great options: - Spinach or arugula for extra greens - Bell peppers for crunch - Grated Parmesan cheese for a salty kick - Cooked bacon for a smoky flavor - Quinoa instead of pasta for a healthier twist Feel free to mix and match. Your salad can be unique each time you make it. When it comes to pesto, you have choices. You can use fresh homemade pesto or store-bought pesto. Fresh pesto tastes bright and bold. You can make it with basil, garlic, pine nuts, cheese, and olive oil. Store-bought pesto saves time but may have preservatives. Both options work well in your salad. I recommend trying fresh pesto if you have the time. It elevates the dish and adds a personal touch. For the full recipe, check out the [Full Recipe]. 1. Cook the Pasta: Start by boiling water in a large pot. Add salt for flavor. When it boils, add 2 cups of penne pasta. Cook until al dente, about 8-10 minutes. Drain the pasta and rinse it with cold water to cool it down. 2. Mix the Ingredients: In a big mixing bowl, add 1 cup of shredded cooked chicken, 1/2 cup of halved cherry tomatoes, and 1/2 cup of drained mozzarella balls. Use a spatula to mix them well. 3. Combine with Pasta: Add the cooled penne pasta to the bowl. Gently mix to combine everything. Be careful not to break the mozzarella balls. 4. Make the Dressing: In a small bowl, whisk together 1/4 cup of pesto sauce, 2 tablespoons of extra virgin olive oil, and the juice from 1 fresh lemon. Add a pinch of salt and black pepper. 5. Dress the Salad: Pour the dressing over the pasta salad. Use a spoon or tongs to toss everything gently. Make sure all the ingredients are coated. 6. Fold in Fresh Herbs: Add 1/4 cup of chopped fresh basil and optional 1/4 cup of toasted pine nuts. Gently fold them into the salad without bruising the basil. 7. Taste and Adjust: Taste your salad. If it needs more flavor, add more salt, pepper, or lemon juice. 8. Chill Before Serving: Cover the salad with plastic wrap. Let it chill in the fridge for at least 30 minutes. This helps the flavors mix well. - Use a large pot to give the pasta room to move. - Salt the water before adding pasta. This makes it taste better. - Stir the pasta often while it cooks to prevent sticking. - Always taste the pasta a minute before the time is up. It should be firm but not hard. Making the dressing is quick and easy. In just a few steps, you can create a burst of flavor. Start with fresh pesto sauce. If you like a creamier dressing, mix in some yogurt or sour cream. Always taste your dressing before adding it to the salad. Adjust the flavors based on your taste. This simple dressing brings the whole dish together and makes it shine. For the full recipe, check out the details above. Mixing ingredients well is key to flavor. Start with the pasta. Make sure it is cold before adding other items. This keeps everything fresh. Next, add the chicken, tomatoes, and mozzarella. Use a spatula to fold gently. This ensures the mozzarella stays whole. It adds nice pops of flavor to each bite. Taste your dish as you cook. Start with a pinch of salt and pepper. The lemon juice adds brightness, so taste it first. If it needs more zing, add another squeeze. Always remember that you can add more, but you can't take it out. This rule helps you control the flavors. For a great look, serve the salad in a big bowl. Layer the salad for a beautiful view. Add extra basil leaves on top. A sprinkle of toasted pine nuts adds crunch. This makes your dish eye-catching and fun. Enjoy serving this colorful salad at any gathering! You can find the full recipe in the main article. {{image_4}} You can boost your Chicken Pesto Pasta Salad with more veggies and proteins. Adding fresh spinach or arugula gives a nice crunch. Bell peppers add color and sweetness. Toss in some peas or zucchini for a nutritious kick. You can also swap chicken for shrimp, tofu, or chickpeas. This way, you can cater to different tastes and dietary needs. When it comes to ingredients, you have choices. Using homemade pesto elevates your dish. It tastes fresh and bright. You can easily make pesto with basil, nuts, olive oil, and garlic. If you’re short on time, store-bought pesto works too. Just pick a brand with simple, quality ingredients. This saves time without losing flavor. You can adjust this recipe for various diets. For a gluten-free option, use gluten-free pasta. Many brands offer great alternatives. If you want a vegan version, replace the chicken with chickpeas or roasted vegetables. Use a vegan pesto made from nuts and nutritional yeast instead of cheese. These swaps keep the dish tasty and satisfying for everyone. To store leftover chicken pesto pasta salad, place it in an airtight container. Make sure the lid seals tightly to keep the salad fresh. You can keep it in the fridge for up to three days. If you notice the salad looking dry, add a splash of olive oil or lemon juice before serving. This will help restore some moisture. Freezing pasta salad is not the best choice since the texture can change. If you do want to freeze it, separate the chicken and pasta from the veggies and dressing. Store each part in a freezer-safe bag or container. You can freeze it for up to one month. When ready, thaw it in the fridge overnight before serving. Reheating chicken pesto pasta salad is simple. If you have stored it in the fridge, serve it cold or at room temperature. If you prefer it warm, place it in a microwave-safe dish. Heat it for about 30 seconds at a time until it reaches your desired warmth. Be careful not to overheat, as it can make the pasta mushy. Always check the seasoning again after reheating and adjust as needed. You can use tofu, shrimp, or chickpeas as great chicken alternatives. Tofu gives a nice texture. Shrimp adds a seafood twist. Chickpeas provide protein and a hearty feel. You can also try cooked turkey or beef for a different taste. The key is to use a protein you enjoy. This salad stays fresh in the fridge for three to five days. Make sure to store it in an airtight container. The flavors will blend nicely as it sits. However, the longer it sits, the softer the pasta becomes. Yes, you can prepare this salad a day in advance. It tastes even better after the flavors meld overnight. Just keep it covered in the fridge. If you use fresh basil, add it right before serving to keep it vibrant. Check out the Full Recipe for complete details! This article covered how to make a tasty Chicken Pesto Pasta Salad. You learned about key ingredients, and how to cook pasta just right. I shared some helpful tips for mixing and serving. Remember, you can add veggies or change spices to fit your taste. Store leftovers well for future meals. This salad is great for lunch or a gathering. Enjoy your cooking and happy eating!](https://dishtreats.com/wp-content/uploads/2025/06/0440c548-7b14-481e-8658-8224512ec7fd-768x768.webp)
![When you make cheesy sheet pan chicken quesadillas, you need the right ingredients for the best taste. Here’s what you will need: - Shredded chicken options - 2 cups cooked chicken, shredded (rotisserie chicken works wonderfully) - Cheese varieties - 1 cup shredded cheddar cheese - 1 cup shredded Monterey Jack cheese - 1/2 cup cream cheese, softened - 1/4 cup sour cream - Vegetables and other mix-ins - 1 medium red bell pepper, diced - 1 medium green bell pepper, diced - 1 small red onion, finely chopped - 1 tablespoon taco seasoning - 8 large flour tortillas - 1 tablespoon olive oil - Fresh cilantro, chopped (for garnish) - Salsa, for serving - Avocado or guacamole, for serving These ingredients blend together to create a flavor-packed meal. Using rotisserie chicken saves time and adds great taste. The mix of cheddar and Monterey Jack gives a creamy, melty texture. Adding bell peppers and onions adds crunch and freshness. The taco seasoning gives it that extra kick. Feel free to experiment with your favorite veggies and cheese. This recipe is versatile and allows you to customize it to your liking. For the full recipe, check out the details above. Set your oven to 400°F (200°C). This heat helps the quesadillas cook evenly. Grab a large baking sheet and line it with parchment paper. This step is key because it keeps the quesadillas from sticking. Plus, it makes clean-up a breeze. In a big bowl, mix your ingredients well. You will need cooked chicken, cheddar cheese, Monterey Jack cheese, cream cheese, sour cream, diced red and green bell peppers, chopped red onion, and taco seasoning. The mixture should be smooth and creamy. Look for a texture that is spreadable but not runny. This helps keep the filling inside the tortillas. On a flat surface, lay down four tortillas. Spread the chicken mixture evenly on each one. Make sure to reach the edges so every bite is tasty. Then, place another tortilla on top of each filled one. Press down gently. This helps them stick together and hold the filling in. Once your quesadillas are ready, move them to the baking sheet. Brush the tops with olive oil. This adds flavor and helps them turn golden brown. Bake in your preheated oven for 15-20 minutes. Look for a nice golden color and melted cheese inside. These signs tell you they are done. After baking, take the quesadillas out and let them cool for a few minutes. This makes slicing easier. Cut each quesadilla into quarters for serving. Aim for about 4-6 servings, depending on your crowd. These quesadilla wedges are perfect for sharing! Avoiding Soggy Tortillas To keep your tortillas crisp, avoid overfilling them. Less is more! Also, use the right amount of olive oil on top. This will help them brown nicely. Always make sure to bake them until they are golden brown. Best Types of Tortillas to Use For the best texture, I recommend using large flour tortillas. They hold the filling well and become soft when baked. Corn tortillas can work too, but they may crack more easily. Pairing with Dipping Sauces Serve your quesadillas with a variety of dips. Salsa is a classic choice. You can also offer guacamole and sour cream. These add creaminess and flavor. Garnishes for Presentation To make your dish look great, sprinkle fresh cilantro on top. You can also add sliced jalapeños for a pop of color. This makes your quesadillas look fancy and appetizing. Adjusting the Recipe If you have a big group, you can easily double the recipe. Just make sure to use a larger baking sheet. This way, you can cook more quesadillas at once. Time-Saving Tips Use rotisserie chicken for quick prep. It saves time and adds great flavor. You can also chop your veggies ahead of time. This keeps the cooking quick and easy. To see the full recipe, check out the [Full Recipe]. {{image_4}} Alternative Proteins You can switch the chicken for other proteins. Try shredded beef or cooked shrimp. For a lighter option, use turkey. If you prefer plant-based meals, chickpeas or tofu work well too. Different Cheese Combos Cheese is key to quesadillas. You can mix different cheeses for fun flavors. Pepper Jack adds spice, while gouda gives a smoky touch. Experiment with cream cheese and feta for creamy bites. Adding Spices or Herbs Spice up your quesadillas! Add chili powder or cumin for warmth. Fresh herbs like cilantro or parsley brighten flavors. A squeeze of lime gives a fresh zing. Incorporating Beans or Corn Beans and corn boost nutrition and flavor. Black beans add protein, while corn brings sweetness. Mix them into your filling for a hearty twist. Gluten-Free Options To make this dish gluten-free, swap flour tortillas for corn ones. Always check labels to ensure they meet your needs. You can also serve the filling on lettuce wraps. Vegetarian Adjustments For a vegetarian version, skip the chicken. Use mushrooms or zucchini for a meaty texture. Add more beans and veggies to keep it filling. For the full recipe, check the [Full Recipe]. To store your cheesy sheet pan chicken quesadillas, let them cool first. Wrap them tightly in plastic wrap or foil. You can also place them in an airtight container. This keeps them fresh and tasty. - Shelf Life: When stored properly, quesadillas last up to 3 days in the fridge. After that, they may lose flavor and freshness. If you want to save some for later, freezing is great! - How to Freeze Quesadillas: First, cool them completely. Then, wrap each quesadilla in plastic wrap. Place them in a freezer-safe bag or container. This helps prevent freezer burn. - Reheating Tips for Best Results: To reheat, thaw overnight in the fridge. Then, bake them at 350°F (175°C) for about 10 minutes. This makes them warm and crispy again. Don't let any filling go to waste! - Creative Ways to Use Leftovers: You can add leftover filling to salads or burritos. Mix it with scrambled eggs for a tasty breakfast. - Recipes Using Leftover Filling: Try using the filling in omelets or as a topping for nachos. You can also use it in stuffed peppers for a fun twist. For more details on making this dish, check out the [Full Recipe]. To make this dish gluten-free, swap out regular flour tortillas for gluten-free ones. Many brands offer great taste and texture. You can also check for taco seasoning that is gluten-free. This way, you keep all the flavor without the gluten. Yes, you can use raw chicken. Just make sure to cook it first. You can bake or grill the chicken until it reaches 165°F (75°C). Shred the cooked chicken before mixing it with the other ingredients. This keeps your quesadillas safe and tasty. To reheat quesadillas, use the oven or a skillet. Preheat the oven to 350°F (175°C) and bake for about 10 minutes. If using a skillet, heat it over medium heat. Cook for 2-3 minutes on each side until warm and crispy. This way, you keep the texture nice. Look for a golden brown color on the outside. You should also see melted cheese oozing out from the edges. A crispy texture means they are ready to enjoy. Let them cool for a few minutes after baking before slicing. Quesadillas pair well with many sides. You can serve them with salsa or guacamole for dipping. A fresh salad or some Mexican rice adds a nice touch too. Black beans are another great side option. These sides enhance your meal and make it even more fun to eat. You now have all the tools to make great chicken quesadillas. We covered essential ingredients and step-by-step instructions. Use the tips to avoid soggy tortillas and serve with tasty dips. Don’t forget to explore variations to suit your taste. Store any leftovers properly for future meals. Whether for a quiet dinner or a crowd, you’re ready to impress. Enjoy your cooking and have fun creating delicious quesadillas!](https://dishtreats.com/wp-content/uploads/2025/07/9e515845-1856-4bb5-82ee-80ca33afd87d-768x768.webp)