
Spicy Sesame Noodle Salad Easy and Flavorful Recipe


Are you ready to elevate your salad game? This Spicy Sesame Noodle Salad is easy to make and packed with flavor. With fresh veggies, a spicy dressing, and simple ingredients, you’ll want to make it again and again. Whether you’re enjoying it for lunch or dinner, this recipe fits all occasions. Let’s dive into the ingredients and get started on a delicious journey!
Why I Love This Recipe
- Fresh and Crunchy: This salad is packed with fresh vegetables that add a delightful crunch in every bite.
- Spice Level Control: The recipe allows you to adjust the spice level according to your preference, making it versatile for everyone.
- Quick and Easy: With a prep time of just 15 minutes, it’s perfect for a quick lunch or dinner.
- Flavorful Dressing: The combination of soy sauce, sesame oil, and sriracha creates a rich and savory dressing that ties everything together.
Ingredients
Main Ingredients for Spicy Sesame Noodle Salad
To make this vibrant dish, you will need:
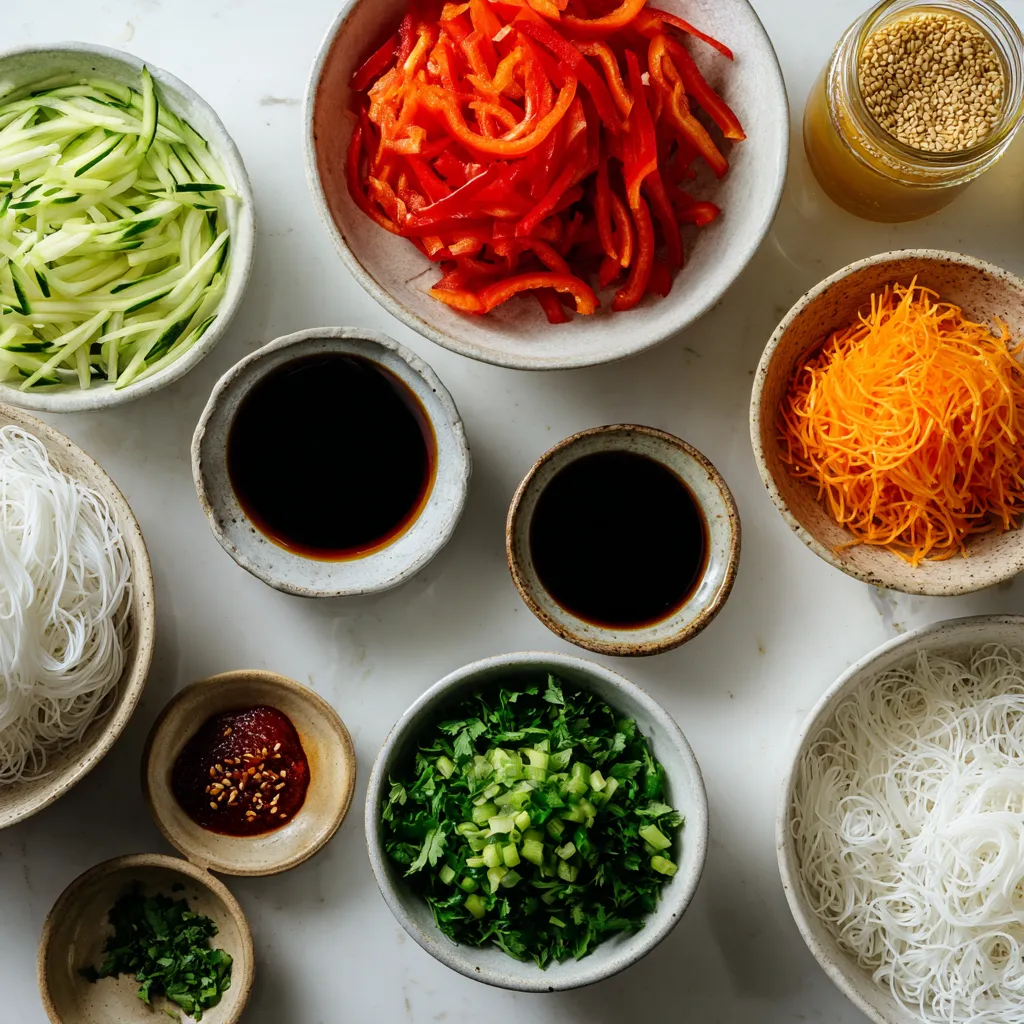
- 200g rice noodles
- 1 red bell pepper, thinly sliced
- 1 cucumber, julienned
- 1 medium carrot, grated
- 4 green onions, sliced diagonally
- 1/4 cup fresh cilantro, roughly chopped
- 1/4 cup sesame seeds, lightly toasted
These main ingredients give the salad a crunchy texture and colorful look. The rice noodles serve as a soft base, while the fresh veggies add a burst of flavor and nutrition.
Condiments and Seasonings
Next, we need some key condiments to create that bold flavor:
- 3 tablespoons soy sauce
- 2 tablespoons sesame oil
- 1 tablespoon rice vinegar
- 1 tablespoon sriracha or chili paste (adjust based on spice preference)
- 1 tablespoon honey or maple syrup
- Salt and pepper to taste
These condiments bring the salad to life! The soy sauce and sesame oil add depth, while the sriracha gives it that spicy kick. Honey or maple syrup balances the heat with a hint of sweetness.
Optional Add-Ins for Extra Flavor
For those who want to kick it up a notch, consider adding:
- Cooked protein like chicken, shrimp, or tofu
- Extra veggies like snap peas or radishes
- Peanuts or cashews for crunch
These optional add-ins not only enhance the flavor, but also make the dish more filling. You can mix and match based on your taste and what you have at home.
Step-by-Step Instructions
Cooking the Noodles
Start by boiling water in a pot. Add 200g of rice noodles when the water is bubbling. Cook them for about 5-7 minutes. You want them tender but not mushy. Drain the noodles and rinse them under cold water. This stops the cooking. Set the cooled noodles aside in a large mixing bowl.
Preparing the Vegetables
While the noodles cook, wash your veggies. Thinly slice one red bell pepper. Julienne one cucumber, and grate one medium carrot. Next, slice four green onions at an angle. Combine all these fresh vegetables in your mixing bowl with the cooled noodles.
Making the Spicy Dressing
In a small bowl, whisk together three tablespoons of soy sauce, two tablespoons of sesame oil, and one tablespoon of rice vinegar. Then add one tablespoon of sriracha or chili paste. If you like it spicier, feel free to add more. Finally, mix in one tablespoon of honey or maple syrup for a touch of sweetness.
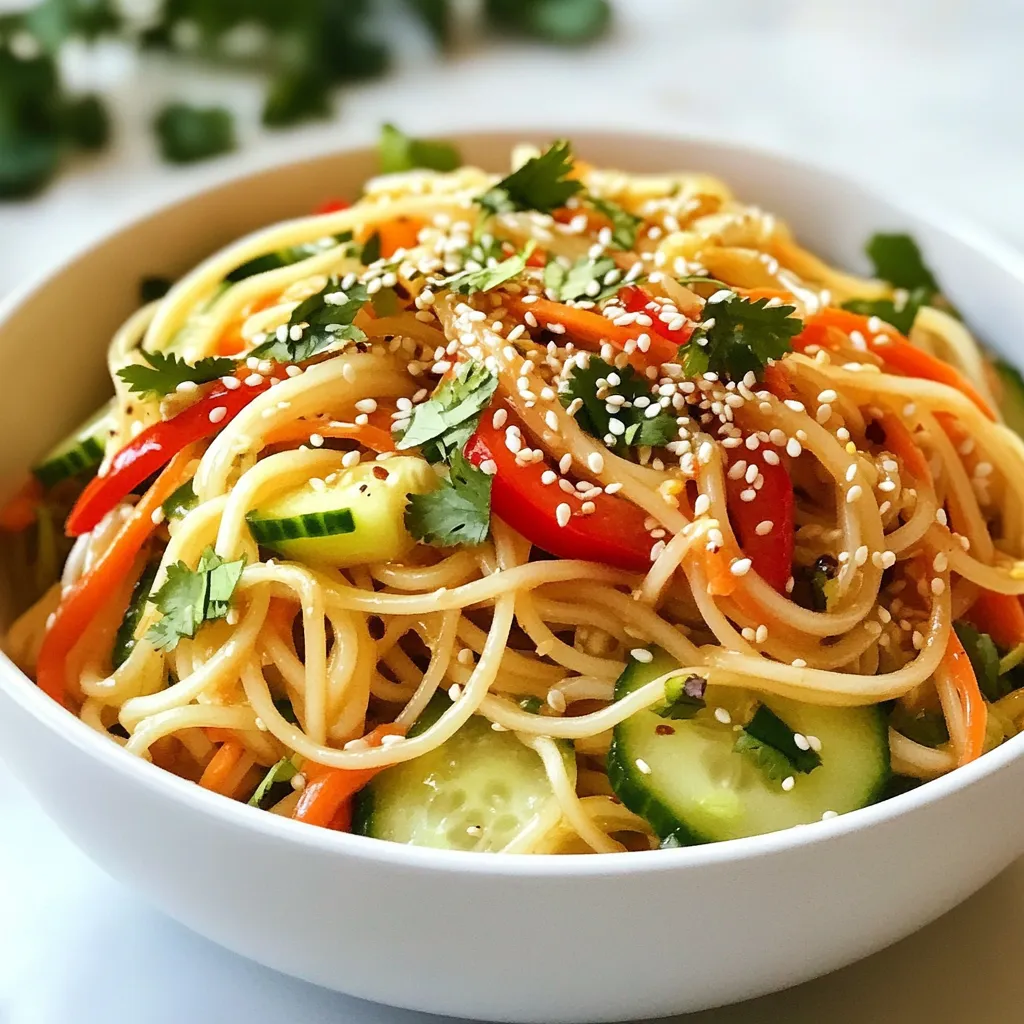
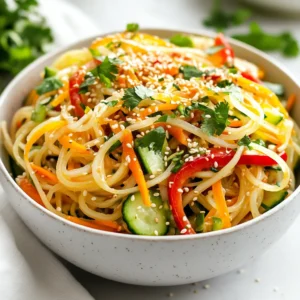
Combining Ingredients
Pour the dressing over the noodles and veggies in the bowl. Gently toss everything together until each piece is coated. You want to blend those flavors well. Next, sprinkle 1/4 cup of lightly toasted sesame seeds and 1/4 cup of roughly chopped cilantro on top. Toss it all together one more time. Season with salt and pepper to taste. For the best flavor, cover the salad and chill it in the fridge for 30 minutes before serving.
Tips & Tricks
Adjusting Spice Levels
To change the heat in your Spicy Sesame Noodle Salad, start with sriracha. Use 1 tablespoon for mild heat. If you want more spice, add more sriracha by half a tablespoon. You can even mix in chili paste for a different flavor. Always taste the dressing before mixing it into the salad. This way, you can get the spice just right for your taste.
Ensuring Perfectly Cooked Noodles
Cooking rice noodles can be tricky. Follow the package instructions carefully, usually around 5-7 minutes. Check the noodles a minute early. They should be tender but not mushy. After cooking, drain and rinse them under cold water. This stops the cooking process and keeps the noodles from sticking together. Make sure they cool down completely before adding them to the salad.
Serving Suggestions for Presentation
Presentation matters, even for a simple salad. Serve the salad in bright bowls or on a big platter. Sprinkle extra sesame seeds and fresh cilantro on top for color. You can add lime wedges on the side. This gives guests a zesty option to squeeze over their servings. A beautiful dish makes the meal more enjoyable, so take a moment to arrange it nicely!
Pro Tips
- Use Fresh Ingredients: Opt for the freshest vegetables you can find, as they enhance the flavor and texture of the salad. Fresh cilantro and crisp vegetables make a significant difference.
- Adjust the Spice Level: Feel free to customize the level of heat in your dressing by adjusting the amount of sriracha or chili paste. Start with less and add more gradually to suit your taste.
- Toast Sesame Seeds: Lightly toasting sesame seeds before adding them to the salad brings out their nutty flavor and adds a delightful crunch. Just a few minutes in a dry pan will do the trick!
- Chill for Best Flavor: Allow the salad to chill in the refrigerator for at least 30 minutes before serving. This resting time helps the flavors meld together beautifully.
Variations
Protein Additions (Chicken, Tofu, Shrimp)
Adding protein boosts the flavor and makes the salad heartier. You can use shredded chicken, cubed tofu, or cooked shrimp. If you choose chicken, grill or sauté it first. For tofu, press it to remove excess water before cooking. Shrimp cooks quickly and adds a nice touch. Just sauté them until pink. Mix your choice of protein into the salad for a filling meal.
Gluten-Free Options
If you need a gluten-free salad, use rice noodles. They are naturally gluten-free and perfect for this dish. You can also swap soy sauce for tamari, which is gluten-free. Just check your labels to ensure all ingredients meet your needs. This way, everyone can enjoy the spicy sesame noodle salad without worry.
Add Seasonal Vegetables
Feel free to get creative with vegetables! Use what’s fresh and in season. For spring, add peas or asparagus. In the summer, try cherry tomatoes or zucchini. Autumn brings great options like roasted squash. Adding seasonal veggies keeps the salad fresh and exciting. It also makes your meal colorful and nutrient-rich.
Storage Info
Best Practices for Storing Leftovers
To store your spicy sesame noodle salad, place it in an airtight container. This keeps the flavors fresh. You can store it in the fridge for up to three days. Make sure to separate the dressing if you want to keep the noodles firm.
Freezing Tips for Future Meals
Freezing the salad is possible, but some textures may change. If you want to freeze it, store the noodles and veggies separately from the dressing. Use freezer-safe containers or bags. You can freeze it for up to a month. When ready to eat, let it thaw overnight in the fridge.
Reheating Instructions
You can eat the salad cold or warm it slightly. If you heat it, use a microwave. Heat in short bursts, stirring in between. This way, the noodles warm without getting mushy. After reheating, add fresh herbs or extra dressing for a great taste!
FAQs
What can I substitute for rice noodles?
You can use other noodles like soba or whole wheat pasta. Zucchini noodles also work well. They add a fresh taste and keep the dish light. Make sure to cook them to your liking for best results.
How long does the salad last in the fridge?
The salad lasts about 3-4 days in the fridge. To keep it fresh, store it in an airtight container. The flavors will meld, making it even tastier over time.
Can I make this salad in advance?
Yes, you can make this salad a day ahead. Just store it in the fridge. The flavors develop nicely overnight. If you like, add the sesame seeds and cilantro just before serving.
Is it possible to make this dish vegan?
Absolutely! To make it vegan, use maple syrup instead of honey. Also, ensure your soy sauce is vegan-friendly. The salad will still be full of flavor and satisfying.
This article covered all you need for a tasty spicy sesame noodle salad. We explored key ingredients, preparation steps, and helpful tips. You learned how to adjust spice levels and add proteins or veggies. The storage tips ensure your salad stays fresh longer.
Try your version and enjoy each delicious bite. Cooking can be fun and simpl
Spicy Sesame Noodle Salad
Ingredients
- 200 g rice noodles
- 1 piece red bell pepper, thinly sliced
- 1 piece cucumber, julienned
- 1 medium carrot, grated
- 4 pieces green onions, sliced diagonally
- 1/4 cup fresh cilantro, roughly chopped
- 1/4 cup sesame seeds, lightly toasted
- 3 tablespoons soy sauce
- 2 tablespoons sesame oil
- 1 tablespoon rice vinegar
- 1 tablespoon sriracha or chili paste
- 1 tablespoon honey or maple syrup
- to taste salt and pepper
Instructions
- Cook the noodles by bringing a pot of water to a rapid boil. Add the rice noodles and cook according to package instructions, typically around 5-7 minutes, until tender but slightly firm. Drain and rinse under cold water, then set aside in a large mixing bowl.
- While the noodles are cooking, wash and prepare the vegetables. Thinly slice the red bell pepper, julienne the cucumber, grate the carrot, and diagonally slice the green onions. Combine all the chopped vegetables in the mixing bowl with the cooled noodles.
- In a small bowl, whisk together the soy sauce, sesame oil, rice vinegar, sriracha, and honey or maple syrup until smooth. Adjust the heat by adding more sriracha if desired.
- Pour the dressing over the noodles and vegetables in the mixing bowl. Gently toss until everything is evenly coated.
- Sprinkle the toasted sesame seeds and chopped cilantro over the salad. Toss gently once more and season with salt and pepper to taste.
- Cover and chill in the refrigerator for about 30 minutes before serving to allow flavors to meld.


![To make the best creamy buffalo chicken dip, you need the following key ingredients: - 2 cups shredded cooked chicken - 1/2 cup cream cheese, softened to room temperature - 1/2 cup sour cream - 1/2 cup plain Greek yogurt - 1/2 cup buffalo sauce (adjust based on desired heat level) - 1 cup shredded sharp cheddar cheese These ingredients create a rich and creamy base that is sure to please any crowd. The chicken adds protein and heartiness, while the cream cheese, sour cream, and Greek yogurt provide a smooth texture. Buffalo sauce gives it that spicy kick, and the sharp cheddar cheese adds a wonderful flavor. You can also enhance your dip with these optional ingredients for extra flavor: - 1/2 teaspoon garlic powder - 1/2 teaspoon onion powder - 1 tablespoon fresh chives, finely chopped (plus additional for garnishing) Garlic powder and onion powder add depth to the dip's flavor profile. Fresh chives bring a pop of color and a mild onion taste. Feel free to add your favorite seasonings to make it truly yours. For the full recipe, check out [Full Recipe]. To start, we need to mix the creamy base. In a large mixing bowl, combine the softened cream cheese, sour cream, and Greek yogurt. Use a hand mixer or spatula to blend until smooth. Make sure there are no lumps. This creamy base will give the dip its rich texture. Next, we add the chicken and buffalo sauce. Fold in the shredded cooked chicken and buffalo sauce gently. Add garlic powder, onion powder, salt, and pepper. Mix until everything is well combined. The buffalo sauce gives this dip its signature kick. Adjust the sauce to suit your taste. Now, we prepare to bake the dip. Spoon the creamy chicken mixture into a medium-sized baking dish. Spread it out evenly. For a cheesy finish, sprinkle some reserved cheddar cheese on top. Preheat your oven to 350°F (175°C). Place the baking dish in the oven and bake for about 20 minutes. The dip should be bubbling and the top lightly golden. After baking, let the dip cool for about 5 minutes. This helps prevent burns when serving. Garnish with fresh chopped chives for a pop of color. For dipping, I recommend using tortilla chips, crunchy celery sticks, or sweet carrot sticks. These dippers complement the creamy dip perfectly. Enjoy this dish at your next gathering or game day! For the complete recipe, check out the [Full Recipe]. To get the perfect creaminess, blend the cream cheese, sour cream, and Greek yogurt well. Use a hand mixer for a smooth texture. This step ensures your dip is rich and velvety. If it feels too thick, add a splash of buffalo sauce to loosen it up. When it comes to heat, buffalo sauce is your friend. Start with half a cup, then taste. If you want more heat, add a little more sauce. Remember, you can always add, but you can't take away! For mixing, I recommend a sturdy mixing bowl and a hand mixer. This combination makes it easy to achieve a smooth mix. If you prefer, a spatula works just as well. For baking, use a medium-sized baking dish. A glass or ceramic dish helps the dip bake evenly. You might also want a cookie sheet underneath for easy handling. Pair your dip with tortilla chips for crunch. Fresh celery and carrot sticks add a great veggie option. You can even set up a fun dip station with various dippers. Try serving the dip in individual ramekins for a party. It makes each serving special and easy to grab. A wooden cutting board adds a rustic touch, making it look even more inviting! {{image_4}} You can easily make this dip fit your needs. For a gluten-free option, use gluten-free buffalo sauce. Check labels to ensure all ingredients are safe. You can also swap regular sour cream with a gluten-free version. If you're watching carbs, try using cream cheese and Greek yogurt as they are lower in carbs. You can reduce the amount of buffalo sauce or serve with veggies instead of chips. Celery sticks and carrot sticks are great low-carb dippers! Want to shake things up? Add a twist with different cheeses. Blue cheese adds a bold flavor that many love. You can also use mozzarella or pepper jack for a creamy texture and a kick. Incorporate extra spices, like smoked paprika or cayenne, to enhance the flavor. Adding diced bell peppers or jalapeños gives it a crunchy texture. These simple changes make your dip unique and fun! No oven? No problem! You can make this dip in a slow cooker. Just mix all ingredients and cook on low for 2-3 hours. Stir occasionally for a creamy result. If you have an air fryer, you can use it too! Place the dip in a heat-safe dish and cook at 350°F for about 15-20 minutes. This method gives it a crispy top while keeping the inside gooey. For the full recipe, check out the link. To keep your creamy buffalo chicken dip fresh, store it in an airtight container. Make sure to let it cool completely before sealing. This helps lock in flavors. Place the container in the fridge. Your dip can last up to 3 days this way. If you have more leftovers, you can freeze it. Use freezer-safe bags or containers. Just be sure to remove as much air as possible. When properly stored, it can last up to 3 months in the freezer. When it comes time to enjoy your dip again, reheating it is key. The best method is to use the oven. Preheat the oven to 350°F (175°C). Place the dip in an oven-safe dish and cover it with foil. Heat for about 15-20 minutes. This keeps the dip creamy and prevents it from drying out. You can use the microwave if you're short on time. Place a portion in a microwave-safe bowl. Heat in 30-second bursts, stirring in between. This method may change the texture a bit, but it still tastes great. In the fridge, your dip stays fresh for about 3 days. After that, the flavor and texture may change. Signs that your dip has gone bad include an off smell, discoloration, or separation. If you see any of these signs, it's best to throw it away. Always trust your senses! For the full recipe, check out the Buffalo Bliss Chicken Dip section above. Can I make this dip ahead of time? Yes, you can prepare this dip ahead of time. Mix all the ingredients and store it in the fridge. Bake it just before serving. This makes it easy for parties. Is it possible to use canned chicken instead of shredded? Yes, you can use canned chicken. It saves time and is easy to mix in. Just drain and shred the chicken before adding it to the dip. The dip has about 300 calories per serving. Each serving is roughly 1/2 cup. If you want to lower calories, use low-fat cream cheese or Greek yogurt. This gives you a tasty dip without adding too many calories. Creamy Buffalo Chicken Dip is great for game day, parties, or family gatherings. It’s a crowd-pleaser! Pair it with cold drinks like beer or soda. You can also serve it with fresh veggies and chips for extra crunch. This article covered how to make creamy buffalo chicken dip, from ingredients to storage. We explored main and optional ingredients, easy step-by-step instructions, tips for a perfect dip, and variations. In the end, making this dip is all about fun and flavor. Enjoy experimenting with ingredients and serving ideas. Whether for game day or a gathering, this dip will impress your guests!](https://dishtreats.com/wp-content/uploads/2025/07/05957703-937f-462f-adea-92812be79973-768x768.webp)