Creamy Herb Chicken Casserole Easy and Flavorful Meal

Are you looking for a quick, tasty meal that pleases everyone? Look no further! My Creamy Herb Chicken Casserole combines tender chicken, fresh broccoli, and rich flavors for a dish that’s easy to make. In this article, I’ll walk you through simple steps, helpful tips, and fun variations. Get ready to impress your family with this one-pan wonder that’s sure to be a new favorite!
Why I Love This Recipe
- Quick and Easy: This casserole comes together in just 15 minutes of prep time, making it a perfect weeknight meal.
- Comforting Flavors: The combination of creamy mushroom soup, cheddar cheese, and herbs creates a rich and satisfying dish.
- Healthy Ingredients: Packed with chicken and broccoli, it’s a wholesome option that doesn’t compromise on taste.
- Crispy Topping: The panko breadcrumbs add a delightful crunch that contrasts beautifully with the creamy filling.
Ingredients
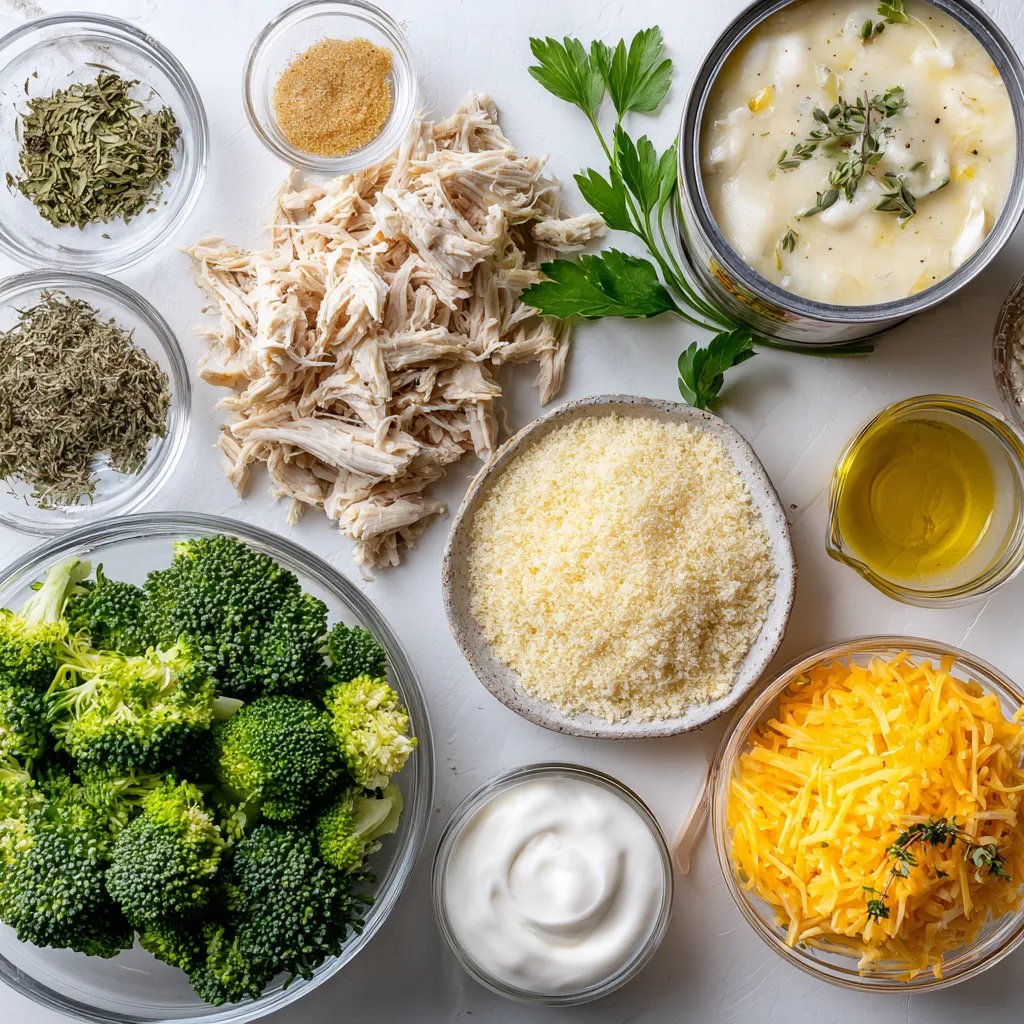
Here is what you need for the creamy herb chicken casserole:
- 2 cups cooked chicken, shredded into bite-sized pieces
- 1 cup fresh broccoli florets, lightly steamed until vibrant
- 1 cup cooked rice, either white or brown
- 1 can cream of mushroom soup for a rich base
- 1 cup sour cream for added creaminess
- 1 teaspoon garlic powder for depth of flavor
- 1 teaspoon onion powder to enhance sweetness
- 1 teaspoon dried thyme, crumbled
- 1 teaspoon dried basil for an aromatic touch
- 1 cup shredded cheddar cheese, preferably sharp
- Salt and freshly ground black pepper, to taste
- 1 cup panko breadcrumbs for a crispy topping
- 2 tablespoons olive oil, to coat the breadcrumbs
- Optional garnish: fresh parsley, finely chopped
Gather these ingredients to make a flavorful and comforting meal. Each one plays a key role in making this dish rich and satisfying. The cream of mushroom soup and sour cream add creaminess, while the herbs give it a lovely aroma. Don’t forget the cheddar for that cheesy goodness!
Step-by-Step Instructions
Preheat the Oven
Set your oven to 350°F (175°C). Preheating is key. It ensures that your casserole cooks evenly. If you skip this step, the dish may not bake well.
Prepare the Chicken Mixture
In a large bowl, mix the shredded chicken, steamed broccoli, and cooked rice. Add the cream of mushroom soup and sour cream. Sprinkle in garlic powder, onion powder, thyme, and basil. Season with salt and pepper. Stir until everything is well combined. This mixture is the heart of your casserole.
Assemble the Casserole
Grease a 9×13-inch casserole dish lightly. Spoon the chicken mixture into the dish. Spread it evenly. This helps it cook uniformly. Next, sprinkle the shredded cheddar cheese over the top. This cheese layer adds flavor and richness.
Prepare the Topping
In a small bowl, mix panko breadcrumbs with olive oil. Stir well. This oil helps the breadcrumbs become crispy. Evenly sprinkle this topping over the cheese layer. This step gives the casserole a crunchy finish.
Bake the Casserole
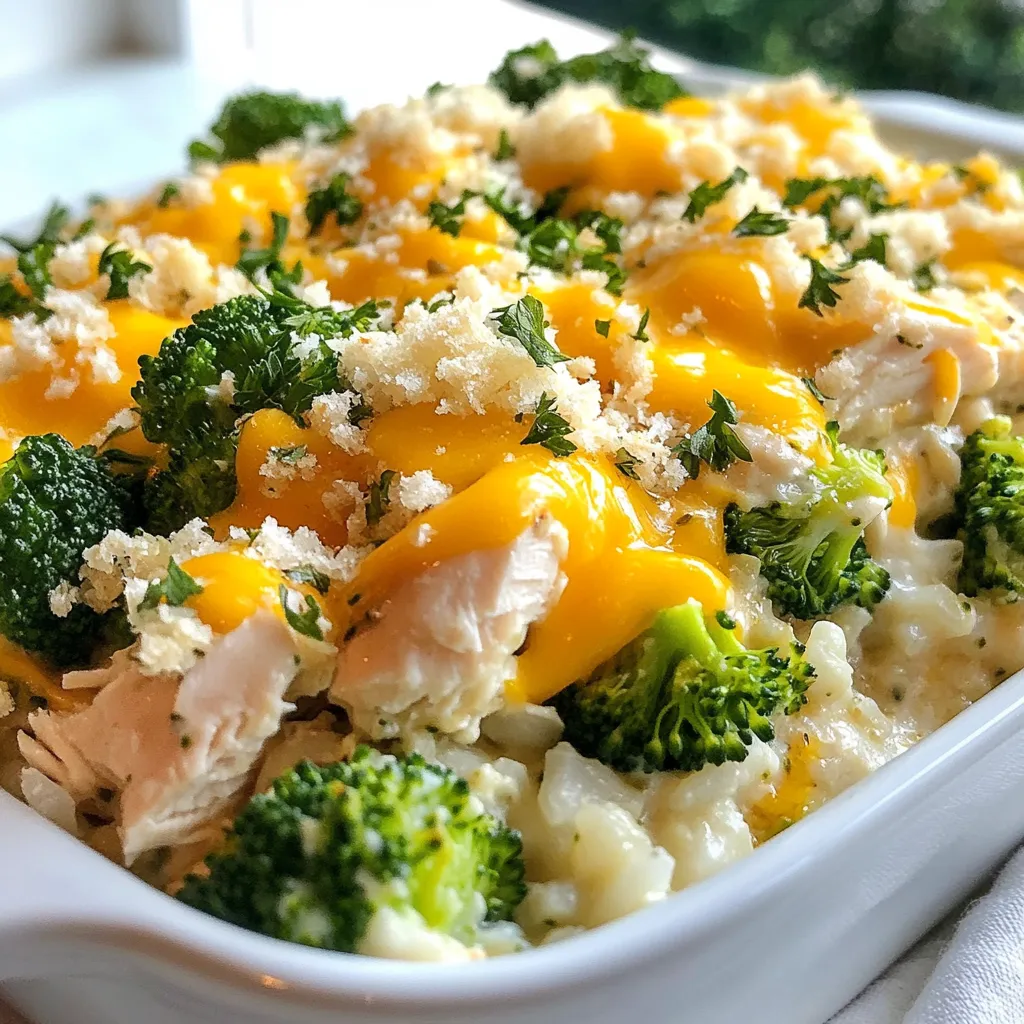
Place the casserole in the oven. Bake for 25-30 minutes. Look for bubbling edges and a golden top. These signs mean it’s ready.
Cool and Serve
After baking, let the casserole cool for about 5 minutes. This cooling time helps it set. For a nice touch, garnish with finely chopped parsley. This adds color and freshness to your dish. Enjoy every bite!
Tips & Tricks
Choosing the Right Chicken
For this dish, you can use leftover chicken or rotisserie chicken. It saves time and adds great flavor. Shredding chicken is easy. Just use two forks to pull apart the meat into bite-sized pieces. Make sure to remove any bones or skin. If starting with raw chicken, boil it until cooked through, then shred.
Enhancing Flavor
To boost flavor, add fresh herbs like parsley, rosemary, or dill. You can also mix in spices like paprika or cayenne for some heat. A squeeze of lemon juice adds brightness. Experiment with these options to find what you love best.
Ensuring Creaminess
To get the perfect creamy texture, use full-fat sour cream and cream of mushroom soup. Mixing them well ensures a smooth base. If you want it even creamier, add a splash of chicken broth or a bit of cream. Stirring in cheese while mixing helps make it rich and luscious.
Pro Tips
- Cooked Chicken: Using leftover rotisserie chicken can save you time and add extra flavor to your casserole.
- Broccoli Prep: Steaming the broccoli until it’s vibrant ensures it retains its nutrients and bright color in the dish.
- Cheese Choice: Opting for sharp cheddar cheese enhances the flavor profile, making each bite more satisfying.
- Crispy Topping: Coating the panko breadcrumbs with olive oil before baking gives them a delightful crunch that’s irresistible.
Variations
Vegetarian Option
You can make this casserole without meat. For a vegetarian option, use cooked chickpeas or lentils instead of chicken. These add protein and texture. Instead of cream of mushroom soup, use a vegetable cream soup. This keeps the creamy base while adding more flavor.
Different Types of Cheese
Cheddar cheese is great, but you can switch it up. Try mozzarella for a milder taste. If you want a tangy flavor, use feta cheese. You can also mix cheeses for a richer taste. Just remember to keep the total amount the same.
Healthier Swaps
You can lighten up this dish easily. Use low-fat sour cream to cut calories. Brown rice is a good swap for white rice. For gluten-free options, look for gluten-free breadcrumbs. These changes keep the dish tasty while making it a bit healthier.
Storage Info
Refrigeration
To keep your creamy herb chicken casserole fresh, store it in an airtight container. This helps lock in moisture and flavor. Let the casserole cool down before placing it in the fridge. It lasts up to three days. When you’re ready to enjoy it again, simply take it out and reheat.
Freezing Tips
Freezing is a great way to save leftovers for later. First, let the casserole cool completely. Then, cut it into individual portions. Wrap each piece tightly in plastic wrap. Place the wrapped portions in a freezer-safe bag or container. This method avoids freezer burn. You can freeze it for up to three months for best quality.
Reheating Instructions
To reheat, you have a few options. If you use the oven, preheat it to 350°F (175°C). Place the casserole in a baking dish and cover it with foil. Heat for about 20-25 minutes, or until warmed through. If you’re short on time, you can use the microwave. Place a portion on a microwave-safe plate and heat for 1-2 minutes. Stir halfway to ensure even heating. Both methods will help keep the texture and flavor intact.
FAQs
How can I make this casserole ahead of time?
You can prepare this casserole in advance. First, make the chicken mixture and layer it in the dish. Do not add the cheese or breadcrumbs yet. Cover it tightly with plastic wrap and store it in the fridge. You can keep it there for up to two days. When you are ready to bake, add the cheese and breadcrumbs on top. Then bake as directed.
Can I use rotisserie chicken?
Yes, using rotisserie chicken is a great idea! It saves time and effort. The chicken is already cooked, so you just shred it. This adds great flavor and makes the dish even easier to prepare. Plus, rotisserie chicken is juicy and tender, which enhances the casserole’s texture.
What can I serve with creamy herb chicken casserole?
This casserole pairs well with many side dishes. Try serving it with a fresh green salad for a light touch. Garlic bread is also a great choice, adding crunch and flavor. Steamed vegetables like green beans or carrots can round out your meal nicely.
Is it possible to make this casserole dairy-free?
Yes, you can make this casserole dairy-free! Use dairy-free sour cream and a dairy-free cream of mushroom soup. For cheese, try a plant-based cheese or omit it altogether. This way, you can still enjoy the creamy texture without dairy.
This blog post guides you through making a creamy herb chicken casserole. We discussed ingredients like chicken, broccoli, and cheese. I shared step-by-step instructions, tips for flavor, and variations to suit your needs. You can easily store leftovers and reheat them later.
Try this recipe today, and enjoy a tasty, comforting meal with your family. Cooking is fun, and I hope you make this dish your ow

Creamy Herb Chicken Casserole
Ingredients
- 2 cups cooked chicken, shredded into bite-sized pieces
- 1 cup fresh broccoli florets, lightly steamed
- 1 cup cooked rice
- 1 can (10.5 oz) cream of mushroom soup
- 1 cup sour cream
- 1 teaspoon garlic powder
- 1 teaspoon onion powder
- 1 teaspoon dried thyme
- 1 teaspoon dried basil
- 1 cup shredded cheddar cheese
- to taste salt and freshly ground black pepper
- 1 cup panko breadcrumbs
- 2 tablespoons olive oil
- optional fresh parsley, finely chopped
Instructions
- Preheat your oven to 350°F (175°C) to prepare for baking.
- In a large mixing bowl, thoroughly combine the shredded chicken, steamed broccoli, and cooked rice. Add in the cream of mushroom soup and sour cream, followed by the garlic powder, onion powder, thyme, basil, salt, and pepper. Stir until all ingredients are evenly mixed.
- Lightly grease a 9x13-inch casserole dish with cooking spray or butter, then carefully spoon the chicken mixture into the dish, spreading it out evenly to ensure consistent cooking.
- Evenly sprinkle the shredded cheddar cheese over the top of the chicken mixture, making sure to cover the surface well for melty goodness.
- In a separate small bowl, combine the panko breadcrumbs with the olive oil, stirring until the breadcrumbs are thoroughly coated. Evenly sprinkle this mixture over the layer of cheese for an extra crunchy topping.
- Place the casserole in the preheated oven and bake for 25-30 minutes, or until the casserole is bubbling and the top is a delicious golden brown.
- Once baked, remove the casserole from the oven and allow it to cool for about 5 minutes before serving. For a touch of freshness, garnish with finely chopped parsley if desired.



![- 1 cup uncooked jasmine rice - 1 pound shrimp, peeled and deveined - 2 tablespoons vegetable oil - 3 tablespoons soy sauce - 1 tablespoon sesame oil - Salt and pepper, to taste - 1 cup mixed vegetables - 2 cloves garlic, minced - Fresh green onions, for garnish When I make Easy Shrimp Fried Rice, I always start with the main ingredients. The jasmine rice gives a lovely aroma and texture. For the shrimp, I prefer fresh, peeled, and deveined ones. They cook quickly and taste great. Seasonings are key to this dish. Soy sauce adds umami, while sesame oil gives a nutty flavor. Always remember to season with salt and pepper to bring out the taste. I love adding optional ingredients for extra flavor and color. Mixed veggies like peas and carrots add a nice crunch. Minced garlic gives it a punch, and fresh green onions on top make it look beautiful. For the full recipe, check out the details. Enjoy cooking! - First, rinse 1 cup of jasmine rice under cold water. Use your hands to stir the rice as you rinse. This helps remove excess starch. Keep rinsing until the water runs clear. Drain the rice well. - Next, take a medium saucepan. Add the rinsed rice along with 2 cups of water or low-sodium chicken broth. Bring it to a boil over high heat. Once it boils, lower the heat. Cover the pot with a lid and let it simmer for 15 minutes. The rice will absorb the liquid and become tender. When done, fluff the rice with a fork and set it aside to cool. - Now, heat 2 tablespoons of vegetable oil in a large skillet or wok over medium-high heat. Add 2 cloves of minced garlic and 1 small finely chopped onion. Sauté them for 2-3 minutes. The garlic should smell nice, and the onion will turn clear. - Then, add 1 pound of peeled and deveined shrimp to the skillet. Spread them out evenly. Cook for 2-3 minutes, until the shrimp turn pink and opaque. Once cooked, take them out and set them aside on a plate. - In the same skillet, toss in 1 cup of mixed vegetables. Stir-fry them for 2-3 minutes. They should soften but stay colorful. - Next, push the cooked vegetables to one side of the skillet. Pour in 2 large lightly beaten eggs on the other side. Scramble them until fully cooked and a bit golden. - Now, add the cooled jasmine rice to the skillet. Mix it in with the scrambled eggs and vegetables. Gently fold in the cooked shrimp, ensuring everything combines well. - Drizzle 3 tablespoons of soy sauce and 1 tablespoon of sesame oil over the rice mixture. Stir everything well. Season with salt and freshly ground black pepper to taste. Cook for another 2-3 minutes to let the flavors mix. - Finally, take the skillet off the heat. Garnish with sliced green onions for a fresh touch before serving. This is how you create a delicious shrimp fried rice. For the full recipe, check the section above! - Rinse rice for fluffiness: Rinsing jasmine rice helps remove excess starch. This keeps the rice from becoming sticky. Rinse it until the water runs clear. - Avoid overcooking shrimp: Cook shrimp until they turn pink and opaque. Overcooked shrimp can become rubbery. Remove them from heat as soon as they are done. - Use low-sodium soy sauce: This allows you to control salt levels. It makes your fried rice taste good without too much sodium. - Add extra vegetables for nutrition: Toss in broccoli, peas, or bell peppers. This boosts fiber and vitamins, making your meal healthier. - Recommended garnishes: Fresh green onions add color and taste. You can also sprinkle sesame seeds for a fun crunch. - Pairing options for a complete meal: Serve with a side of steamed veggies or a light salad. This makes your meal balanced and tasty. If you want to dive deeper into the recipe, check out the Full Recipe. {{image_4}} You can easily switch out shrimp in this dish. Try using chicken or tofu instead. Both options work great. For chicken, use bite-sized pieces and cook until golden. For tofu, press it to remove water and then cube it. Sauté until crispy. These changes keep the meal tasty and fun! If you want a vegetarian dish, just leave out the shrimp. Increase the number of vegetables instead. You can add more peas, carrots, bell peppers, or even broccoli. This makes the dish colorful and healthy. Plus, you still get a yummy meal that fills you up! Want to make your fried rice pop with flavor? Add spices like chili or ginger. These spices add heat and depth. You can also mix in some citrus zest, like lemon or lime. This adds a fresh, bright taste that enhances the dish. These little changes make a big difference! Check out the Full Recipe for more ideas. To store shrimp fried rice, let it cool first. Place it in an airtight container. This keeps the rice fresh and prevents it from drying out. You can refrigerate it for up to three days. When you want to eat it, check for any off smells or changes in texture. If you want to freeze shrimp fried rice, portion it into small containers. Make sure to leave some space at the top for expansion. This dish can last in the freezer for about one month. When ready to eat, thaw it in the fridge overnight for best results. For reheating, the stovetop is ideal. Add a splash of water or broth to keep it moist. Heat over medium heat, stirring often. You can also use the microwave. Heat in 30-second intervals, stirring in between. This way, your shrimp fried rice will taste fresh and full of flavor. For more cooking tips, you can check the [Full Recipe]. To boost flavor, use fresh ingredients. Fresh garlic, ginger, and green onions add depth. Try adding a splash of fish sauce for umami. A sprinkle of lime juice brightens the dish. For heat, add chili flakes or sriracha. Lastly, use low-sodium soy sauce to control saltiness. These tips help create a tasty, vibrant meal. Yes, you can prepare shrimp fried rice ahead of time. Cook the rice and shrimp, then store them separately. Keep everything in airtight containers in your fridge. When ready to eat, combine and reheat in a skillet. Add a splash of water or broth to keep it moist. This method ensures your dish stays fresh and delicious. You can use many veggies to add color and crunch. Consider bell peppers, broccoli, or snap peas. Zucchini and mushrooms also work well. Toss in some corn for sweetness or spinach for extra greens. Feel free to mix and match based on your taste. This allows for fun, creative variations. Yes, shrimp fried rice can be gluten-free. Use tamari instead of soy sauce. Check labels on other sauces to ensure they are gluten-free. Most vegetables are naturally gluten-free too. By choosing the right ingredients, you can enjoy this dish without worry. It makes for a tasty option for everyone! You learned how to make shrimp fried rice from scratch. We covered the key ingredients, step-by-step cooking instructions, and helpful tips. You can easily customize this dish with different proteins and veggies. Remember to store leftovers properly for future meals. Enjoying this dish should be fun and easy. With these steps, you can impress your family and friends. Happy cooking!](https://dishtreats.com/wp-content/uploads/2025/06/9ac088a4-5695-4856-8853-65ac7e0439f3-768x768.webp)