
Chipotle Lime Shrimp Bowls Flavorful and Easy Recipe


If you’re looking for a fresh and vibrant meal, my Chipotle Lime Shrimp Bowls are a must-try! This easy recipe combines tender shrimp, zesty chipotle sauce, and wholesome quinoa or rice. Boost your weeknight dinners with bold flavors and simple steps. I’ll show you how to create this delicious dish that’s perfect for any occasion. Ready to dive into flavor? Let’s get started!
Why I Love This Recipe
- Bold Flavors: The combination of chipotle and lime creates a vibrant and exciting flavor profile that elevates the shrimp to new heights.
- Healthy Ingredients: This recipe is packed with nutritious components like quinoa, black beans, and fresh veggies, making it a wholesome meal choice.
- Quick and Easy: With a total prep and cook time of just 40 minutes, this dish is perfect for busy weeknights when you want something delicious without spending hours in the kitchen.
- Customizable: You can easily swap out the toppings or grains based on your preference, making this recipe versatile for any palate.
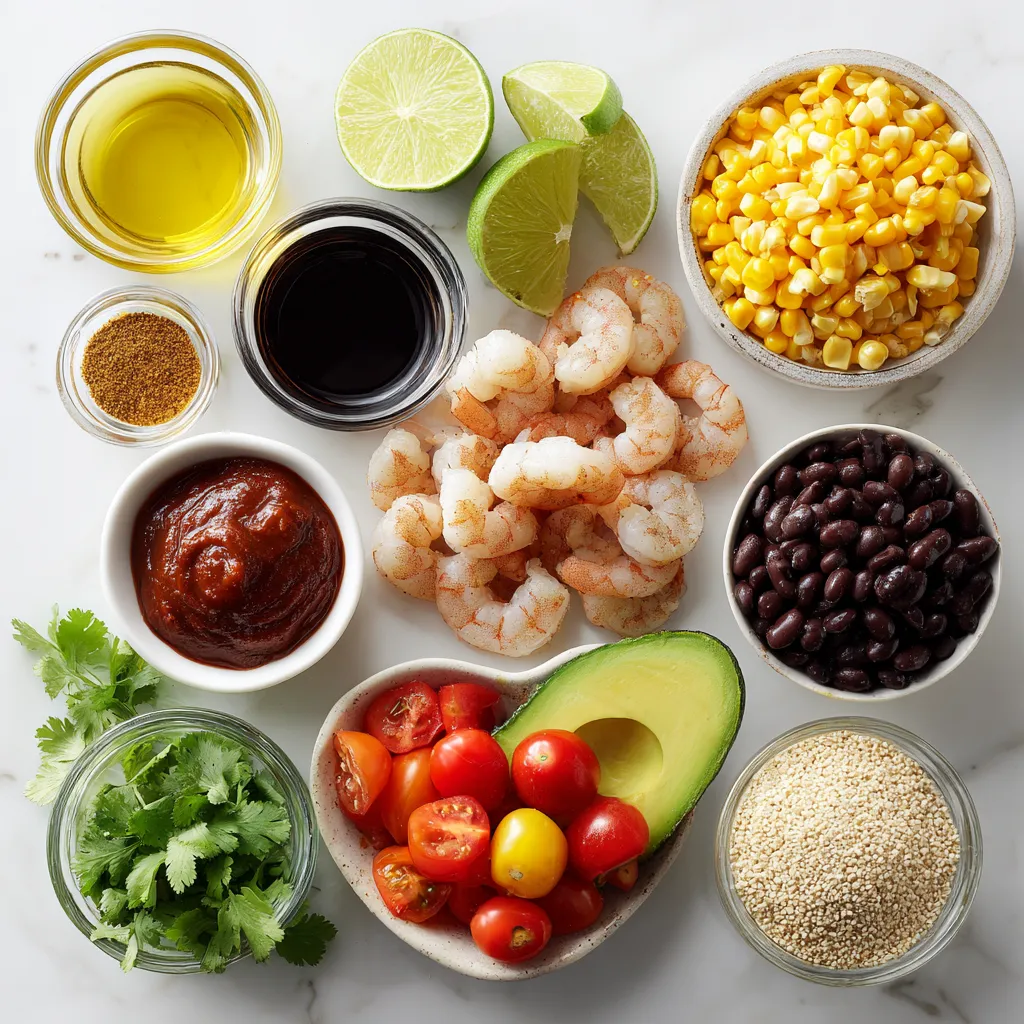
Ingredients
Main Ingredients
- 1 lb shrimp, peeled and deveined
- 2 cups quinoa (or rice)
- 2 tablespoons chipotle sauce
- 1 cup corn (fresh, canned, or frozen)
- 1 cup black beans, rinsed and drained
- 1 ripe avocado, diced
- 1 cup cherry tomatoes, halved
The shrimp form the base of this dish. They add protein and flavor. Choose fresh shrimp if possible. Quinoa or rice works well as the base. Both provide good texture and nutrients. Chipotle sauce brings the heat and smokiness. Fresh veggies add color and crunch.
Seasonings
- 2 tablespoons olive oil
- Juice of 2 limes
- 1 teaspoon garlic powder
- 1 teaspoon ground cumin
- Salt and pepper to taste
The olive oil helps the shrimp cook evenly. Lime juice adds brightness. Garlic powder and cumin enhance the shrimp’s flavor. Salt and pepper balance the taste. These seasonings make each bite burst with flavor.
Garnishes
- Fresh cilantro, chopped
- Lime wedges
Cilantro adds a fresh touch to the dish. Lime wedges give a zesty kick when squeezed on top. These garnishes not only look good but also uplift the taste.
This recipe uses simple yet fresh ingredients. Each one plays a role in making the dish tasty and satisfying. Enjoy preparing your Chipotle Lime Shrimp Bowls!
Step-by-Step Instructions
Marinating the Shrimp
Start by mixing shrimp with the marinade. In a large bowl, combine peeled and deveined shrimp with olive oil, chipotle sauce, lime juice, garlic powder, cumin, salt, and pepper. Gently toss the shrimp until they are coated in the marinade. Let the shrimp rest for 15-20 minutes at room temperature. This resting time helps the flavors seep into the shrimp.
Cooking the Quinoa or Rice
Next, bring 4 cups of water to a rolling boil in a medium saucepan. Stir in 2 cups of quinoa or rice, adding a pinch of salt. Lower the heat and cover the pot. Let it simmer for about 15 minutes for quinoa or 20 minutes for rice. Check to see if the grains are tender and the water is absorbed.
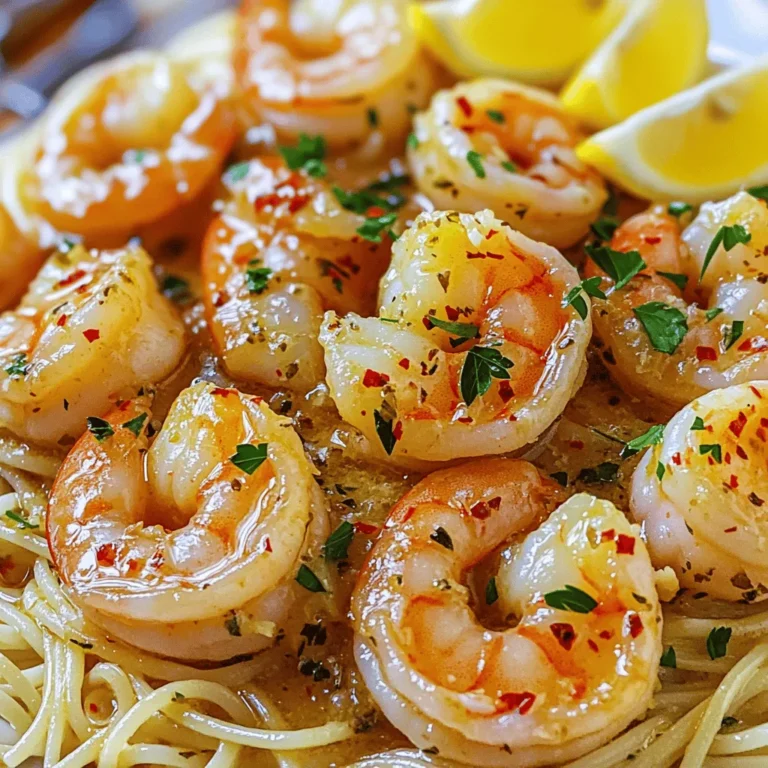
Cooking the Shrimp
Heat a non-stick skillet over medium-high heat. Add the marinated shrimp in a single layer. Cook the shrimp for 2-3 minutes on each side. They should turn pink and opaque. Be careful not to overcook them; this will keep them tender. Once done, remove the shrimp from heat and set them aside.
Preparing Bowl Components
While the shrimp cooks, warm 1 cup of corn and 1 cup of black beans in a small saucepan over low heat. Stir occasionally for about 5 minutes until they are heated through. This ensures even warming of the ingredients.
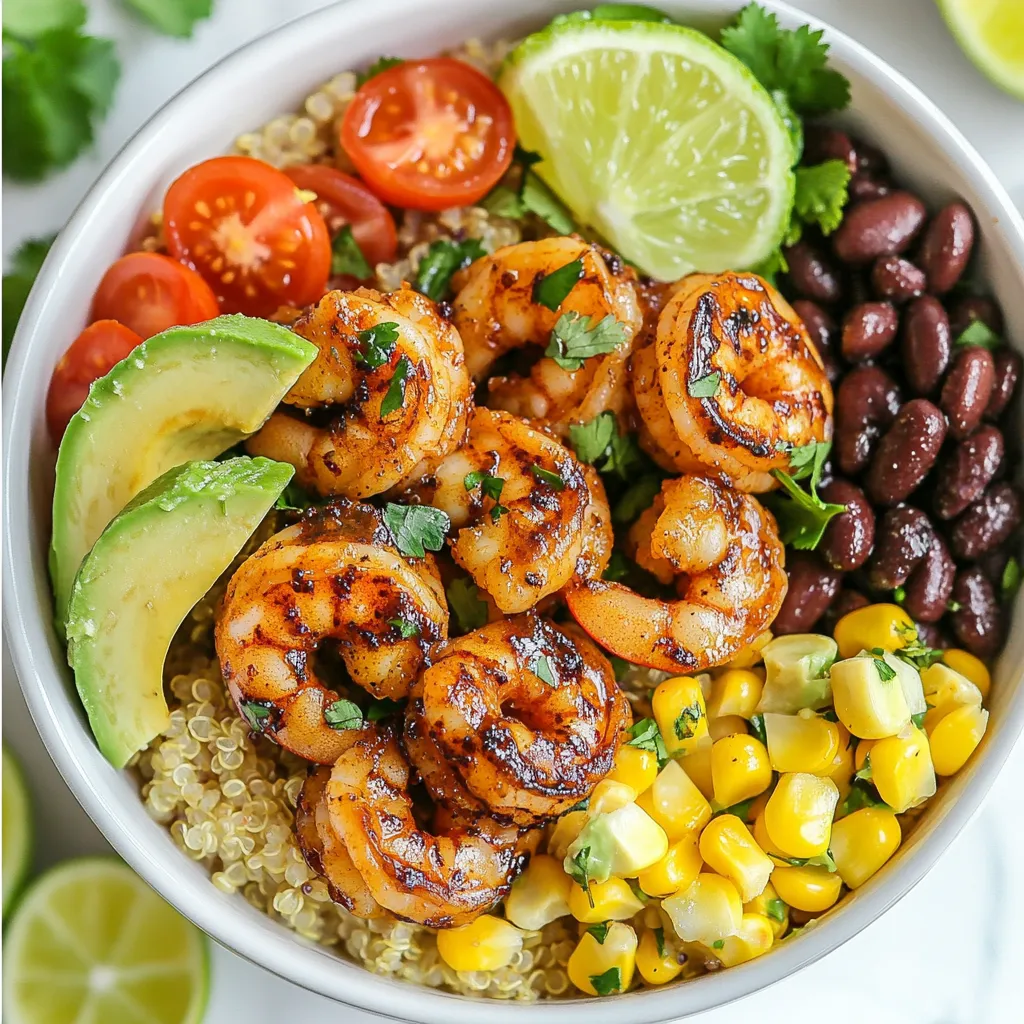
Assembling the Bowls
To create your bowls, start with a base layer of cooked quinoa or rice. Next, add in the warmed black beans and corn. Place the cooked chipotle lime shrimp on top. Finish by adding diced avocado and halved cherry tomatoes for a fresh touch.
Garnishing and Serving
To finish, sprinkle freshly chopped cilantro over the bowls for added flavor. Serve with lime wedges on the side, inviting everyone to squeeze fresh lime juice over their bowls. This gives an extra zest to each bite.
Tips & Tricks
Best Practices for Marinating
- How long to marinate for best flavor: Marinate the shrimp for 15 to 20 minutes. This time lets the shrimp soak up all the great flavors. If you marinate too long, the shrimp can get mushy.
- Alternative marinade ideas: Try mixing lime juice with honey and garlic for a sweet twist. You can also use a mix of soy sauce and ginger for a different flavor profile.
Cooking Tips for Perfect Shrimp
- Visual indicators of doneness: Cook shrimp until they turn bright pink and opaque. This shows they are done. Avoid cooking them too long, or they will become tough.
- Preventing shrinkage: Cook shrimp on medium-high heat. This helps them cook quickly without losing too much moisture.
Serving Suggestions
- Ideal side dishes: Serve your shrimp bowls with a side of fresh salad or roasted veggies. These add color and nutrients to your meal.
- Making it a complete meal: Include quinoa or rice as a base for your shrimp. Add black beans and corn to round out the meal. You can top it with avocado and tomatoes for extra flavor and texture.
Pro Tips
- Marinate for Maximum Flavor: Allow the shrimp to marinate for at least 20 minutes to enhance the flavor absorption. For even better results, marinate for up to an hour in the refrigerator.
- Perfectly Cooked Shrimp: Keep a close eye on the shrimp while cooking. They should turn pink and opaque in about 2-3 minutes per side. Overcooking can make them tough and rubbery.
- Ingredient Freshness: Use fresh ingredients whenever possible, especially for the avocado and tomatoes, to ensure the best flavor and texture in your bowls.
- Customize Your Bowl: Feel free to add your favorite toppings such as cheese, jalapeños, or a dollop of sour cream for added richness and flavor diversity.
Variations
Ingredient Substitutions
If you want to swap out shrimp, try using chicken or tofu. Chicken works well with the same spices. Tofu will soak up the flavor nicely. Both options still give you a tasty bowl.
When it comes to grains, quinoa and rice are great choices. You can also use farro or couscous. Each grain adds a unique texture and taste. Just make sure to adjust cooking times based on the grain you choose.
Flavor Enhancements
To make the dish even more exciting, add spices like smoked paprika or cayenne. These spices bring a warm kick. You can also try adding chili powder for extra depth. Each spice can change the whole flavor profile.
Fresh herbs make a big difference too. Consider using parsley or basil along with cilantro. These will brighten the dish and add freshness. Don’t be afraid to mix and match!
Dietary Modifications
For a vegan or vegetarian option, replace shrimp with black beans or chickpeas. Both are packed with protein. They will keep your bowl filling and delicious.
If you need gluten-free adjustments, stick with quinoa or rice. Both are naturally gluten-free. Just make sure any sauces you use are also gluten-free. This way, everyone can enjoy your meal!
Storage Info
Storage Instructions
To keep your Chipotle Lime Shrimp Bowls fresh, follow these steps:
- Best practices for storing leftovers: Let the dish cool down before storing it. This helps prevent moisture buildup, which can make your food soggy.
- Containers to use: Use airtight containers for storage. Glass containers work well and allow you to see what’s inside.
Reheating Tips
When it’s time to enjoy your leftovers, reheating is key:
- Methods for reheating without losing flavor: The best way to reheat shrimp bowls is in the microwave. Place the bowl in for one minute, then stir. This helps heat evenly.
- Timing and temperature recommendations: Heat at 50% power for about 2–3 minutes. This keeps shrimp tender and prevents overcooking.
Shelf Life
Knowing how long your meals last is important:
- How long can it be kept in the fridge: You can store the shrimp bowls in the fridge for up to 3 days. Make sure to seal them well.
- Freezing options: If you want to freeze the bowls, it’s best to freeze the shrimp and grains separately. They can last up to 2 months in the freezer. Just thaw before reheating.
FAQs
How do I know when the shrimp is fully cooked?
Look for the shrimp to turn pink and opaque. They should curl slightly into a C shape. This means they are done. Cook them for about 2-3 minutes on each side. Do not overcook, or they will get tough.
Can I make Chipotle Lime Shrimp Bowls ahead of time?
Yes, you can prepare the shrimp and grains in advance. Store the shrimp in the fridge for up to two days. Cook the quinoa or rice and keep it in a separate container. Warm them up before serving for the best taste.
What can I use instead of chipotle sauce?
If you want less heat, use smoked paprika or mild chili powder. You can also mix some adobo sauce without the peppers. These will give you a nice flavor without too much spice.
Are these bowls healthy?
Yes! Shrimp is high in protein and low in calories. Quinoa is a great source of fiber and nutrients. Fresh veggies like avocado and tomatoes add vitamins and healthy fats. This makes the bowls nutritious and filling.
How spicy is the chipotle sauce?
Chipotle sauce can be quite spicy, but you can adjust it. Use less sauce or add more lime juice to balance the heat. If you like it milder, start with one tablespoon of sauce and taste as you go.
In this blog post, we explored how to make delicious Chipotle Lime Shrimp Bowls. We covered the key ingredients, from shrimp and quinoa to chipotle sauce and fresh veggies. You learned step-by-step how to marinate, cook, and assemble your bowl. We also shared best practices, variations, and tips for storage.
These bowls are not just tasty but also easy to customize. I hope you’re excited to try this recipe and make it your own. Enjoy your cooking adventur

Chipotle Lime Shrimp Bowls
Ingredients
- 1 lb shrimp, peeled and deveined
- 2 tablespoons olive oil
- 2 tablespoons chipotle sauce
- 2 limes Juice of
- 1 teaspoon garlic powder
- 1 teaspoon ground cumin
- to taste Salt and pepper
- 2 cups quinoa or rice
- 1 cup corn (fresh, canned, or frozen)
- 1 cup black beans, rinsed and drained
- 1 ripe avocado, diced
- 1 cup cherry tomatoes, halved
- for garnish Fresh cilantro, chopped
- for serving Lime wedges
Instructions
- In a large mixing bowl, combine the peeled and deveined shrimp with olive oil, chipotle sauce, lime juice, garlic powder, ground cumin, and a sprinkle of salt and pepper. Gently toss the shrimp until they are evenly coated in the marinade. Allow the mixture to rest for 15-20 minutes at room temperature to let the flavors meld.
- In a medium saucepan, bring 4 cups of water to a rolling boil. Stir in the quinoa (or rice) along with a pinch of salt. Lower the heat, cover the pot, and let it simmer according to package instructions—approximately 15 minutes for quinoa or 20 minutes for rice—until the grains are tender and the water has been absorbed.
- Heat a non-stick skillet over medium-high heat. Add the marinated shrimp to the skillet in a single layer, cooking for about 2-3 minutes on each side. They should turn pink and opaque; avoid overcooking to keep them tender. Once cooked, remove the shrimp from heat and set aside.
- While the shrimp are cooking, place the corn and black beans in a small saucepan over low heat. Warm gently for about 5 minutes, stirring occasionally, until heated through.
- To create beautiful bowls, start with a generous layer of cooked quinoa (or rice) at the base. Next, add a portion of the warmed black beans and corn. Arrange the cooked chipotle lime shrimp on top, followed by the diced avocado and halved cherry tomatoes for freshness and color.
- Finish your bowls with a sprinkle of freshly chopped cilantro for a burst of flavor. Serve with lime wedges on the side, encouraging diners to squeeze fresh lime juice over the bowls for an extra zesty kick.
![- 4 large bell peppers (any color) - 1 lb ground chicken - 2 cups fresh spinach, roughly chopped - 1 cup cooked quinoa (or rice) - 1 cup mozzarella cheese, shredded - 1 small onion, finely minced - 2 cloves garlic, minced - 1 teaspoon Italian seasoning blend - ½ teaspoon red pepper flakes - Salt and pepper to taste - 1 tablespoon olive oil - Fresh basil leaves for garnish When I make chicken and spinach stuffed peppers, I love using fresh ingredients. The bell peppers can be red, green, yellow, or orange. Each color adds a fun touch and a slight flavor difference. Ground chicken gives a light taste and pairs well with spinach. I usually chop the spinach roughly. This keeps some texture in the filling. Quinoa or rice adds a nice base and helps the stuffing stick together. I recommend using cooked quinoa for a nutty flavor and added protein. Mozzarella cheese brings creaminess and melts beautifully on top. The minced onion and garlic create a fragrant base. I often sauté these first to build flavor. The Italian seasoning and red pepper flakes bring warmth and depth. Adjust the red pepper flakes to suit your taste. Lastly, a sprinkle of salt and pepper enhances all the flavors. The olive oil adds richness and helps everything cook evenly. I often finish with fresh basil leaves for a bright and fresh touch. You can find the full recipe to make these delicious stuffed peppers! - Preheat your oven to 375°F (190°C). - Prepare the bell peppers by removing the tops and seeds. Start by heating your oven. This ensures it’s hot for your peppers. While waiting, grab your bell peppers. Cut off the tops and scoop out the seeds inside. You want them ready to hold all that tasty filling. A little olive oil on the outside adds flavor and color. - Sauté onion and garlic in olive oil. - Add ground chicken and cook thoroughly. - Stir in spinach, quinoa, and spices. Now, heat olive oil in a large skillet over medium heat. Add the finely minced onion and sauté for about 3-4 minutes. You want them soft and clear. Then, toss in your minced garlic and cook for one more minute. It will smell amazing! Next, add the ground chicken. Use a spoon to break it apart as it cooks. This should take about 6-8 minutes. Make sure the chicken is brown and fully cooked. Then, mix in the chopped spinach, cooked quinoa, Italian seasoning, red pepper flakes, salt, and pepper. Cook for another 2-3 minutes until the spinach wilts and blends in. - Mix in mozzarella and stuff peppers. - Bake covered and then uncovered until cooked. Remove the skillet from heat. Now, add half of the shredded mozzarella cheese to the filling. Stir until it melts and mixes well. Carefully spoon this tasty mixture into each pepper. Press it down to fill them well. Finally, sprinkle the remaining mozzarella over the tops of each pepper. Cover your dish tightly with foil and place it in the oven. Bake for 25 minutes. This helps the peppers cook through. After that, take off the foil and bake for another 10-15 minutes. Look for tender peppers and bubbly, golden cheese. Your Chicken and Spinach Stuffed Peppers are almost ready! - Choosing the right peppers for optimal flavor: I love using bell peppers in various colors. Each color brings a unique taste. Red peppers are sweet, while green ones are more bitter. Choose your favorite or mix them for a colorful dish. - Ensuring even cooking of the filling: To cook the filling evenly, chop the spinach and onion small. This helps them blend well with the ground chicken. Stir often while cooking to make sure everything heats up at the same time. - Plates and garnishes for serving: Use bright plates to showcase your stuffed peppers. A white plate makes the colors pop. Add fresh basil leaves on top for a nice touch. It adds color and flavor. - Drizzling options for added flavor: Consider drizzling a balsamic reduction over the peppers. This gives a sweet and tangy kick. You can also use olive oil or a bit of hot sauce if you like spice. - Low-calorie ingredient options: If you want to cut calories, use ground turkey instead of chicken. You can also skip the cheese or use a low-fat version. This keeps the rich taste without the extra calories. - Gluten-free substitutes: For a gluten-free option, use quinoa or rice as a base. Both are great alternatives. Make sure your seasonings are also gluten-free to keep the dish safe for everyone. For the full recipe, check out the details above. {{image_4}} You can switch the protein in your stuffed peppers. Ground turkey works great as a leaner choice. It has a mild flavor that blends well with the spices. Ground beef is another option. It adds richness and depth to the dish. If you want a vegetarian option, try black beans or chickpeas. They add protein and fiber. You can mash them for a creamy texture or leave them whole for a nice bite. Spicing up your stuffed peppers can elevate the dish. Add cumin or smoked paprika for a smoky flavor. You can also try chili powder for a bit of heat. If you love sauces, think about adding salsa or barbecue sauce to the filling. A drizzle of ranch or yogurt on top can enhance the taste too. These simple tweaks can really make your meal pop. Stuffed peppers pair well with many sides. A fresh salad with greens and a lemon vinaigrette works nicely. You can also serve them with rice or quinoa on the side. For meal prep, these stuffed peppers are great to make ahead. They store well and taste even better the next day. Leftovers can be enjoyed cold or reheated easily, making them perfect for quick lunches. If you want to impress, plate them on colorful dishes and garnish with fresh herbs. For the full recipe, check [Full Recipe]. After you make your chicken and spinach stuffed peppers, let them cool. Place leftovers in an airtight container. This keeps them fresh and tasty. You can store them in the fridge for up to three days. When you want to enjoy them again, simply reheat in the oven or microwave. If using the oven, cover with foil to keep the moisture in. Heat at 350°F (175°C) for about 15-20 minutes. If using a microwave, heat in one-minute bursts until hot. If you want to save some for later, freezing is a great option. Wrap each stuffed pepper in plastic wrap. Then put them in a freezer-safe bag. This keeps them from getting freezer burn. You can freeze them for up to three months. When you’re ready to eat, take them out and let them thaw in the fridge overnight. You can bake them from frozen, but it will take longer. Bake at 375°F (190°C) for about 40-50 minutes. Make sure they are hot all the way through. Enjoy the convenience of having these delicious meals ready to go! How long do stuffed peppers last in the fridge? Stuffed peppers can last up to four days in the fridge. Store them in an airtight container. Can I use frozen spinach instead of fresh? Yes, you can use frozen spinach. Just thaw and drain it first to remove excess water. What can I substitute for quinoa in this recipe? You can use rice instead of quinoa. Brown rice or white rice works well for this dish. Are stuffed peppers healthy? Yes, stuffed peppers are healthy. They are full of protein, fiber, and vitamins. How can I tell when the peppers are done cooking? Peppers are done when they are tender and the cheese is bubbly and golden. Can I prep these ahead of time? Yes, you can prep them a day in advance. Just store the stuffed peppers in the fridge. What sides pair well with stuffed peppers? Great sides include a light salad, garlic bread, or steamed veggies. Enjoy your meal! In this article, we explored a tasty recipe for chicken and spinach stuffed peppers. We covered detailed ingredients, step-by-step instructions, cooking tips, and variations to try. Stuffed peppers are fun to make and easy to adapt. You can even store leftovers or freeze them for later. This dish is not only healthy but also full of flavor that everyone will enjoy. Try it out and get creative!](https://dishtreats.com/wp-content/uploads/2025/06/8d5b3b7f-ae7d-4f86-a3ac-77abf09c6433-768x768.webp)
![- 2 cups cooked chicken, shredded - 4 cups mixed salad greens - 1 cup cherry tomatoes - 1 cup corn - 1 ripe avocado - 1/2 cup red onion - 1 cup shredded cheddar cheese - 1/2 cup ranch dressing - BBQ sauce - Salt and freshly ground black pepper - Crispy tortilla strips, fresh cilantro leaves When making BBQ Ranch Chicken Salad, start with fresh, quality ingredients. The chicken brings protein and heartiness. I love using shredded chicken that is moist and flavorful. Mixed salad greens add crunch and color. You can choose your favorites like romaine, arugula, or baby spinach. Cherry tomatoes bring sweetness. Always cut them in half to make them easy to eat. Corn adds a pop of sweetness too, and you can use canned or fresh. I prefer fresh corn when it’s in season for the best taste. The avocado adds creaminess. A ripe avocado makes the salad smooth and rich. Red onion gives a nice bite. Keep it thinly sliced so it does not overpower. Shredded cheddar cheese adds a delightful sharpness, making each bite even tastier. The ranch dressing is creamy and tangy, tying everything together. Pair it with BBQ sauce for a smoky flavor boost. This combo is truly delicious. For seasoning, use salt and freshly ground black pepper. These simple touches really enhance the flavors. Lastly, crispy tortilla strips add a fun crunch. Fresh cilantro leaves not only look great but also add a fresh taste. You can find the full recipe [Full Recipe]. Enjoy mixing these ingredients for a vibrant, tasty salad! - Combine shredded chicken with BBQ sauce. - Use a large bowl for easy mixing. - Season with salt and black pepper to taste. - Mix until the chicken is fully coated. This step is key. The BBQ sauce gives the chicken a sweet and smoky flavor. It makes the salad pop with taste. - Create the salad base with mixed greens. - Spread the greens evenly in a large bowl. - Layer fresh ingredients: tomatoes, corn, avocado, and onion. - Arrange each ingredient for a colorful look. The vibrant colors make the salad appealing. Each bite brings a different taste, making it fun to eat! - Top with BBQ chicken and cheddar cheese. - Spoon the chicken evenly over the fresh veggies. - Drizzle with ranch dressing, adjusting to your liking. - Toss gently with clean hands or tongs to mix. This salad is now ready to impress! The creamy ranch dressing and savory chicken blend perfectly. Check the [Full Recipe] for more tips! To make your BBQ Ranch Chicken Salad shine, adjust the ranch dressing to your taste. If you love creamy flavors, add more dressing. For a lighter touch, use less. This lets you control how rich the salad feels. Make sure all ingredients mix well. This way, each bite has a bit of everything. An even spread of chicken, veggies, and cheese creates balance. For a lovely presentation, serve the salad in individual bowls or on a large platter. This makes it easy for everyone to take their share. Add some cilantro leaves and crispy tortilla strips on top. These toppings not only look great but also add flavor and crunch. A colorful display of greens and toppings makes the salad more appealing. Feel free to experiment with different seasonings. A dash of chili powder can add a nice kick. You might also try garlic powder or smoked paprika for depth. Also, think about adding extra ingredients for more variety. Black beans, diced peppers, or even fresh corn can bring new tastes. Each addition offers a chance to create your perfect salad blend. For more details on making this delicious salad, check out the Full Recipe. {{image_4}} You can easily change the protein in this salad. If you want a different taste, use pulled pork or tofu instead of chicken. Both options add great flavor. For a seafood twist, grilled shrimp works well. The shrimp adds a nice, light touch to the salad. While ranch dressing is a favorite, you can swap it out. Blue cheese dressing gives a strong flavor. A vinaigrette adds a tangy kick that brightens the salad. You can also make your own dressing blends. Mix yogurt with herbs for a fresh taste. Don't be afraid to add more veggies. Bell peppers, cucumbers, and radishes give a nice crunch. You can also roast vegetables like zucchini or carrots. Roasting adds a warm, rich taste that contrasts nicely with the cool salad. For a full recipe, check out the BBQ Ranch Chicken Salad with a Crunchy Twist. Store your BBQ Ranch Chicken Salad in an airtight container. This keeps it fresh and tasty. For best results, eat it within 2-3 days. The longer it sits, the soggier it may get. If you want to freeze some, consider freezing the chicken separately. This helps keep the chicken tasty when you eat it later. Avoid freezing the salad with dressing. The dressing makes the greens soggy, and nobody likes that! To refresh your leftovers, toss them with fresh greens. This adds crunch and makes it feel new again. If you want to reheat the BBQ chicken, do it separately. This keeps it warm without making the salad wilt. To make BBQ Ranch Chicken Salad, follow these simple steps: 1. Prepare the BBQ Chicken: Mix shredded chicken with BBQ sauce in a big bowl. Add salt and black pepper. Stir until the chicken is well coated. 2. Build the Salad Base: In another large bowl, spread the mixed greens evenly. This is your salad's base. 3. Layer Fresh Ingredients: Add halved cherry tomatoes, corn, diced avocado, and sliced red onion on top of the greens. This creates a colorful layer. 4. Top with BBQ Chicken: Spoon the BBQ chicken evenly over the fresh layers. This ensures every bite has flavor. 5. Add Creamy Cheese: Sprinkle shredded cheddar cheese over the salad. Let it melt slightly into the warm chicken. 6. Drizzle with Dressing: Pour ranch dressing over the salad. Adjust the amount to fit your taste. 7. Toss Gently: Use clean hands or tongs to mix everything. Make sure the ranch dressing coats all the ingredients. 8. Taste Test: Before serving, taste the salad. Add more salt or black pepper if needed. 9. Add Crunch and Garnish: Top with crispy tortilla strips and fresh cilantro for a nice finish. This process makes a delicious and colorful salad. For the complete recipe, check the Full Recipe above. Yes, you can prep this salad ahead of time. Here are some tips: - Cook the Chicken: You can cook and shred the chicken a day in advance. Store it in the fridge with BBQ sauce. - Chop Veggies: Cut the vegetables, like tomatoes and onions, a few hours before serving. Keep them in airtight containers. - Store Dressing Separately: Keep the ranch dressing separate until serving. This keeps the greens fresh and crisp. - Combine Before Serving: Mix everything together just before you eat. This keeps your salad from becoming soggy. This BBQ Ranch Chicken Salad goes great with several side dishes. Here are some ideas: - Crusty Bread: A nice loaf of bread pairs well and adds a hearty touch. - Chips: Tortilla chips or potato chips add crunch and fun. - Fruit Salad: A fresh fruit salad adds sweetness and a refreshing taste. - Grilled Veggies: Grilled vegetables complement the salad's flavors. - Coleslaw: A crunchy coleslaw gives a nice contrast to the salad. These sides enhance your BBQ Ranch Chicken Salad experience. Enjoy! We explored a tasty BBQ Ranch Chicken Salad. You learned about the main and optional ingredients, along with step-by-step instructions for making it. You also picked up tips for perfecting the salad and ideas for variations. Don’t forget to check the storage info for leftovers. This salad is easy to adjust, making it a fun dish for everyone. Enjoy this recipe and make it your own!](https://dishtreats.com/wp-content/uploads/2025/07/4c564630-ecab-497d-8bae-b951c19ef4f1-768x768.webp)
