Pineapple Teriyaki Meatballs Flavorful and Simple Dish

If you crave a dish that’s both tasty and easy, you’re in the right place! Pineapple Teriyaki Meatballs are full of flavor and require just a few simple steps. Whether you want a quick dinner or a fun party snack, these meatballs deliver. I’ll walk you through the ingredients, cooking tips, and variations that will make this dish shine. Let’s dive in and create something delicious!
Why I Love This Recipe
- Delicious Flavor Combination: The sweet and tangy pineapple teriyaki sauce perfectly complements the savory meatballs, creating a delightful fusion of flavors that everyone will love.
- Quick and Easy to Prepare: This recipe is simple and can be made in just 40 minutes, making it perfect for busy weeknights or last-minute gatherings.
- Versatile Ingredients: You can easily substitute ground beef with ground turkey or even make it vegetarian with plant-based meat, accommodating various dietary preferences.
- Fun for Everyone: Rolling meatballs is a fun activity that the whole family can enjoy, making it a great recipe for cooking together.
Ingredients
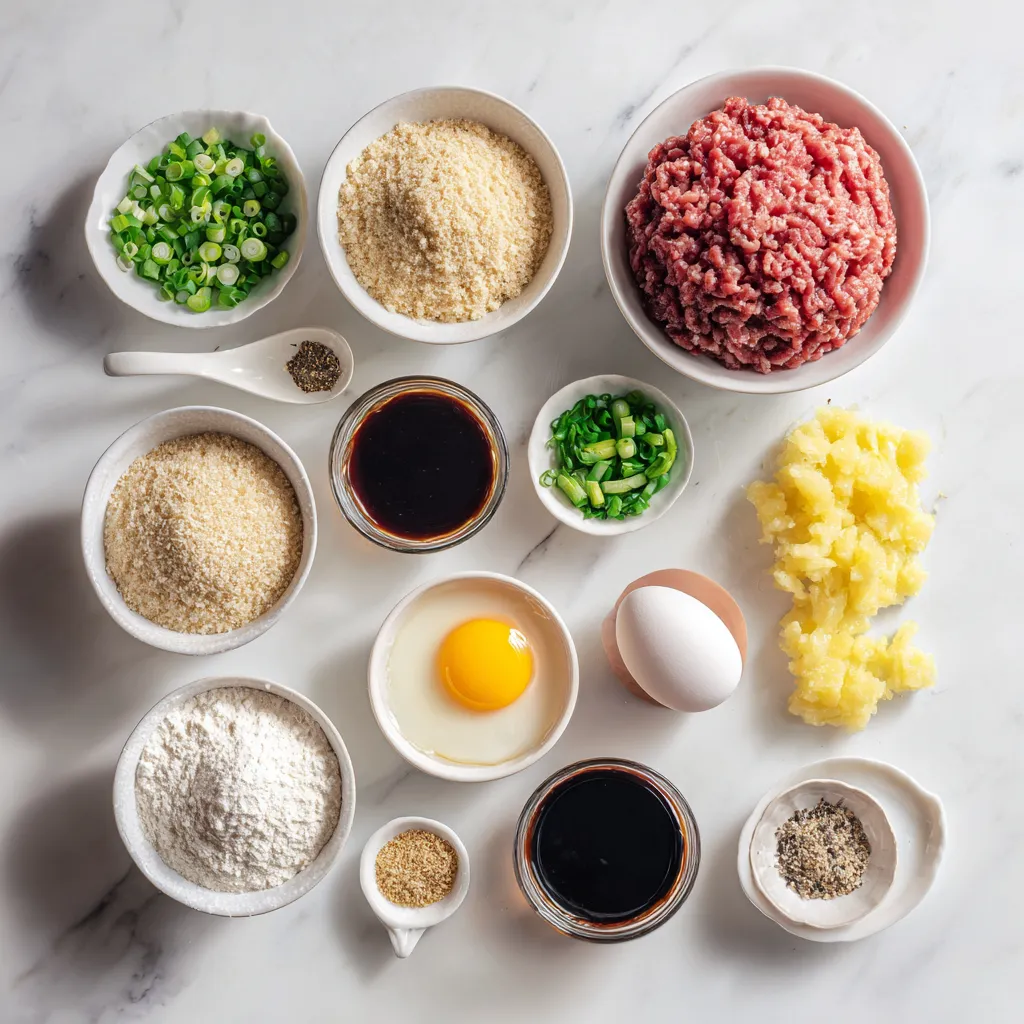
Main ingredients for Pineapple Teriyaki Meatballs
These meatballs are easy to make and full of flavor. Here are the main items you need:
- 1 pound ground beef (or ground turkey for a lighter dish)
- 1/2 cup breadcrumbs (panko gives a great crunch)
- 1/4 cup green onions, finely chopped (plus more for garnish)
- 1 large egg, beaten
- 2 tablespoons low-sodium soy sauce
- 1 teaspoon garlic powder
- 1 teaspoon ginger powder
- 1/4 teaspoon black pepper
- 1 can (8 oz) crushed pineapple in juice, drained (keep juice)
- 1/4 cup teriyaki sauce
- 1 tablespoon cornstarch
- 1 tablespoon sesame seeds (for garnish)
Substitutions and variations
You can switch out some ingredients for your taste or needs. Ground turkey is a great choice if you want less fat. If you can’t find panko, regular breadcrumbs work too. You can even use ground chicken or pork. For a gluten-free option, look for gluten-free breadcrumbs and soy sauce.
Optional garnishes and serving suggestions
Garnishes add a nice touch. Extra green onions and sesame seeds give a pop of color and flavor. You can also serve the meatballs with pineapple slices around them. For a full meal, pair them with steamed rice or a fresh Asian slaw. Enjoy your tasty dish!

Step-by-Step Instructions
Preparing the meatball mixture
To make the meatballs, start by mixing the ingredients. In a large bowl, combine:
- 1 pound ground beef (or ground turkey)
- 1/2 cup panko breadcrumbs
- 1/4 cup finely chopped green onions
- 1 large beaten egg
- 2 tablespoons low-sodium soy sauce
- 1 teaspoon garlic powder
- 1 teaspoon ginger powder
- 1/4 teaspoon black pepper
Use your hands or a spatula to mix until everything is well blended. You want a smooth and sticky mixture.
Next, form the meatballs. With clean hands, roll the mixture into small balls, about 1 inch wide. Arrange them on a baking sheet lined with parchment paper. Leave space between each meatball, so they cook evenly.
Baking the meatballs
Now, it’s time to bake the meatballs. Preheat your oven to 400°F (200°C). This step is key for a nice brown color. Once the oven is hot, bake the meatballs for 15 to 20 minutes. They are ready when they turn brown and reach an internal temperature of 165°F for beef or turkey.
Making the teriyaki sauce
While the meatballs bake, you can prepare the teriyaki sauce. In a saucepan over medium heat, combine the reserved pineapple juice, 1/4 cup teriyaki sauce, and 1 tablespoon cornstarch. Whisk the mixture continuously. This will help the sauce thicken in about 2 to 3 minutes.
After that, stir in the crushed pineapple into the thickened sauce. Mix well and let it simmer gently for another minute to blend the flavors nicely.
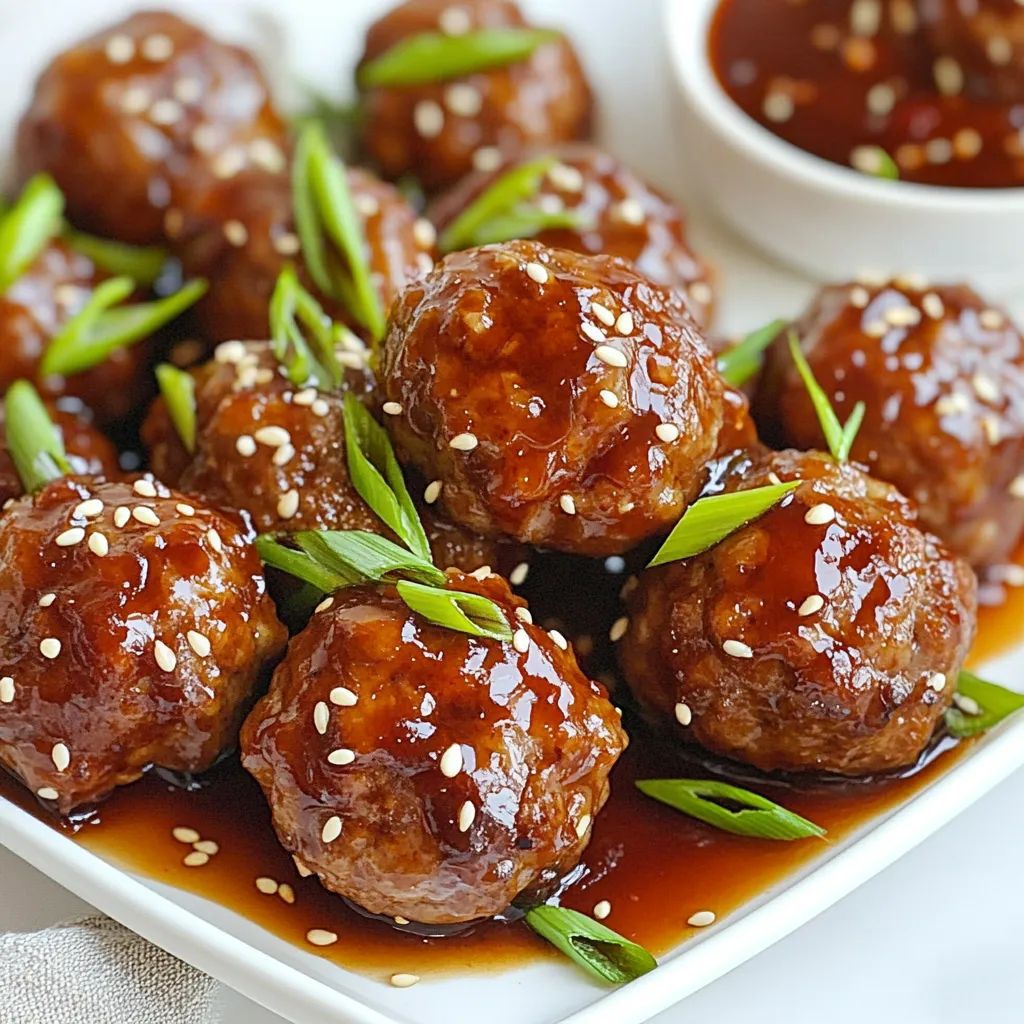
Once the meatballs are done baking, remove them from the oven. Transfer them to a large bowl and pour the pineapple teriyaki sauce over them. Toss gently until all the meatballs are coated in the sweet and tangy glaze.
Serve the meatballs beautifully on a platter. You can sprinkle sesame seeds and extra chopped green onions on top for a fresh touch. Enjoy this tasty dish!
Tips & Tricks
Ensuring perfect texture and flavor
To get the best texture, use panko breadcrumbs. They offer a nice crunch. Mix the meat and other ingredients well. If you see any dry spots, keep mixing. This helps the meatballs hold together. Adding crushed pineapple keeps them moist and adds sweetness.
Cooking tips for even baking
Make sure to space the meatballs on the baking sheet. This allows hot air to circulate. Bake at 400°F for 15-20 minutes. Check for a nice brown color. You can use a meat thermometer to ensure they reach 165°F. This step keeps them juicy and safe to eat.
Presentation ideas for serving
For a fun look, serve meatballs on a platter. Sprinkle sesame seeds and green onions on top. You can also add pineapple slices around the edge. This gives a fresh, tropical vibe. Pair with steamed rice or a simple slaw for balance. Enjoy your colorful and tasty dish!
Pro Tips
- Use Fresh Ingredients: For the best flavor, opt for fresh ground meat and fresh green onions. They enhance the overall taste and texture of your meatballs.
- Experiment with Meat Types: Don’t hesitate to try different types of ground meat such as chicken or pork. Each will give a unique flavor to your teriyaki meatballs.
- Adjust the Sweetness: If you prefer a sweeter sauce, feel free to add a little honey or brown sugar to the teriyaki sauce mixture to suit your taste.
- Make Ahead: These meatballs can be made ahead of time and frozen. Just bake and glaze them when you’re ready to serve for a quick meal option.

Variations
Alternative protein options (vegan, chicken, etc.)
You can switch the meat to fit your diet. For a vegan option, use lentils or chickpeas. You can also use ground chicken or turkey for a lighter choice. Both options still taste great with the teriyaki sauce. Just remember to adjust cooking times if you use chicken or turkey.
Different sauce options (spicy teriyaki, honey garlic, etc.)
While the classic teriyaki sauce is tasty, feel free to get creative. You can add sriracha to make a spicy teriyaki sauce. Or mix in honey and garlic for a sweet garlic sauce. Both options will give your meatballs a different flavor. Don’t hesitate to experiment until you find your favorite!
Serving with different sides (rice, veggie noodles, etc.)
These meatballs are great with many sides. Serve them over steamed rice for a filling meal. If you prefer something lighter, try veggie noodles. You can also serve them with a fresh salad or Asian slaw. Each side can change the taste and feel of your dish. Enjoy mixing and matching!
Storage Info
How to store leftovers properly
After you enjoy your Pineapple Teriyaki Meatballs, store any leftovers in an airtight container. Keep them in the fridge for up to three days. Make sure the container is sealed tight to keep the meatballs fresh and tasty.
Freezing meatballs for later use
You can freeze these meatballs for a quick meal later. First, let the meatballs cool completely. Then, place them in a freezer-safe bag or container. They can last in the freezer for about three months. When you’re ready to eat, just thaw them in the fridge overnight before reheating.
Reheating guidelines for best results
To reheat the meatballs, you can use the oven or microwave. For the oven, preheat it to 350°F (175°C). Place the meatballs on a baking sheet and heat for about 10-15 minutes. In the microwave, heat them on medium power for 1-2 minutes. Check if they are hot all the way through before serving. Enjoy your tasty meatballs again!
FAQs
Can I make Pineapple Teriyaki Meatballs ahead of time?
Yes, you can make Pineapple Teriyaki Meatballs ahead of time. Prepare the meatballs and bake them. Once cooked, let them cool. Store them in an airtight container in the fridge for up to three days. When ready to serve, just reheat them in the oven or microwave. You can also make the sauce ahead. Just mix the sauce and meatballs when you are ready to eat.
What can I substitute for teriyaki sauce?
If you need a substitute for teriyaki sauce, you have options. You can mix soy sauce with honey or brown sugar. This mix gives a sweet and salty flavor. Alternatively, use a sweet chili sauce for a different taste. You can also try a homemade sauce with soy sauce, ginger, and garlic.
How can I make this dish gluten-free?
To make Pineapple Teriyaki Meatballs gluten-free, use gluten-free breadcrumbs. There are many brands available now. Make sure to use gluten-free soy sauce, often called tamari. Check the teriyaki sauce label for gluten content too. Many brands offer gluten-free options.
What are some side dishes that pair well with this recipe?
Pineapple Teriyaki Meatballs pair well with several side dishes. Here are some ideas:
- Steamed jasmine rice
- Fried rice with veggies
- Asian slaw for crunch
- Sautéed green beans or broccoli
- Quinoa for a healthy twist
These sides balance the sweet and savory flavors of the meatballs.
Pineapple teriyaki meatballs are a tasty dish. We explored key ingredients and fun substitutes. You can use different proteins and sauces to fit your taste. Baking tips help ensure the right texture, while storage info keeps leftovers fresh. Don’t forget the garnishes for a nice final touch. Making this dish can be easy and fun. I hope you enjoy trying these meatballs as much as I d

Pineapple Teriyaki Meatballs
Ingredients
- 1 pound ground beef or ground turkey
- 0.5 cup breadcrumbs
- 0.25 cup green onions, finely chopped
- 1 large egg, beaten
- 2 tablespoons low-sodium soy sauce
- 1 teaspoon garlic powder
- 1 teaspoon ginger powder
- 0.25 teaspoon black pepper
- 1 can (8 oz) crushed pineapple in juice, drained
- 0.25 cup teriyaki sauce
- 1 tablespoon cornstarch
- 1 tablespoon sesame seeds for garnish
Instructions
- In a large mixing bowl, combine the ground beef (or turkey), breadcrumbs, finely chopped green onions, beaten egg, soy sauce, garlic powder, ginger powder, and black pepper. Using your hands or a spatula, mix until everything is well incorporated and you have a cohesive mixture.
- With clean hands, roll the mixture into small meatballs, about 1 inch in diameter. Arrange the meatballs neatly on a baking sheet lined with parchment paper, ensuring they are spaced apart.
- Preheat your oven to 400°F (200°C). Once the oven reaches the desired temperature, bake the meatballs for 15-20 minutes. They should be nicely browned and cooked through (internal temperature should reach 165°F for beef or turkey).
- While the meatballs are baking, prepare the teriyaki sauce. In a saucepan set over medium heat, combine the reserved pineapple juice, teriyaki sauce, and cornstarch. Whisk continuously until the sauce begins to thicken, which should take about 2-3 minutes.
- Stir in the crushed pineapple into the thickened sauce, mixing well to ensure it is heated through. Let it simmer gently for another minute to meld the flavors.
- Once the meatballs are finished baking, remove them from the oven and transfer them to a large mixing bowl. Gently pour the pineapple teriyaki sauce over the meatballs and toss gently until they are thoroughly coated in the delicious glaze.
- Serve the meatballs on a decorative platter, sprinkling sesame seeds and extra chopped green onions on top for a fresh and vibrant touch.


. It takes about 20 minutes to cook garlic butter steak bites. You spend 10 minutes prepping the ingredients and another 10 minutes cooking them. This quick cook time makes it easy to enjoy a tasty meal in no time. Yes, you can use other cuts of steak. Ribeye, filet mignon, or flank steak work well. Just remember to adjust the cooking time based on the cut you choose. Each cut has its own flavor and texture, so pick one you like best. You can serve garlic butter steak bites with various sides. Here are some great options: - Creamy mashed potatoes - Sautéed vegetables like green beans or broccoli - Fresh salad with light dressing - Crispy garlic bread These sides add flavor and balance to your meal. You can also use toothpicks for easy serving at parties or gatherings. For more ideas, check out the Full Recipe for garlic butter steak bites. It offers tips on presentation and other serving suggestions. In this post, we covered how to make garlic butter steak bites using simple ingredients. You learned about the key steps, from preparing the steak to combining it with garlic butter. We also shared tips for cooking and presented flavor variations to try. Finally, we discussed storage tricks and answered common questions. Keep this recipe handy for a quick and tasty meal. Enjoy your cooking and the delicious bites you create!](https://dishtreats.com/wp-content/uploads/2025/06/daf37226-e56f-491f-87e9-6665894a306e-768x768.webp)
![When you make cheesy sheet pan chicken quesadillas, you need the right ingredients for the best taste. Here’s what you will need: - Shredded chicken options - 2 cups cooked chicken, shredded (rotisserie chicken works wonderfully) - Cheese varieties - 1 cup shredded cheddar cheese - 1 cup shredded Monterey Jack cheese - 1/2 cup cream cheese, softened - 1/4 cup sour cream - Vegetables and other mix-ins - 1 medium red bell pepper, diced - 1 medium green bell pepper, diced - 1 small red onion, finely chopped - 1 tablespoon taco seasoning - 8 large flour tortillas - 1 tablespoon olive oil - Fresh cilantro, chopped (for garnish) - Salsa, for serving - Avocado or guacamole, for serving These ingredients blend together to create a flavor-packed meal. Using rotisserie chicken saves time and adds great taste. The mix of cheddar and Monterey Jack gives a creamy, melty texture. Adding bell peppers and onions adds crunch and freshness. The taco seasoning gives it that extra kick. Feel free to experiment with your favorite veggies and cheese. This recipe is versatile and allows you to customize it to your liking. For the full recipe, check out the details above. Set your oven to 400°F (200°C). This heat helps the quesadillas cook evenly. Grab a large baking sheet and line it with parchment paper. This step is key because it keeps the quesadillas from sticking. Plus, it makes clean-up a breeze. In a big bowl, mix your ingredients well. You will need cooked chicken, cheddar cheese, Monterey Jack cheese, cream cheese, sour cream, diced red and green bell peppers, chopped red onion, and taco seasoning. The mixture should be smooth and creamy. Look for a texture that is spreadable but not runny. This helps keep the filling inside the tortillas. On a flat surface, lay down four tortillas. Spread the chicken mixture evenly on each one. Make sure to reach the edges so every bite is tasty. Then, place another tortilla on top of each filled one. Press down gently. This helps them stick together and hold the filling in. Once your quesadillas are ready, move them to the baking sheet. Brush the tops with olive oil. This adds flavor and helps them turn golden brown. Bake in your preheated oven for 15-20 minutes. Look for a nice golden color and melted cheese inside. These signs tell you they are done. After baking, take the quesadillas out and let them cool for a few minutes. This makes slicing easier. Cut each quesadilla into quarters for serving. Aim for about 4-6 servings, depending on your crowd. These quesadilla wedges are perfect for sharing! Avoiding Soggy Tortillas To keep your tortillas crisp, avoid overfilling them. Less is more! Also, use the right amount of olive oil on top. This will help them brown nicely. Always make sure to bake them until they are golden brown. Best Types of Tortillas to Use For the best texture, I recommend using large flour tortillas. They hold the filling well and become soft when baked. Corn tortillas can work too, but they may crack more easily. Pairing with Dipping Sauces Serve your quesadillas with a variety of dips. Salsa is a classic choice. You can also offer guacamole and sour cream. These add creaminess and flavor. Garnishes for Presentation To make your dish look great, sprinkle fresh cilantro on top. You can also add sliced jalapeños for a pop of color. This makes your quesadillas look fancy and appetizing. Adjusting the Recipe If you have a big group, you can easily double the recipe. Just make sure to use a larger baking sheet. This way, you can cook more quesadillas at once. Time-Saving Tips Use rotisserie chicken for quick prep. It saves time and adds great flavor. You can also chop your veggies ahead of time. This keeps the cooking quick and easy. To see the full recipe, check out the [Full Recipe]. {{image_4}} Alternative Proteins You can switch the chicken for other proteins. Try shredded beef or cooked shrimp. For a lighter option, use turkey. If you prefer plant-based meals, chickpeas or tofu work well too. Different Cheese Combos Cheese is key to quesadillas. You can mix different cheeses for fun flavors. Pepper Jack adds spice, while gouda gives a smoky touch. Experiment with cream cheese and feta for creamy bites. Adding Spices or Herbs Spice up your quesadillas! Add chili powder or cumin for warmth. Fresh herbs like cilantro or parsley brighten flavors. A squeeze of lime gives a fresh zing. Incorporating Beans or Corn Beans and corn boost nutrition and flavor. Black beans add protein, while corn brings sweetness. Mix them into your filling for a hearty twist. Gluten-Free Options To make this dish gluten-free, swap flour tortillas for corn ones. Always check labels to ensure they meet your needs. You can also serve the filling on lettuce wraps. Vegetarian Adjustments For a vegetarian version, skip the chicken. Use mushrooms or zucchini for a meaty texture. Add more beans and veggies to keep it filling. For the full recipe, check the [Full Recipe]. To store your cheesy sheet pan chicken quesadillas, let them cool first. Wrap them tightly in plastic wrap or foil. You can also place them in an airtight container. This keeps them fresh and tasty. - Shelf Life: When stored properly, quesadillas last up to 3 days in the fridge. After that, they may lose flavor and freshness. If you want to save some for later, freezing is great! - How to Freeze Quesadillas: First, cool them completely. Then, wrap each quesadilla in plastic wrap. Place them in a freezer-safe bag or container. This helps prevent freezer burn. - Reheating Tips for Best Results: To reheat, thaw overnight in the fridge. Then, bake them at 350°F (175°C) for about 10 minutes. This makes them warm and crispy again. Don't let any filling go to waste! - Creative Ways to Use Leftovers: You can add leftover filling to salads or burritos. Mix it with scrambled eggs for a tasty breakfast. - Recipes Using Leftover Filling: Try using the filling in omelets or as a topping for nachos. You can also use it in stuffed peppers for a fun twist. For more details on making this dish, check out the [Full Recipe]. To make this dish gluten-free, swap out regular flour tortillas for gluten-free ones. Many brands offer great taste and texture. You can also check for taco seasoning that is gluten-free. This way, you keep all the flavor without the gluten. Yes, you can use raw chicken. Just make sure to cook it first. You can bake or grill the chicken until it reaches 165°F (75°C). Shred the cooked chicken before mixing it with the other ingredients. This keeps your quesadillas safe and tasty. To reheat quesadillas, use the oven or a skillet. Preheat the oven to 350°F (175°C) and bake for about 10 minutes. If using a skillet, heat it over medium heat. Cook for 2-3 minutes on each side until warm and crispy. This way, you keep the texture nice. Look for a golden brown color on the outside. You should also see melted cheese oozing out from the edges. A crispy texture means they are ready to enjoy. Let them cool for a few minutes after baking before slicing. Quesadillas pair well with many sides. You can serve them with salsa or guacamole for dipping. A fresh salad or some Mexican rice adds a nice touch too. Black beans are another great side option. These sides enhance your meal and make it even more fun to eat. You now have all the tools to make great chicken quesadillas. We covered essential ingredients and step-by-step instructions. Use the tips to avoid soggy tortillas and serve with tasty dips. Don’t forget to explore variations to suit your taste. Store any leftovers properly for future meals. Whether for a quiet dinner or a crowd, you’re ready to impress. Enjoy your cooking and have fun creating delicious quesadillas!](https://dishtreats.com/wp-content/uploads/2025/07/9e515845-1856-4bb5-82ee-80ca33afd87d-768x768.webp)
![- 8 oz. spaghetti or pasta of your choice - 1 cup cherry tomatoes, halved - 1 cup zucchini, sliced into half-moons - 1 cup mixed bell peppers, sliced - 1 cup broccoli florets - 1 cup fresh spinach - 2 tablespoons extra virgin olive oil - 3 cloves garlic, finely minced - Zest and juice from 1 medium-sized lemon - 1 teaspoon dried oregano - Salt and freshly ground black pepper, to taste - Fresh basil leaves and grated Parmesan cheese (optional) When I craft my Pasta Primavera, I focus on fresh and vibrant veggies. The cherry tomatoes burst with flavor, giving a sweet touch. Zucchini adds a nice crunch, while bell peppers bring color. Broccoli florets add a delightful bite, and fresh spinach wilts perfectly into the mix. I love using extra virgin olive oil for its rich taste. Garlic gives it a fragrant kick. The zest and juice of the lemon brighten the dish and enhance all the flavors. Dried oregano is my go-to herb here, adding warmth and depth. A pinch of salt and pepper brings it all together. For a finishing touch, I often sprinkle fresh basil on top. You can also add grated Parmesan cheese for creaminess. This recipe is simple yet packed with flavor, perfect for any meal. To see the full recipe, check out the details above. - Fill a large pot with salted water. - Bring to a boil and cook pasta until al dente. - Reserve pasta water and drain. To cook the pasta, I fill a big pot with water and add a good amount of salt. This helps to flavor the pasta. Once the water boils, I add my spaghetti or whatever pasta I choose. I cook it until it is al dente, which means it is firm but cooked. Before draining, I set aside about one cup of the pasta water. This water is full of starch and will help make my sauce creamy later. - Heat olive oil in a skillet. - Sauté minced garlic for fragrance. - Add broccoli and mixed bell peppers, sauté for 3-4 minutes. Next, I heat some olive oil in a large skillet over medium heat. Once the oil is hot, I add minced garlic and sauté it for about 30 seconds. The smell is amazing! I have to be careful not to burn it. After that, I toss in the broccoli and mixed bell peppers. I sauté these for 3-4 minutes until they soften a bit but still have some crunch. - Incorporate zucchini and cherry tomatoes. - Add reserved pasta water and seasonings. - Let simmer to create sauce. Now, I add my zucchini and cherry tomatoes to the skillet. I stir everything for about three minutes. The tomatoes will start to release their juices, making the dish juicy. I then pour in the reserved pasta water, followed by the lemon juice and zest, and dried oregano. This creates a light sauce. I let it simmer for two minutes to blend the flavors. - Add drained pasta and fresh spinach. - Toss until well mixed. - Season to taste and plate with garnishes. Finally, I gently add the drained pasta to the skillet along with fresh spinach. I toss everything well so the pasta gets coated in the sauce. The heat wilts the spinach just right. I taste the dish and season it with salt and black pepper. To serve, I plate the pasta in deep bowls and garnish with fresh basil and a sprinkle of Parmesan cheese if I want. This dish looks and tastes great. You can find the full recipe for this delightful dish to enjoy! To achieve al dente pasta, you need to watch the clock. Start checking your pasta a minute before the package time. It should be firm but not hard. The texture is key! Reserving pasta water is a must. Always save about one cup before you drain it. This water is starchy and helps create a silky sauce later. It can make your dish creamy without adding heavy cream. To boost flavor, think about adding fresh herbs like parsley or thyme. You can also sprinkle in some red pepper flakes for heat. These add extra layers of taste and excitement. When sautéing vegetables, keep the heat high but don’t overcook them. Stir them quickly to keep their crunch. A short cooking time keeps veggies bright and fresh. For a beautiful presentation, use deep bowls for serving. This allows the colors to pop. A splash of lemon zest on top adds brightness, too. Garnishing can elevate your dish. Scatter fresh basil leaves over the top. A sprinkle of grated Parmesan cheese adds a nice touch. It makes your dish look like it came from a restaurant! For the full recipe, check out the detailed instructions above. Enjoy your cooking adventure! {{image_4}} You can change up the veggies in your Pasta Primavera with Lemon. Seasonal veggies work best. Try using asparagus, snap peas, or carrots. These will add color and flavor. If fresh veggies aren't available, frozen ones are a great option too. Just remember to thaw them and drain any excess water before cooking. This keeps your dish from getting soggy. Want to make your Pasta Primavera heartier? You can add protein! Chicken, shrimp, or tofu are great choices. If you use chicken, cook it in the skillet first, and then add the veggies. For shrimp, toss them in when the veggies are almost done. They only need a few minutes to cook. If you prefer tofu, press it to remove moisture, then cube and sauté until golden before adding it to the mix. Pasta Primavera is very flexible with pasta types. You can choose gluten-free pasta if you need it. Options like brown rice or quinoa pasta work well. Whole grain pasta is another healthy choice, adding fiber to your meal. If you want something unique, try legume-based pasta made from lentils or chickpeas. These add a nice twist and extra protein. For the full recipe, check out the [Full Recipe]. To keep your Pasta Primavera fresh, refrigerate it right after cooling. Place it in airtight containers. This helps lock in flavors and keeps it safe to eat. Always store leftovers within two hours of cooking. The pasta will taste great for up to three days in the fridge. When you reheat your pasta, use a stove or microwave. For the stove, add a splash of water or olive oil. Stir gently to heat evenly. If using a microwave, cover it to keep moisture in. Avoid overheating to prevent soggy pasta. Heat just until warm. To freeze Pasta Primavera, let it cool first. Transfer it to freezer-safe containers, leaving space for expansion. This dish can be frozen for up to three months. When ready to eat, thaw it overnight in the fridge. Reheat it on the stove or microwave, adding a bit of water to help it steam. Enjoy your flavorful veggie delight later! For the full recipe, check out the details above. Pasta Primavera lasts about 3 to 5 days in the fridge. To keep it fresh, store it in an airtight container. It’s best to let the pasta cool before sealing. This helps prevent moisture buildup, which can make it soggy. Yes, you can make Pasta Primavera ahead of time. To prepare, cook the pasta and veggies as usual. Let everything cool completely before storing. When you are ready to eat, just reheat it in a skillet over low heat. Add a splash of water or extra olive oil to keep it moist. If you need a lemon substitute, try lime juice or vinegar. Use the same amount, about 2 tablespoons. You can also use orange juice for a sweeter flavor. Adjust to your taste, as different fruits can change the dish's profile. Pasta Primavera is healthy and full of nutrients. It has lots of veggies like broccoli, spinach, and bell peppers. These provide vitamins and fiber. The olive oil adds healthy fats. Overall, this dish is low in calories and high in flavor, making it a great choice. Pasta Primavera is a simple and tasty dish. We discussed the essential ingredients, like pasta, fresh vegetables, and seasonings. I shared step-by-step instructions for cooking and combining ingredients. You can enhance flavors with herbs and spices while following tips for perfect presentation. Consider variations with protein and different pasta types for more options. Lastly, I covered storage and reheating to keep leftovers fresh. This dish is not only delicious but also healthy, making it a great meal for everyone. Enjoy experimenting with it!](https://dishtreats.com/wp-content/uploads/2025/05/1202f33f-9285-4746-af91-946a78d77e80-768x768.webp)
![For One Pot Fiesta Rice, you need: - 1 cup long-grain rice - 2 cups vegetable broth - 1 can (15 oz) black beans, drained and rinsed - 1 cup corn kernels (choice of fresh, frozen, or canned) - 1 red bell pepper, diced - 1 green bell pepper, diced - 1 small onion, finely chopped - 2 cloves garlic, minced These ingredients create a base full of colors and flavors. The rice absorbs all the tasty broth, making it fluffy and delicious. The black beans add protein, while the corn and peppers provide sweetness and crunch. You will also need: - 1 teaspoon ground cumin - 1 teaspoon chili powder - Salt and pepper to taste These spices give the dish its kick. Cumin adds warmth, while chili powder brings a bit of heat. Adjust the salt and pepper to balance the flavors just right. To finish off your meal, use: - Fresh cilantro, chopped (for garnish) - Lime wedges (for serving) Cilantro adds freshness, and lime juice brightens the dish. Together, they enhance the fiesta feel. The combination of these ingredients makes this dish not just tasty but also visually appealing. You can find the full recipe to guide you through the cooking process. - Heat olive oil and sauté onion and garlic. - Add diced bell peppers. Start by heating one tablespoon of olive oil in a large pot over medium heat. Once hot, add the finely chopped onion and minced garlic. Sauté for about three to four minutes. You want the onion to become soft and clear. The garlic will fill your kitchen with a lovely aroma. Next, toss in your diced red and green bell peppers. Cook them for two to three more minutes. Stir occasionally until they soften and brighten in color. - Incorporate spices and rice. - Simmer with vegetable broth. Now it's time to spice things up! Sprinkle in one teaspoon each of ground cumin and chili powder. Stir well to mix the spices into the onion and pepper mixture. Let them cook for one minute. This step helps release their rich flavors. Next, add one cup of long-grain rice to the pot. Stir it thoroughly so each grain gets coated with the mixture. Now, pour in two cups of vegetable broth. Turn the heat up to bring it to a boil. Once boiling, reduce the heat to low. Cover the pot and let it simmer for about 15 to 20 minutes. Do not lift the lid during this time; you want to keep the steam in. - Add black beans and corn. - Season and fluff. - Presentation tips. When the rice is tender and all the liquid is gone, gently fold in one can of drained black beans and one cup of corn. Allow the mixture to heat through for about five minutes on low heat. Afterward, taste your dish and season with salt and pepper as needed. Use a fork to fluff the rice gently, mixing all the ingredients together. For a beautiful presentation, serve the fiesta rice in bright bowls. Top with fresh cilantro and add lime wedges on the side. This adds a zesty touch and makes your meal look vibrant. Enjoy the colorful feast you've created! You can find the Full Recipe for more details. To prevent rice from sticking, rinse the rice before cooking. This step removes excess starch. After rinsing, dry the rice with a towel. This helps the grains stay separate. Next, use the right water ratio. For every cup of rice, use two cups of liquid. The right ratio keeps the rice fluffy. Simmering time is key for perfect rice. After bringing the pot to a boil, reduce the heat. Cover the pot tightly and let it simmer. Avoid lifting the lid during cooking. This keeps the steam inside, which is crucial. Allowing it to simmer for 15-20 minutes ensures even cooking. For an extra kick, try adding spices like paprika or oregano. These spices blend well with the base flavors. You can also add a pinch of cayenne for heat. Fresh ingredients like diced tomatoes or jalapeños work great too. Top your fiesta rice with fresh avocado or sour cream. It adds creaminess and balances the spice. Using pre-cooked ingredients saves time. You can find canned black beans and corn at the store. These options cut down your prep time significantly. You can also use pre-chopped veggies from the store. This helps you skip the chopping step. Quick prep ideas include using frozen vegetables. They cook fast and still taste fresh. Keep them on hand for busy nights. You can even prepare the rice ahead of time. Just reheat it when you're ready to serve. For the full recipe, check [Full Recipe]. {{image_4}} You can easily customize One Pot Fiesta Rice with protein. Try adding chicken or shrimp. For chicken, use bite-sized pieces and cook them first. Add them back in with the beans and corn. Shrimp cooks quickly, so toss them in during the last few minutes. They should turn pink when done. If you want a vegetarian dish, consider adding tofu or tempeh. Both soak up flavors well. Cut them into small cubes and sauté them with the veggies. You can also use extra beans to boost protein. Want a spicy kick? Add jalapeños to the mix. Dice them finely and sauté with the onions and garlic. This will give your dish a nice heat. Adjust the amount to fit your taste. For a Southwest edition, swap out black beans for pinto or kidney beans. You can also add diced tomatoes or corn salsa for a fresh taste. These small changes can make a big difference in flavor. If you're looking for alternatives to long-grain rice, try quinoa or cauliflower rice. Quinoa is packed with protein and cooks in about the same time. Rinse it well before cooking to remove any bitterness. Cauliflower rice is a great low-carb option. It cooks faster, so reduce your liquid and cooking time. You don't want it mushy. For a nuttier flavor, brown rice is another option. Just know it will take longer to cook, so adjust your time and liquid accordingly. These substitutes keep your meals fresh and exciting! Store your One Pot Fiesta Rice in an airtight container. It stays fresh for 3 to 5 days. Check for any signs of spoilage before using leftovers. To keep the rice at its best, let it cool down before sealing it. This helps prevent moisture build-up, which can cause mushy rice. You can freeze portions of One Pot Fiesta Rice for later. Use freezer-safe bags or containers. Make sure to remove as much air as possible to avoid freezer burn. It will last up to 3 months in the freezer. When you're ready to eat, thaw it overnight in the fridge. For quick meals, you can microwave frozen rice straight from the freezer. To reheat, place the rice in a pot with a splash of water. Cover and warm it over low heat. Stir occasionally to heat evenly. If it seems dry, add a bit more water. You can also microwave it. Just add a little water and cover it. After reheating, taste and adjust the flavors. You may want to add a squeeze of lime or a sprinkle of fresh cilantro for a burst of flavor. Can I use brown rice instead of white? Yes, you can use brown rice. It takes longer to cook. Add about 10-15 minutes to the cooking time. You may also need to add more broth to keep it moist. How do I adjust the recipe for more servings? To make more servings, simply double the ingredients. Use a larger pot to fit everything. Cooking time may not change much, but check the rice to be sure. What are the best side dishes to serve with One Pot Fiesta Rice? Some great sides include grilled veggies, avocado slices, or a fresh salad. You could also serve it with tortilla chips for a crunchy contrast. How to tell when the rice is cooked? The rice is ready when it has absorbed all the liquid. It should look fluffy and tender. You can taste a grain to check if it’s done. Can I substitute vegetable broth with chicken broth? Yes, chicken broth works well. It adds a different flavor that many people enjoy. Just make sure to choose low-sodium broth if you watch your salt intake. What is the calorie count per serving? Each serving has about 250 calories. This can vary based on additional toppings or sides added. Are there any allergens in this recipe? This recipe is generally free from common allergens. However, check the labels on canned goods for potential allergens. If you are sensitive to beans or corn, be cautious. This blog covered a simple recipe for One Pot Fiesta Rice. We explored ingredients like long-grain rice, black beans, and fresh veggies. I shared tips on cooking techniques and storage methods. You can enjoy many variations to suit your taste. Whether you prefer chicken, shrimp, or a spicy twist, the options are endless. This dish is easy to make and great for leftovers. Enjoy your cooking adventure!](https://dishtreats.com/wp-content/uploads/2025/07/eb10aa28-84d4-4922-bf2e-e4835b83e1a4-768x768.webp)
![- 1 cup green or brown lentils - 1 tablespoon olive oil - 1 medium onion, finely chopped - 2 cloves garlic, minced - 2 medium carrots, diced into bite-size pieces - 2 stalks celery, diced - 1 red bell pepper, diced - Ground cumin - Smoked paprika - Turmeric - Salt - Black pepper - 6 cups vegetable broth (preferably low-sodium) - 1 (14-ounce) can diced tomatoes, including their juices - 2 tablespoons fresh lemon juice In this vegan lentil soup, I love using green or brown lentils. They add a hearty feel. The olive oil helps to sauté the veggies, making them soft and full of flavor. The mix of vegetables is key. You need an onion for sweetness. Garlic adds a nice kick. Carrots and celery give texture. The red bell pepper adds color and sweetness. For spices, I use ground cumin and smoked paprika. They bring warmth and depth. A bit of turmeric adds a lovely golden hue. Salt and black pepper round out the flavors. Liquid ingredients are vital too. I use vegetable broth for a rich base. Diced tomatoes add acidity and sweetness. Lastly, fresh lemon juice brightens the dish. You can find the full recipe above for all the details! - Rinse the lentils and chop the vegetables. - Heat olive oil and sauté onion and garlic. Start by rinsing one cup of green or brown lentils under cold water. This helps remove any dirt or debris. While the lentils drain, chop your vegetables. You will need one medium onion, two cloves of garlic, two medium carrots, two stalks of celery, and one red bell pepper. Next, in a large pot, heat one tablespoon of olive oil over medium heat. Add the chopped onion and cook for about five minutes. Stir until it becomes soft and clear. Then, add the minced garlic. Cook for one more minute to release its wonderful aroma. - Incorporate remaining vegetables and spices. - Add lentils, broth, and tomatoes, bring to a boil. Now, add the diced carrots, celery, and red bell pepper to the pot. Cook for another five to seven minutes. Stir often until the vegetables become tender. To build flavor, sprinkle in one teaspoon of ground cumin, one teaspoon of smoked paprika, and half a teaspoon of turmeric. Mix well and cook for one more minute. After the spices bloom, add the rinsed lentils, six cups of vegetable broth, and one can of diced tomatoes with their juices. Increase the heat and bring this mixture to a boil. Once it boils, reduce the heat and cover the pot. Let it simmer for 25 to 30 minutes, or until the lentils are soft but not mushy. - Simmer and add kale. - Season and serve. Once the lentils are cooked, stir in two cups of chopped kale. Let it simmer for an additional five to seven minutes. The kale should turn bright green and wilted. Now, season your soup with salt, freshly ground black pepper, and two tablespoons of fresh lemon juice. The lemon juice adds a nice zing. Taste it and adjust the seasoning as needed. Serve the soup hot, garnished with fresh parsley for a hint of color and flavor. For a full recipe, please see the [Full Recipe]. Enjoy your warm and nourishing vegan lentil soup! To boost the taste of your vegan lentil soup, consider these tips: - Add spices: Try bay leaf for depth or chili flakes for heat. - Sauté longer: Cook your vegetables a bit more. This gives a richer, deeper flavor. This soup shines when paired with the right sides. Here are my favorite ways: - Bread: Serve it with homemade bread for a warm, cozy meal. - Garnishes: Top it with nutritional yeast for a cheesy flavor or creamy avocado for richness. Lentils are packed with nutrients. Here’s why they are great: - Nutritional benefits: They provide protein, fiber, and iron, making them a healthy choice. - Leafy greens: Adding kale boosts vitamins and minerals. It also adds color and texture. For the full experience, check out the Full Recipe. These tips will help you create a dish that's not just tasty but also nourishing! {{image_4}} You can switch lentils for other beans or pulses. Black beans or chickpeas work well. Each bean adds a unique taste and texture to the soup. You can also use seasonal vegetables. Try zucchini in summer or butternut squash in fall. These swaps keep your soup fresh and exciting. To make your soup creamier, add coconut milk. It gives a rich texture and a hint of sweetness. You can also use fresh herbs like basil or cilantro. They add bright flavors and an herbal kick. A sprinkle of fresh herbs before serving makes a big difference. If you want a faster option, try an Instant Pot. Cook the soup on high pressure for about 15 minutes. You can also use a slow cooker. Simply set it on low for 6-8 hours. For a creamy version, use a blender. Blend half the soup and mix it back in. This makes the soup thick and smooth. Explore the [Full Recipe] for more ideas on making this soup your own! After enjoying your vegan lentil soup, you can store leftovers easily. Let the soup cool down first. Then, transfer it to airtight containers. Glass or plastic containers work well for this. Store it in the fridge for up to five days. For longer storage, freeze the soup. Use freezer-safe containers or bags to prevent freezer burn. The soup can last up to three months in the freezer. When it’s time to enjoy the soup again, reheat it gently. You can use a pot on the stove or a microwave. If using a pot, heat it over medium-low until warm. Stir occasionally to prevent sticking. In the microwave, use a microwave-safe bowl. Heat in short bursts, stirring in between. This helps heat evenly. Avoid overcooking, as the lentils may become mushy. Preparing for future meals is smart and easy with this soup. Chop your vegetables ahead of time, like onion, garlic, and carrots. Store them in the fridge for quick use. You can also rinse your lentils in advance and keep them in a container. Making larger batches is a great idea too. This way, you always have a warm, nourishing meal ready. Just follow the full recipe and freeze extra portions for busy days. Green and brown lentils are great for soup. They hold their shape well. Green lentils have a slightly peppery taste. Brown lentils are milder and cook faster. Both work well in this vegan lentil soup. Yes, you can adapt this recipe. If you prefer meat, try adding cooked chicken or sausage. For dairy, a splash of cream or some cheese can add richness. Just remember, this makes it less vegan. To thicken your soup, you have a few options. You can mash some lentils against the pot. Adding a spoonful of tomato paste also helps. If you want a creamier feel, blend a portion of the soup. These techniques will help you achieve the perfect consistency. For more details, check the full recipe. This blog post covers the key aspects of making a hearty lentil soup. We discussed the essential ingredients, including lentils, vegetables, and spices. I shared step-by-step instructions for preparing and cooking the soup. We explored tips for enhancing flavors and serving suggestions. You can create variations with different ingredients and learn best practices for storing and reheating leftovers. Lentil soup is a healthy, versatile meal that is easy to make. Enjoy experimenting with your own flavors and keep discovering new ways to make it.](https://dishtreats.com/wp-content/uploads/2025/06/c46bc7f1-46e5-4579-b786-1848127316df-768x768.webp)
