
Teriyaki Chicken Meatballs Tasty and Easy Recipe


Are you ready to impress your family with a delicious dinner? Teriyaki chicken meatballs are both tasty and easy to make. This recipe is packed with flavor, and I’ll walk you through each step. From mixing the perfect meatball blend to whipping up a homemade teriyaki sauce, you’ll create a meal everyone will love. Let’s dive in and make this scrumptious dish together!
Why I Love This Recipe
- Delicious Flavor Combination: The sweet and savory teriyaki sauce perfectly complements the tender chicken meatballs, creating a mouthwatering dish that everyone loves.
- Easy to Prepare: This recipe is quick to make, with simple steps that yield impressive results, making it ideal for weeknight dinners or meal prep.
- Healthy Ingredients: Using ground chicken and fresh vegetables ensures that these meatballs are a nutritious option, packed with flavor while being lower in fat.
- Customizable: The meatballs and sauce can easily be adapted to suit your taste, whether you want to spice them up or add more veggies!
Ingredients
Main Ingredients
- 1 lb ground chicken
- 1/2 cup panko breadcrumbs
- 1/4 cup green onions, finely chopped
- 1/4 cup carrots, finely grated
- 1 large egg
- 2 tablespoons low sodium soy sauce
- 1 tablespoon sesame oil
- 1 tablespoon fresh ginger, minced
- 2 cloves garlic, minced
- Salt and black pepper to taste
- 1/2 teaspoon black sesame seeds (for garnish)
Teriyaki Sauce Ingredients
- 1/4 cup low sodium soy sauce
- 2 tablespoons honey or maple syrup
- 1 tablespoon rice vinegar
- 1 tablespoon cornstarch mixed with 2 tablespoons water
- 1 teaspoon sesame oil
- 1 teaspoon fresh ginger, minced
- 1 teaspoon garlic, minced
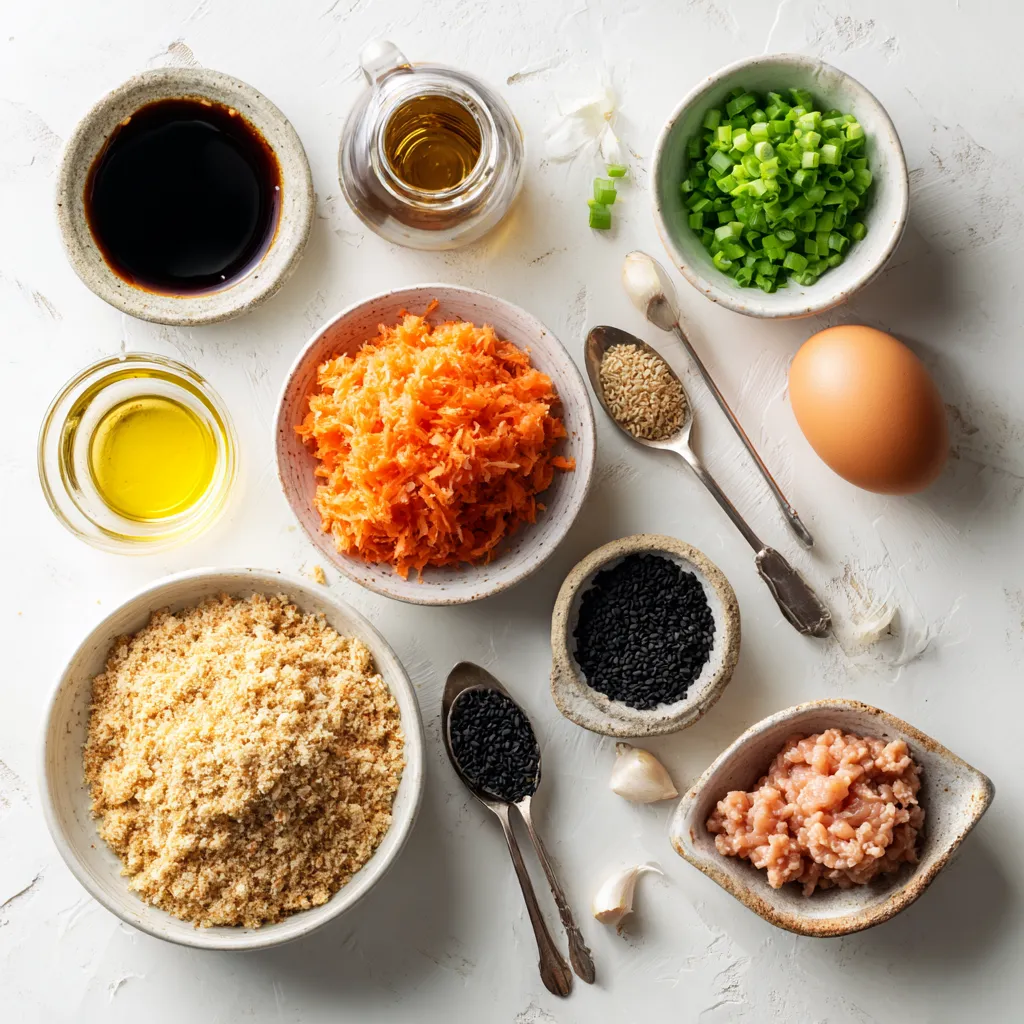
Gather these ingredients before you start cooking. The ground chicken gives a great base. Panko breadcrumbs help keep the meatballs light and fluffy. The green onions and carrots add a nice crunch and flavor. Don’t forget the ginger and garlic; they really make a difference!
For the teriyaki sauce, use low sodium soy sauce to keep it tasty but not too salty. Honey or maple syrup adds a sweet touch. Rice vinegar gives it a slight tang. Cornstarch mixed with water will help thicken the sauce. This sauce will coat the meatballs perfectly!
All these ingredients work together to create a meal that’s fun to eat and easy to make. Feel free to mix and match, but this list will give you the best results!
Step-by-Step Instructions
Preparing the Meatball Mixture
To make the meatballs, start by combining the main ingredients. In a large bowl, mix together:
- 1 lb ground chicken
- 1/2 cup panko breadcrumbs
- 1/4 cup green onions, finely chopped
- 1/4 cup carrots, finely grated
- 1 large egg
- 2 tablespoons low sodium soy sauce
- 1 tablespoon sesame oil
- 1 tablespoon fresh ginger, minced
- 2 cloves garlic, minced
- Salt and black pepper to taste
Use your hands to mix the ingredients well. This helps ensure that every bite is full of flavor. Make sure you blend everything until it looks like a uniform mixture.
Cooking the Meatballs
Next, it’s time to cook the meatballs. Preheat your oven to 400°F (200°C). While it heats, prepare a baking sheet by lining it with parchment paper. This will help with easy cleanup and prevent sticking.
Now, shape the meatballs. With your hands, scoop out portions of the mixture and roll them into balls about 1 inch in size. Place them on the baking sheet, giving them enough space to cook evenly.
Bake the meatballs in the oven for about 15 to 20 minutes. They are done when they turn golden brown and have an internal temperature of 165°F (74°C).
Making the Teriyaki Sauce
While the meatballs bake, you can make the teriyaki sauce. In a saucepan over medium heat, add:
- 1/4 cup low sodium soy sauce
- 2 tablespoons honey or maple syrup
- 1 tablespoon rice vinegar
- 1 teaspoon sesame oil
- 1 teaspoon fresh ginger, minced
- 1 teaspoon garlic, minced
Whisk these ingredients together and bring the mixture to a gentle simmer.
To thicken the sauce, mix 1 tablespoon of cornstarch with 2 tablespoons of water in a small bowl. Gradually add this to the simmering sauce while whisking continuously. This will help avoid lumps. Keep stirring until the sauce thickens and looks shiny. This should take about 2-3 minutes.
Once the meatballs are cooked, toss them in the thickened sauce. Enjoy!
Tips & Tricks
Enhancing Flavor
To make your teriyaki chicken meatballs even better, consider adding fresh herbs. Basil, cilantro, or mint can add a nice touch. You can also try spices like crushed red pepper for heat or a hint of garlic powder for extra flavor.
When it comes to sweetness, you can adjust the amount of honey or maple syrup in the sauce. If you prefer a saltier taste, add a bit more soy sauce. Taste your sauce as you go to find the right balance for you.
Meatball Consistency
For the perfect texture, mix the ground chicken well with the other ingredients. Don’t overmix, as this can make the meatballs tough. You want them juicy and tender.
If you can’t find ground chicken, you can use ground turkey or even lean ground beef. These options will still taste great but may change the flavor a bit.
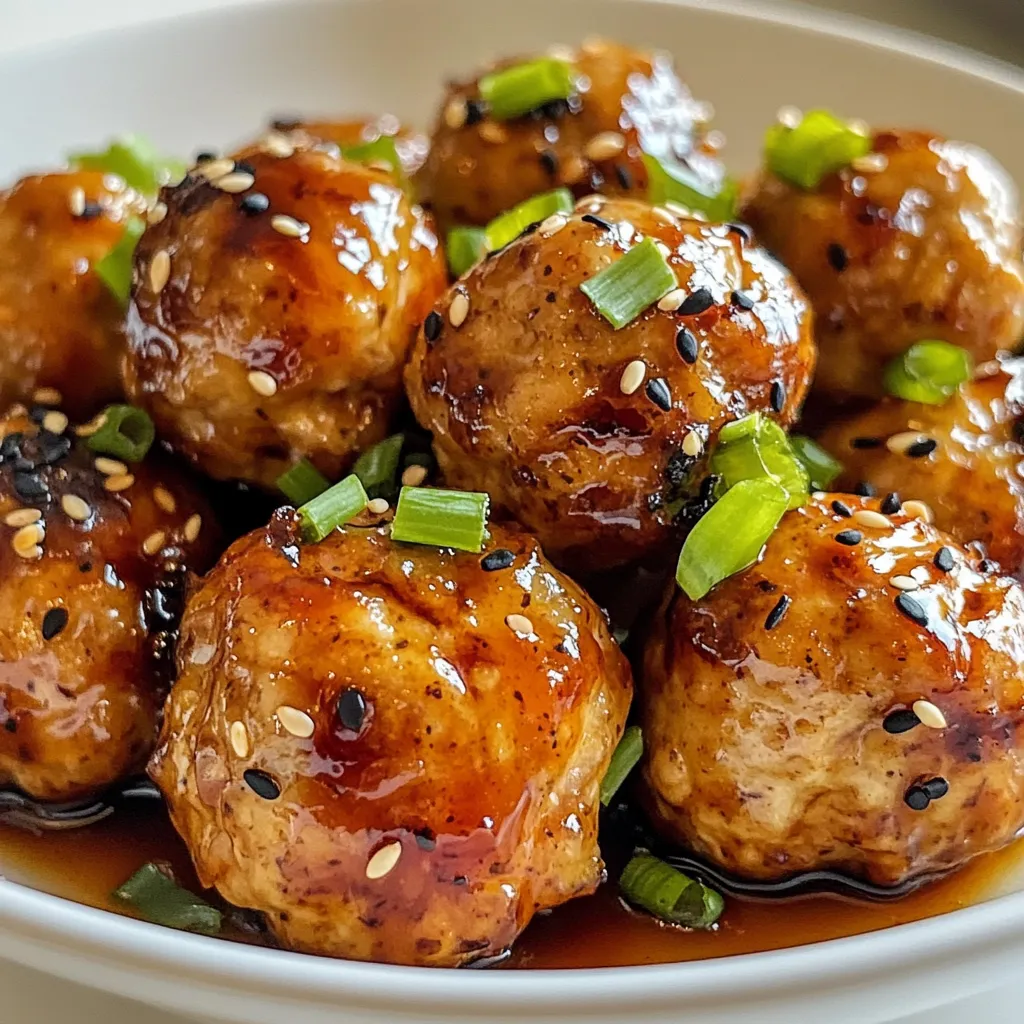
Presentation Ideas
Plating is key to a beautiful dish. Serve your meatballs on a bed of steamed rice or quinoa. This adds color and makes the meal more filling.
For garnishes, sprinkle black sesame seeds and chopped green onions on top. A drizzle of the teriyaki sauce can also enhance the look, making your dish pop with flavor and style.
Pro Tips
- Use Fresh Ingredients: Fresh ginger and garlic will elevate the flavor of your teriyaki sauce significantly. Avoid using pre-minced products for the best taste.
- Adjust Sweetness: Depending on your preference, you can adjust the amount of honey or maple syrup in the teriyaki sauce to make it sweeter or less sweet.
- Experiment with Proteins: While this recipe uses ground chicken, feel free to substitute with ground turkey or even ground beef for a different flavor profile.
- Keep Them Moist: To prevent the meatballs from drying out, avoid overbaking them. Use a meat thermometer to ensure they reach 165°F (74°C) without going over.
Variations
Alternative Protein Options
You can swap out ground chicken for turkey or beef. Turkey works well and stays moist. Beef offers a richer flavor. If you prefer plant-based options, try using lentils or chickpeas. These provide a hearty texture and great taste.
Sauce Variants
Want some heat? Add sriracha or chili flakes to your teriyaki sauce. This brings a spicy kick. For sweetness, try agave syrup or coconut sugar instead of honey. Each option can change the flavor profile of your dish.
Serving Suggestions
Serve these meatballs over rice or noodles for a filling meal. Steamed veggies add color and nutrients. You can also create a meatball platter with skewers. This is perfect for parties or family gatherings.
Storage Info
Storing Leftovers
To keep your teriyaki chicken meatballs fresh, place them in an airtight container. Store them in the fridge. They will stay good for about 3 to 4 days. Make sure they cool down before sealing. This way, they won’t steam and get soggy.
Freezing Guidelines
If you want to save meatballs for later, freezing is a great option. First, let them cool completely. Then, arrange them in a single layer on a baking sheet. Freeze until solid. After that, transfer them to a freezer bag or container. They can last up to 3 months in the freezer.
To thaw, place the meatballs in the fridge overnight. For quick thawing, you can use the microwave. When ready to eat, reheat them in the oven or microwave. Make sure they reach an internal temperature of 165°F (74°C) before serving.
Meal Prep Options
Making meatballs ahead of time can save you effort on busy nights. You can mix and shape them in advance. Store them in the fridge for up to 24 hours before cooking. This way, they’re ready to bake when you need them.
For easy reheating, consider portioning them into smaller containers. This makes it simple to grab and go. Just heat the amount you need, and enjoy a tasty meal without much fuss!
FAQs
Can I use chicken breast instead of ground chicken?
Yes, you can use chicken breast. Just chop it finely or blend it. Ground chicken gives a better texture for meatballs, though.
How do I know when the meatballs are fully cooked?
The meatballs are done when they reach 165°F (74°C) inside. They should be golden brown on the outside. A meat thermometer is best for checking.
Can I make the teriyaki sauce in advance?
Yes, you can make it ahead of time. Store it in the fridge for up to a week. Just warm it up before using.
What can I substitute for panko breadcrumbs?
You can use regular breadcrumbs or crushed crackers. For a gluten-free option, try almond flour or gluten-free breadcrumbs.
Are there gluten-free options for this recipe?
Yes, use gluten-free soy sauce and panko breadcrumbs. Many brands offer these options. This way, everyone can enjoy the dish!
In this post, I covered how to make delicious teriyaki chicken meatballs. I shared essential ingredients like ground chicken, panko breadcrumbs, and green onions. You learned step-by-step instructions for preparing the mixture and making teriyaki sauce. Tips for flavor and presentation add extra flair.
Remember, you can experiment with proteins and sauces to suit your taste. Whether you store leftovers or prep in advance, these meatballs are a fun, tasty meal. Enjoy your cookin

Teriyaki Chicken Meatballs
Ingredients
- 1 lb ground chicken
- 0.5 cup panko breadcrumbs
- 0.25 cup green onions, finely chopped
- 0.25 cup carrots, finely grated
- 1 large egg
- 2 tablespoons low sodium soy sauce
- 1 tablespoon sesame oil
- 1 tablespoon fresh ginger, minced
- 2 cloves garlic, minced
- to taste salt and black pepper
- 0.5 teaspoon black sesame seeds (for garnish)
- 0.25 cup low sodium soy sauce (for sauce)
- 2 tablespoons honey or maple syrup
- 1 tablespoon rice vinegar
- 1 tablespoon cornstarch mixed with 2 tablespoons water
- 1 teaspoon sesame oil (for sauce)
- 1 teaspoon fresh ginger, minced (for sauce)
- 1 teaspoon garlic, minced (for sauce)
Instructions
- In a large mixing bowl, thoroughly mix together the ground chicken, panko breadcrumbs, finely chopped green onions, grated carrots, beaten egg, low sodium soy sauce, sesame oil, minced ginger, minced garlic, and a generous pinch of salt and black pepper. Ensure all ingredients are well-blended.
- Preheat your oven to 400°F (200°C). Line a baking sheet with parchment paper for easy cleanup and to prevent sticking.
- With your hands, scoop out portions of the chicken mixture and roll them into small meatballs, roughly 1 inch in diameter. Place each meatball onto the prepared baking sheet, spacing them out evenly.
- Transfer the baking sheet to the preheated oven and bake for 15-20 minutes. The meatballs should be golden brown and fully cooked, with an internal temperature reaching 165°F (74°C).
- While the meatballs are baking, prepare the teriyaki sauce. In a saucepan set over medium heat, whisk together the low sodium soy sauce, honey (or maple syrup), rice vinegar, sesame oil, minced ginger, and minced garlic. Bring this mixture to a gentle simmer.
- Gradually add the cornstarch-water mixture to the simmering sauce, whisking continuously to avoid any lumps. Continue to stir until the sauce thickens and becomes glossy, which should take about 2-3 minutes. Remove the saucepan from the heat and set aside.
- When the meatballs are fully cooked, take them out of the oven and transfer them to a large bowl. Drizzle the thickened teriyaki sauce over the meatballs and gently toss them until they are evenly coated.
- Serve the teriyaki chicken meatballs warm, garnished with black sesame seeds and additional chopped green onions for a fresh pop of color and flavor.


![To make Honey Mustard Chicken Thighs, you need simple, fresh ingredients. Here’s what you will need: - 4 bone-in chicken thighs, skin-on - 1/4 cup honey - 1/4 cup Dijon mustard - 2 tablespoons olive oil - 3 cloves garlic, minced - 1 teaspoon dried thyme - 1 teaspoon paprika - Salt and black pepper to taste - Fresh parsley for garnish These ingredients bring great flavor to your meal. The honey adds sweetness, while the Dijon mustard gives it a nice tang. Olive oil keeps the chicken juicy, and garlic boosts the taste. Dried thyme and paprika add depth, making every bite delicious. Don’t forget the parsley! It makes your dish look pretty and fresh. This recipe is quick and easy, perfect for any night. For the full instructions, check the Full Recipe. First, preheat your oven to 400°F (200°C). This heat will cook your chicken just right. In a small bowl, whisk together these ingredients: - 1/4 cup honey - 1/4 cup Dijon mustard - 2 tablespoons olive oil - 3 cloves garlic, minced - 1 teaspoon dried thyme - 1 teaspoon paprika - Salt and black pepper to taste Make sure to mix well. This creates a smooth and tasty marinade. Next, take your chicken thighs and place them in a large bowl or a resealable bag. Pour the marinade over the chicken. Ensure each piece is coated well. For the best flavor, let it marinate for at least 30 minutes. If you have more time, refrigerating it overnight works wonders. Now, heat a large oven-safe skillet over medium-high heat. Once hot, add the marinated chicken thighs, skin-side down. Sear them for about 5-7 minutes until the skin is golden brown. This step gives the chicken a nice crisp. After that, flip the thighs using tongs. Transfer the skillet to your preheated oven. Bake for 25-30 minutes. Check that the internal temperature reaches 165°F (75°C). If the juices run clear, the chicken is done. Once cooked, take the skillet from the oven and let the chicken rest for 5 minutes. This helps keep it juicy. Before serving, sprinkle some fresh parsley on top for a lovely finish. For the complete recipe, don't forget to check the [Full Recipe]. To get the best flavor, marinate the chicken thighs well. Use a large bowl or a resealable plastic bag for this. After mixing the marinade, pour it over the chicken. Make sure each piece is coated. For great results, let the chicken sit in the marinade for at least 30 minutes. You can also refrigerate it overnight. This extra time helps the flavors soak in deep. Cooking chicken thighs at the right temperature is key. Preheat your oven to 400°F (200°C). This hot oven cooks the chicken evenly and keeps it juicy. After searing the chicken for 5-7 minutes on the stovetop, transfer it to the oven. Bake for 25-30 minutes. Check the chicken's internal temperature. It should reach 165°F (75°C) for safe eating. Let it rest for 5 minutes before serving, which helps keep it moist. When serving, presentation matters. Place the chicken thighs on a white platter or a wooden board. Drizzle any leftover marinade over the top for added flavor. Garnish with fresh parsley for a pop of color. This simple touch makes the dish look more inviting. You can pair the chicken with roasted veggies or a fresh salad. These sides complement the sweet and tangy flavors of the honey mustard. For the full recipe, check out the details above. {{image_4}} You can change the sauce to fit your taste. Try using maple syrup instead of honey. This gives a unique sweetness. You can also mix in some soy sauce for a savory twist. If you like heat, add a dash of hot sauce or cayenne pepper. For a tangy flavor, consider apple cider vinegar. Each option adds a new layer to the dish. While chicken thighs are great, you can also use chicken breasts. They cook faster but stay moist if cooked right. Drumsticks are another option. They have lots of flavor and a nice crisp skin. You can even use a whole chicken, just adjust cooking time. Each cut brings its own charm to the recipe. For a full meal, add vegetables. Root veggies like carrots and potatoes roast well. Toss them in the marinade for extra flavor. You can also use green beans or broccoli. Place them in the skillet with the chicken. They will soak up the sauce and cook perfectly. This way, you have a tasty one-pan meal that's easy to serve. For the full recipe, check out the previous section. After cooking, let the chicken cool down. Place the chicken thighs in an airtight container. Store them in the fridge for up to three days. Make sure the temperature stays below 40°F (4°C). This keeps your chicken safe and tasty. If you want to store the chicken longer, freezing is a great option. Wrap each thigh tightly in plastic wrap. Then put them in a freezer-safe bag. You can freeze them for up to three months. Remember to label the bag with the date. When you are ready to enjoy leftovers, preheat your oven to 350°F (175°C). Place the chicken in a baking dish. Cover it with foil to keep it moist. Heat for about 20-25 minutes. You can also use a microwave, but it may dry the chicken out. For the best taste, the oven is the way to go. Enjoy your meal again! You should marinate honey mustard chicken thighs for at least 30 minutes. This allows the flavors to soak into the meat. If you have time, marinating overnight works even better. It deepens the taste and makes the chicken more tender. Yes, you can use boneless chicken thighs. They cook faster than bone-in thighs. Adjust the cooking time to about 20-25 minutes in the oven. Always check that the internal temperature reaches 165°F (75°C) for safety. Honey mustard chicken thighs pair well with many sides. Here are some ideas: - Steamed vegetables: Broccoli or green beans add color. - Rice or quinoa: Both soak up the sauce nicely. - Salad: A fresh green salad balances the meal. - Mashed potatoes: Creamy potatoes are a great comfort food option. You can find the full recipe to help you create this delicious meal. In this post, I shared ingredients and steps for making honey mustard chicken thighs. I provided tips for marinating and cooking this dish to enhance its flavor. You learned about variations and how to store leftovers properly. Remember, simple changes can make a big impact on taste. I encourage you to try these ideas for yourself. Enjoy cooking and delight in every bite!](https://dishtreats.com/wp-content/uploads/2025/06/0b4fb8df-5400-4b6b-9acb-490ad2d6fca7-768x768.webp)
![To make Indian-spiced chickpea stew, you need fresh and flavorful ingredients. This stew brings warmth and comfort to your table. Here’s what you’ll need: - Canned chickpeas: 2 cups, thoroughly drained and rinsed - Vegetables and aromatics: - 1 medium onion, finely chopped - 2 cloves garlic, minced - 1 tablespoon fresh ginger, grated - Spices and liquids: - 1 can (14 oz) diced tomatoes with juice - 1 can (14 oz) coconut milk - 2 cups vegetable broth - 1 tablespoon curry powder - 1 teaspoon ground cumin - 1 teaspoon turmeric powder - 1/2 teaspoon red chili powder (adjust according to your heat preference) - 1 tablespoon olive oil - Salt and freshly ground black pepper, to taste - Fresh cilantro, chopped (for garnishing) These ingredients create a rich base for your stew. The chickpeas provide protein and texture. The diced tomatoes add acidity and sweetness. Coconut milk gives a creamy touch. Each spice brings its own unique flavor. You can find the full recipe [here]. Enjoy cooking! 1. Sautéing the aromatics Start by heating olive oil in a large pot over medium heat. Add the chopped onion and cook until it turns soft and golden. This should take around five minutes. Then, mix in minced garlic and grated ginger. Cook for one more minute, stirring often. You want to smell the lovely aroma from the garlic and ginger. 2. Adding spices and liquids Next, sprinkle in the curry powder, ground cumin, turmeric powder, and red chili powder. Stir until the onion is coated with these spices. Let them cook for two minutes. This step makes the flavors pop! Now, pour in the diced tomatoes with their juice, followed by the creamy coconut milk and vegetable broth. Mix everything well to combine. 3. Simmering the stew Gently fold in the rinsed chickpeas. Add salt and black pepper to taste. Bring the stew to a gentle simmer. Once simmering, lower the heat, cover the pot, and let it cook for 20 to 25 minutes. Stir occasionally to keep it from sticking. After cooking, taste and tweak the seasoning. If you want it thicker, mash a few chickpeas against the pot. Garnish with fresh cilantro before serving. Enjoy your delicious Indian-spiced chickpea stew! For the full recipe, refer back to the ingredients section. - Ensuring the perfect texture: To get that creamy and thick stew, you should mash some chickpeas. This adds a nice body. Stir gently while mashing to keep some whole. - Adjusting spice levels: If you want more heat, add more red chili powder. Start with a little, then taste and add more if needed. For less spice, cut the chili powder in half. - Enhancing flavor with garnishes: Fresh cilantro adds color and brightness to the stew. Just chop it up and sprinkle it on top before serving. You can also add a squeeze of lime for extra zing. These tips will help you craft a comforting dish. For the complete cooking process, check the Full Recipe. {{image_4}} You can easily change this stew to fit your taste. - Using different legumes or vegetables: If you don’t have chickpeas, try black beans or lentils. You can also add sweet potatoes, carrots, or spinach for more nutrients. - Dairy-free options: The coconut milk gives a rich taste, but you can swap it with almond or soy milk. This keeps the stew creamy without dairy. - Additional spices to suit taste: If you want more heat, add cayenne pepper or fresh chili. For a different flavor, try garam masala or coriander. Play around with spices to find your perfect blend. Feel free to explore these options! Every change can make your stew unique and delicious. Want to try the original? Check out the Full Recipe for the classic dish. To keep your Indian-spiced chickpea stew fresh, let it cool first. This step is key. Place the pot on a cool surface. Give it about 30 minutes to reach room temperature. Use airtight containers for storage. Glass containers work well. They keep the flavors locked in. You can also use plastic containers, but make sure they are BPA-free. When ready to reheat, take the stew from the fridge. Pour it into a pot. Heat it on medium-low. Stir often to stop it from sticking. If it seems thick, add a splash of vegetable broth or water. Heat until it's warm, about 5 to 10 minutes. For safe eating, ensure it reaches at least 165°F. This way, you'll enjoy the stew's warmth and flavor again! For the full recipe, check out the Spicy Indian Chickpea Stew 🥘. Yes, you can freeze this stew. Let it cool first. Then, put it in a safe container. Leave some space at the top for expansion. It stays good for about three months. To thicken your stew, mash some chickpeas. Use the back of a spoon against the pot. You can also simmer it longer. This helps reduce the liquid and makes it thicker. You can serve this stew with rice or naan. Both soak up the flavors well. A side salad or yogurt adds a nice touch too. Enjoy experimenting with different pairings! For the complete recipe, check out the [Full Recipe]. This blog post covered how to make a tasty Indian-spiced chickpea stew. We explored key ingredients like canned chickpeas, various vegetables, and spices. I shared step-by-step instructions for cooking, along with helpful tips for texture and flavor. You learned about fun ingredient variations and how to store leftovers properly. In conclusion, this stew is simple to make and packed with flavor. Feel free to get creative with your ingredients. Enjoy your cooking!](https://dishtreats.com/wp-content/uploads/2025/06/561fcdd4-13bb-4dd2-b7b4-b44f6a9d9028-768x768.webp)