Honey Lime Chicken Thighs Irresistible Flavor Dish

Are you ready to delight your taste buds with a dish that bursts with flavor? Honey Lime Chicken Thighs are a simple yet irresistible meal that everyone will love. With a perfect mix of sweet and tangy, this recipe transforms ordinary chicken into something special. In this post, I’ll share the secret to this tasty dish, along with easy steps and tips. Let’s dive in and make dinner unforgettable!
Why I Love This Recipe
- Sweet and Tangy Flavor: The combination of honey and lime creates a delicious balance of sweetness and acidity that enhances the chicken’s natural flavor.
- Simple to Prepare: This recipe requires minimal ingredients and easy preparation, making it perfect for a quick weeknight dinner.
- Versatile Cooking Method: Whether you choose to bake or grill, this recipe adapts well, allowing for different cooking techniques.
- Impressive Presentation: The vibrant colors from the garnishes and the glossy marinade make this dish visually stunning for any occasion.
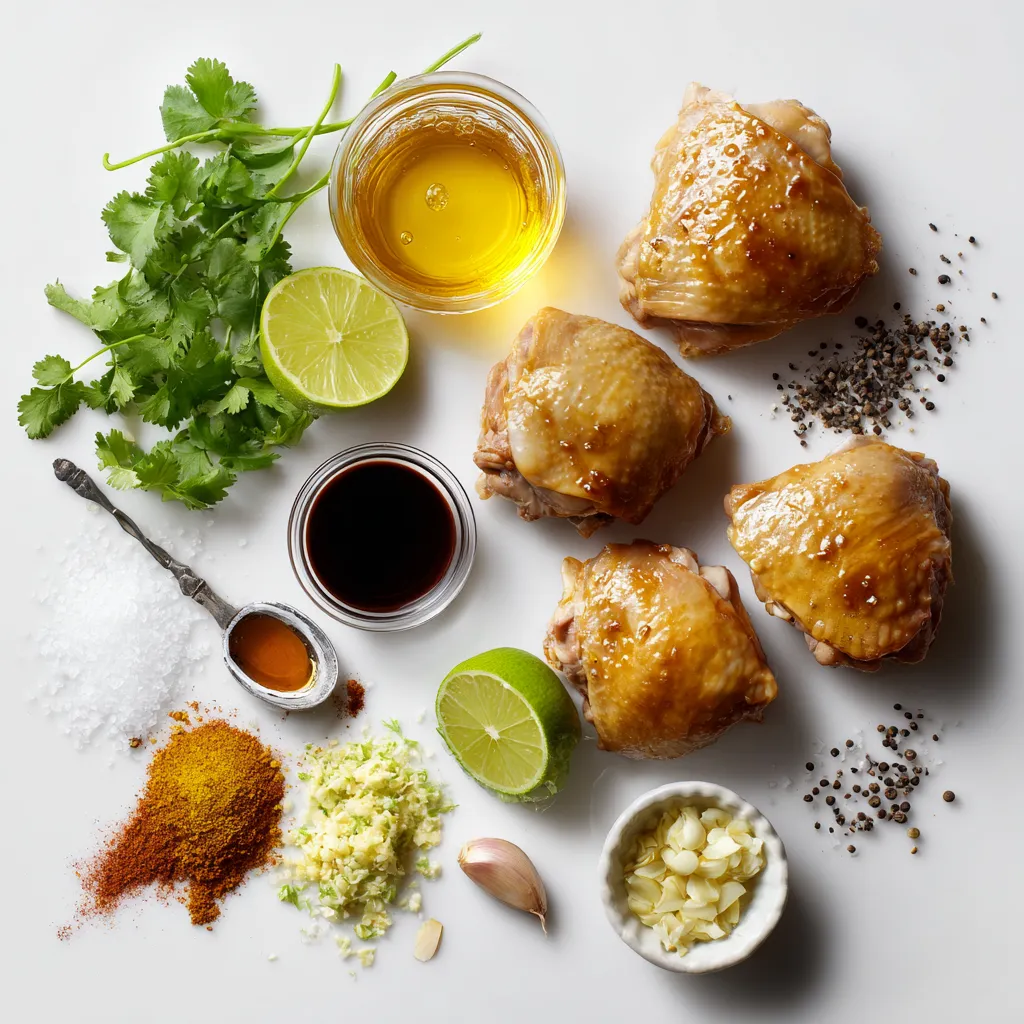
Ingredients
Main ingredients for Honey Lime Chicken Thighs
- 4 bone-in, skin-on chicken thighs
- 1/4 cup honey
- 2 tablespoons freshly squeezed lime juice
- 2 cloves garlic, finely minced
- 1 teaspoon lime zest
- 1 teaspoon low-sodium soy sauce
- 1/2 teaspoon ground cumin
- 1/4 teaspoon smoked paprika
- Salt and pepper to taste
The chicken thighs are the star here. They stay juicy and flavorful. Honey adds sweetness, while lime juice brings the zing. Garlic gives a nice depth, and soy sauce adds umami. Ground cumin and smoked paprika round out the flavor, making it truly standout.
Optional ingredients for garnish
- Fresh cilantro, chopped (for garnish, optional)
Adding fresh cilantro on top makes the dish pop. The color brightens the plate. It also adds a fresh note that balances the sweet and savory flavors.
Equipment needed
- Mixing bowl
- Whisk
- Large resealable plastic bag or shallow dish
- Ovenproof skillet
- Meat thermometer
Using the right tools helps you succeed. A meat thermometer ensures the chicken is safe to eat. The mixing bowl and whisk make preparing the marinade quick and easy. An ovenproof skillet allows for a seamless transition from stovetop to oven.

Step-by-Step Instructions
Marinating the chicken thighs
To start, gather your ingredients. Grab a small bowl. Mix together 1/4 cup honey, 2 tablespoons of lime juice, 2 cloves of minced garlic, 1 teaspoon lime zest, and 1 teaspoon soy sauce. Add 1/2 teaspoon ground cumin and 1/4 teaspoon smoked paprika. Sprinkle in salt and pepper to taste. Whisk everything until it blends well. This marinade is key for flavor.
Next, take 4 bone-in, skin-on chicken thighs. Place them in a large resealable bag or shallow dish. Pour the marinade over the chicken, making sure each piece is coated. Seal the bag or cover the dish with plastic wrap. Let it sit in the fridge for at least 30 minutes. For the best taste, marinate for up to 2 hours.
Searing the chicken thighs in skillet
After marinating, it’s time to cook. First, preheat your oven to 400°F (200°C). This ensures it’s hot and ready. Then, take the chicken out of the marinade. Set the marinade aside for later use.
In a large, ovenproof skillet, heat 2 tablespoons of oil over medium-high heat. Once hot, place the chicken thighs skin-side down in the skillet. Sear for about 5-7 minutes. You want the skin to turn golden brown and crispy. Flip the chicken gently to prevent splattering.
Pour the reserved marinade evenly over the chicken. This adds great flavor to the underside.
Baking in the oven
Now, it’s time to bake. Transfer the skillet to the preheated oven. Bake the chicken for 25-30 minutes. You want it to reach an internal temperature of 165°F (74°C). This ensures the chicken is safe to eat.
After baking, remove the skillet from the oven. Let the chicken rest for a few minutes. This helps the juices redistribute, making the meat juicy.
Your Honey Lime Chicken Thighs are now ready to enjoy!
Tips & Tricks
Perfecting the marinade
To make the best marinade, mix honey, lime juice, garlic, lime zest, soy sauce, cumin, smoked paprika, salt, and pepper. Whisk it well. The balance of sweet and tart gives your chicken a great taste. Marinate the chicken for at least 30 minutes. For deeper flavor, let it sit for up to 2 hours. This step is key for juicy, flavorful chicken.
How to achieve crispy skin
For crispy skin, start by searing the chicken in a hot skillet. Heat oil over medium-high heat. Place the chicken skin-side down and let it cook for 5 to 7 minutes. This browns the skin nicely. Do not rush this step! When you flip it over, the skin should be golden brown and crispy.
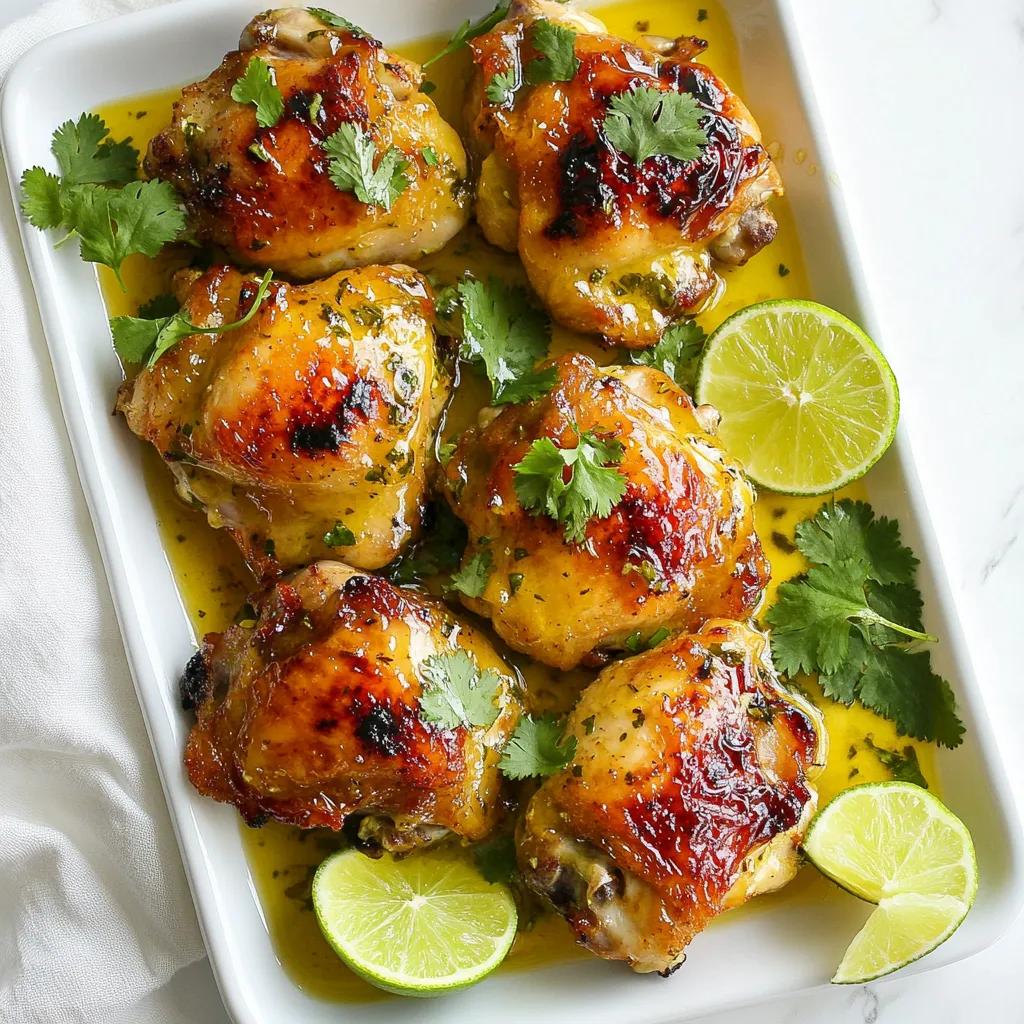
Serving suggestions for Honey Lime Chicken Thighs
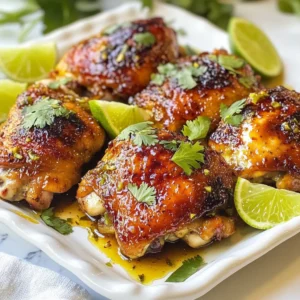
Serve the chicken on a large platter. Garnish it with freshly chopped cilantro and lime wedges. Drizzle some pan drippings over the chicken for added flavor. This not only makes it look nice but also adds a burst of taste. Pair it with rice or a fresh salad for a complete meal. Enjoy every bite!
Pro Tips
- Marination Time: For the best flavor, allow the chicken to marinate for at least 2 hours, or overnight if possible. This will enhance the taste and tenderness of the meat.
- Searing Technique: Ensure your skillet is hot enough before adding the chicken. A proper sear will create a crispy skin and lock in juices for a more flavorful dish.
- Use a Meat Thermometer: To ensure perfectly cooked chicken, use a meat thermometer to check the internal temperature. The chicken should reach 165°F (74°C) for safe consumption.
- Resting Period: Let the chicken rest for about 5 minutes after baking. This allows the juices to redistribute, keeping the meat moist and flavorful when you cut into it.

Variations
Cooking on the grill vs. oven
You can cook honey lime chicken thighs on a grill or in the oven. Grilling gives it a smoky flavor. The high heat adds a nice char to the skin. If you choose the grill, preheat it to medium-high heat. Sear the chicken thighs for about 5-7 minutes on each side. Use a meat thermometer to check for doneness. The chicken should reach 165°F. Baking in the oven keeps the meat juicy. It also makes cleanup easy. Both methods work well, so pick one that suits you.
Substituting different proteins
If you want to switch things up, try different proteins. Chicken thighs are great, but you can use chicken breasts too. They will cook faster, so adjust your time. You can also use pork chops for a different taste. Pork pairs well with honey and lime too. If you are feeling adventurous, use shrimp. Shrimp cooks quickly and absorbs the marinade well. Just marinate for about 15-20 minutes. This will give you a new twist on the dish.
Alternative sauces and flavorings
You can experiment with sauces and flavors. Try using maple syrup instead of honey for a rich taste. You can also add chili flakes for heat. If you like a citrus kick, add orange juice instead of lime. Soy sauce can be swapped for tamari for a gluten-free option. Mix in fresh herbs like thyme or rosemary for a unique flavor. These changes can turn the dish into something new and exciting. Don’t be afraid to get creative!
Storage Info
How to store leftovers
After you enjoy your Honey Lime Chicken Thighs, store any leftovers right away. Place the chicken in an airtight container. Make sure to cover it well. This helps keep the chicken fresh. You can store it in the fridge for up to 3 days.
Reheating methods
To reheat your chicken, use the oven for the best results. Preheat the oven to 350°F (175°C). Place the chicken on a baking sheet. Cover it with foil to prevent it from drying out. Heat for about 15-20 minutes, or until hot. You can also use a microwave if you’re short on time. Just place the chicken on a microwave-safe plate and heat for 1-2 minutes. Check it often to avoid overcooking.
Freezing instructions and tips
If you have more leftovers, freezing is a great option. Wrap each piece of chicken in plastic wrap. Then place the wrapped chicken in a freezer bag. Remove as much air as you can before sealing. This helps prevent freezer burn. You can keep it frozen for up to 3 months. When you’re ready to eat, thaw it in the fridge overnight. Reheat it like I mentioned above for the best flavor.
FAQs
How long should I marinate the chicken thighs?
You should marinate the chicken thighs for at least 30 minutes. For the best flavor, let them sit for up to 2 hours. This time allows the chicken to soak up the sweet and tangy marinade. If you’re short on time, even a quick 30-minute soak will work.
Can I use boneless chicken thighs?
Yes, you can use boneless chicken thighs. They cook faster than bone-in thighs. This means you may need to reduce the baking time by about 10 minutes. Check for that perfect golden color and juicy texture.
What side dishes pair well with Honey Lime Chicken Thighs?
Several side dishes work well with Honey Lime Chicken Thighs. Here are some tasty ideas:
- Steamed rice
- Quinoa salad
- Roasted vegetables
- Fresh coleslaw
- Corn on the cob
These sides balance the rich flavors of the chicken and add freshness to your meal.
How do I know when the chicken is fully cooked?
To check if the chicken is done, use a meat thermometer. Insert it into the thickest part of the thigh. The internal temperature should reach 165°F (74°C). If you don’t have a thermometer, look for clear juices when you cut into it. No pink meat means it’s ready to enjoy!
In this post, we explored the key ingredients and tools for Honey Lime Chicken Thighs. I shared step-by-step instructions, plus tips for perfecting the dish. We discussed different cooking methods and variations, along with storage advice.
Ultimately, making this recipe can greatly enhance your meal options. With simple changes, you can enjoy this dish in many ways. You’ll impress anyone who shares a meal with you. Enjoy your cooking journe

Honey Lime Chicken Thighs
Ingredients
- 4 pieces bone-in, skin-on chicken thighs
- 0.25 cup honey
- 2 tablespoons freshly squeezed lime juice
- 2 cloves garlic, finely minced
- 1 teaspoon lime zest
- 1 teaspoon low-sodium soy sauce
- 0.5 teaspoon ground cumin
- 0.25 teaspoon smoked paprika
- to taste salt and pepper
- optional fresh cilantro, chopped
Instructions
- In a small mixing bowl, combine the honey, freshly squeezed lime juice, minced garlic, lime zest, soy sauce, ground cumin, smoked paprika, salt, and pepper. Whisk together until well-blended to create a flavorful marinade.
- In a large resealable plastic bag or shallow dish, place the chicken thighs. Pour the prepared marinade over the chicken, making sure each thigh is thoroughly coated. Seal the bag tightly or cover the dish with plastic wrap. Let it marinate in the refrigerator for at least 30 minutes, or for optimal flavor, up to 2 hours.
- Preheat your oven to 400°F (200°C) so it’s ready to go when you’re done preparing the chicken.
- Once marinated, take the chicken thighs out of the marinade, setting the marinade aside for later use.
- In a large, ovenproof skillet, heat 2 tablespoons of oil over medium-high heat. Carefully place the chicken thighs in the skillet, skin-side down, and sear them for 5-7 minutes until the skin turns golden brown and crispy.
- Once the skin is browned, gently flip the chicken thighs over. Pour the reserved marinade evenly over the chicken, allowing it to flavor the underside as well.
- Transfer the skillet directly to the preheated oven and bake for 25-30 minutes or until the chicken is cooked through, achieving an internal temperature of 165°F (74°C).
- After baking, carefully remove the skillet from the oven. Allow the chicken to rest for a few minutes to let the juices redistribute before serving.


![To make stuffed bell peppers with quinoa, gather these tasty ingredients: - 4 large bell peppers (mixed colors) - 1 cup quinoa (rinsed) - 2 cups vegetable broth - 1 can black beans (drained and rinsed) - 1 cup corn kernels - 1 medium onion (finely chopped) - 2 cloves garlic (minced) - 1 teaspoon ground cumin - 1 teaspoon chili powder - ½ teaspoon smoked paprika - Salt and pepper to taste - 1 cup diced tomatoes - 1 cup shredded cheese - Fresh cilantro (optional for garnish) These ingredients work together to create a colorful and healthy meal. Quinoa is the star here, adding protein and fiber. The bell peppers not only look great but also bring sweetness and crunch. If you want to learn how to combine them into a delicious dish, check out the Full Recipe. - To cook quinoa with vegetable broth, start by rinsing 1 cup of quinoa under cold water. This step removes bitterness. Pour the rinsed quinoa into a medium saucepan. Add 2 cups of vegetable broth for added flavor. Bring the mixture to a boil over medium-high heat. Once boiling, reduce the heat to low. Cover the pan and let it simmer for about 15 minutes. You will know it's done when all the liquid is absorbed. - After cooking, fluff the quinoa with a fork. This makes it light and airy. Set the quinoa aside to cool while you prepare the other ingredients. - Heat a non-stick skillet over medium heat. Add 1 medium onion, finely chopped, and 2 cloves of minced garlic. Cook these until the onion turns soft and translucent. This takes about 3 to 5 minutes. - Next, add 1 can of drained black beans and 1 cup of corn kernels to the skillet. Stir in 1 cup of diced tomatoes, along with 1 teaspoon of ground cumin, 1 teaspoon of chili powder, ½ teaspoon of smoked paprika, and salt and pepper to taste. Mix well and let it cook for an additional 5 minutes until everything is warm. - To prepare the bell peppers, slice off the tops and remove the seeds and membranes. Choose 4 large bell peppers for a colorful dish. Place the hollowed peppers upright in a baking dish. Make sure they stand stable. - Now, fill each bell pepper with the quinoa and vegetable mix. Press it down gently to pack it in well. For a cheesy touch, top each pepper with 1 cup of shredded cheese. Let it cascade down the sides for a fun look. - Cover the baking dish with aluminum foil. This helps keep the moisture in. Place it in the preheated oven at 375°F (190°C). Bake for 25 minutes. - After 25 minutes, carefully remove the foil. Return the dish to the oven for another 10 to 15 minutes. You want the peppers to be tender, and the cheese to melt and bubble. It should have a lovely golden color when done. Now you have a delicious, colorful dish ready to serve! For full details, refer to the [Full Recipe]. How to choose the right bell peppers Pick large, firm bell peppers for stuffing. Look for vibrant colors like red, yellow, or green. The best peppers have smooth skin. Avoid any with soft spots or blemishes. This ensures a tasty bite every time. Ensuring even cooking Cut off the tops of the peppers evenly. This helps them stand upright. Remove seeds and membranes for better stuffing. Place them in a baking dish that fits snugly. This keeps them from tipping over during cooking. Adding herbs or spices for variety Fresh herbs like cilantro or parsley boost flavor. Try adding a pinch of oregano or thyme for depth. For a spicy touch, sprinkle in some red pepper flakes. These small tweaks make a big difference in taste. Recommended cheese types for best flavor Cheddar and mozzarella melt well and taste great. For a kick, use pepper jack cheese. If you like tang, feta cheese can add a nice twist. Experiment to find your favorite cheese blend. Essential kitchen tools and equipment You’ll need a sharp knife and a cutting board for prep. A medium saucepan is great for cooking quinoa. Use a non-stick skillet for sautéing vegetables. A sturdy spoon helps you mix everything well. Baking dish recommendations for even heat distribution Choose a glass or ceramic baking dish. These materials distribute heat evenly. Make sure it’s big enough to hold all your stuffed peppers. This way, they cook through without burning. For the full recipe, follow this link: [Full Recipe]. {{image_4}} You can change the protein in stuffed peppers easily. If you want a meat option, try ground turkey. It adds great flavor. For a plant-based choice, use tofu. You can mash it and mix it into the filling. Black beans are great, but these options offer variety. You can also make vegetarian or vegan options. Use black beans or lentils for protein. These keep it meat-free. Just ensure you skip the cheese for a vegan meal. There are many ways to customize the protein to fit your needs. Quinoa is a fantastic base for stuffed peppers, but you can switch grains. Rice is a classic choice that works well. Farro or couscous can also bring a different texture. They make the meal hearty and filling. If you need gluten-free options, use rice or quinoa. Both are naturally gluten-free. This way, everyone can enjoy your stuffed peppers without worry. Think about different flavors to spice things up. For a Mexican twist, add jalapeños or taco seasoning. This gives the dish a kick and adds excitement. You can also use salsa for added flavor. For a Mediterranean vibe, add olives or crumbled feta cheese. These ingredients enhance the taste and bring a fresh feel. Both options are simple yet effective ways to change your stuffed peppers. To keep your stuffed bell peppers fresh, store them in the fridge. Place them in an airtight container. They will stay good for up to 4 days. If you want to save them for later, freezing is a great option. Wrap each stuffed pepper in plastic wrap, then put them in a freezer-safe bag. This way, they can last for up to 3 months. For reheating in the oven, preheat it to 350°F (175°C). Place the peppers in a baking dish with a little broth or water. Cover with foil to keep moisture in. Bake for about 20 minutes or until heated through. If you need a quick option, use the microwave. Place one stuffed pepper on a microwave-safe plate. Heat on high for about 2-3 minutes. If it's not hot enough, heat in 30-second bursts until warm. Stuffed peppers last in the fridge for about 4 days. After that, they may spoil. Look out for any signs of spoilage. If you see mold or a bad smell, it's time to toss them. Always trust your senses! You typically bake stuffed bell peppers for 35 to 40 minutes. Start by covering them with foil for the first 25 minutes. This keeps them moist. After that, remove the foil to let the cheese melt and brown for another 10 to 15 minutes. Check the peppers to ensure they are tender but not mushy. Yes, you can prepare stuffed peppers in advance. Stuff the peppers and place them in a baking dish. Cover with foil and store them in the fridge for up to 24 hours. When ready to bake, just pop them in the oven. You may need to extend the baking time by a few minutes. If you want to swap quinoa, try rice, farro, or couscous. These grains provide a nice texture. Rice cooks quickly and absorbs flavors well. Farro adds a chewy bite, while couscous is fluffy and light. You can also use lentils for a protein boost. Stuffed peppers are quite healthy! They are full of fiber from the quinoa, beans, and veggies. Bell peppers are rich in vitamins A and C. This dish tends to be low in calories and high in nutrients. It offers a balanced meal with protein, carbs, and healthy fats. Absolutely! You can use green, red, yellow, or orange bell peppers. Each type has a unique taste. Green peppers are more bitter, while red ones are sweet and fruity. Mixing colors not only looks pretty but also gives different flavors. Feel free to choose your favorite or what’s on hand! For the complete method to make flavorful stuffed bell peppers, check out the [Full Recipe]. Here, I’ll share key details about the dish that will help you create a yummy meal your family will love. Stuffed bell peppers are colorful and fun. They make a great meal for any day. You can use any bell pepper color. Red, yellow, and green peppers add a nice look to your plate. Each color has a different taste too. Quinoa is the star here. It’s a healthy grain packed with protein. Rinsing it before cooking helps remove any bitter taste. You cook quinoa in vegetable broth for extra flavor. This makes it soft and fluffy, perfect for mixing with veggies. The filling is made from black beans, corn, diced tomatoes, and spices. Black beans add protein and fiber. Corn brings sweetness and crunch. Diced tomatoes add moisture and flavor, making the filling juicy. The spices—cumin, chili powder, and smoked paprika—give your dish a tasty kick. They create layers of flavor that make each bite exciting. Don’t forget to add salt and pepper to taste! When you stuff the peppers, pack the filling well. This keeps everything together during cooking. Topping with shredded cheese adds a melty touch. As the peppers bake, the cheese melts and gets golden. Baking them with foil keeps the peppers moist. Then, removing the foil lets the cheese get bubbly and brown. The result is a beautiful dish that is sure to impress! Stuffed peppers combine colorful ingredients into a tasty meal. We discussed how to prepare quinoa, sauté vegetables, and stuff the peppers. I shared tips for choosing the right peppers and flavoring your dish. Variations allow you to substitute proteins and grains based on your taste. Storing leftovers properly extends the life of your meal. Making stuffed peppers can be fun and creative. Enjoy trying new flavors and share this recipe with others!](https://dishtreats.com/wp-content/uploads/2025/06/552026c8-f020-4e58-b656-10611c333f52-768x768.webp)


![- 1 cup uncooked jasmine rice - 1 pound shrimp, peeled and deveined - 2 tablespoons vegetable oil - 3 tablespoons soy sauce - 1 tablespoon sesame oil - Salt and pepper, to taste - 1 cup mixed vegetables - 2 cloves garlic, minced - Fresh green onions, for garnish When I make Easy Shrimp Fried Rice, I always start with the main ingredients. The jasmine rice gives a lovely aroma and texture. For the shrimp, I prefer fresh, peeled, and deveined ones. They cook quickly and taste great. Seasonings are key to this dish. Soy sauce adds umami, while sesame oil gives a nutty flavor. Always remember to season with salt and pepper to bring out the taste. I love adding optional ingredients for extra flavor and color. Mixed veggies like peas and carrots add a nice crunch. Minced garlic gives it a punch, and fresh green onions on top make it look beautiful. For the full recipe, check out the details. Enjoy cooking! - First, rinse 1 cup of jasmine rice under cold water. Use your hands to stir the rice as you rinse. This helps remove excess starch. Keep rinsing until the water runs clear. Drain the rice well. - Next, take a medium saucepan. Add the rinsed rice along with 2 cups of water or low-sodium chicken broth. Bring it to a boil over high heat. Once it boils, lower the heat. Cover the pot with a lid and let it simmer for 15 minutes. The rice will absorb the liquid and become tender. When done, fluff the rice with a fork and set it aside to cool. - Now, heat 2 tablespoons of vegetable oil in a large skillet or wok over medium-high heat. Add 2 cloves of minced garlic and 1 small finely chopped onion. Sauté them for 2-3 minutes. The garlic should smell nice, and the onion will turn clear. - Then, add 1 pound of peeled and deveined shrimp to the skillet. Spread them out evenly. Cook for 2-3 minutes, until the shrimp turn pink and opaque. Once cooked, take them out and set them aside on a plate. - In the same skillet, toss in 1 cup of mixed vegetables. Stir-fry them for 2-3 minutes. They should soften but stay colorful. - Next, push the cooked vegetables to one side of the skillet. Pour in 2 large lightly beaten eggs on the other side. Scramble them until fully cooked and a bit golden. - Now, add the cooled jasmine rice to the skillet. Mix it in with the scrambled eggs and vegetables. Gently fold in the cooked shrimp, ensuring everything combines well. - Drizzle 3 tablespoons of soy sauce and 1 tablespoon of sesame oil over the rice mixture. Stir everything well. Season with salt and freshly ground black pepper to taste. Cook for another 2-3 minutes to let the flavors mix. - Finally, take the skillet off the heat. Garnish with sliced green onions for a fresh touch before serving. This is how you create a delicious shrimp fried rice. For the full recipe, check the section above! - Rinse rice for fluffiness: Rinsing jasmine rice helps remove excess starch. This keeps the rice from becoming sticky. Rinse it until the water runs clear. - Avoid overcooking shrimp: Cook shrimp until they turn pink and opaque. Overcooked shrimp can become rubbery. Remove them from heat as soon as they are done. - Use low-sodium soy sauce: This allows you to control salt levels. It makes your fried rice taste good without too much sodium. - Add extra vegetables for nutrition: Toss in broccoli, peas, or bell peppers. This boosts fiber and vitamins, making your meal healthier. - Recommended garnishes: Fresh green onions add color and taste. You can also sprinkle sesame seeds for a fun crunch. - Pairing options for a complete meal: Serve with a side of steamed veggies or a light salad. This makes your meal balanced and tasty. If you want to dive deeper into the recipe, check out the Full Recipe. {{image_4}} You can easily switch out shrimp in this dish. Try using chicken or tofu instead. Both options work great. For chicken, use bite-sized pieces and cook until golden. For tofu, press it to remove water and then cube it. Sauté until crispy. These changes keep the meal tasty and fun! If you want a vegetarian dish, just leave out the shrimp. Increase the number of vegetables instead. You can add more peas, carrots, bell peppers, or even broccoli. This makes the dish colorful and healthy. Plus, you still get a yummy meal that fills you up! Want to make your fried rice pop with flavor? Add spices like chili or ginger. These spices add heat and depth. You can also mix in some citrus zest, like lemon or lime. This adds a fresh, bright taste that enhances the dish. These little changes make a big difference! Check out the Full Recipe for more ideas. To store shrimp fried rice, let it cool first. Place it in an airtight container. This keeps the rice fresh and prevents it from drying out. You can refrigerate it for up to three days. When you want to eat it, check for any off smells or changes in texture. If you want to freeze shrimp fried rice, portion it into small containers. Make sure to leave some space at the top for expansion. This dish can last in the freezer for about one month. When ready to eat, thaw it in the fridge overnight for best results. For reheating, the stovetop is ideal. Add a splash of water or broth to keep it moist. Heat over medium heat, stirring often. You can also use the microwave. Heat in 30-second intervals, stirring in between. This way, your shrimp fried rice will taste fresh and full of flavor. For more cooking tips, you can check the [Full Recipe]. To boost flavor, use fresh ingredients. Fresh garlic, ginger, and green onions add depth. Try adding a splash of fish sauce for umami. A sprinkle of lime juice brightens the dish. For heat, add chili flakes or sriracha. Lastly, use low-sodium soy sauce to control saltiness. These tips help create a tasty, vibrant meal. Yes, you can prepare shrimp fried rice ahead of time. Cook the rice and shrimp, then store them separately. Keep everything in airtight containers in your fridge. When ready to eat, combine and reheat in a skillet. Add a splash of water or broth to keep it moist. This method ensures your dish stays fresh and delicious. You can use many veggies to add color and crunch. Consider bell peppers, broccoli, or snap peas. Zucchini and mushrooms also work well. Toss in some corn for sweetness or spinach for extra greens. Feel free to mix and match based on your taste. This allows for fun, creative variations. Yes, shrimp fried rice can be gluten-free. Use tamari instead of soy sauce. Check labels on other sauces to ensure they are gluten-free. Most vegetables are naturally gluten-free too. By choosing the right ingredients, you can enjoy this dish without worry. It makes for a tasty option for everyone! You learned how to make shrimp fried rice from scratch. We covered the key ingredients, step-by-step cooking instructions, and helpful tips. You can easily customize this dish with different proteins and veggies. Remember to store leftovers properly for future meals. Enjoying this dish should be fun and easy. With these steps, you can impress your family and friends. Happy cooking!](https://dishtreats.com/wp-content/uploads/2025/06/9ac088a4-5695-4856-8853-65ac7e0439f3-768x768.webp)
