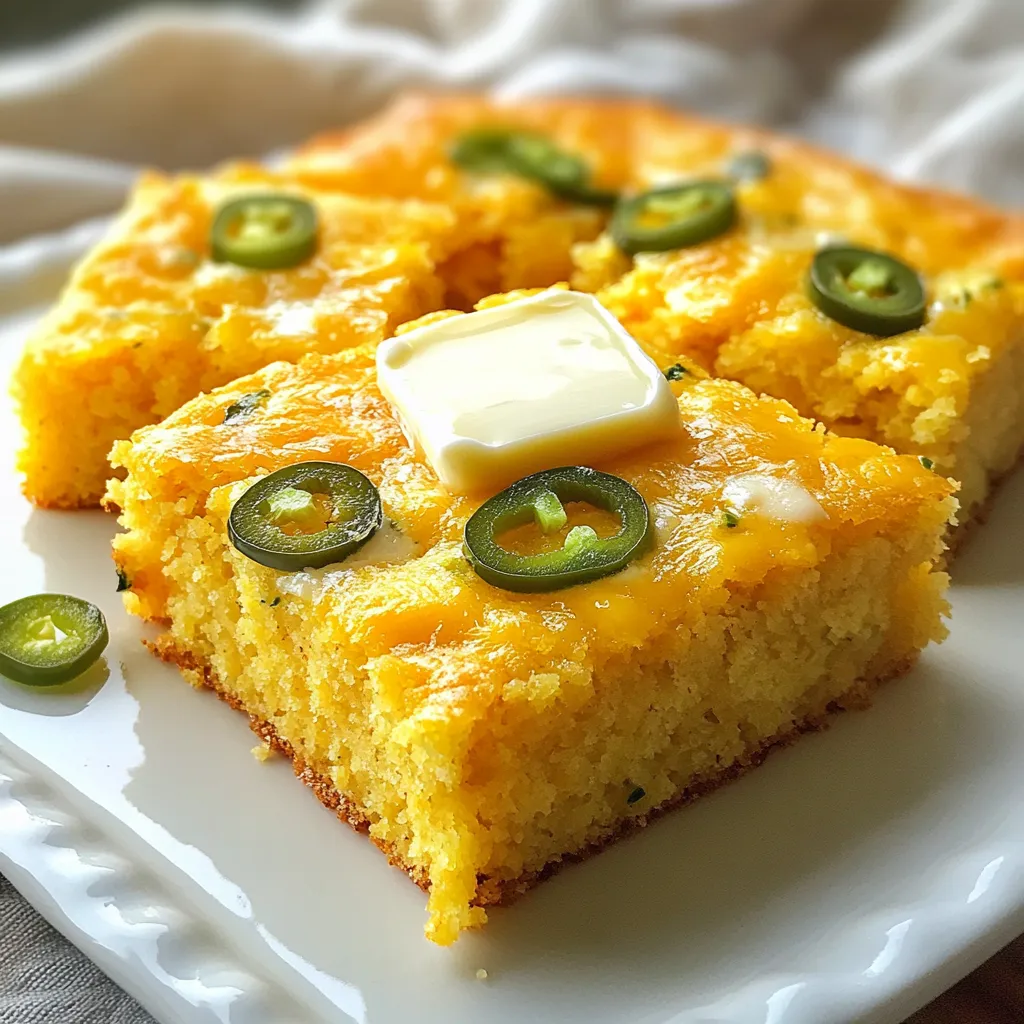
Jalapeño Cheddar Cornbread Tasty and Simple Recipe


If you’re craving a warm, tasty treat, look no further! This Jalapeño Cheddar Cornbread is simple to make and full of flavor. With the right blend of cornmeal, cheese, and just a hint of spice, this cornbread will be a hit at your next meal. Let’s dive into this easy recipe that elevates any dish. Your taste buds are about to thank you!
Why I Love This Recipe
- Deliciously Spicy: The jalapeños add a kick that perfectly contrasts with the richness of the cheddar cheese, making each bite exciting.
- Easy to Make: With simple ingredients and straightforward steps, this cornbread comes together quickly, perfect for any level of home cook.
- Versatile Pairing: This cornbread is a fantastic side for chili, soups, or barbecued dishes, elevating your meal with its unique flavor.
- Perfect Texture: With a moist interior and a slightly crispy crust, this cornbread is satisfying to eat and sure to please your guests.
Ingredients
To make Jalapeño Cheddar Cornbread, gather these key ingredients:
- 1 cup cornmeal
- 1 cup all-purpose flour
- 1 tablespoon baking powder
- ½ teaspoon salt
- ½ teaspoon baking soda
- 2 large eggs
- 1 cup buttermilk (or milk with a tablespoon of lemon juice)
- ¼ cup unsalted butter, melted and slightly cooled
- 1 cup sharp cheddar cheese, shredded
- 1-2 jalapeños, finely chopped (adjust to your heat level)
- 2 tablespoons honey (optional for sweetness)
Each ingredient plays an important role. The cornmeal gives the cornbread its unique texture and flavor. The flour helps with structure. Baking powder and baking soda make it rise. Salt adds depth, while eggs bind the mix together. Buttermilk keeps it moist and tender. Unsalted butter adds rich flavor. Sharp cheddar brings a tasty kick, and jalapeños add spice. Honey, if you choose to use it, balances the heat with a hint of sweetness.
Make sure to use fresh ingredients for the best taste. Enjoy gathering these items before you start baking!

Step-by-Step Instructions
Preheat Oven and Prepare Pan
First, preheat your oven to 400°F (200°C). This step is key for a nice rise. Next, take an 8-inch baking pan and grease it well with butter or non-stick spray. This helps the cornbread come out easily.
Combine Dry Ingredients
In a big mixing bowl, add 1 cup of cornmeal, 1 cup of all-purpose flour, 1 tablespoon of baking powder, ½ teaspoon of salt, and ½ teaspoon of baking soda. Mix these dry ingredients well with a whisk. This ensures they blend evenly for a great texture.
Mix Wet Ingredients
In another bowl, crack 2 large eggs and beat them gently. Pour in 1 cup of buttermilk and ¼ cup of melted butter. If you want a hint of sweetness, add 2 tablespoons of honey. Whisk this mixture until it looks smooth.
Combine Wet and Dry Mixtures
Carefully pour the wet mixture into the bowl with the dry ingredients. Stir it together gently. Stop mixing when it’s just combined. It’s fine if the batter is a bit lumpy. Overmixing can make it tough.
Fold in Cheese and Jalapeños
Now, it’s time to add flavor! Fold in 1 cup of shredded sharp cheddar cheese and 1-2 finely chopped jalapeños. Make sure they spread evenly throughout the batter for that perfect spicy kick.
Bake and Cool
Pour the batter into your prepared pan. Use a spatula to smooth it out. Bake in the oven for 20-25 minutes. Check if it’s done by inserting a toothpick in the center. If it comes out clean, your cornbread is ready! Let it cool in the pan for about 5 minutes before slicing. Enjoy your tasty creation!
Tips & Tricks
Achieving the Best Flavor
To get the best flavor in your cornbread, use fresh ingredients. Fresh jalapeños add spice and zest. Sharp cheddar cheese gives a rich taste. If you like sweet, add honey. It balances the heat well. You can also try different spices. A dash of cumin or smoked paprika can add depth.
Perfect Baking Time
Baking time is key for perfect cornbread. Bake at 400°F for 20-25 minutes. Keep an eye on it as it cooks. Look for a golden top and a toothpick that comes out clean. Underbaking can lead to a mushy center, while overbaking can dry it out.
Avoiding Overmixing
Mix the batter gently to avoid overmixing. Overmixing can make your cornbread tough. Stir until the dry and wet ingredients are just combined. It’s okay if the batter is slightly lumpy. Lumps mean a light, fluffy cornbread.
Pro Tips
- Use Fresh Jalapeños: For the best flavor and heat, opt for fresh jalapeños instead of pickled ones. Adjust the quantity based on your spice tolerance.
- Don’t Overmix: When combining wet and dry ingredients, mix just until combined. This will keep your cornbread light and fluffy.
- Experiment with Cheese: Feel free to mix different types of cheese, like pepper jack or gouda, for a unique flavor twist.
- Serve Warm: Cornbread is best enjoyed warm. Serve with butter or honey for an added layer of flavor that complements the spice.
Variations
Add-ins and Substitutions
You can get creative with your cornbread. Add-ins can boost flavor and texture. Here are some ideas:
- Corn kernels: Fresh or frozen corn adds sweetness and crunch.
- Chopped green onions: These give a mild onion taste.
- Cooked bacon: For a savory twist, add crispy bacon bits.
- Spices: Try cumin or chili powder for extra warmth.
If you want a sweeter cornbread, consider adding more honey or even brown sugar.
Gluten-Free Options
Making this cornbread gluten-free is easy. Swap out all-purpose flour for a gluten-free blend. Many blends work well, but look for one that contains xanthan gum. This helps bind the ingredients together. You can also use almond flour or coconut flour, but adjust the liquid to keep the batter moist.
Different Cheese Choices
While sharp cheddar is tasty, you can try different cheeses too. Here are some options:
- Monterey Jack: This cheese melts well and adds creaminess.
- Pepper Jack: For more spice, use pepper jack cheese.
- Feta: Crumbled feta can add a tangy, salty flavor.
- Mozzarella: This cheese gives a gooey texture but is milder.
Mixing cheeses can also create a unique flavor profile.
Storage Info
How to Store Leftovers
To keep your Jalapeño Cheddar Cornbread fresh, place it in an airtight container. You can also wrap it in plastic wrap or foil. Store it at room temperature for up to two days. If you want to keep it longer, refrigerate it. The cornbread will last about a week in the fridge. Remember, keeping it wrapped helps maintain its moisture.
Reheating Instructions
When you want to enjoy leftover cornbread, preheat your oven to 350°F (175°C). Place the cornbread on a baking sheet and cover it with foil. Heat it for about 10-15 minutes. If you prefer, you can microwave it. Place a slice on a plate and heat it for 20-30 seconds. This keeps it warm and soft.
Freezing Cornbread
Freezing is a great option if you have extra cornbread. Allow it to cool completely first. Then, wrap each piece in plastic wrap. Place the wrapped pieces in a freezer-safe bag. You can freeze it for up to three months. When you’re ready to eat it, thaw it in the fridge overnight. Then, reheat as mentioned above.
FAQs
Can I make Jalapeño Cheddar Cornbread without buttermilk?
Yes, you can make this cornbread without buttermilk. Use regular milk with a tablespoon of lemon juice instead. This trick will add the tangy flavor that buttermilk gives. It works great and keeps the cornbread moist.
How spicy is this cornbread?
The spice level depends on how many jalapeños you add. One jalapeño gives a mild heat. Two jalapeños bring more kick. You can adjust the heat to fit your taste. If you like it hot, add more jalapeños or use spicy cheese.
Can I use frozen jalapeños?
Yes, you can use frozen jalapeños. Just thaw them and chop them finely. They will still add good flavor to the cornbread. Fresh jalapeños are great, but frozen ones work too if that’s what you have.
What to serve with Jalapeño Cheddar Cornbread?
This cornbread pairs well with many dishes. Serve it with chili, soup, or BBQ. It also tastes great with a dollop of butter on top. For a sweet touch, offer honey on the side. Enjoy it with friends and family for a cozy meal!
In this blog post, we explored how to make delicious Jalapeño Cheddar Cornbread from scratch. We discussed key ingredients, easy steps, and tips to boost flavor. You can experiment with variations and storage options. I encourage you to try this recipe at home. You’ll enjoy the blend of cheese and spices. Happy bakin

Spicy Jalapeño Cheddar Cornbread
Ingredients
- 1 cup cornmeal
- 1 cup all-purpose flour
- 1 tablespoon baking powder
- 0.5 teaspoon salt
- 0.5 teaspoon baking soda
- 2 large eggs
- 1 cup buttermilk
- 0.25 cup unsalted butter, melted and slightly cooled
- 1 cup sharp cheddar cheese, shredded
- 1 to 2 jalapeños, finely chopped
- 2 tablespoons honey (optional)
Instructions
- Start by preheating your oven to 400°F (200°C). Prepare an 8-inch square or round baking pan by greasing it generously with butter or non-stick cooking spray.
- In a large mixing bowl, combine the cornmeal, all-purpose flour, baking powder, salt, and baking soda. Whisk these dry ingredients thoroughly until they are evenly mixed.
- In a separate bowl, crack the eggs and beat them lightly. Add the buttermilk, melted butter, and honey (if using), then whisk the mixture until it reaches a smooth consistency.
- Gently pour the wet ingredients into the bowl containing the dry ingredients. Stir the mixture together until it's just combined; take care not to overmix—it should still be slightly lumpy in texture.
- Carefully fold in the shredded cheddar cheese and finely chopped jalapeños, ensuring even distribution throughout the batter.
- Transfer the cornbread batter into the prepared baking pan, using a spatula to spread it out evenly across the surface.
- Bake in the preheated oven for 20-25 minutes, or until the top is a lovely golden brown. To check for doneness, insert a toothpick into the center of the cornbread; it should come out clean when done.
- Once baked, remove the pan from the oven and allow the cornbread to cool in the pan for about 5 minutes before slicing into squares or wedges.
![The Sun-Dried Tomato Chickpea Salad is simple to make and full of flavor. Here’s what you need: - 1 can (15 oz) chickpeas, thoroughly drained and rinsed - 1/2 cup sun-dried tomatoes, roughly chopped - 1/4 cup red onion, finely diced - 1/2 cucumber, peeled and diced - 1/4 cup feta cheese, crumbled into small pieces - 2 tablespoons fresh parsley, finely chopped - 2 tablespoons extra virgin olive oil - 1 tablespoon freshly squeezed lemon juice - 1 teaspoon dried oregano - Salt and freshly ground black pepper, to taste This mix of ingredients creates a bright, fresh dish. Chickpeas add protein and fiber. Sun-dried tomatoes give a sweet and tangy taste. The red onion adds a sharp bite, while cucumber brings crunch. Feta cheese adds creaminess to the salad. Fresh parsley brightens the flavors. Make sure to use high-quality extra virgin olive oil for the best taste. Fresh lemon juice adds a zesty kick. Dried oregano brings an earthy flavor that ties everything together. Adjust salt and pepper to your liking for a perfect balance. For the full recipe, follow the steps to enjoy this delightful salad. It's quick to prepare and great for lunch or dinner! To make this salad, start with a large mixing bowl. Combine the following ingredients: - 1 can (15 oz) chickpeas, thoroughly drained and rinsed - 1/2 cup sun-dried tomatoes, roughly chopped - 1/4 cup red onion, finely diced - 1/2 cucumber, peeled and diced - 1/4 cup feta cheese, crumbled into small pieces Gently stir the ingredients together. This ensures an even distribution of flavors and textures. In a separate small bowl, whisk together the dressing ingredients: - 2 tablespoons extra virgin olive oil - 1 tablespoon freshly squeezed lemon juice - 1 teaspoon dried oregano - Salt and freshly ground black pepper, to taste Mix until well combined. You want the oil and lemon juice to emulsify, meaning they blend into a smooth mixture. Drizzle the dressing over the salad base. Toss gently to coat everything evenly. Be careful not to break the chickpeas or feta cheese. After mixing, sprinkle the freshly chopped parsley on top. Give it one last gentle toss. Cover the salad and let it rest for at least 15 minutes. This time allows the flavors to meld together, enhancing the taste. You can serve it chilled or at room temperature for the best experience. For the full recipe, check the ingredients and instructions above. To make your Sun-Dried Tomato Chickpea Salad stand out, choose a nice serving bowl. A colorful bowl can catch the eye and add to the meal. You can layer the salad to show off its colors. Start with chickpeas at the bottom, then add layers of sun-dried tomatoes, cucumbers, and red onions. For garnishing, sprinkle extra parsley leaves on top. This adds a fresh touch. You can also add a few crumbles of feta cheese over the top. This gives a nice contrast to the vibrant colors of the salad. If you want to impress, serve it with crusty bread or pita on the side. You can make this salad ahead of time. Store it in the fridge for a quick meal later. After you mix it, cover the salad well. It stays fresh for 2 to 3 days. The flavors will deepen as it sits. For meal prepping, divide the salad into single-serving containers. This makes it easy to grab and go. Keep the dressing separate until you are ready to eat. This keeps the salad crisp and fresh. Enjoy your meal! For the full recipe, check out the details above. {{image_4}} You can switch out chickpeas for other beans. Black beans or kidney beans work well. They add a different taste and texture. If you want to try lentils, they can also be good. For a dairy-free option, use a vegan feta cheese. There are many brands available. You can also skip the cheese and add more vegetables. This keeps the salad fresh and tasty. To boost the flavor, add spices like cumin or paprika. These spices can take your salad to a new level. You could also add bell peppers or corn for a nice crunch. If you want more protein, add grilled chicken or tofu. These options make the salad heartier. You can even mix in some nuts or seeds for added texture. For the full recipe, check out the details above and create your own delicious twist! To keep your Sun-Dried Tomato Chickpea Salad fresh, use these tips: - Store in an airtight container. - Layer ingredients to prevent sogginess. - Keep dressing separate until serving. - Use glass containers for better preservation. Glass keeps the salad fresh longer. It also helps you see the colorful layers. Your salad lasts up to three days in the fridge. After that, it may lose its crunch. Watch for these signs of spoilage: - Change in smell or color. - Soft or mushy chickpeas. - Feta cheese that appears slimy. If you notice these signs, it's best to throw it away. Enjoy the salad while it's fresh for the best taste! For the full recipe, click [Full Recipe]. To make this salad, start by gathering your ingredients. You need chickpeas, sun-dried tomatoes, red onion, cucumber, feta cheese, parsley, olive oil, lemon juice, oregano, salt, and pepper. 1. In a large bowl, mix the chickpeas, sun-dried tomatoes, cucumber, onion, and feta. 2. In a small bowl, whisk olive oil, lemon juice, oregano, salt, and pepper together. 3. Pour the dressing over the salad and toss gently. 4. Add the parsley and mix lightly. 5. Let the salad rest for 15 minutes. This helps the flavors blend well. You can find the full recipe above for detailed steps. Yes! This salad is perfect for meal prep. You can prepare it a day in advance. Just store it in an airtight container in the fridge. The flavors will deepen, making it taste even better. Make sure to keep the salad covered to keep it fresh. This salad pairs well with many dishes. Here are some ideas: - Grilled chicken or fish for added protein. - Crusty bread or pita to scoop up the salad. - A light soup like tomato basil for a cozy meal. - Roasted vegetables for a colorful plate. These options will enhance your meal and make it even more enjoyable! This blog post detailed how to create a refreshing Sun-Dried Tomato Chickpea Salad. We covered the necessary ingredients, simple steps to prepare, and tips for presentation. You can enhance this salad with various substitutes or flavors. Proper storage ensures freshness and keeps meals tasty longer. Remember, this salad is not just easy to make—it's also adaptable. Enjoy making it your own, and delight your taste buds with every bite. Your next meal can be both fun and healthy!](https://dishtreats.com/wp-content/uploads/2025/07/f0fe0f85-1842-4358-ad7f-ac591425fdaf-768x768.webp)


![To make crispy baked sweet potato fries, you need just a few simple ingredients. Here’s what you’ll need: - 2 large sweet potatoes - 2 tablespoons extra-virgin olive oil - 1 teaspoon cornstarch - 1 teaspoon smoked paprika - 1/2 teaspoon garlic powder - 1/2 teaspoon onion powder - 1/4 teaspoon cayenne pepper (optional) - Salt and freshly ground black pepper - Fresh parsley for garnish These ingredients combine to create a flavorful and fun side dish. Sweet potatoes give a natural sweetness. Olive oil helps with that crispy texture. The cornstarch is the secret for extra crunch. Smoked paprika adds a nice depth of flavor. Garlic and onion powder bring warmth. Cayenne pepper can spice things up if you like it hot. Finally, salt and pepper enhance everything. Using fresh parsley on top not only looks nice but adds a fresh taste. This is the perfect mix for a tasty treat. You can find the full recipe in the recipe section to make it easy for you. 1. Preheat your oven to 425°F (220°C). It’s key for crispiness. 2. Line a large baking sheet with parchment paper. This helps fries not stick. 3. Take 2 large sweet potatoes. Rinse and cut them into even-sized fries. Try to keep them similar in size for even cooking. 4. Place the fries in a mixing bowl. Drizzle 2 tablespoons of olive oil over them. Mix well to coat each fry evenly. 1. Sprinkle 1 teaspoon of cornstarch over the fries. This helps them get that crispy texture. 2. Add spices: 1 teaspoon of smoked paprika, 1/2 teaspoon of garlic powder, 1/2 teaspoon of onion powder, and 1/4 teaspoon of cayenne pepper if you like spice. 3. Season with salt and black pepper to taste. Toss the fries gently to make sure they are all coated well with the seasonings. 1. Arrange the seasoned fries on your baking sheet. Make sure they are in a single layer. This allows air to flow and makes them crispy. 2. Bake in the preheated oven for 25 to 30 minutes. Flip the fries halfway through. This helps them brown evenly. 3. When they turn golden and crispy, they are ready. Let them cool for a few minutes before serving. Enjoy these crispy baked sweet potato fries with your favorite dips! For the full recipe, check out the detailed instructions. To get the best crispy fries, air circulation is key. When you spread the fries out on the baking sheet, make sure they aren't touching. This allows hot air to flow all around them. If your fries aren’t crispy enough, try adding a few extra minutes to the cooking time. Keep an eye on them to avoid burning. You can customize the spice levels based on your taste. If you like more heat, add more cayenne pepper. For a milder flavor, leave it out. You can also swap the spices for other favorites like chili powder or Italian herbs. Mix and match to find your perfect blend. An eye-catching way to serve your fries is in a cone or a basket with parchment paper. This makes them look fun and inviting. Pair your fries with tasty dipping sauces like spicy mayo, creamy ranch, or classic ketchup. It adds more flavor and makes the meal special. Enjoy your crispy baked sweet potato fries from the [Full Recipe]. {{image_4}} You can easily change the taste of your sweet potato fries. For a sweet and spicy option, drizzle them with maple syrup before baking. This will add a nice glaze and a kick of flavor. If you prefer herbs, try adding fresh rosemary or thyme. These herbs bring a savory touch that pairs well with the natural sweetness of the potatoes. Using an air fryer is a fantastic way to make crispy fries. Set your air fryer to 400°F (200°C) and cook them for about 15-20 minutes. Shake the basket halfway through to ensure even cooking. If you enjoy grilling, you can also grill sweet potato fries. Slice them thicker, brush with olive oil, and grill over medium heat for about 5-7 minutes on each side. This gives a nice smoky flavor. Sweet potato fries are great on their own, but you can elevate your meal. Pair them with grilled chicken, fish, or a fresh salad for a balanced dish. They also work well in meal prep. You can make a batch and store them in the fridge. Just reheat them for a quick snack or side dish. For a fun twist, serve them in a cone with a side of your favorite dipping sauce. Try creamy ranch, spicy mayo, or classic ketchup for added flavor. For the full recipe, check out the full recipe link! To keep your crispy baked sweet potato fries fresh, store them in the fridge. Place them in an airtight container. This helps maintain their flavor and texture. They can last for up to three days in the fridge. If you want to keep them longer, freezing is a great option. Place the fries in a freezer-safe bag. Remove as much air as you can before sealing. This prevents freezer burn and keeps them tasty. When you're ready to enjoy your leftovers, reheating is key. For crispy fries, use the oven. Preheat your oven to 400°F (200°C). Spread the fries in a single layer on a baking sheet. Heat for about 10 to 15 minutes, flipping halfway through. This method keeps the fries crispy. You can also use an air fryer. Set it to 380°F (193°C) and heat for about 5 to 7 minutes. Avoid using a microwave, as it can make the fries soggy. In the fridge, your fries can last about three days. In the freezer, they can last up to three months. When you store them correctly, you can enjoy them later without losing flavor or texture. Just remember to check for any signs of freezer burn if they are in the freezer for a while. How can I make sweet potato fries even crispier? To make your sweet potato fries crispier, soak them in cold water. Do this for at least 30 minutes. This helps remove excess starch. After soaking, dry them well with a towel. Also, use cornstarch before baking to create a crisp outer layer. Can I use regular potatoes instead? Yes, you can use regular potatoes. They will taste different but can still be delicious. You might need to adjust the cooking time. Regular potatoes may cook faster than sweet potatoes. What's the nutritional value of sweet potato fries? Sweet potato fries are high in vitamins A and C. They are also a good source of fiber. Compared to regular fries, they have fewer calories and more nutrients. This makes them a healthier choice for a snack or side dish. What is the optimal temperature for baking sweet potato fries? The best temperature for baking sweet potato fries is 425°F (220°C). This high heat helps them cook evenly and get crispy. How long should I bake them for the best results? Bake the fries for 25 to 30 minutes. Be sure to flip them halfway through to get an even golden color. They should look crispy and slightly browned when done. Can I use a different oil? Yes, you can use other oils like avocado oil or canola oil. Each oil has a different flavor, but all will work well for baking. What if I don't have cornstarch? If you don't have cornstarch, you can use potato starch or even flour. Both will help create a crisp texture. Just use the same amount as the cornstarch in the recipe. Making sweet potato fries is simple and fun. You learned the key ingredients and steps to create crispy fries. I shared tips for seasoning and presentation to elevate your meal. You can also explore variations and alternative cooking methods. Storing and reheating properly ensures you can enjoy leftovers without losing quality. Incorporate your favorite flavors and get creative. Remember, these fries are a tasty, healthy option for any meal. Enjoy your cooking adventure!](https://dishtreats.com/wp-content/uploads/2025/07/5c45319a-0858-4d48-b29a-502acd419023-768x768.webp)