Cajun Sausage Potato Skillet Flavorful Family Meal

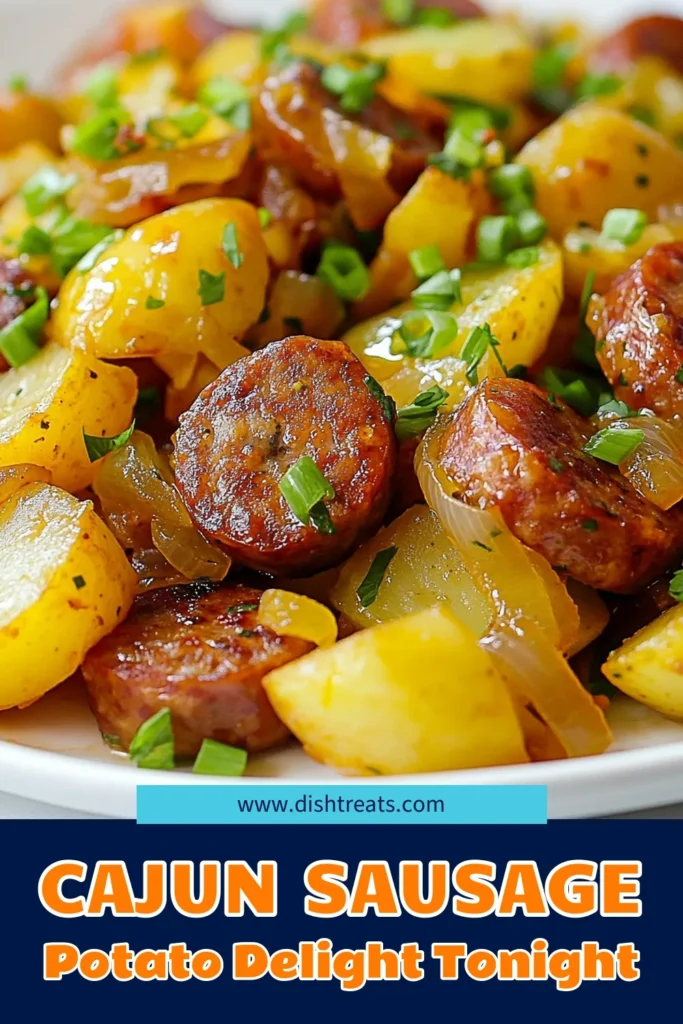
Looking for a tasty, easy dish to please your family? The Cajun Sausage Potato Skillet is a flavorful winner. With savory smoked sausage, crispy potatoes, and fresh veggies, this meal hits the spot. I’ll show you how to whip up this comforting dish in just a few steps. Let’s dive into the ingredients and get cooking! You’ll want seconds!
Why I Love This Recipe
- Flavor Explosion: This dish combines the smoky richness of sausage with the hearty goodness of potatoes and vibrant vegetables, creating a delightful medley of flavors.
- Quick and Easy: With just a few simple steps and minimal prep time, this skillet recipe is perfect for busy weeknight dinners or a last-minute meal.
- Customizable: Feel free to tweak the ingredients based on your preferences; add more veggies or adjust the spice level to make it your own!
- One-Pan Wonder: Cooking everything in one skillet means less cleanup, allowing you to enjoy your meal without the hassle of washing numerous pots and pans.
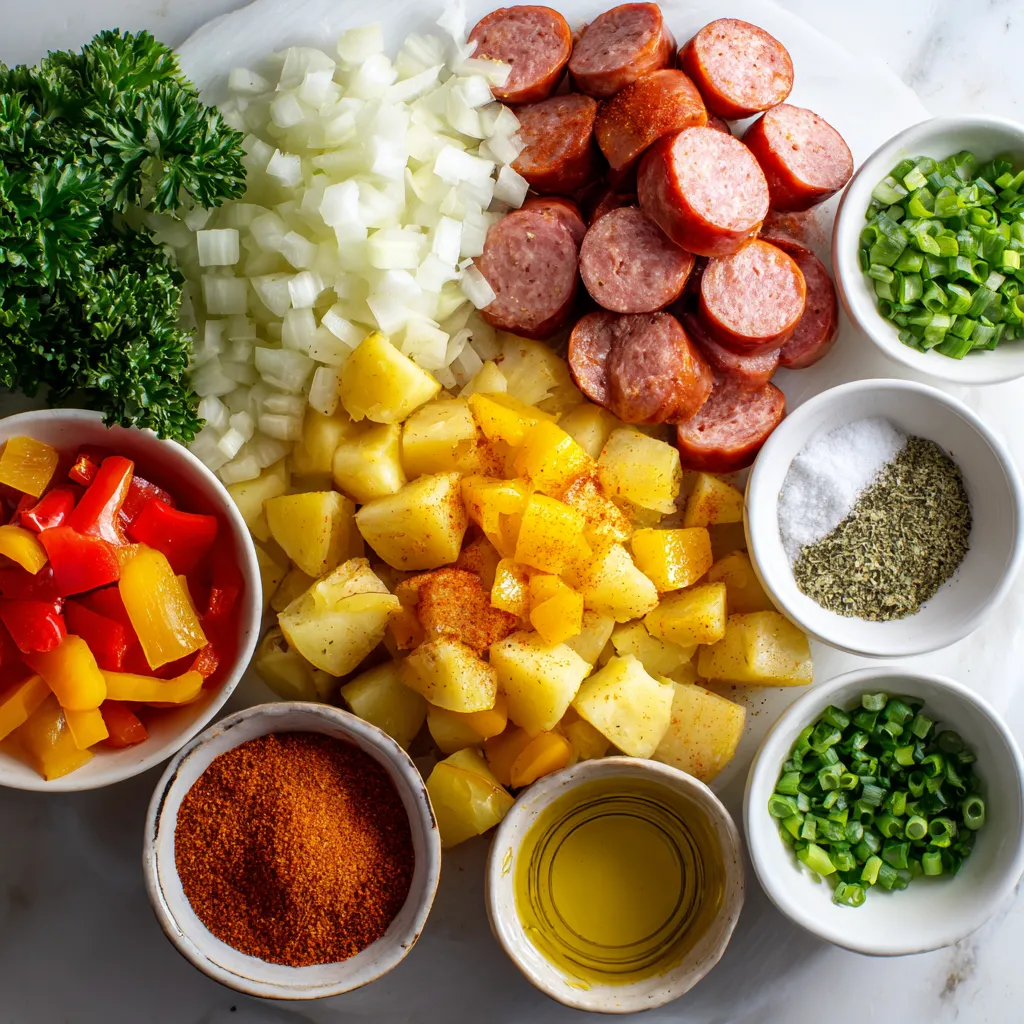
Ingredients
Main Ingredients
- 1 lb smoked sausage (options: andouille or kielbasa)
- 4 medium potatoes (diced into small cubes)
- 1 bell pepper (diced – any color)
Aromatics and Seasonings
- 1 small onion (finely chopped)
- 3 cloves garlic (minced)
- 1 teaspoon Cajun seasoning
Cooking Essentials
- 2 tablespoons olive oil
- Salt and black pepper to taste
- Optional: 1/4 teaspoon cayenne pepper, green onions, and fresh parsley for garnish
The heart of any great dish lies in its ingredients. For this Cajun sausage potato skillet, we start with 1 pound of smoked sausage. I love using andouille for its bold flavor, but kielbasa works well too.
Next, we need 4 medium potatoes, diced into small cubes. This helps them cook evenly and blend well with other flavors. Choose a bell pepper in any color you like. It adds a nice crunch and color.
Don’t forget the aromatics! A small onion, finely chopped, brings a sweet depth. Three cloves of minced garlic are a must for that savory kick. I also use 1 teaspoon of Cajun seasoning. It adds just the right amount of spice.
For cooking, 2 tablespoons of olive oil are perfect for sautéing. You’ll want to season with salt and black pepper to taste. If you like some heat, add 1/4 teaspoon of cayenne pepper. For garnish, chopped green onions and fresh parsley add a beautiful touch right before serving.
These ingredients come together to create a flavorful family meal that everyone will enjoy.
Step-by-Step Instructions
Preparing the Sausage
1. First, heat olive oil in a large, deep skillet over medium heat. Wait until it shimmers.
2. Add sliced smoked sausage to the skillet. Sauté for about five minutes. Look for golden brown edges. This step brings out the great flavor of the sausage.
Cooking the Vegetables
1. Next, add the chopped onion and diced bell pepper. Cook for another four to five minutes. You want them to soften and become fragrant.
2. Stir in the minced garlic, Cajun seasoning, paprika, and cayenne pepper. Add a pinch of salt and black pepper, too. Sauté for one minute. This helps the garlic release its wonderful aroma.
Cooking the Potatoes
1. Now, raise the heat to medium-high. Add the diced potatoes to the skillet. Mix everything well.
2. Cover the skillet with a lid and let it cook for 15 to 20 minutes. Stir occasionally. The potatoes should become tender and easy to pierce with a fork.
3. After the potatoes are soft, remove the lid. Cook for an extra two to three minutes. This helps them get crispy and golden brown.
4. Taste the dish and adjust the salt or pepper if needed.
5. Finally, take the skillet off the heat. Garnish with chopped green onions and fresh parsley. This adds a pop of color and flavor.
Tips & Tricks
Perfecting the Cook
Timing matters when cooking. Sauté the sausage for about 5 minutes until it’s golden. This step boosts the sausage flavor. After that, add the onion and bell pepper. Cook them for around 4-5 minutes. You want them soft and fragrant.
For crispy potatoes, start by covering the skillet. Let the potatoes simmer for about 15-20 minutes. Stir occasionally to ensure even cooking. After they soften, remove the lid and increase the heat. Cook for another 2-3 minutes. This will give them a nice, crispy finish.
Flavor Enhancements
Adjusting spice levels is easy. If you like it hot, add more cayenne pepper. For a milder dish, skip the cayenne. You can also swap the Cajun seasoning for a milder blend if needed.
Feel free to use different sausages. Andouille adds a smoky flavor, while kielbasa is milder. You can even use turkey sausage for a lighter option. For veggies, try adding zucchini or mushrooms for more texture.
Serving Suggestions
To present your dish, serve it right in the skillet. It gives a rustic look that feels homey. If you want a pop of color, transfer it to a bright platter.
Pair your skillet meal with crusty bread or a fresh green salad. A nice cold drink, like iced tea, complements the flavors well. Enjoying the meal together makes it even more special.
Pro Tips
- Choose the Right Sausage: Opt for andouille sausage for a spicier kick or kielbasa for a milder flavor. Each brings a unique taste to the dish.
- Cut Potatoes Evenly: Ensure that the potato cubes are of uniform size to guarantee even cooking and a consistent texture throughout the dish.
- Customize the Heat: Adjust the cayenne pepper according to your spice preference. Start with the recommended amount, and increase if you enjoy more heat.
- Garnish Generously: Don’t skip on the green onions and parsley! They add freshness and a pop of color that enhances the dish visually and flavor-wise.

Variations
Protein Alternatives
You can switch up the sausage to make this dish your own. Here are some great options:
- Andouille sausage: This adds a nice smoky flavor.
- Kielbasa: A milder choice with a juicy bite.
- Chicken or turkey sausage: These are leaner and still very tasty.
If you want to go meatless, try these substitutes:
- Plant-based sausage: Look for options made from soy or pea protein.
- Chickpeas: They add protein and a nice texture.
- Tofu: Firm tofu works well when seasoned and sautéed.
Vegetable Additions
Adding more veggies can boost flavor and nutrition. Here are some great choices:
- Zucchini: Slice it thin for quick cooking.
- Mushrooms: They add a savory depth.
- Spinach: Toss it in at the end for vibrant color.
Experiment with seasonings for a twist:
- Italian herbs: Swap Cajun seasoning for oregano and basil.
- Garlic powder: Adds more garlic flavor without fresh cloves.
- Lemon zest: Brightens up the dish with a fresh taste.
Cooking Method Alternatives
If you want to try different cooking methods, here are a couple of ideas:
- Oven-baked version: Preheat your oven to 400°F. Mix everything in a large baking dish. Bake for 30-40 minutes, stirring once. This gives a nice crispness to the potatoes.
- Instant Pot: Use the sauté function for the sausage and veggies. Add potatoes and a cup of broth. Cook on high pressure for 8 minutes. Quick-release for perfectly cooked potatoes.
- Air fryer: Sauté the sausage and veggies first. Transfer to the air fryer basket. Cook at 400°F for 10-15 minutes for crispy potatoes.
These variations let you customize your Cajun sausage potato skillet to suit your taste and needs!
Storage Info
Refrigeration Guidelines
To store your Cajun sausage potato skillet, follow these steps:
- Let the dish cool to room temperature.
- Place it in an airtight container.
- Store it in the fridge.
This meal lasts about 3 to 4 days in the fridge. Always check for any off smells or changes in texture before eating. Reheating your leftovers can bring back the delicious flavors.
Freezing Instructions
Freezing this dish is easy and can save it for later. Here’s how:
- Allow the skillet to cool completely.
- Transfer it to a freezer-safe container or bags.
- Make sure to remove as much air as possible.
You can freeze it for up to 2 to 3 months. When you’re ready to eat, follow these steps for reheating:
- Thaw it overnight in the fridge for best results.
- Reheat in a skillet over medium heat until warmed through.
- Add a splash of water or broth if it seems dry.
This way, your Cajun sausage potato skillet stays tasty!
FAQs
Common Questions
Can I make this dish ahead of time?
Yes, you can make this dish ahead of time. Cook it, let it cool, then store it in the fridge. Reheat it on the stove or in the microwave. This dish tastes great even after a day or two.
What sides pair well with Cajun Sausage Potato Skillet?
This dish goes well with many sides. Here are some ideas:
- Crusty bread
- Fresh green salad
- Steamed vegetables
- Coleslaw
Dietary Concerns
Is this dish gluten-free?
Yes, Cajun Sausage Potato Skillet is gluten-free. Just check the sausage label to ensure no gluten ingredients.
Tips for making it dairy-free or low-carb
To make it dairy-free, you don’t need any dairy products. For a low-carb version, use cauliflower instead of potatoes. This swap keeps it tasty and healthy.
Additional Queries
What can I use instead of Cajun seasoning?
If you don’t have Cajun seasoning, try using smoked paprika, chili powder, or a mix of garlic powder and black pepper. These will give a nice flavor.
How to make this recipe spicier or milder?
To add more heat, increase the cayenne pepper or add hot sauce. For a milder taste, reduce the cayenne and use less Cajun seasoning. Adjust to your liking!
In this blog post, we explored how to make a Cajun sausage potato skillet. We covered the key ingredients, from smoked sausage to potatoes and spices. The step-by-step instructions made it easy to follow, and the tips enhanced the dish’s flavor. Variations offered new ideas for proteins and vegetables. Lastly, we discussed storage and common questions to ensure your meal stays fresh. Now, you have the tools to cook a delicious dish that can impress anyone. Enjoy experimenting with flavors and sharing this tasty meal with friends and famil

Cajun Sausage Potato Skillet
Ingredients
- 1 lb smoked sausage, sliced (andouille or kielbasa)
- 4 medium potatoes, diced into small cubes
- 1 whole bell pepper, diced
- 1 small onion, finely chopped
- 3 cloves garlic, minced
- 1 teaspoon Cajun seasoning
- 1 2 paprika
- 1 4 cayenne pepper (optional)
- 2 tablespoons olive oil
- to taste salt and black pepper
- 2 whole green onions, chopped
- to taste fresh parsley, chopped
Instructions
- In a large, deep skillet, heat the olive oil over medium heat until shimmering.
- Add the sliced smoked sausage to the skillet and sauté for approximately 5 minutes, or until the sausage is golden brown on the edges.
- Incorporate the chopped onion and bell peppers into the skillet, cooking for an additional 4-5 minutes, or until the vegetables soften and become aromatic.
- Stir in the minced garlic, Cajun seasoning, paprika, and cayenne pepper, along with a pinch of salt and black pepper. Sauté everything together for about 1 minute.
- Raise the heat to medium-high, then add the diced potatoes. Mix thoroughly to ensure that everything is well combined.
- Cover the skillet with a lid and let the potatoes cook for roughly 15-20 minutes, stirring occasionally, until tender.
- Once the potatoes are cooked through, remove the lid and increase the heat slightly. Cook for an additional 2-3 minutes, allowing the potatoes to crisp up.
- Taste the dish and adjust the seasoning with more salt or pepper if needed.
- Remove the skillet from the heat and garnish with chopped green onions and fresh parsley before serving.
![- 8 oz. elbow macaroni - 1 lb. ground beef or ground turkey - 1 packet taco seasoning mix - 1 cup diced tomatoes (fresh or canned) - 1 cup canned black beans, drained and rinsed - 1 cup corn (can be frozen or canned) - 2 cups shredded cheddar cheese (divided) - 1 cup salsa (your choice of spiciness) - 1/2 cup sour cream - 1 tablespoon olive oil - Salt and pepper to taste - Chopped green onions and fresh cilantro for garnish Gather these ingredients before you start cooking. This will make the process smooth and fun! The elbow macaroni is the base of this dish. It holds the cheesy sauce very well. Ground beef or turkey adds a hearty touch. You can use either, depending on your taste. The taco seasoning mix gives the pasta that classic taco flavor. Diced tomatoes bring freshness and moisture, while black beans boost protein and fiber. Corn adds a nice sweetness. Cheddar cheese is key for that melty, gooey goodness. Salsa adds a kick; choose your preferred heat level. Sour cream makes the dish creamy and rich. Olive oil helps cook the meat and adds flavor. Finally, salt, pepper, and garnishes like green onions and cilantro make it all pop. When you have everything ready, the fun part starts! You’ll see how these simple ingredients blend into a delicious dish. For the complete recipe, check out the Full Recipe section. To start, cook the elbow macaroni. Follow the package instructions carefully. Aim for al dente texture, which means the pasta should be firm when bitten. This keeps it from getting mushy later. Once done, drain the pasta in a colander and set it aside in a large bowl. While the pasta cooks, heat the olive oil in a large skillet over medium heat. Add the ground beef or turkey. Cook for about 5-7 minutes, stirring often to break up the meat. Look for a nice brown color. After browning, drain any extra fat from the skillet. Next, add the taco seasoning mix, diced tomatoes, black beans, corn, and salsa. Stir well and let the mixture simmer for about 5 minutes. This helps the flavors come together. After simmering, gently fold the cooked macaroni into the skillet. Make sure the pasta gets well-coated with the tasty mixture. Lower the heat to low, then add 1 1/2 cups of shredded cheddar cheese. Stir until the cheese melts into a creamy coating. Remove the skillet from the heat and add the sour cream. Mix it well until fully blended. Taste your dish and add salt and pepper to your liking. For the full recipe, refer to the instructions above. Enjoy your cheesy taco pasta! To get the best taco flavor, use a high-quality taco seasoning mix. It gives a bold taste. I often mix in extra spices, like garlic powder or cumin, for depth. For a creamy texture, add the cheese slowly. Let it melt fully before adding sour cream. This step ensures a smooth, rich sauce. Garnish your cheesy taco pasta with fresh green onions and cilantro. They add color and freshness. You can also use sliced avocado or jalapeños for extra flair. For a complete meal, pair the pasta with a simple side salad or tortilla chips. The crunch complements the creamy pasta well. You can find the full recipe [here]. {{image_4}} You can change up the protein in this dish. Ground turkey is a lighter choice. Ground chicken also works well. If you prefer plant-based options, try meat substitutes made from soy or lentils. Each option gives a unique flavor, but they all blend well with taco spices. If you need gluten-free pasta, many brands offer great options. Just look for gluten-free elbow macaroni. For those avoiding dairy, you can find dairy-free cheese and sour cream at most stores. These alternatives melt nicely and keep the dish creamy. Don’t be afraid to play with flavors! Different salsas add unique twists. You can also add jalapeños for heat. Hot sauce can give it an extra kick, too. These simple changes can make your cheesy taco pasta even more exciting. For the full recipe, check out the Cheesy Taco Pasta Extravaganza. To store your Cheesy Taco Pasta, let it cool first. Place leftovers in an airtight container. This keeps the dish fresh and tasty. It will last in the fridge for about 3 to 4 days. Always check for smells or mold before eating. When you’re ready to eat, reheat the pasta on the stove. Pour the pasta into a skillet over low heat. Stir it often to ensure even heating. You can also add a splash of water or broth to keep it creamy. Microwave is another option. Use a microwave-safe dish and cover it. Heat in short bursts, stirring every minute until it’s hot. Freezing Cheesy Taco Pasta is a great way to enjoy it later. First, let it cool completely. Then, transfer it to a freezer-safe container. Make sure to leave some space for expansion. You can freeze it for up to 2 months. When you are ready to eat, defrost it overnight in the fridge. Reheat it on the stove, just like before, to keep the flavor and texture. Cheesy Taco Pasta can last for about 3 to 5 days in the fridge. To keep it fresh, store it in an airtight container. Look for signs of spoilage like a sour smell or mold. If you see either, it’s best to toss it out. Yes, you can make Cheesy Taco Pasta ahead of time. Cook it and let it cool. Then, store it in the fridge for up to 2 days before serving. When ready to eat, just reheat it in a pan or microwave. Add a splash of water or broth to keep it moist. If you don’t have elbow macaroni, you can use other pasta shapes. Options include rotini, penne, or even gluten-free pasta. Quinoa or rice can also work if you want a grain instead. Just adjust cooking times as needed. We explored a tasty Cheesy Taco Pasta recipe, packed with flavor and fun. You learned about the key ingredients, easy steps for cooking, and tips to nail that taco taste. We also talked about variations to fit your needs, storage tips, and answers to common questions. This dish is not just simple; it’s a crowd-pleaser. Enjoy cooking and sharing your delicious creation!](https://dishtreats.com/wp-content/uploads/2025/07/060fa6b2-3df9-47e4-b794-a1b6a0be3885-768x768.webp)

![When you make cheesy sheet pan chicken quesadillas, you need the right ingredients for the best taste. Here’s what you will need: - Shredded chicken options - 2 cups cooked chicken, shredded (rotisserie chicken works wonderfully) - Cheese varieties - 1 cup shredded cheddar cheese - 1 cup shredded Monterey Jack cheese - 1/2 cup cream cheese, softened - 1/4 cup sour cream - Vegetables and other mix-ins - 1 medium red bell pepper, diced - 1 medium green bell pepper, diced - 1 small red onion, finely chopped - 1 tablespoon taco seasoning - 8 large flour tortillas - 1 tablespoon olive oil - Fresh cilantro, chopped (for garnish) - Salsa, for serving - Avocado or guacamole, for serving These ingredients blend together to create a flavor-packed meal. Using rotisserie chicken saves time and adds great taste. The mix of cheddar and Monterey Jack gives a creamy, melty texture. Adding bell peppers and onions adds crunch and freshness. The taco seasoning gives it that extra kick. Feel free to experiment with your favorite veggies and cheese. This recipe is versatile and allows you to customize it to your liking. For the full recipe, check out the details above. Set your oven to 400°F (200°C). This heat helps the quesadillas cook evenly. Grab a large baking sheet and line it with parchment paper. This step is key because it keeps the quesadillas from sticking. Plus, it makes clean-up a breeze. In a big bowl, mix your ingredients well. You will need cooked chicken, cheddar cheese, Monterey Jack cheese, cream cheese, sour cream, diced red and green bell peppers, chopped red onion, and taco seasoning. The mixture should be smooth and creamy. Look for a texture that is spreadable but not runny. This helps keep the filling inside the tortillas. On a flat surface, lay down four tortillas. Spread the chicken mixture evenly on each one. Make sure to reach the edges so every bite is tasty. Then, place another tortilla on top of each filled one. Press down gently. This helps them stick together and hold the filling in. Once your quesadillas are ready, move them to the baking sheet. Brush the tops with olive oil. This adds flavor and helps them turn golden brown. Bake in your preheated oven for 15-20 minutes. Look for a nice golden color and melted cheese inside. These signs tell you they are done. After baking, take the quesadillas out and let them cool for a few minutes. This makes slicing easier. Cut each quesadilla into quarters for serving. Aim for about 4-6 servings, depending on your crowd. These quesadilla wedges are perfect for sharing! Avoiding Soggy Tortillas To keep your tortillas crisp, avoid overfilling them. Less is more! Also, use the right amount of olive oil on top. This will help them brown nicely. Always make sure to bake them until they are golden brown. Best Types of Tortillas to Use For the best texture, I recommend using large flour tortillas. They hold the filling well and become soft when baked. Corn tortillas can work too, but they may crack more easily. Pairing with Dipping Sauces Serve your quesadillas with a variety of dips. Salsa is a classic choice. You can also offer guacamole and sour cream. These add creaminess and flavor. Garnishes for Presentation To make your dish look great, sprinkle fresh cilantro on top. You can also add sliced jalapeños for a pop of color. This makes your quesadillas look fancy and appetizing. Adjusting the Recipe If you have a big group, you can easily double the recipe. Just make sure to use a larger baking sheet. This way, you can cook more quesadillas at once. Time-Saving Tips Use rotisserie chicken for quick prep. It saves time and adds great flavor. You can also chop your veggies ahead of time. This keeps the cooking quick and easy. To see the full recipe, check out the [Full Recipe]. {{image_4}} Alternative Proteins You can switch the chicken for other proteins. Try shredded beef or cooked shrimp. For a lighter option, use turkey. If you prefer plant-based meals, chickpeas or tofu work well too. Different Cheese Combos Cheese is key to quesadillas. You can mix different cheeses for fun flavors. Pepper Jack adds spice, while gouda gives a smoky touch. Experiment with cream cheese and feta for creamy bites. Adding Spices or Herbs Spice up your quesadillas! Add chili powder or cumin for warmth. Fresh herbs like cilantro or parsley brighten flavors. A squeeze of lime gives a fresh zing. Incorporating Beans or Corn Beans and corn boost nutrition and flavor. Black beans add protein, while corn brings sweetness. Mix them into your filling for a hearty twist. Gluten-Free Options To make this dish gluten-free, swap flour tortillas for corn ones. Always check labels to ensure they meet your needs. You can also serve the filling on lettuce wraps. Vegetarian Adjustments For a vegetarian version, skip the chicken. Use mushrooms or zucchini for a meaty texture. Add more beans and veggies to keep it filling. For the full recipe, check the [Full Recipe]. To store your cheesy sheet pan chicken quesadillas, let them cool first. Wrap them tightly in plastic wrap or foil. You can also place them in an airtight container. This keeps them fresh and tasty. - Shelf Life: When stored properly, quesadillas last up to 3 days in the fridge. After that, they may lose flavor and freshness. If you want to save some for later, freezing is great! - How to Freeze Quesadillas: First, cool them completely. Then, wrap each quesadilla in plastic wrap. Place them in a freezer-safe bag or container. This helps prevent freezer burn. - Reheating Tips for Best Results: To reheat, thaw overnight in the fridge. Then, bake them at 350°F (175°C) for about 10 minutes. This makes them warm and crispy again. Don't let any filling go to waste! - Creative Ways to Use Leftovers: You can add leftover filling to salads or burritos. Mix it with scrambled eggs for a tasty breakfast. - Recipes Using Leftover Filling: Try using the filling in omelets or as a topping for nachos. You can also use it in stuffed peppers for a fun twist. For more details on making this dish, check out the [Full Recipe]. To make this dish gluten-free, swap out regular flour tortillas for gluten-free ones. Many brands offer great taste and texture. You can also check for taco seasoning that is gluten-free. This way, you keep all the flavor without the gluten. Yes, you can use raw chicken. Just make sure to cook it first. You can bake or grill the chicken until it reaches 165°F (75°C). Shred the cooked chicken before mixing it with the other ingredients. This keeps your quesadillas safe and tasty. To reheat quesadillas, use the oven or a skillet. Preheat the oven to 350°F (175°C) and bake for about 10 minutes. If using a skillet, heat it over medium heat. Cook for 2-3 minutes on each side until warm and crispy. This way, you keep the texture nice. Look for a golden brown color on the outside. You should also see melted cheese oozing out from the edges. A crispy texture means they are ready to enjoy. Let them cool for a few minutes after baking before slicing. Quesadillas pair well with many sides. You can serve them with salsa or guacamole for dipping. A fresh salad or some Mexican rice adds a nice touch too. Black beans are another great side option. These sides enhance your meal and make it even more fun to eat. You now have all the tools to make great chicken quesadillas. We covered essential ingredients and step-by-step instructions. Use the tips to avoid soggy tortillas and serve with tasty dips. Don’t forget to explore variations to suit your taste. Store any leftovers properly for future meals. Whether for a quiet dinner or a crowd, you’re ready to impress. Enjoy your cooking and have fun creating delicious quesadillas!](https://dishtreats.com/wp-content/uploads/2025/07/9e515845-1856-4bb5-82ee-80ca33afd87d-768x768.webp)