
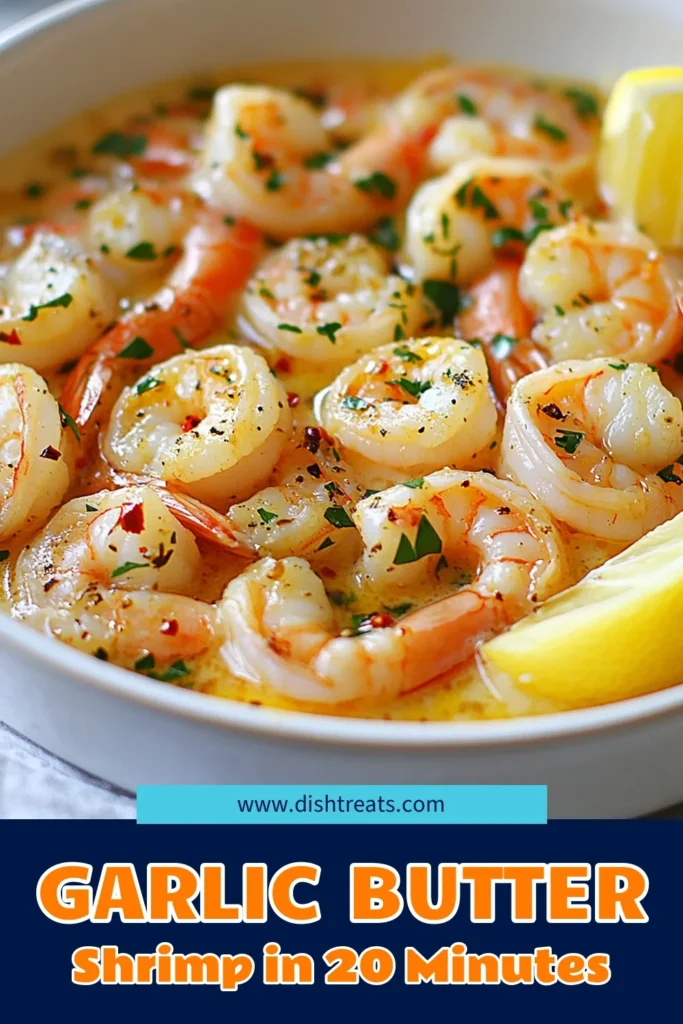
Garlic Butter Shrimp Scampi Delightful and Easy Meal
Craving a dinner that’s both simple and delicious? Look no further! Garlic Butter Shrimp Scampi is the answer. This dish combines fresh shrimp and garlic in a rich butter sauce that will excite your taste buds. In this post, I’ll guide you through easy steps to create a delightful meal for any night. Get ready to impress your family with your cooking skills! Let’s dive into the recipe and get cooking.
Why I Love This Recipe
- Quick and Easy: This Garlic Butter Shrimp Scampi can be made in just 20 minutes, making it perfect for a weeknight dinner or an impressive last-minute meal for guests.
- Flavorful Ingredients: The combination of garlic, butter, and fresh lemon juice creates a rich and zesty sauce that perfectly complements the shrimp.
- Customizable: You can easily adjust the spice level by adding more or fewer red pepper flakes, and it pairs beautifully with or without pasta.
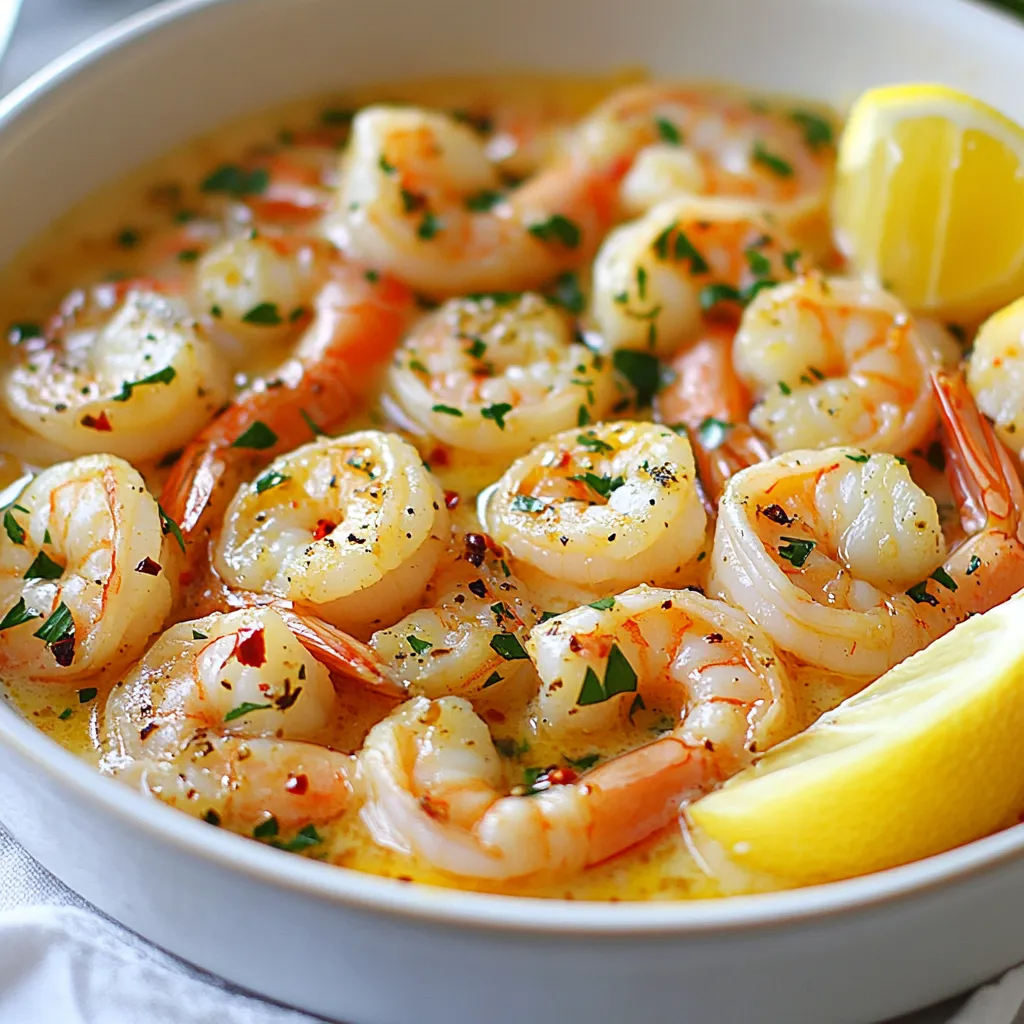
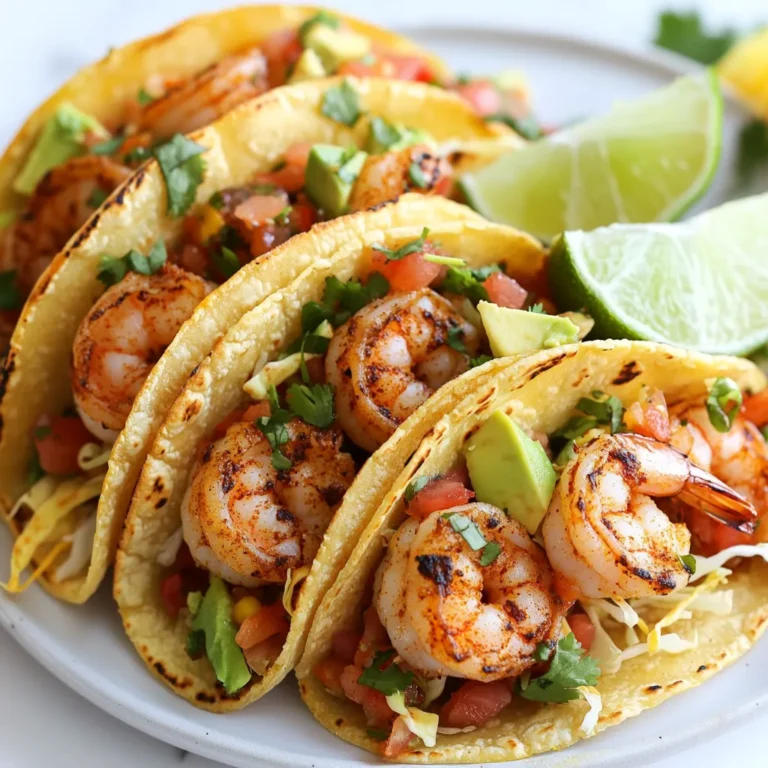
- Beautiful Presentation: Serve it in a wide plate garnished with fresh parsley and lemon wedges for an elegant touch that will impress everyone at the table.
Ingredients
List of Ingredients
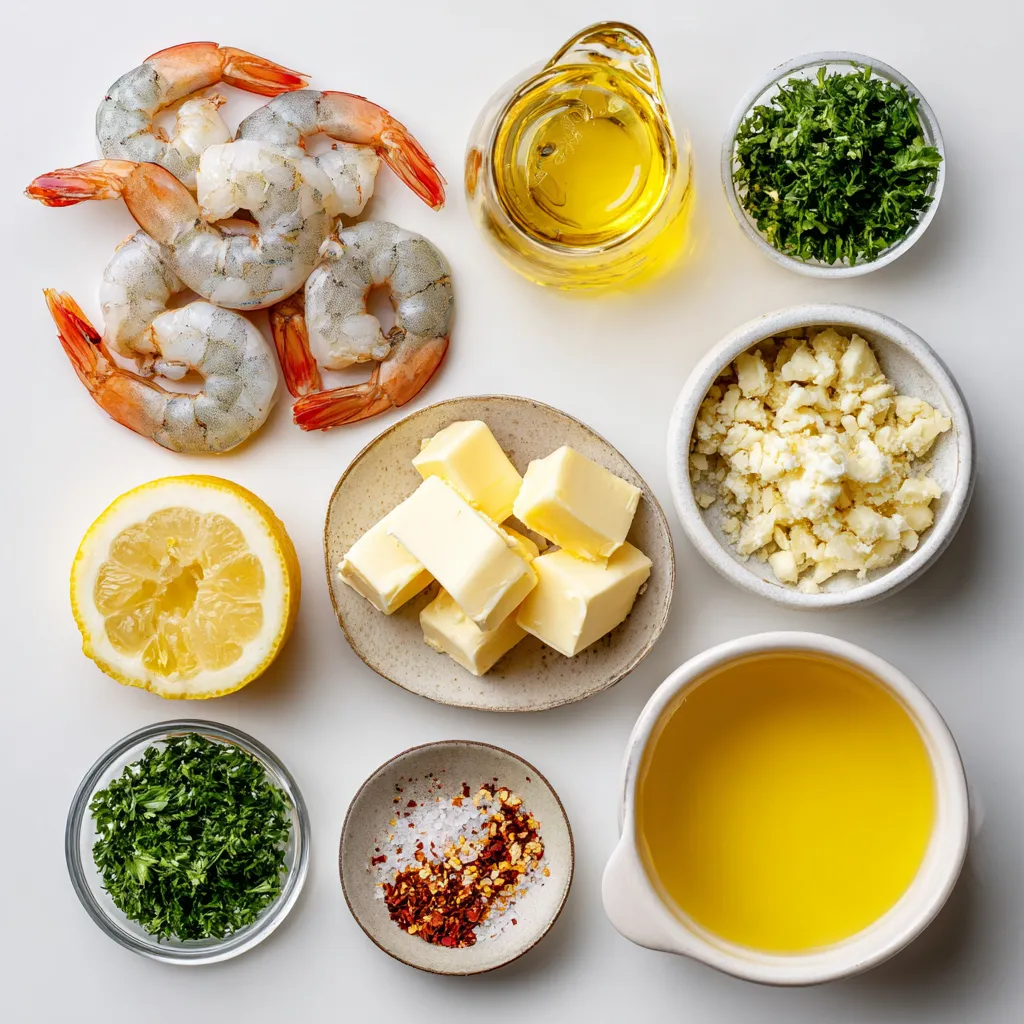
- 1 lb large shrimp, peeled and deveined
- 4 tablespoons unsalted butter
- 4 cloves garlic, minced
- 1 tablespoon olive oil
- 1/4 teaspoon red pepper flakes (adjust to taste for spice)
- 1/2 cup low-sodium chicken broth
- 2 tablespoons fresh lemon juice
- 1/4 cup fresh parsley, chopped
- Salt and black pepper to taste
- 8 oz linguine or spaghetti (optional, for serving)
Notes on Ingredient Quality
Use fresh shrimp for the best taste. Look for shrimp that smell like the ocean, not fishy. The butter should be unsalted, as it lets you control the salt. Fresh garlic is key for a strong flavor. Choose a good brand of chicken broth for a rich base. Fresh parsley adds color and a fresh taste.
Substitutions and Alternatives
If you can’t find fresh shrimp, frozen works well, too. Just thaw them before cooking. You can swap unsalted butter with ghee for a dairy-free option. For a kick, use cayenne pepper instead of red pepper flakes. If you want a vegetarian dish, try using mushrooms or zucchini instead of shrimp. Gluten-free pasta is a great choice for those avoiding gluten.
Step-by-Step Instructions
Cooking the Pasta (if using)
If you want to add pasta, start by boiling salted water in a large pot. Once the water is ready, add 8 oz of linguine or spaghetti. Cook the pasta according to the package instructions until it is al dente. This usually takes about 8-10 minutes. When done, drain the pasta but save 1/2 cup of the pasta water for later. Set the pasta aside.
Preparing the Base and Sautéing the Garlic
In a large skillet, add 1 tablespoon of olive oil and 2 tablespoons of unsalted butter over medium heat. Let the butter melt completely. Once melted, swirl the pan to mix the oil and butter. Then, add 4 cloves of minced garlic. Sauté the garlic for about 1 minute or until you smell its great aroma. Be careful not to burn it, as this can ruin the dish.
Cooking and Searing the Shrimp
Now it’s time for the star of the dish—shrimp! Add 1 lb of peeled and deveined large shrimp to the skillet. Spread them out evenly. Season them with salt and black pepper to taste. Cook the shrimp for about 2-3 minutes on each side. They are ready when they turn pink and opaque. Once cooked, transfer the shrimp to a plate to keep warm.
Making the Sauce and Combining Ingredients
In the same skillet, pour in 1/2 cup of low-sodium chicken broth and 2 tablespoons of fresh lemon juice. Take a wooden spoon and scrape any browned bits off the bottom of the skillet. This ensures you get all the flavor. Bring the mixture to a gentle simmer. Let it cook for about 2 minutes to combine the flavors.
Final Adjustments
Reduce the heat and return the cooked shrimp to the skillet. Add the remaining 2 tablespoons of butter and 1/4 cup of chopped fresh parsley. Stir everything gently to warm the shrimp and blend the sauce. If you cooked pasta, now is the time to stir in some reserved pasta water for a silkier sauce. Toss everything together if serving with pasta. Taste the dish and adjust the seasoning with extra salt or pepper if needed.
Tips & Tricks
Cooking Tips for Perfect Shrimp
To get perfect shrimp, use fresh or thawed shrimp. They should be pink and firm. Avoid overcooking, as shrimp cook fast. Cook them for 2-3 minutes per side. They turn opaque when done. If they curl tightly, they are overcooked.
Enhancing Flavor with Seasonings
To boost flavor, add salt and pepper to taste. Use fresh lemon juice for brightness. Red pepper flakes add a nice kick. Adjust the amount based on your spice level. Fresh parsley gives a burst of freshness. Don’t forget to taste and adjust as needed.
Presentation Suggestions
For a lovely look, serve the dish in a shallow bowl. Twirl pasta on a fork for elegance. Garnish with more parsley and lemon wedges. This adds color and charm. Serving with crusty bread helps soak up the sauce. Enjoy the beautiful meal you’ve created!
Pro Tips
- Fresh Ingredients: Using fresh shrimp and high-quality butter will significantly enhance the flavor of your scampi, making it more aromatic and delicious.
- Perfect Pasta: If serving with pasta, make sure to cook it al dente. This will help it hold up against the sauce without becoming mushy.
- Adjust the Spice: Feel free to modify the amount of red pepper flakes according to your spice preference. Start with a small amount and add more if desired.
- Garnish for Presentation: Adding extra chopped parsley and lemon wedges not only enhances the visual appeal but adds a fresh burst of flavor to the dish.

Variations
Adding Vegetables or Other Proteins
You can make this dish even better by adding veggies. Consider sautéing spinach, bell peppers, or zucchini. These add color and nutrients. You can also swap shrimp for chicken, scallops, or even tofu for a plant-based meal. Just adjust the cooking time so everything cooks evenly.
Gluten-Free Options
If you want a gluten-free version, use gluten-free pasta. You can also serve the shrimp on rice or quinoa. Both options taste great and fit the gluten-free diet. Just ensure the broth and any sauces are gluten-free too.
Flavor Variations (Herbs, Spices, and Sauces)
You can change up the flavors with fresh herbs. Try basil, thyme, or even dill. Add more heat by using cayenne pepper instead of red pepper flakes. For a richer taste, mix in white wine or cream into the sauce. These little tweaks make the dish your own and keep it exciting!
Storage Information
Storing Leftovers
After you enjoy your Garlic Butter Shrimp Scampi, store leftovers right away. Place the shrimp and sauce in an airtight container. Add pasta if you have any left. Keep it in the fridge for up to two days. The shrimp will stay fresh, but they taste best when eaten right away.
Reheating Instructions
To reheat, use a skillet over medium heat. Add a splash of water or broth to prevent sticking. Cook until hot, stirring gently. If you used pasta, you can also reheat it in boiling water for a minute. This method keeps the shrimp tender and the sauce creamy.
Freezing Options
You can freeze Garlic Butter Shrimp Scampi, but it’s best to skip the pasta. Place the shrimp and sauce in a freezer-safe bag. Remove as much air as possible. Label the bag with the date. Use it within three months for best taste. To thaw, place it in the fridge overnight before reheating.
FAQs
How long does it take to cook shrimp?
Cooking shrimp is fast. It only takes about 4 to 6 minutes. You want them pink and opaque. This shows they are cooked just right. Don’t overcook them; they can get tough.
Can I use frozen shrimp for this recipe?
Yes, frozen shrimp works well! Just thaw them before cooking. You can place them in cold water for about 15 minutes. This quick method helps them thaw safely and evenly.
What can I serve with Garlic Butter Shrimp Scampi?
You can serve it with pasta like linguine or spaghetti. A fresh salad also pairs nicely. Garlic bread is another tasty side. It helps soak up the rich sauce.
How spicy is this dish?
The spice level is mild to medium. You control it with red pepper flakes. Start with a little, then add more if you like it spicy.
Can I make this dish ahead of time?
It’s best to enjoy it fresh. However, you can prep ingredients in advance. Chop the garlic and parsley, and thaw the shrimp. This saves time when you cook.
In this blog post, we covered all you need for Garlic Butter Shrimp Scampi. We explored key ingredients and how to choose quality ones. Then, I guided you through each cooking step, from prepping the pasta to making a delicious sauce. You learned helpful tips to enhance flavor and present your dish well. We also discussed tasty variations and how to store leftovers safely.
Enjoy your cooking adventure, and don’t hesitate to experiment with new flavor

Garlic Butter Shrimp Scampi
Ingredients
- 1 lb large shrimp, peeled and deveined
- 4 tablespoons unsalted butter
- 4 cloves garlic, minced
- 1 tablespoon olive oil
- 1 4 teaspoon red pepper flakes (adjust to taste for spice)
- 1 2 cup low-sodium chicken broth
- 2 tablespoons fresh lemon juice
- 1 4 cup fresh parsley, chopped
- to taste Salt and black pepper
- 8 oz linguine or spaghetti (optional, for serving)
Instructions
- Cook the Pasta (if using): Begin by boiling salted water in a large pot. Cook the linguine or spaghetti according to the package instructions until al dente. Once cooked, drain the pasta and set aside. Make sure to reserve 1/2 cup of the pasta water for later use.
- Prepare the Base: In a large skillet, combine the olive oil and 2 tablespoons of butter over medium heat. Allow the butter to melt completely, swirling the pan gently to mix.
- Sauté the Garlic: Add the minced garlic to the skillet and sauté for approximately 1 minute or until fragrant, ensuring it does not burn for a perfect flavor.
- Add Spice: Stir in the red pepper flakes and continue to cook for an additional 30 seconds, allowing the flavors to meld.
- Cook the Shrimp: Introduce the shrimp to the skillet, ensuring they are evenly distributed. Season generously with salt and black pepper. Cook for about 2-3 minutes per side, or until the shrimp are pink and opaque.
- Set Aside the Shrimp: Once cooked, carefully remove the shrimp from the skillet and place them on a plate to keep warm.
- Make the Sauce: In the same skillet, pour in the chicken broth and freshly squeezed lemon juice. Use a wooden spoon to scrape any browned bits from the bottom of the skillet, creating a flavorful base. Bring the mixture to a gentle simmer and cook for roughly 2 minutes.
- Combine Ingredients: Lower the heat and return the cooked shrimp to the skillet. Add the remaining 2 tablespoons of butter and the freshly chopped parsley, stirring gently until the shrimp are warmed through and the sauce is beautifully blended.
- Adjust the Sauce: If you opted to cook pasta, stir in some of the reserved pasta water, a little at a time, for a silkier consistency. Toss everything together if serving with pasta.
- Final Seasoning: Taste the dish and adjust the seasoning with additional salt or pepper as needed.
![- 4 boneless, skinless chicken breasts - 1 cup finely grated Parmesan cheese - 1 cup panko breadcrumbs - 2 teaspoons garlic powder - 1 teaspoon onion powder - 1 teaspoon dried Italian herbs - Salt and pepper to taste - 2 large eggs - 2 tablespoons olive oil - 1 tablespoon fresh parsley (for garnish) This dish starts with simple, fresh ingredients. The chicken breasts are the star, offering lean protein. The Parmesan cheese gives a rich, savory flavor. I love panko breadcrumbs for their crunch. They make the crust crispy and delightful. For seasoning, I use garlic and onion powders. They add depth to the chicken. Dried Italian herbs bring a nice touch of flavor. Don't forget salt and pepper for balance. The breading mixture includes eggs and olive oil. The eggs help the coating stick well. Olive oil adds richness. Fresh parsley is for garnish. It brightens up the dish and adds color. You can find the full recipe in the article for more details. Each ingredient plays an important role in making this dish a winner. - Preheat your oven to 400°F (200°C). - Line a baking sheet with parchment paper or grease it with olive oil. - Combine 1 cup of finely grated Parmesan cheese, 1 cup of panko breadcrumbs, and the seasonings. You can use 2 teaspoons of garlic powder, 1 teaspoon of onion powder, and 1 teaspoon of dried Italian herbs. Add salt and pepper to taste. Mix everything well in a bowl and set aside. - Take 4 boneless, skinless chicken breasts. Dip each breast into the egg mixture, then coat it in the breadcrumb mix. Make sure to cover it completely. Arrange the coated chicken on the baking sheet, leaving space between each piece. - Drizzle olive oil (2 tablespoons) over the coated chicken for added flavor and crispiness. - Bake the chicken for 25-30 minutes. It is ready when it turns golden and reaches an internal temperature of 165°F (75°C). You can find the full recipe to follow along while you cook. To get that amazing crispiness, you need an even coating. Make sure to press the breadcrumb mixture onto the chicken well. This helps the crust stick. Drizzle a little extra olive oil on top before baking. This oil adds a great crunch and helps the chicken brown nicely. Want to kick up the taste? Try adding different spices to the breadcrumb mix. You can mix in paprika for a smoky flavor or some crushed black pepper for a bit of heat. Fresh herbs like thyme or rosemary can also add a nice touch. Experiment until you find your favorite blend! This dish pairs well with lemon wedges. Squeeze some lemon juice over the chicken for brightness. A fresh salad is also a great side. It balances the meal and adds crunch. Try a simple green salad with a light vinaigrette to round out your plate! For the full recipe, check out the [Full Recipe]. {{image_4}} You can make this dish even more delicious by adding cheese. Try mixing in shredded mozzarella for a cheesy twist. This extra layer of gooey goodness makes every bite special. You can also use different types of cheese. Parmesan pairs well with cheddar, gouda, or even pepper jack. Each choice brings a new flavor to the table. For those who like a kick, add crushed red pepper flakes to the breadcrumb mix. This small change can bring big heat. Adjust the amount to suit your taste. Just a pinch can make your chicken sing with flavor. If you want a low-carb version, swap panko for almond flour. Almond flour gives you a nice crunch without the carbs. This option is great for anyone watching their carbs. It keeps the dish light while still being tasty. For the Full Recipe, you’ll find all the details you need to make this meal shine. Store leftovers in an airtight container in the fridge for up to 3 days. This keeps the chicken fresh and safe to eat. When ready to enjoy, just take it out and reheat. You can freeze the breaded chicken before baking for up to 2 months. This option is great for meal prep. Just coat the chicken and place it in a freezer-safe container. When you are ready to cook, bake it straight from the freezer. Reheat in the oven to maintain crispiness rather than using the microwave. Preheat your oven to 350°F (175°C) and bake for about 10-15 minutes. This way, your chicken will stay crunchy and delicious. Enjoy it as if it was freshly made! Yes, chicken thighs can be used for more flavor and moisture. Chicken thighs are juicier than breasts. They provide a rich taste that pairs well with the crispy coating. You can follow the same steps in the recipe. Just adjust the baking time if needed. Serve with pasta, steamed vegetables, or a simple green salad. Pasta with olive oil and garlic makes a great side. Steamed broccoli or green beans add color and nutrients. A light salad with lemon dressing balances the meal perfectly. These options make dinner fun and flavorful! Reduce ingredient quantities accordingly while maintaining ratios. For example, if you need two servings, simply cut the chicken and other ingredients in half. This keeps the flavors balanced and the dish just as tasty. You can easily scale it up or down based on your needs. This post outlined how to make Baked Parmesan Crusted Chicken, from ingredients to storage tips. We covered key steps, including creating a crispy coating and baking methods. To achieve perfect results, remember to coat evenly and explore flavor options. Enjoy this dish with sides like pasta or salad. With easy adjustments for servings, this recipe fits any table. Try it out and savor every bite!](https://dishtreats.com/wp-content/uploads/2025/07/ab4c9608-7523-42b9-8dc2-3e25f574410b-768x768.webp)
![To make tasty chicken gyros, you need fresh and simple ingredients. Here’s what you will need: - 500g chicken breast, thinly sliced - 2 tablespoons olive oil - 1 tablespoon dried oregano - 1 teaspoon garlic powder - 1 teaspoon onion powder - 1 teaspoon smoked paprika - Salt and freshly ground black pepper, to taste - 4 pita breads - 1 cup Greek yogurt - 1 tablespoon fresh lemon juice - 1 cucumber, finely diced - 1 ripe tomato, finely diced - 1 small red onion, thinly sliced - Fresh parsley, chopped, for garnish These ingredients work together to create a rich flavor for your gyros. The chicken pairs well with the spices. The tzatziki adds a creamy texture that balances the dish. Feel free to add more flavors to your gyros. Here are some optional ingredients: - Feta cheese, crumbled - Bell peppers, thinly sliced - Hot sauce or chili flakes for spice These extras can personalize your gyros. They can boost the taste and make your meal even more exciting. Garnishes make your gyros look pretty and add flavor. Here are some great ideas: - Extra tzatziki sauce on the side - Sliced olives for a briny kick - Fresh mint or dill for added freshness Serve your gyros with a side of simple salad or roasted potatoes. This adds to the fun and makes a complete meal. For the full recipe, check the earlier section! To start, you need to make the chicken marinade. In a big bowl, mix the chicken breast with olive oil, dried oregano, garlic powder, onion powder, smoked paprika, salt, and pepper. Ensure every piece is coated well. Cover the bowl with plastic wrap or a lid. Let it sit in the fridge for at least 30 minutes. You can even marinate it for up to 2 hours. This step helps the chicken soak up all the flavors. Next, heat your grill or skillet over medium-high heat. When it's hot, add the marinated chicken slices. Cook them for about 6 to 8 minutes. Make sure to turn them occasionally. You want them golden brown and fully cooked. Use a meat thermometer to check the chicken's internal temperature. It should reach 75°C (165°F) to be safe to eat. While the chicken cooks, prepare the tzatziki sauce. In a medium bowl, mix Greek yogurt, fresh lemon juice, finely diced cucumber, salt, and pepper. Stir it well and set it aside. Letting it sit helps the flavors blend together nicely. This sauce adds a cool taste to your gyros. It's a perfect match for the warm chicken. For the full recipe including all ingredients and steps, see [Full Recipe]. When making chicken gyros, many people make simple errors. Here are some to watch for: - Not marinating long enough: Marinate your chicken for at least 30 minutes. Longer gives better flavor. - Overcrowding the grill: Give each piece space. This helps the chicken cook evenly. - Skipping the meat thermometer: Always check if chicken is at 75°C (165°F). This keeps it safe to eat. You can easily change the recipe to fit your needs. Here are some ideas: - Gluten-free: Use gluten-free pita or lettuce wraps instead of pita bread. - Dairy-free: Swap Greek yogurt with a non-dairy yogurt for the tzatziki sauce. - Low-carb: Serve the chicken on a salad instead of using pita bread. Grilling chicken gyros can be easy with a few tips: - Heat control: Make sure your grill is hot before adding chicken. This gives nice grill marks. - Avoid pressing down: Don’t press the chicken with a spatula. This releases juices and dries it out. - Let it rest: Always let the chicken rest after cooking. This keeps it juicy when you slice it. Using these tips will help you craft great homemade chicken gyros. For the complete recipe, check out the Full Recipe section. {{image_4}} You can swap chicken with other meats. Try beef, lamb, or pork. Each protein brings its own taste. Marinate them the same way as chicken. This gives you tasty options for your gyros. For example, beef adds a rich flavor. Lamb has a unique zest. Pork is juicy and tender. All these variations keep your meals exciting. If you prefer plant-based meals, there are great choices. Use marinated mushrooms or eggplant as your base. Grilled zucchini or bell peppers work well too. For protein, try chickpeas or lentils. These options are filling and tasty. You can still make a delicious tzatziki sauce with vegan yogurt. This lets everyone join in on the fun. Want to change up the flavor? Add spices like cumin or coriander to the marinade. This gives your gyros a warm, earthy taste. You can also try different herbs, like mint or dill. They add a fresh twist. For a kick, include hot sauce or chili flakes. Each tweak can create a new flavor experience. Enjoy creating your own unique version of homemade chicken gyros. For the full recipe, check the earlier section. To keep your leftover gyros fresh, wrap them tightly. I recommend using plastic wrap or aluminum foil. This helps prevent air from getting in and keeps the flavors locked in. Place the wrapped gyros in an airtight container or a resealable bag. Store them in the fridge for up to three days. If you notice any extra moisture, you can add a paper towel inside to absorb it. Reheating gyros can be easy. To maintain their taste and texture, use a skillet or grill. Heat it over medium heat. Place the gyros in the skillet for about 3-4 minutes. Turn them halfway through so they warm evenly. If you prefer, you can also use a microwave. Just remember to wrap them in a damp paper towel. This keeps them from drying out. Heat for 30 seconds, then check. If they need more time, heat in 10-second bursts. If you want to save gyros for later, freezing is a great option. Start by letting the cooked chicken cool completely. Then, wrap the chicken in plastic wrap. Place it in a freezer-safe bag or container. You can freeze the chicken for up to three months. When you are ready to eat, thaw it in the fridge overnight. Reheat it as mentioned earlier. You can also freeze the tzatziki sauce separately. Just remember to stir it well after thawing. To make tzatziki sauce, mix Greek yogurt, fresh lemon juice, and diced cucumber. Add salt and pepper for taste. This sauce adds a cool, creamy touch to your gyros. It’s simple and fresh. Let it sit for a few minutes to blend the flavors. Yes, you can use store-bought pita bread. It saves time and works well. Just warm the pita on the grill or in a skillet. This makes it soft and ready to hold your tasty filling. Homemade pita is great, but store-bought is quick and easy. Serve chicken gyros with a side of Greek salad or roasted veggies. You can also add extra tzatziki for dipping. For drinks, try a refreshing lemonade or some iced tea. These sides enhance your meal and bring more flavor to the table. For the full recipe, check out the complete guide on making Homemade Chicken Gyros. Homemade chicken gyros are easy and fun to make. We covered key ingredients, cooking steps, and tips to avoid mistakes. You can add your own twist by using different proteins or flavors. Storing leftovers or prepping meals ahead keeps dinner simple. With all this info, you can create a tasty meal your whole family will love. Enjoy making gyros that bring great joy to your table!](https://dishtreats.com/wp-content/uploads/2025/06/a33d49ac-ff2d-4809-8657-a37e258bd1fd-768x768.webp)
![- 8 oz spaghetti or fettuccine pasta - 2 boneless, skinless chicken breasts - 1 cup basil pesto (homemade or store-bought) - 1/2 cup heavy cream - 1/4 cup cherry tomatoes, halved - 1/4 cup freshly grated Parmesan cheese - Fresh basil leaves for garnish - Salt and freshly ground black pepper, to taste - 2 tablespoons extra virgin olive oil Gather these ingredients before you start cooking. The pasta and chicken form the base of your dish. The creamy pesto sauce adds rich flavor. The cherry tomatoes bring a burst of freshness. The Parmesan cheese tops it off with a salty kick. Fresh basil leaves make it look gorgeous. Using fresh ingredients makes a big difference. If you have the time, try making your own pesto. It’s simple and tastes amazing. You can adjust the flavors to your liking. You can also swap the pasta type if you want. Just keep in mind that different shapes may change how the sauce clings to the pasta. For the chicken, you want it juicy and tender. The seasoning is key here. Use good quality olive oil, salt, and pepper. This will help keep the flavor bright and fresh. Once you have everything, you’ll be ready to make a delicious meal. If you want the full recipe, check out the complete guide for step-by-step instructions. Start by boiling a large pot of water. Add a good amount of salt to the water. This will help flavor the pasta. Once the water is boiling, add your spaghetti or fettuccine. Cook it until it is al dente, which means it should be firm to the bite. This usually takes around 8-10 minutes. When done, drain the pasta. Make sure to save about 1/2 cup of the pasta water for later. While the pasta cooks, get ready to season the chicken. Sprinkle salt and pepper on both sides of the chicken breasts. Heat 2 tablespoons of olive oil in a large skillet over medium heat. When the oil is hot, add the chicken. Cook each side for about 6-7 minutes. You want the chicken to turn a nice golden brown. Check that the juices run clear when you cut into it. Once cooked, take the chicken out of the skillet and let it rest for a few minutes. Then, slice it into thin strips. In the same skillet, lower the heat to medium-low. Add your basil pesto to the pan and stir it. You want to warm it through but not burn it. After about a minute, slowly pour in 1/2 cup of heavy cream. Stir it all together until it is well mixed and heated, which should take about 2-3 minutes. Now, add the cooked pasta to the skillet with your creamy pesto sauce. Toss the pasta gently to make sure it gets coated evenly. If the sauce looks too thick, add a little of the reserved pasta water. This will help you reach your desired creamy consistency. To finish, fold in the halved cherry tomatoes and the sliced chicken. Stir everything together for another 2 minutes. This will warm the chicken and tomatoes through. Finally, sprinkle freshly grated Parmesan cheese on top. Toss it lightly to mix. For a bright touch, garnish with fresh basil leaves before serving. For a full recipe, check out the details above! You can use homemade or store-bought pesto for this dish. Homemade pesto gives you full control over flavors, but store-bought saves time. If you want a stronger basil taste, simply add more fresh basil leaves to your mix. For a milder flavor, blend in more nuts or cheese. This helps balance the taste to your liking. To keep your chicken juicy, avoid overcooking it. Cook chicken breasts in a hot skillet for 6-7 minutes on each side. The internal temperature should reach 165°F. Rest the chicken for a few minutes before slicing. This helps the juices stay inside. You can make your sauce thicker or lighter based on your taste. For a richer sauce, use more heavy cream. If you want a lighter option, try half-and-half or low-fat milk. Adding a splash of pasta water helps adjust the sauce's thickness too. This way, you can achieve the perfect creamy texture for your chicken pesto pasta. For the Full Recipe, check out the detailed instructions to create this delightful dish! {{image_4}} Adding vegetables to your Chicken Pesto Pasta makes it even better. It boosts flavor and nutrition. Seasonal veggies like spinach or bell peppers work great. Spinach adds a nice green color. Bell peppers give a sweet crunch. You can toss them in during the last few minutes of cooking. This way, they stay bright and fresh. If you need gluten-free pasta, you have choices! You can use rice pasta or chickpea pasta. These options taste great and cook well. Just follow the package instructions. Cooking times may differ, so keep an eye on them. You want your pasta to be tender but not mushy. Not in the mood for chicken? Try shrimp or tofu instead! Shrimp cooks fast and adds a nice twist. Just sauté them until they turn pink. Tofu is a fantastic plant-based option. Make sure to press it first to remove extra water. Adjust cooking times based on what you choose. This keeps your dish delicious and exciting. For the full recipe, check out the [Full Recipe]. Store any leftovers in the fridge. Use a tight-sealing container to keep your chicken pesto pasta fresh. Glass containers work well, as do plastic ones. Make sure to let it cool down before putting it away. It stays good in the fridge for up to three days. To freeze your chicken pesto pasta, pack it in an airtight container or freezer bag. Remove as much air as possible. This helps prevent freezer burn. You can freeze it for up to three months. Just label the bag with the date so you remember when you froze it. When reheating, use the microwave or stovetop. If using the microwave, heat in short bursts. Stir between each burst to ensure even warming. On the stovetop, add a splash of water or cream to keep it moist. This helps keep the creaminess intact. Enjoy your meal again as if it were fresh! To make chicken pesto pasta from scratch, follow these basic steps: 1. Cook the pasta. Boil water in a large pot, add salt, and cook your choice of spaghetti or fettuccine until al dente. 2. Prepare the chicken. Season boneless chicken breasts with salt and pepper. Sear them in olive oil until golden brown. 3. Make the sauce. In the same skillet, mix basil pesto with heavy cream until warm and creamy. 4. Combine. Toss the cooked pasta with the sauce and sliced chicken. Adjust the sauce with reserved pasta water if needed. 5. Serve. Garnish with cherry tomatoes, Parmesan cheese, and fresh basil. You can find the full recipe above for a detailed guide. Yes, you can make chicken pesto pasta ahead of time. Here are some tips: - Cooked pasta and sauce. Prepare the chicken and sauce, then store them separately from the pasta. This keeps them fresh. - Refrigerate. Store in airtight containers in the fridge for up to three days. - Freeze. For longer storage, freeze the chicken and sauce. Use within two months for best flavor. - Reheat. When ready, reheat the chicken and sauce. Cook the pasta fresh to keep it al dente. Chicken pesto pasta pairs well with various side dishes. Consider these suggestions: - Garlic bread. A warm, crispy slice complements the creamy pasta. - Salad. A light green salad with a tangy vinaigrette balances the richness of the dish. - Roasted vegetables. Seasonal veggies add color and nutrients to the meal. Chicken pesto pasta can be a healthy option. Here’s why: - Protein. Chicken provides lean protein, which is vital for muscle health. - Basil and olive oil. These ingredients are rich in antioxidants and healthy fats. - Pasta. Whole-grain pasta offers fiber, which aids digestion. - Portion control. Adjust the serving size to fit your dietary needs. Absolutely! You can use various pasta types. Here are some alternatives: - Whole wheat pasta. Adds extra fiber and nutrients. - Gluten-free pasta. Great for those with gluten sensitivities. - Zoodles. Spiralized zucchini for a low-carb option. - Penne or rigatoni. These shapes hold the sauce well, providing a satisfying bite. In this post, I covered how to make a delicious chicken pesto pasta. We discussed the main ingredients and their roles, along with simple steps for cooking. I also shared tips for perfecting your dish and exciting variations to try. In closing, this recipe is easy and flexible, letting you customize flavors. Whether you choose to add veggies or change proteins, your meal will impress. Enjoy this tasty dish and make it your own!](https://dishtreats.com/wp-content/uploads/2025/06/ae0d281d-adb6-406a-8a42-58bd8911a0b3-768x768.webp)
