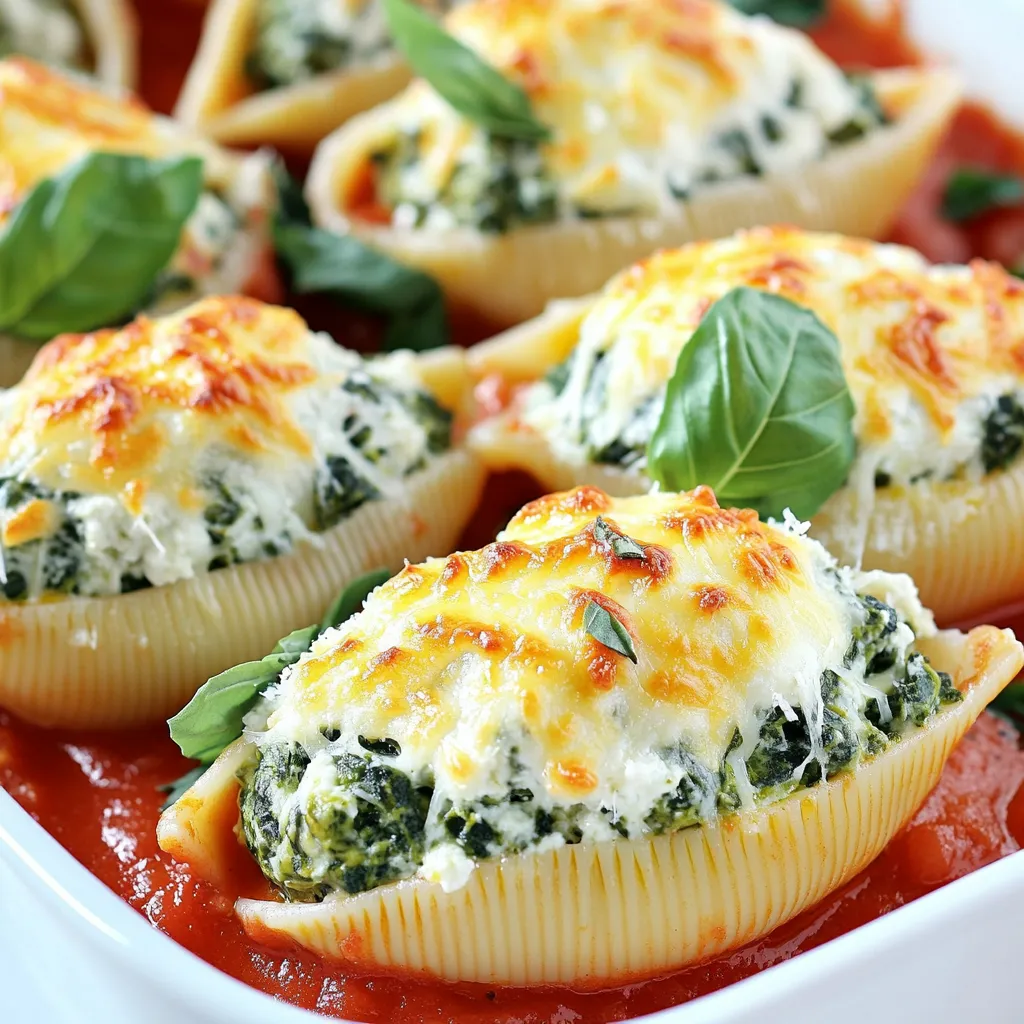
Cheesy Spinach Stuffed Shells Delicious and Simple Dish
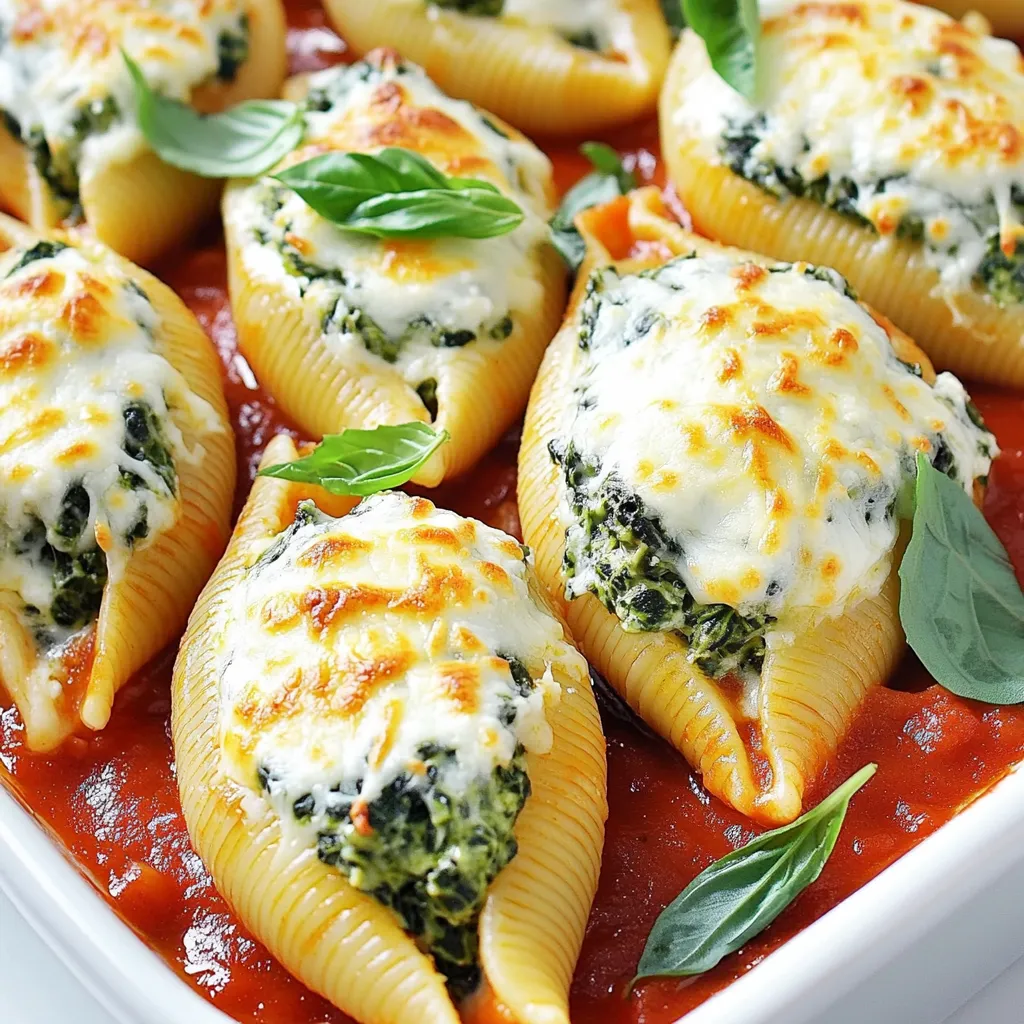

Are you ready to impress your family with a dish that’s both simple and delicious? Cheesy Spinach Stuffed Shells are a perfect choice. This recipe is loaded with creamy cheese and vibrant spinach, packed into jumbo pasta shells. I’ll guide you through every step, from gathering ingredients to baking the perfect shell. Let’s dive in and make a meal that will have everyone coming back for seconds!
Ingredients
List of Ingredients
- 12 jumbo pasta shells
- 2 cups fresh spinach, finely chopped
- 1 cup ricotta cheese
- 1 cup shredded mozzarella cheese
- 1/2 cup grated Parmesan cheese
- 1 large egg, beaten
- 1 teaspoon garlic powder
- 1 teaspoon onion powder
- 1/2 teaspoon salt
- 1/4 teaspoon freshly ground black pepper
- 2 cups marinara sauce
- Fresh basil leaves for garnish
Ingredient Measurements
Each ingredient plays a key role in the dish. The jumbo pasta shells hold the filling well. Fresh spinach adds a nice green color and healthy touch. Ricotta cheese gives a creamy texture. Shredded mozzarella adds gooey goodness. Grated Parmesan brings a salty bite. The beaten egg helps bind the filling together. Garlic and onion powders add flavor, while salt and pepper enhance all these tastes. Marinara sauce gives a rich base. Finally, fresh basil adds a burst of freshness.
Suggested Substitutions
If you cannot find jumbo shells, use manicotti or even cannelloni. For a twist, swap spinach with kale or Swiss chard. Cottage cheese can replace ricotta if needed. You can use any cheese you like instead of mozzarella. Try adding feta for a tangy taste. If you want a vegan dish, use tofu instead of ricotta and skip the egg. Lastly, any pasta sauce will work if you do not have marinara.
Step-by-Step Instructions
Cooking the Pasta
Start by boiling a large pot of water. Add a good amount of salt to the water. Once the water is boiling, add 12 jumbo pasta shells. Cook them according to the package instructions until they are al dente. After cooking, drain the shells and let them cool. Make sure they do not stick together.
Preparing the Spinach Cheese Filling
In a big mixing bowl, combine the spinach, ricotta cheese, half of the shredded mozzarella, and grated Parmesan cheese. Add in the beaten egg, garlic powder, onion powder, salt, and black pepper. Use a fork or spatula to mix everything well. The filling should be creamy and smooth.
Stuffing the Pasta Shells
Preheat your oven to 375°F (190°C). Take a spoon or a piping bag to fill each shell with the spinach and cheese mixture. Be careful to fill them well but do not let the filling overflow.
Assembling the Dish
Take a baking dish and spread 1 cup of marinara sauce on the bottom. Lay the stuffed shells in a single layer over the sauce. Drizzle the remaining marinara sauce on top of the shells. Then, sprinkle the rest of the shredded mozzarella cheese over everything.
Baking the Stuffed Shells
Cover the baking dish with aluminum foil. Place it in the oven and bake for 25 minutes. After this, remove the foil and bake for another 10 minutes. This will make the cheese bubbly and slightly golden.
Garnishing and Serving Suggestions
Once baked, let the dish cool for about 5 minutes. This helps the flavors blend. Garnish with fresh basil leaves before serving. This adds color and a nice touch of flavor. Serve your stuffed shells warm and enjoy!
Tips & Tricks
Perfecting Your Stuffed Shells
To make your stuffed shells stand out, use fresh ingredients. Fresh spinach adds a bright taste. Mix your filling well. Each bite should burst with flavor. Make sure your shells are cooked al dente. This helps them hold their shape. When stuffing, don’t overfill. Leave a little space to avoid spills. Lastly, let the dish rest before serving. This helps the flavors mingle.
Common Mistakes to Avoid
Avoid using old pasta shells. They can break easily. Don’t skip the salt in the pasta water. It adds flavor to the shells. Watch the baking time closely. Overbaking can lead to dry shells. If you use too much sauce, it can make the shells soggy. Keep the filling balanced. Too much cheese can overpower the spinach.
Making Ahead for Meal Prep
You can prepare the stuffed shells in advance. Stuff the shells and place them in the baking dish. Cover with plastic wrap and refrigerate for up to 24 hours. When ready to cook, add a few extra minutes to the baking time. You can also freeze the stuffed shells. Just make sure to wrap them well. Thaw them overnight in the fridge before baking. This makes meal prep easy and quick.
Variations
Adding Protein Options
You can add protein to your cheesy spinach stuffed shells. Ground beef, turkey, or chicken work well. Cook the meat in a pan until brown. Mix it into the spinach and cheese filling. This adds flavor and makes the dish heartier. For a tasty twist, try adding cooked sausage. It adds great spice to each bite.
Vegan and Dairy-Free Options
If you want a vegan version, swap the cheeses. Use a plant-based ricotta or tofu instead. You can blend silken tofu with nutritional yeast and garlic for a creamy texture. For cheese flavor, add vegan mozzarella shreds. Use aquafaba instead of the egg to bind the filling. This keeps the dish creamy and delicious without dairy.
Alternative Sauces
You can change up the sauce for your stuffed shells. Instead of marinara, try a creamy Alfredo sauce. This gives the dish a rich flavor. A pesto sauce also adds a fresh, herby taste. If you like spice, use a spicy arrabbiata sauce. Each sauce change creates a new experience while keeping the filling the same.
Storage Info
How to Store Leftovers
To keep your cheesy spinach stuffed shells fresh, let them cool first. Place any leftovers in an airtight container. Store them in the fridge for up to three days. If you want to enjoy them later, freezing is a great option.
Reheating Instructions
When you’re ready to eat the leftovers, you can reheat them easily. Preheat your oven to 350°F (175°C). Place the stuffed shells in an oven-safe dish. Cover them with foil to keep them moist. Bake for about 20 minutes or until hot. You can also microwave them for a quick option. Just cover them with a microwave-safe lid and heat for 2-3 minutes.
Freezing Tips for Long-Term Storage
If you want to freeze the stuffed shells, prepare them as usual but do not bake them. Place the filled shells in a single layer on a baking sheet. Freeze them for 1-2 hours, then transfer them to a freezer bag. Be sure to label the bag with the date. They will last up to three months in the freezer. When you’re ready to cook, bake them straight from the freezer. Just add an extra 10-15 minutes to the baking time.
FAQs
Can I use regular pasta instead of jumbo shells?
Yes, you can use regular pasta. However, jumbo shells hold the filling better. If you choose regular pasta, try using lasagna sheets or manicotti. They can also work well for stuffing.
How do I prevent stuffed shells from sticking together?
To prevent sticking, add salt to the boiling water. Stir the shells gently while cooking. After draining, spread them out on a baking sheet. You can also drizzle a bit of olive oil over them. This keeps them from clumping.
What to serve with Cheesy Spinach Stuffed Shells?
These shells pair well with a simple green salad. You can also serve garlic bread alongside them. A light drizzle of balsamic vinegar adds nice flavor. For drinks, a crisp white wine nicely complements the dish.
How long can I keep leftovers in the fridge?
You can keep leftovers in the fridge for about three to four days. Store them in an airtight container. If you want to keep them longer, consider freezing them. This way, they can last for up to three months.
You learned how to make cheesy spinach stuffed shells today. We covered ingredients, measurements, and substitutions. You know the steps for cooking and baking the dish. I shared tips for perfecting the shells and avoiding common mistakes. Plus, you explored variations with protein, vegan options, and sauces.
Remember to store and reheat leftovers the right way. Happy cooking, and enjoy your tasty meal!

![Creating a Grilled Peach Caprese Salad is simple and fun. Here’s what you need: - Ripe peaches - Fresh mozzarella - Mixed greens - Cherry tomatoes - Fresh basil leaves - Balsamic glaze - Extra virgin olive oil - Salt and black pepper Each ingredient plays a key role in this dish. Ripe peaches bring sweetness. Fresh mozzarella adds creaminess. Mixed greens provide a nice crunch. Cherry tomatoes add color and flavor. Fresh basil contributes a fragrant touch. The balsamic glaze adds a tangy finish. Extra virgin olive oil enhances the taste. Lastly, salt and pepper bring everything together. For the full recipe, check out the steps to make this tasty salad. Trust me, your taste buds will thank you! - Preheat the grill to medium-high heat. This helps create great grill marks. - Ensure your grill grates are clean and lightly oiled. This prevents sticking. - Start by cutting the peaches in half and removing the pit. - Brush the cut sides of the peach halves with olive oil. This adds flavor and helps them grill well. - Place the peach halves cut side down on the grill. Grill for about 3-4 minutes. You want those nice grill marks. - Once they soften slightly, remove them. Let them cool for a couple of minutes. - Grab a large serving platter. Create a bed of mixed greens in the center. - Place the grilled peach halves on top of the greens. Spread them out for a nice look. - Next, add slices of fresh mozzarella around the peaches. Then scatter halved cherry tomatoes. - Tear fresh basil leaves and sprinkle them over the salad. This adds a lovely aroma. - Finally, drizzle balsamic glaze over the salad. Add salt and black pepper to taste. - For the best flavor, serve the salad right away. You can chill it a bit if you prefer. For the complete recipe, check out the [Full Recipe]. To get perfect grill marks on your peaches, heat your grill to medium-high. Brush the cut sides of each peach half with olive oil. This helps prevent sticking and adds flavor. Look for ripe peaches that yield slightly when pressed. They should be fragrant and have a bright color. Presentation matters! Try arranging your salad in a spiral pattern. You can also layer the ingredients in single servings. This makes each plate look special. Pair your salad with a crisp white wine or a light red. Both will enhance the flavors of the dish. Want to mix things up? Try using different dressings like a lemon vinaigrette or honey mustard. Fresh herbs like mint or dill can add a twist. You could also sprinkle some chili flakes for a little heat. These simple changes will keep your salad exciting. For the full recipe, check here: [Full Recipe]. {{image_4}} You can change up your Grilled Peach Caprese Salad by swapping fruits. Try using ripe nectarines or plums instead of peaches. These fruits provide a sweet touch and work well on the grill. You can also use strawberries or even grilled pineapple for a fun twist. For cheese, fresh mozzarella is the classic choice. However, you can try burrata for a creamier texture. Feta cheese adds a salty punch, while goat cheese gives a tangy flavor. Each cheese brings its own flair to the dish. To make this salad vegan, skip the cheese and use a plant-based alternative. Cashew cheese or tofu can work well. Drizzle a vegan balsamic glaze for that sweet touch. If you need a gluten-free option, this salad is naturally gluten-free. Just make sure your balsamic glaze is gluten-free as well. Enjoy fresh ingredients without any worries. For the best flavor, pick peaches in late summer. They are sweet and juicy in this season. In spring, try using asparagus or snap peas for a fresh crunch. In winter, roasted root vegetables like beets can replace fresh greens. Add some nuts for extra texture and flavor. Adapt your salad to fit the season and enjoy a fresh taste year-round. For the complete recipe of Grilled Peach Caprese Salad, check the Full Recipe. To keep your Grilled Peach Caprese Salad fresh, store it properly. First, separate the components. This way, the flavors stay bright and fresh. - Peaches: Place grilled peaches in a sealed container. Store them in the fridge for up to three days. - Salad Greens: Keep mixed greens in a dry, airtight container. This keeps them crisp and fresh. - Cheese and Tomatoes: Store mozzarella and cherry tomatoes in separate containers. This helps prevent sogginess. - Balsamic Glaze: Keep the glaze in a small jar. It can last for weeks in the fridge. You might wonder if you should reheat grilled peaches. I recommend enjoying them cold. Their flavor shines best this way. But if you prefer warm peaches, here’s how to heat them: - Microwave: Place peaches on a microwave-safe plate. Heat for about 10-20 seconds. Check them often to avoid overheating. - Stovetop: Heat a non-stick pan over low heat. Add a dash of olive oil and warm the peaches for a minute. For other salad ingredients, like mozzarella and tomatoes, it’s best to enjoy them cold too. Mixing warm and cold can lead to a fun flavor contrast in your dish. To make this dish, follow these simple steps: 1. Preheat your grill to medium-high heat. 2. Brush cut sides of halved peaches with olive oil. 3. Grill peach halves cut side down for 3-4 minutes. 4. On a platter, spread mixed greens for a base. 5. Place grilled peaches on top of the greens. 6. Add mozzarella slices and halved cherry tomatoes around the peaches. 7. Scatter torn basil leaves over the salad. 8. Drizzle balsamic glaze on top, then season with salt and pepper. 9. Serve right away or chill slightly before serving. Fresh mozzarella is the classic choice for Caprese salad. Its creamy texture balances the sweetness of grilled peaches. You can also try burrata for extra creaminess. Feta adds a tangy twist, while goat cheese can give a bold flavor. Choose based on your taste preferences to enhance your salad. You can prep parts of the salad ahead of time. Grill the peaches and store them in the fridge. Wash and dry the greens and tomatoes, keeping them fresh. Assemble everything just before serving to maintain flavor and texture. This way, your salad stays fresh and tasty. Check the [Full Recipe] for more details. This blog shared how to make a Grilled Peach Caprese Salad. You learned about choosing ripe peaches, grilling them, and assembling the salad. Tips on serving and variations helped you create your own version. Remember to store leftovers properly to keep them fresh. With these insights, you can enjoy a delicious, refreshing salad anytime. Trust that your skills will shine. Enjoy experimenting with flavors and ingredients to make it uniquely yours. Your summer gatherings will never be the same!](https://dishtreats.com/wp-content/uploads/2025/06/c765deb6-47e2-46b1-bbfc-9b058c8c2a51-768x768.webp)