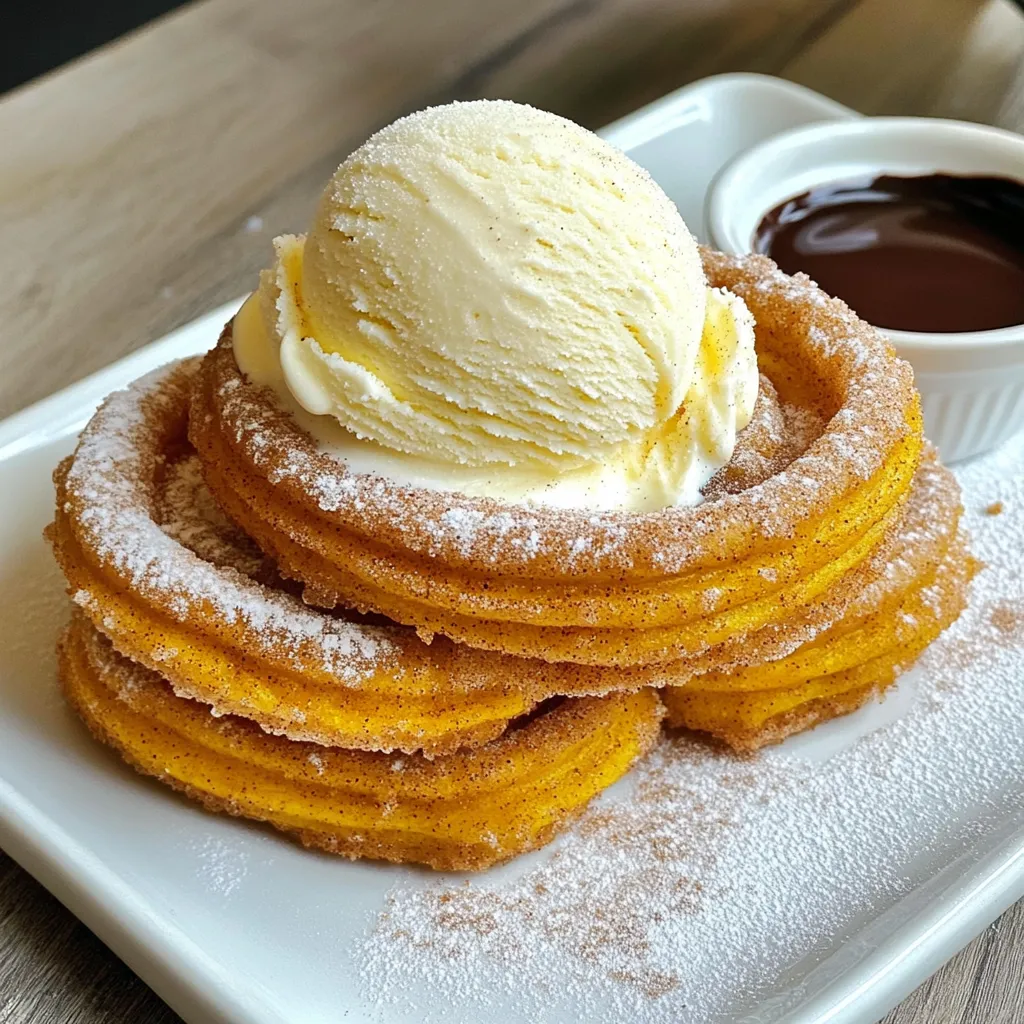
Pumpkin Churro Ice Cream Sandwiches Delicious Treat


Fall is the perfect time to indulge in Pumpkin Churro Ice Cream Sandwiches! This sweet treat combines warm, cinnamon-spiced churros with creamy ice cream for an unforgettable flavor experience. In this post, I’ll guide you through the simple steps to create your own. We’ll cover ingredients, tips, and delicious variations. Get ready to impress your friends and family with this seasonal delight! Let’s dive in!
Ingredients
Dry Ingredients
- 1 cup all-purpose flour
- 1/4 cup granulated sugar
- 1/2 teaspoon ground cinnamon
- 1/4 teaspoon ground nutmeg
- 1/2 teaspoon baking powder
- 1/4 teaspoon salt
Wet Ingredients
- 1/2 cup pumpkin puree
- 1/2 cup water
- 1/4 cup unsalted butter (for brushing)
Ice Cream
- 2 cups ice cream (vanilla or your favorite flavor)
- 1/4 cup granulated sugar (for rolling)
- 1 teaspoon ground cinnamon (for rolling)
In this recipe, you’ll need a mix of dry and wet ingredients to create churros that shine. The dry ingredients include flour, sugar, spices, baking powder, and salt. These create the base for your churros.
Then, you will add pumpkin puree and water as wet ingredients. The pumpkin gives flavor and moisture. Butter helps the churros crisp up after frying.
For the ice cream part, choose your favorite flavor, like vanilla. You’ll also need sugar and cinnamon for rolling the finished churros. This adds a sweet and spicy touch.
Gather all these ingredients before you start. This will help make your cooking experience smooth and fun!
Step-by-Step Instructions
Preparing the Churro Dough
Mixing dry ingredients
Start by grabbing a big bowl. Add 1 cup of flour, 1/4 cup of sugar, 1/2 teaspoon of cinnamon, 1/4 teaspoon of nutmeg, 1/2 teaspoon of baking powder, and 1/4 teaspoon of salt. Mix these dry items well until they blend together.
Combining wet ingredients
Now, take another bowl and add 1/2 cup of pumpkin puree. Pour in 1/2 cup of water. Whisk this mixture until it looks smooth and creamy. Slowly add this blend to the dry mix. Stir until the dough forms. It should be a bit sticky and smooth.
Frying the Churros
Heating the oil to the correct temperature
For frying, you need hot oil. Pour vegetable oil into a deep pot. Heat it over medium heat until it reaches 350°F (175°C). Use a thermometer to check the temperature.
Piping and frying the churros
Once the oil is hot, grab a piping bag with a big star tip. Squeeze out 4 to 5-inch strips of dough into the oil. Fry them in batches, cooking each side for 2-3 minutes. They should turn golden brown. Use a slotted spoon to move them to a paper towel-lined plate to soak up extra oil.
Coating and Cooling
Coating churros in cinnamon-sugar
In a small bowl, mix 1/4 cup sugar and 1 teaspoon cinnamon. While the churros are warm, brush them with melted butter. Roll each churro in the cinnamon-sugar mix until covered.
Cooling instructions
Let the churros cool completely before making your ice cream sandwiches. This step is important to keep the ice cream from melting too fast.
Tips & Tricks
Achieving the Perfect Churro
To make great churros, keep the oil at 350°F (175°C). Use a thermometer for best results. Fry churros for about 2-3 minutes on each side. This timing helps them turn golden brown and tasty.
To keep churros crispy, coat them in melted butter right after frying. Then, roll them in cinnamon-sugar while warm. This crunchy coating adds flavor and texture. Let them cool completely before making ice cream sandwiches.
Serving Suggestions
For a fun presentation, arrange the churro ice cream sandwiches on a colorful platter. Dust the tops with powdered sugar for a sweet touch. You can place a small bowl of chocolate or caramel sauce on the side for dipping.
Consider rolling the edges of the ice cream in extra cinnamon-sugar. It adds a nice crunch and looks great. Drizzling chocolate syrup over the top also gives a delightful twist.
Common Mistakes to Avoid
One common mistake is getting the dough too thick or too runny. The dough should be smooth and slightly sticky. If it’s too dry, add a little more water. If it’s too wet, add a bit more flour.
Another mistake is frying too many churros at once. Overcrowding the pan can lower the oil temperature. This can lead to soggy churros. Fry in small batches to keep them crispy and golden.
Variations
Different Ice Cream Flavors
You can customize your ice cream sandwiches with different flavors. Seasonal flavors like pumpkin spice or maple work great. If you want a dairy-free option, try coconut or almond milk ice cream. These choices add a fun twist and cater to everyone’s taste.
Alternative Spice Combinations
Spicing things up can make a big difference. You can add ginger or cloves for extra warmth. Adjusting sweetness levels can also change the dessert’s flavor. If you prefer less sugar, reduce the granulated sugar in the churro mix or the cinnamon-sugar coating.
Churro Shape and Size
Churros don’t have to be long. Consider making mini churros for bite-sized treats. This fun shape is perfect for parties or sharing. You can also experiment with different shapes, like spirals or hearts, for unique presentations. These variations can make your dessert stand out even more!
Storage Info
Storing Leftover Churros
To keep churros crisp, store them in an airtight container. Place a paper towel inside to absorb moisture. This helps them stay fresh longer. If they get soft, you can reheat them. Preheat your oven to 350°F (175°C). Place the churros on a baking sheet and heat for about 5-7 minutes. This method restores their crunch.
Storing Ice Cream Sandwiches
For ice cream sandwiches, wrap each sandwich in plastic wrap. This prevents freezer burn and keeps them fresh. You can also place them in a sealed container. They are best enjoyed within one week for optimal taste. If left longer, the texture might change.
Safety Tips
Always handle ingredients with clean hands. Keep raw items separate from cooked food. Store pumpkin puree in the fridge after opening. Use it within a week for best quality. If you make dough ahead of time, chill it in the fridge. This keeps it safe until you are ready to fry.
FAQs
How do I make churros without frying?
You can bake churros instead of frying. To bake, preheat your oven to 400°F (200°C). Pipe the churro dough onto a baking sheet lined with parchment paper. Brush them with melted butter and sprinkle with cinnamon sugar. Bake for about 15-20 minutes until golden brown. This method reduces oil and keeps them lighter.
Can I use a different type of flour?
Yes, you can use other flours. Almond flour or gluten-free flour works well. Just keep in mind that the texture may change. Each type of flour brings a new taste and feel to your churros.
What can I substitute for pumpkin puree?
You can use applesauce, mashed sweet potatoes, or butternut squash. Each substitute brings its own flavor. If you want a similar texture, make sure it’s smooth and thick.
How long can I store churro ice cream sandwiches?
You can store churro ice cream sandwiches in the freezer for about 1-2 weeks. Wrap each sandwich in plastic wrap or foil. This helps prevent freezer burn and keeps them fresh.
Can I make the dough in advance?
Yes, you can make the churro dough ahead of time. Store it in the fridge for up to 24 hours. Just remember to let it sit at room temperature for about 30 minutes before piping and frying. This helps it stay smooth and easy to work with.
Making churros at home is fun and rewarding. We covered key ingredients, steps, and tips for the perfect treat. You learned to mix dry and wet ingredients, fry them just right, and coat them in tasty cinnamon-sugar. Plus, we discussed fun variations and how to store leftovers.
Try these tips and enjoy delicious churros with ice cream. Your friends and family will love them! Happy cooking!

![- 4 large bell peppers (any color) - 1 lb ground chicken - 2 cups fresh spinach, roughly chopped - 1 cup cooked quinoa (or rice) - 1 cup mozzarella cheese, shredded - 1 small onion, finely minced - 2 cloves garlic, minced - 1 teaspoon Italian seasoning blend - ½ teaspoon red pepper flakes - Salt and pepper to taste - 1 tablespoon olive oil - Fresh basil leaves for garnish When I make chicken and spinach stuffed peppers, I love using fresh ingredients. The bell peppers can be red, green, yellow, or orange. Each color adds a fun touch and a slight flavor difference. Ground chicken gives a light taste and pairs well with spinach. I usually chop the spinach roughly. This keeps some texture in the filling. Quinoa or rice adds a nice base and helps the stuffing stick together. I recommend using cooked quinoa for a nutty flavor and added protein. Mozzarella cheese brings creaminess and melts beautifully on top. The minced onion and garlic create a fragrant base. I often sauté these first to build flavor. The Italian seasoning and red pepper flakes bring warmth and depth. Adjust the red pepper flakes to suit your taste. Lastly, a sprinkle of salt and pepper enhances all the flavors. The olive oil adds richness and helps everything cook evenly. I often finish with fresh basil leaves for a bright and fresh touch. You can find the full recipe to make these delicious stuffed peppers! - Preheat your oven to 375°F (190°C). - Prepare the bell peppers by removing the tops and seeds. Start by heating your oven. This ensures it’s hot for your peppers. While waiting, grab your bell peppers. Cut off the tops and scoop out the seeds inside. You want them ready to hold all that tasty filling. A little olive oil on the outside adds flavor and color. - Sauté onion and garlic in olive oil. - Add ground chicken and cook thoroughly. - Stir in spinach, quinoa, and spices. Now, heat olive oil in a large skillet over medium heat. Add the finely minced onion and sauté for about 3-4 minutes. You want them soft and clear. Then, toss in your minced garlic and cook for one more minute. It will smell amazing! Next, add the ground chicken. Use a spoon to break it apart as it cooks. This should take about 6-8 minutes. Make sure the chicken is brown and fully cooked. Then, mix in the chopped spinach, cooked quinoa, Italian seasoning, red pepper flakes, salt, and pepper. Cook for another 2-3 minutes until the spinach wilts and blends in. - Mix in mozzarella and stuff peppers. - Bake covered and then uncovered until cooked. Remove the skillet from heat. Now, add half of the shredded mozzarella cheese to the filling. Stir until it melts and mixes well. Carefully spoon this tasty mixture into each pepper. Press it down to fill them well. Finally, sprinkle the remaining mozzarella over the tops of each pepper. Cover your dish tightly with foil and place it in the oven. Bake for 25 minutes. This helps the peppers cook through. After that, take off the foil and bake for another 10-15 minutes. Look for tender peppers and bubbly, golden cheese. Your Chicken and Spinach Stuffed Peppers are almost ready! - Choosing the right peppers for optimal flavor: I love using bell peppers in various colors. Each color brings a unique taste. Red peppers are sweet, while green ones are more bitter. Choose your favorite or mix them for a colorful dish. - Ensuring even cooking of the filling: To cook the filling evenly, chop the spinach and onion small. This helps them blend well with the ground chicken. Stir often while cooking to make sure everything heats up at the same time. - Plates and garnishes for serving: Use bright plates to showcase your stuffed peppers. A white plate makes the colors pop. Add fresh basil leaves on top for a nice touch. It adds color and flavor. - Drizzling options for added flavor: Consider drizzling a balsamic reduction over the peppers. This gives a sweet and tangy kick. You can also use olive oil or a bit of hot sauce if you like spice. - Low-calorie ingredient options: If you want to cut calories, use ground turkey instead of chicken. You can also skip the cheese or use a low-fat version. This keeps the rich taste without the extra calories. - Gluten-free substitutes: For a gluten-free option, use quinoa or rice as a base. Both are great alternatives. Make sure your seasonings are also gluten-free to keep the dish safe for everyone. For the full recipe, check out the details above. {{image_4}} You can switch the protein in your stuffed peppers. Ground turkey works great as a leaner choice. It has a mild flavor that blends well with the spices. Ground beef is another option. It adds richness and depth to the dish. If you want a vegetarian option, try black beans or chickpeas. They add protein and fiber. You can mash them for a creamy texture or leave them whole for a nice bite. Spicing up your stuffed peppers can elevate the dish. Add cumin or smoked paprika for a smoky flavor. You can also try chili powder for a bit of heat. If you love sauces, think about adding salsa or barbecue sauce to the filling. A drizzle of ranch or yogurt on top can enhance the taste too. These simple tweaks can really make your meal pop. Stuffed peppers pair well with many sides. A fresh salad with greens and a lemon vinaigrette works nicely. You can also serve them with rice or quinoa on the side. For meal prep, these stuffed peppers are great to make ahead. They store well and taste even better the next day. Leftovers can be enjoyed cold or reheated easily, making them perfect for quick lunches. If you want to impress, plate them on colorful dishes and garnish with fresh herbs. For the full recipe, check [Full Recipe]. After you make your chicken and spinach stuffed peppers, let them cool. Place leftovers in an airtight container. This keeps them fresh and tasty. You can store them in the fridge for up to three days. When you want to enjoy them again, simply reheat in the oven or microwave. If using the oven, cover with foil to keep the moisture in. Heat at 350°F (175°C) for about 15-20 minutes. If using a microwave, heat in one-minute bursts until hot. If you want to save some for later, freezing is a great option. Wrap each stuffed pepper in plastic wrap. Then put them in a freezer-safe bag. This keeps them from getting freezer burn. You can freeze them for up to three months. When you’re ready to eat, take them out and let them thaw in the fridge overnight. You can bake them from frozen, but it will take longer. Bake at 375°F (190°C) for about 40-50 minutes. Make sure they are hot all the way through. Enjoy the convenience of having these delicious meals ready to go! How long do stuffed peppers last in the fridge? Stuffed peppers can last up to four days in the fridge. Store them in an airtight container. Can I use frozen spinach instead of fresh? Yes, you can use frozen spinach. Just thaw and drain it first to remove excess water. What can I substitute for quinoa in this recipe? You can use rice instead of quinoa. Brown rice or white rice works well for this dish. Are stuffed peppers healthy? Yes, stuffed peppers are healthy. They are full of protein, fiber, and vitamins. How can I tell when the peppers are done cooking? Peppers are done when they are tender and the cheese is bubbly and golden. Can I prep these ahead of time? Yes, you can prep them a day in advance. Just store the stuffed peppers in the fridge. What sides pair well with stuffed peppers? Great sides include a light salad, garlic bread, or steamed veggies. Enjoy your meal! In this article, we explored a tasty recipe for chicken and spinach stuffed peppers. We covered detailed ingredients, step-by-step instructions, cooking tips, and variations to try. Stuffed peppers are fun to make and easy to adapt. You can even store leftovers or freeze them for later. This dish is not only healthy but also full of flavor that everyone will enjoy. Try it out and get creative!](https://dishtreats.com/wp-content/uploads/2025/06/8d5b3b7f-ae7d-4f86-a3ac-77abf09c6433-768x768.webp)