No Bake Maple Pumpkin Pie Cups Simple and Delicious
- 1 cup pumpkin puree - 1/2 cup Greek yogurt - 1/4 cup pure maple syrup - 1 teaspoon vanilla extract - 1 teaspoon ground cinnamon - 1/2 teaspoon ground ginger - 1/4 teaspoon ground nutmeg - 1/4 teaspoon salt - 1 cup crushed graham crackers - 1/4 cup unsalted butter, melted - Whipped cream, for topping - Chopped pecans or walnuts, for garnish These measurements are key to making the cups taste great. The pumpkin puree brings a rich flavor. Greek yogurt adds creaminess and protein. Maple syrup sweetens the mix, while vanilla extract enhances the taste. Ground cinnamon, ginger, and nutmeg give warmth. Salt balances all the flavors. The crust uses crushed graham crackers mixed with melted butter for a tasty base. You can switch things up for fun! Try using different spices like allspice or cloves for a twist. Instead of Greek yogurt, you could use cream cheese for a richer texture. For a nut-free option, skip the nuts on top. You can also use dairy-free yogurt for a lighter touch. Each change can give the pie cups a new flair! To start, grab a medium bowl. Combine 1 cup of crushed graham crackers with 1/4 cup of melted unsalted butter. Use your fingers or a fork to mix the crumbs. Make sure all the crumbs are coated well with the butter. This will help the crust hold together. Next, take small dessert cups or mason jars. Spoon about 2-3 tablespoons of the graham cracker mixture into each cup. Press down firmly with the back of a spoon. This forms a solid base. Make sure it is even across the bottom. Now, let’s focus on the filling. In another bowl, combine 1 cup of pumpkin puree, 1/2 cup of Greek yogurt, and 1/4 cup of pure maple syrup. Add 1 teaspoon of vanilla extract, 1 teaspoon of ground cinnamon, 1/2 teaspoon of ground ginger, 1/4 teaspoon of ground nutmeg, and 1/4 teaspoon of salt. Whisk everything together until it is smooth. Taste the filling. If you want it sweeter, add more maple syrup. It should be creamy and flavorful. With the crust and filling ready, it’s time to layer the cups. Spoon the pumpkin filling over the crust in each cup. Be gentle to avoid disturbing the crust. Use the back of a spoon to smooth the tops. After layering, cover each cup with plastic wrap or a lid. Place them in the refrigerator. Chill for at least 2 hours. This lets the flavors mix and helps the filling firm up. When you are ready to serve, remove the cups from the fridge. Add a dollop of whipped cream on top and sprinkle with chopped pecans or walnuts. Enjoy your tasty no bake maple pumpkin pie cups! To get a creamy filling, use fresh pumpkin puree. It gives a rich taste. Mix the pumpkin with Greek yogurt for creaminess. Whisk until smooth. This helps blend all the flavors well. Let it chill for at least two hours. This will help the filling set nicely. Taste your filling before you spoon it into cups. If you want it sweeter, add more maple syrup. Just a tablespoon at a time works well. Remember, the graham crust adds some sweetness too. So, adjust carefully to find your perfect balance. For a beautiful presentation, use clear cups or jars. It shows off the layers. Top with whipped cream for a fluffy look. Sprinkle chopped pecans or walnuts on top for crunch. Drizzle extra maple syrup for a sweet touch. A dash of cinnamon adds a nice color and flavor. Serve on a festive tray to impress your guests! {{image_4}} If you want a different crust, try using crushed cookies. Chocolate sandwich cookies or vanilla wafers work well. Simply replace the graham crackers with your choice. Mix the cookie crumbs with melted butter, just as you did before. This gives the cups a fun twist in flavor. You can also use nut-based crusts for a gluten-free option. Ground almonds or pecans mixed with coconut oil can create a rich base. Maple syrup is great, but you can switch it up. Honey or agave syrup can work well, too. If you want a sugar-free option, use a sugar substitute like stevia or monk fruit sweetener. Just keep in mind that these sweeteners can be sweeter than maple syrup. Start with less and taste as you go. This way, you find the perfect balance without making it too sweet. To make these pie cups dairy-free or vegan, swap out the Greek yogurt. Use a plant-based yogurt instead. Coconut yogurt or almond yogurt can be tasty choices. You should also ensure your sweetener is vegan, like maple syrup or agave. This way, everyone can enjoy these delicious cups. With a few simple changes, you can cater to different diets without losing flavor. Store any leftover No Bake Maple Pumpkin Pie Cups in the fridge. Use an airtight container to keep them fresh. This helps maintain their creamy texture and flavor. I recommend putting parchment paper between layers if you stack them. This prevents sticking and keeps the whipped cream intact on top. You can freeze these cups too. However, I suggest not freezing the whipped cream topping. The texture changes when thawed. To freeze, cover each cup tightly with plastic wrap, then place them in a freezer-safe bag. Make sure to label the bag with the date. They can stay in the freezer for about one month. In the fridge, these cups last for about three to five days. The flavors deepen as they chill, making them even tastier! Just remember to check for freshness before serving. If they look or smell off, it’s best to toss them. Yes, you can. You might use sweet potato puree or butternut squash puree instead. Both options work well and add a unique flavor. They have a similar texture to pumpkin. Just make sure you choose pureed options, not pie filling. This keeps the taste and texture close to the original recipe. To make this pie cups healthier, consider these tips: - Swap Greek yogurt for low-fat yogurt or a dairy-free option. - Use less maple syrup if you prefer lower sugar. - Add chia seeds or flaxseeds for extra fiber and nutrients. - Choose whole-grain graham crackers for added health benefits. These small changes can boost nutrition while keeping the flavor great. Absolutely! You can prepare these cups a day ahead. Just follow the recipe and store them in the fridge. The chilling time helps the flavors blend. Plus, it saves you time on the day you need to serve them. Just add the whipped cream and nuts right before serving for freshness. This blog post shared all you need to make tasty pumpkin cups. You learned about key ingredients, step-by-step instructions, and helpful tips for the best results. We explored fun variations, storage info, and answers to common questions. You can enjoy these cups in many ways while keeping them fresh and tasty. Try out your favorite twists and impress your friends. Enjoy making these pumpkin cups that are easy and delicious. You won't be disappointed!

WANT TO SAVE THIS RECIPE?

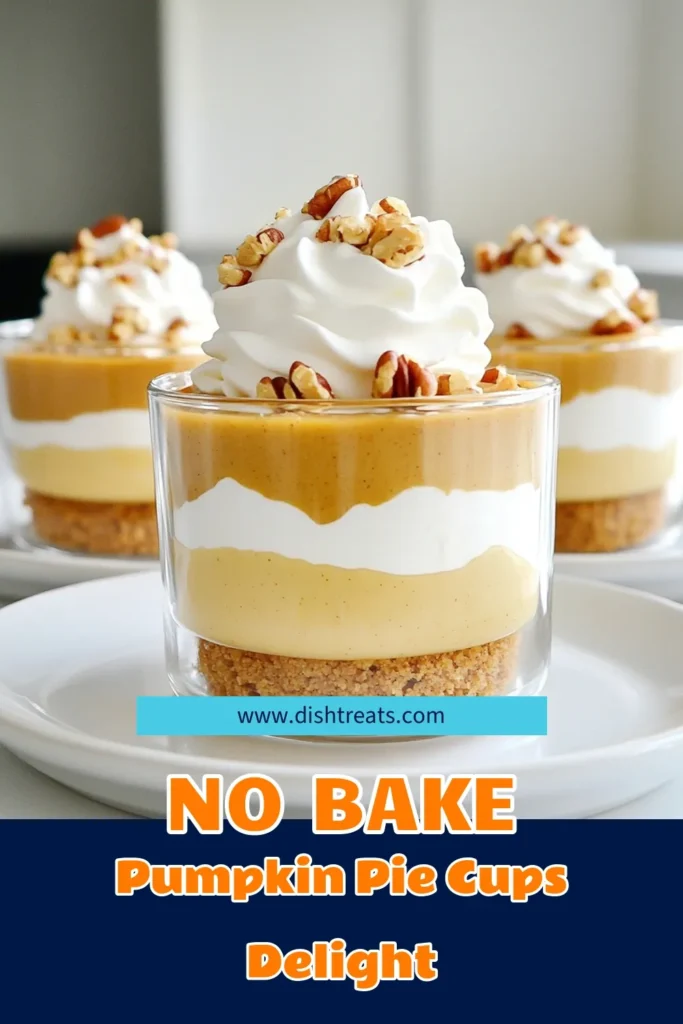
Craving a simple and tasty dessert that’ll impress? Look no further than these No Bake Maple Pumpkin Pie Cups! They’re easy to make and perfect for fall. With just a few key ingredients, you can whip up a sweet treat that satisfies. I’ll guide you through each step, share tips for the best flavor, and show you how to add fun variations. Let’s get started on this delicious journey!

Ingredients

List of Ingredients

  • 1 cup pumpkin puree
  • 1/2 cup Greek yogurt
  • 1/4 cup pure maple syrup
  • 1 teaspoon vanilla extract
  • 1 teaspoon ground cinnamon
  • 1/2 teaspoon ground ginger
  • 1/4 teaspoon ground nutmeg
  • 1/4 teaspoon salt
  • 1 cup crushed graham crackers
  • 1/4 cup unsalted butter, melted
  • Whipped cream, for topping
  • Chopped pecans or walnuts, for garnish

Measurement Details

These measurements are key to making the cups taste great. The pumpkin puree brings a rich flavor. Greek yogurt adds creaminess and protein. Maple syrup sweetens the mix, while vanilla extract enhances the taste. Ground cinnamon, ginger, and nutmeg give warmth. Salt balances all the flavors. The crust uses crushed graham crackers mixed with melted butter for a tasty base.

Optional Ingredients for Variation

You can switch things up for fun! Try using different spices like allspice or cloves for a twist. Instead of Greek yogurt, you could use cream cheese for a richer texture. For a nut-free option, skip the nuts on top. You can also use dairy-free yogurt for a lighter touch. Each change can give the pie cups a new flair!

Step-by-Step Instructions

Preparing the Crust

To start, grab a medium bowl. Combine 1 cup of crushed graham crackers with 1/4 cup of melted unsalted butter. Use your fingers or a fork to mix the crumbs. Make sure all the crumbs are coated well with the butter. This will help the crust hold together.

Next, take small dessert cups or mason jars. Spoon about 2-3 tablespoons of the graham cracker mixture into each cup. Press down firmly with the back of a spoon. This forms a solid base. Make sure it is even across the bottom.

Making the Pumpkin Filling

Now, let’s focus on the filling. In another bowl, combine 1 cup of pumpkin puree, 1/2 cup of Greek yogurt, and 1/4 cup of pure maple syrup. Add 1 teaspoon of vanilla extract, 1 teaspoon of ground cinnamon, 1/2 teaspoon of ground ginger, 1/4 teaspoon of ground nutmeg, and 1/4 teaspoon of salt. Whisk everything together until it is smooth.

Taste the filling. If you want it sweeter, add more maple syrup. It should be creamy and flavorful.

Layering and Chilling the Cups

With the crust and filling ready, it’s time to layer the cups. Spoon the pumpkin filling over the crust in each cup. Be gentle to avoid disturbing the crust. Use the back of a spoon to smooth the tops.

After layering, cover each cup with plastic wrap or a lid. Place them in the refrigerator. Chill for at least 2 hours. This lets the flavors mix and helps the filling firm up.

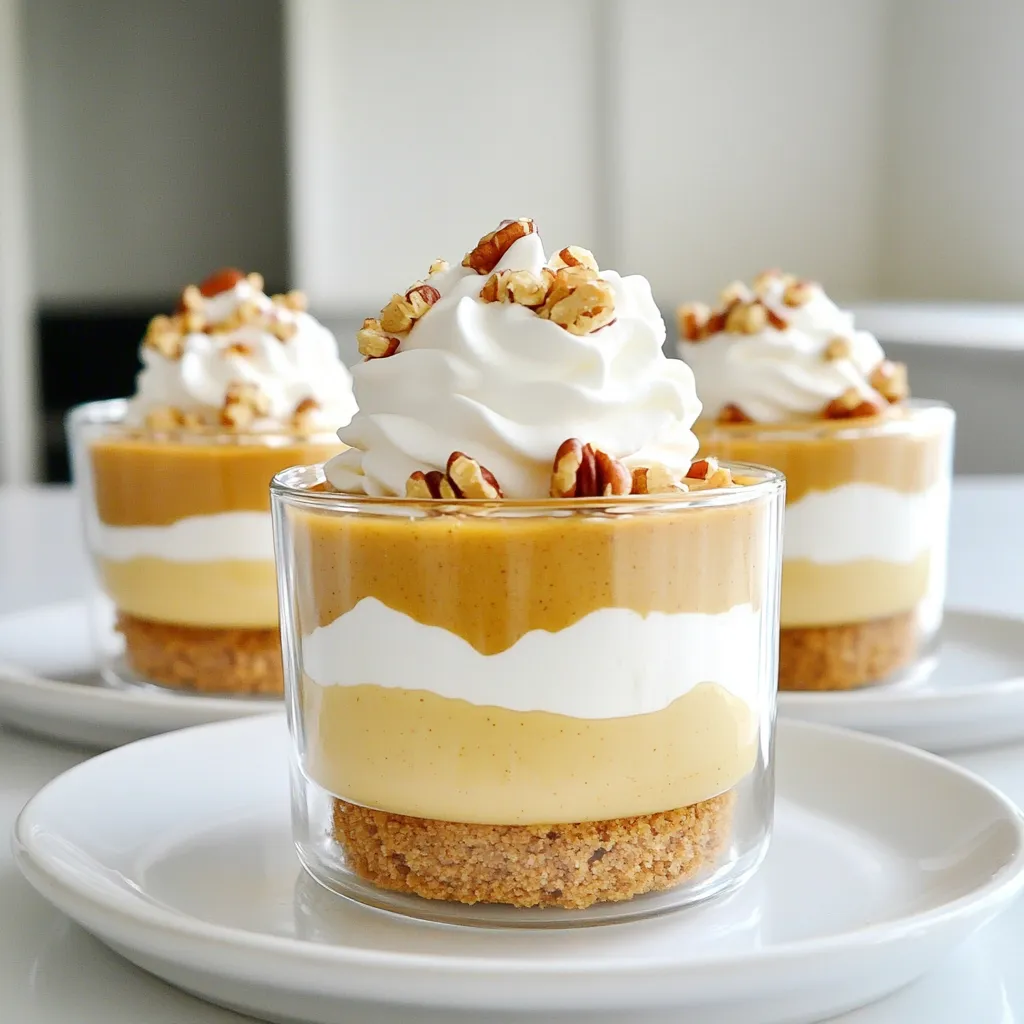
When you are ready to serve, remove the cups from the fridge. Add a dollop of whipped cream on top and sprinkle with chopped pecans or walnuts. Enjoy your tasty no bake maple pumpkin pie cups!

Tips & Tricks

How to Get the Perfect Texture

To get a creamy filling, use fresh pumpkin puree. It gives a rich taste. Mix the pumpkin with Greek yogurt for creaminess. Whisk until smooth. This helps blend all the flavors well. Let it chill for at least two hours. This will help the filling set nicely.

Adjusting Sweetness to Taste

Taste your filling before you spoon it into cups. If you want it sweeter, add more maple syrup. Just a tablespoon at a time works well. Remember, the graham crust adds some sweetness too. So, adjust carefully to find your perfect balance.

Presentation Tips for Serving

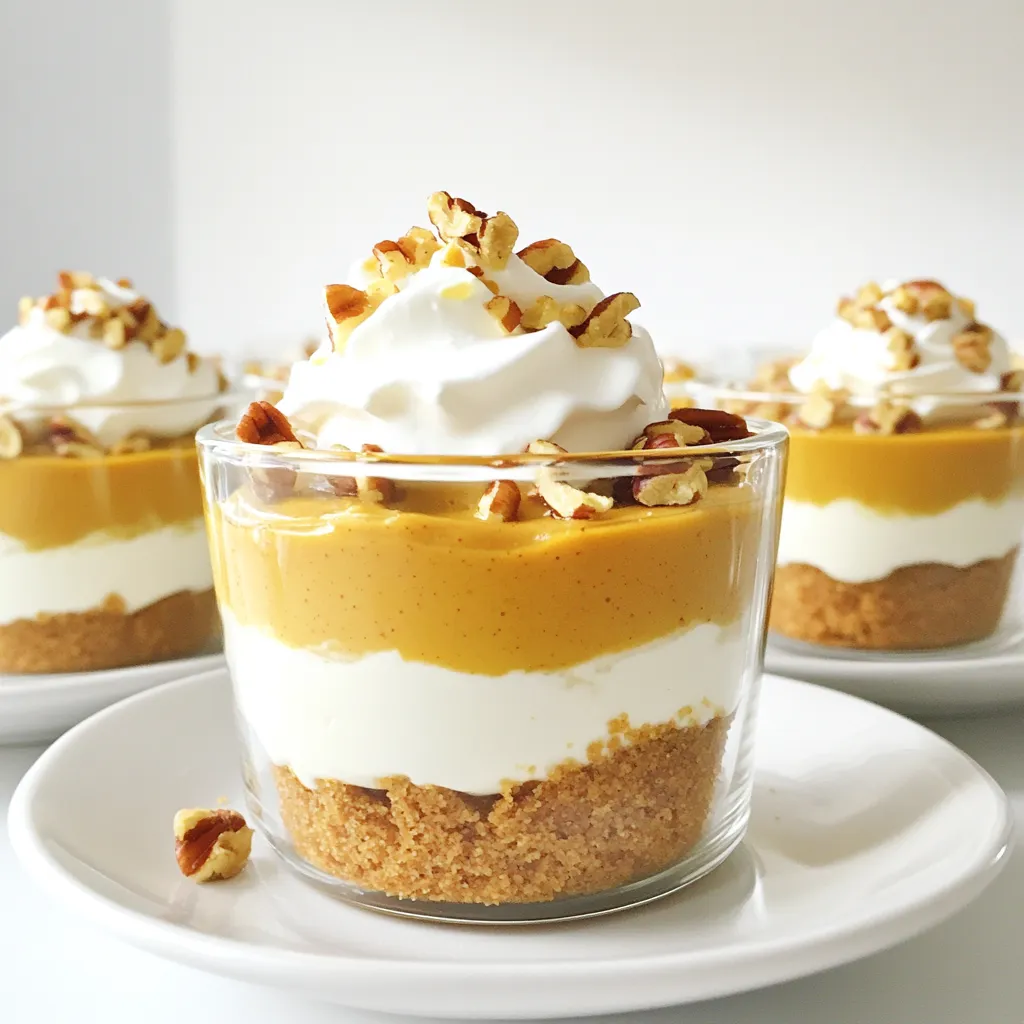
For a beautiful presentation, use clear cups or jars. It shows off the layers. Top with whipped cream for a fluffy look. Sprinkle chopped pecans or walnuts on top for crunch. Drizzle extra maple syrup for a sweet touch. A dash of cinnamon adds a nice color and flavor. Serve on a festive tray to impress your guests!
Variations

Alternative Crust Options

If you want a different crust, try using crushed cookies. Chocolate sandwich cookies or vanilla wafers work well. Simply replace the graham crackers with your choice. Mix the cookie crumbs with melted butter, just as you did before. This gives the cups a fun twist in flavor. You can also use nut-based crusts for a gluten-free option. Ground almonds or pecans mixed with coconut oil can create a rich base.

Using Different Sweeteners

Maple syrup is great, but you can switch it up. Honey or agave syrup can work well, too. If you want a sugar-free option, use a sugar substitute like stevia or monk fruit sweetener. Just keep in mind that these sweeteners can be sweeter than maple syrup. Start with less and taste as you go. This way, you find the perfect balance without making it too sweet.

Dairy-Free and Vegan Options

To make these pie cups dairy-free or vegan, swap out the Greek yogurt. Use a plant-based yogurt instead. Coconut yogurt or almond yogurt can be tasty choices. You should also ensure your sweetener is vegan, like maple syrup or agave. This way, everyone can enjoy these delicious cups. With a few simple changes, you can cater to different diets without losing flavor.

Storage Info

How to Store Leftovers

Store any leftover No Bake Maple Pumpkin Pie Cups in the fridge. Use an airtight container to keep them fresh. This helps maintain their creamy texture and flavor. I recommend putting parchment paper between layers if you stack them. This prevents sticking and keeps the whipped cream intact on top.

Freezing Instructions

You can freeze these cups too. However, I suggest not freezing the whipped cream topping. The texture changes when thawed. To freeze, cover each cup tightly with plastic wrap, then place them in a freezer-safe bag. Make sure to label the bag with the date. They can stay in the freezer for about one month.

How Long Does It Last in the Fridge?

In the fridge, these cups last for about three to five days. The flavors deepen as they chill, making them even tastier! Just remember to check for freshness before serving. If they look or smell off, it’s best to toss them.

FAQs

Can I substitute pumpkin puree with something else?

Yes, you can. You might use sweet potato puree or butternut squash puree instead. Both options work well and add a unique flavor. They have a similar texture to pumpkin. Just make sure you choose pureed options, not pie filling. This keeps the taste and texture close to the original recipe.

How can I make this recipe healthier?

To make this pie cups healthier, consider these tips:

  • Swap Greek yogurt for low-fat yogurt or a dairy-free option.
  • Use less maple syrup if you prefer lower sugar.
  • Add chia seeds or flaxseeds for extra fiber and nutrients.
  • Choose whole-grain graham crackers for added health benefits.

These small changes can boost nutrition while keeping the flavor great.

Is it possible to prepare these cups in advance?

Absolutely! You can prepare these cups a day ahead. Just follow the recipe and store them in the fridge. The chilling time helps the flavors blend. Plus, it saves you time on the day you need to serve them. Just add the whipped cream and nuts right before serving for freshness.

This blog post shared all you need to make tasty pumpkin cups. You learned about key ingredients, step-by-step instructions, and helpful tips for the best results. We explored fun variations, storage info, and answers to common questions. You can enjoy these cups in many ways while keeping them fresh and tasty. Try out your favorite twists and impress your friends. Enjoy making these pumpkin cups that are easy and delicious. You won’t be disappointed!
- 1 cup pumpkin puree - 1/2 cup Greek yogurt - 1/4 cup pure maple syrup - 1 teaspoon vanilla extract - 1 teaspoon ground cinnamon - 1/2 teaspoon ground ginger - 1/4 teaspoon ground nutmeg - 1/4 teaspoon salt - 1 cup crushed graham crackers - 1/4 cup unsalted butter, melted - Whipped cream, for topping - Chopped pecans or walnuts, for garnish These measurements are key to making the cups taste great. The pumpkin puree brings a rich flavor. Greek yogurt adds creaminess and protein. Maple syrup sweetens the mix, while vanilla extract enhances the taste. Ground cinnamon, ginger, and nutmeg give warmth. Salt balances all the flavors. The crust uses crushed graham crackers mixed with melted butter for a tasty base. You can switch things up for fun! Try using different spices like allspice or cloves for a twist. Instead of Greek yogurt, you could use cream cheese for a richer texture. For a nut-free option, skip the nuts on top. You can also use dairy-free yogurt for a lighter touch. Each change can give the pie cups a new flair! To start, grab a medium bowl. Combine 1 cup of crushed graham crackers with 1/4 cup of melted unsalted butter. Use your fingers or a fork to mix the crumbs. Make sure all the crumbs are coated well with the butter. This will help the crust hold together. Next, take small dessert cups or mason jars. Spoon about 2-3 tablespoons of the graham cracker mixture into each cup. Press down firmly with the back of a spoon. This forms a solid base. Make sure it is even across the bottom. Now, let’s focus on the filling. In another bowl, combine 1 cup of pumpkin puree, 1/2 cup of Greek yogurt, and 1/4 cup of pure maple syrup. Add 1 teaspoon of vanilla extract, 1 teaspoon of ground cinnamon, 1/2 teaspoon of ground ginger, 1/4 teaspoon of ground nutmeg, and 1/4 teaspoon of salt. Whisk everything together until it is smooth. Taste the filling. If you want it sweeter, add more maple syrup. It should be creamy and flavorful. With the crust and filling ready, it’s time to layer the cups. Spoon the pumpkin filling over the crust in each cup. Be gentle to avoid disturbing the crust. Use the back of a spoon to smooth the tops. After layering, cover each cup with plastic wrap or a lid. Place them in the refrigerator. Chill for at least 2 hours. This lets the flavors mix and helps the filling firm up. When you are ready to serve, remove the cups from the fridge. Add a dollop of whipped cream on top and sprinkle with chopped pecans or walnuts. Enjoy your tasty no bake maple pumpkin pie cups! To get a creamy filling, use fresh pumpkin puree. It gives a rich taste. Mix the pumpkin with Greek yogurt for creaminess. Whisk until smooth. This helps blend all the flavors well. Let it chill for at least two hours. This will help the filling set nicely. Taste your filling before you spoon it into cups. If you want it sweeter, add more maple syrup. Just a tablespoon at a time works well. Remember, the graham crust adds some sweetness too. So, adjust carefully to find your perfect balance. For a beautiful presentation, use clear cups or jars. It shows off the layers. Top with whipped cream for a fluffy look. Sprinkle chopped pecans or walnuts on top for crunch. Drizzle extra maple syrup for a sweet touch. A dash of cinnamon adds a nice color and flavor. Serve on a festive tray to impress your guests! {{image_4}} If you want a different crust, try using crushed cookies. Chocolate sandwich cookies or vanilla wafers work well. Simply replace the graham crackers with your choice. Mix the cookie crumbs with melted butter, just as you did before. This gives the cups a fun twist in flavor. You can also use nut-based crusts for a gluten-free option. Ground almonds or pecans mixed with coconut oil can create a rich base. Maple syrup is great, but you can switch it up. Honey or agave syrup can work well, too. If you want a sugar-free option, use a sugar substitute like stevia or monk fruit sweetener. Just keep in mind that these sweeteners can be sweeter than maple syrup. Start with less and taste as you go. This way, you find the perfect balance without making it too sweet. To make these pie cups dairy-free or vegan, swap out the Greek yogurt. Use a plant-based yogurt instead. Coconut yogurt or almond yogurt can be tasty choices. You should also ensure your sweetener is vegan, like maple syrup or agave. This way, everyone can enjoy these delicious cups. With a few simple changes, you can cater to different diets without losing flavor. Store any leftover No Bake Maple Pumpkin Pie Cups in the fridge. Use an airtight container to keep them fresh. This helps maintain their creamy texture and flavor. I recommend putting parchment paper between layers if you stack them. This prevents sticking and keeps the whipped cream intact on top. You can freeze these cups too. However, I suggest not freezing the whipped cream topping. The texture changes when thawed. To freeze, cover each cup tightly with plastic wrap, then place them in a freezer-safe bag. Make sure to label the bag with the date. They can stay in the freezer for about one month. In the fridge, these cups last for about three to five days. The flavors deepen as they chill, making them even tastier! Just remember to check for freshness before serving. If they look or smell off, it’s best to toss them. Yes, you can. You might use sweet potato puree or butternut squash puree instead. Both options work well and add a unique flavor. They have a similar texture to pumpkin. Just make sure you choose pureed options, not pie filling. This keeps the taste and texture close to the original recipe. To make this pie cups healthier, consider these tips: - Swap Greek yogurt for low-fat yogurt or a dairy-free option. - Use less maple syrup if you prefer lower sugar. - Add chia seeds or flaxseeds for extra fiber and nutrients. - Choose whole-grain graham crackers for added health benefits. These small changes can boost nutrition while keeping the flavor great. Absolutely! You can prepare these cups a day ahead. Just follow the recipe and store them in the fridge. The chilling time helps the flavors blend. Plus, it saves you time on the day you need to serve them. Just add the whipped cream and nuts right before serving for freshness. This blog post shared all you need to make tasty pumpkin cups. You learned about key ingredients, step-by-step instructions, and helpful tips for the best results. We explored fun variations, storage info, and answers to common questions. You can enjoy these cups in many ways while keeping them fresh and tasty. Try out your favorite twists and impress your friends. Enjoy making these pumpkin cups that are easy and delicious. You won't be disappointed!

No Bake Maple Pumpkin Pie Cups

Indulge in the flavors of fall with these delicious No Bake Maple Pumpkin Pie Cups! This easy recipe combines creamy pumpkin puree, Greek yogurt, and a hint of maple syrup atop a crunchy graham cracker crust, finished with whipped cream and nuts. Perfect for any gathering, these delightful cups will impress your guests or sweeten any evening at home. Click through for the full recipe and share your autumn love! #FallDesserts #PumpkinRecipes #NoBakeDesserts #DessertCups

Ingredients
  

1 cup pumpkin puree

1/2 cup Greek yogurt

1/4 cup pure maple syrup

1 teaspoon vanilla extract

1 teaspoon ground cinnamon

1/2 teaspoon ground ginger

1/4 teaspoon ground nutmeg

1/4 teaspoon salt

1 cup crushed graham crackers

1/4 cup unsalted butter, melted

Whipped cream, for topping

Chopped pecans or walnuts, for garnish

Instructions
 

Prepare the Crust: In a medium-sized mixing bowl, combine the crushed graham crackers with the melted unsalted butter. Use a fork or your fingers to mix well until all the crumbs are evenly coated with the butter, creating a moist crumb mixture.

    Form the Cups: Take small dessert cups or mason jars and spoon approximately 2-3 tablespoons of the graham cracker mixture into the bottom of each cup. Press down firmly with the back of a spoon to create a solid crust layer. Ensure it’s evenly distributed across the bottom.

      Make the Filling: In another bowl, add the pumpkin puree, Greek yogurt, maple syrup, vanilla extract, ground cinnamon, ground ginger, ground nutmeg, and salt. Whisk everything together vigorously until you achieve a smooth, creamy filling. Taste and adjust sweetness if desired.

        Layer the Cups: Evenly distribute the pumpkin filling over the graham cracker crust in each cup, spooning it gently to avoid disturbing the crust. Use the back of the spoon to smooth the tops for a polished finish.

          Chill: Carefully cover each cup with plastic wrap or a lid and place them in the refrigerator. Chill for a minimum of 2 hours, allowing the flavors to meld together beautifully and the filling to firm up for the best texture.

            Serve: When ready to serve, remove the cups from the refrigerator and carefully peel off the plastic wrap. Top each cup with a generous dollop of whipped cream and sprinkle with chopped pecans or walnuts to give an inviting crunch and additional flavor.

              Prep Time: 20 minutes | Total Time: 2 hours 20 minutes | Servings: 6

                Presentation Tips: For an extra pop of autumn flair, consider drizzling a little additional maple syrup over the whipped cream and garnishing with a small sprinkle of cinnamon or a whole pecan on top of the whipped cream. Serve on a festive tray for a charming display!

                  WANT TO SAVE THIS RECIPE?

                  Related Posts