
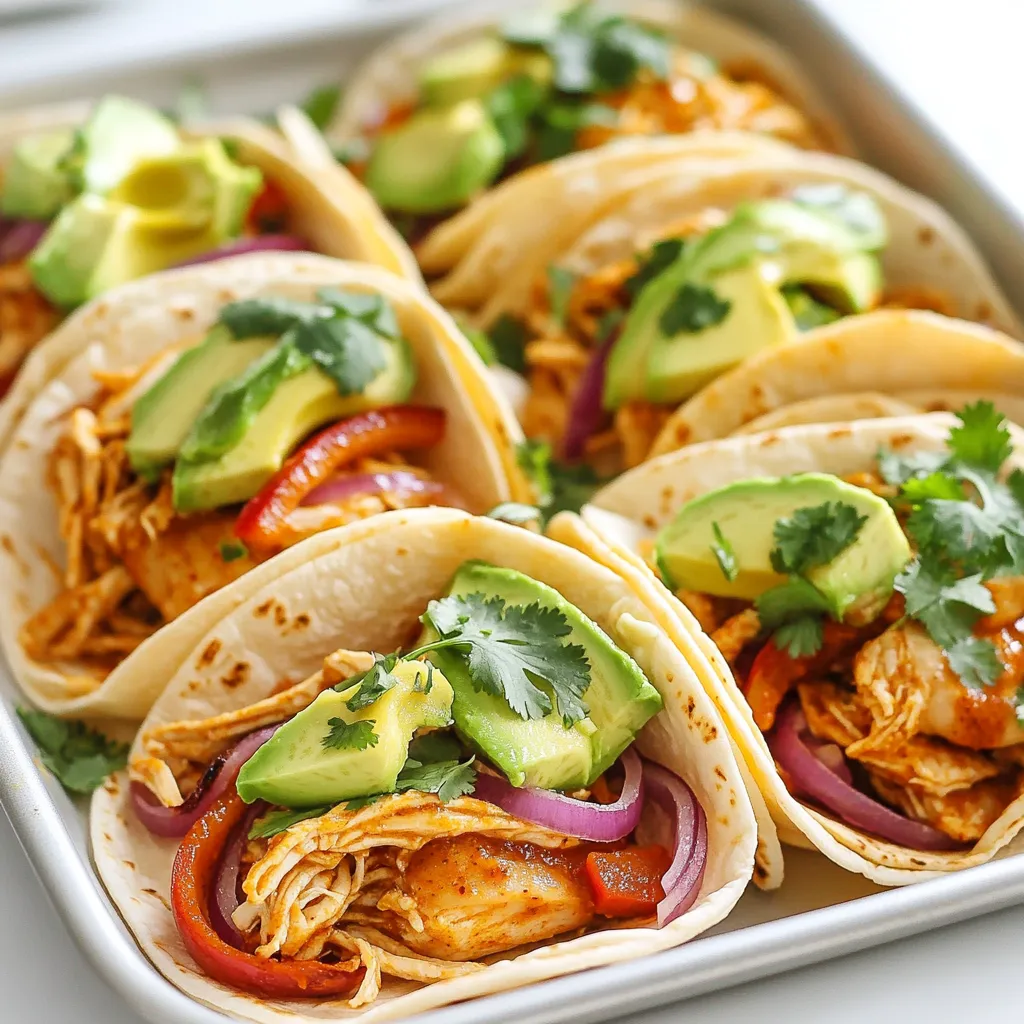
Sheet Pan Chili Lime Chicken Tacos Flavorful Dish


Tired of the same old dinner routine? Let me introduce you to Sheet Pan Chili Lime Chicken Tacos! This dish combines juicy chicken thighs with zesty lime and fresh herbs for a flavor explosion. It’s simple to prepare and fun to eat. Whether you’re cooking for family or a crowd, these tacos will impress everyone. Ready to spice up your weeknight meals? Let’s dive into this tasty recipe!
Ingredients
Main Ingredients
- 1.5 lbs boneless, skinless chicken thighs
- 2 tablespoons olive oil
- 2 teaspoons chili powder
- 1 teaspoon smoked paprika
- 1 teaspoon ground cumin
- 1 teaspoon sea salt
- ½ teaspoon freshly ground black pepper
The chicken thighs are the star of this dish. They stay juicy and flavorful. Olive oil helps the spices stick and adds richness. Chili powder, smoked paprika, and ground cumin give that nice kick. Salt and pepper bring out all the flavors.
Fresh Ingredients
- Zest and juice of 2 fresh limes
- 4 cloves garlic, minced
- A handful of fresh cilantro, roughly chopped (for garnish)
Lime is key for that bright taste. It cuts the richness of the chicken. Garlic adds depth and warmth to the dish. Fresh cilantro brings a pop of color and freshness. These ingredients really elevate the tacos.
Tortilla and Garnishes
- Corn tortillas (for serving)
- 1 ripe avocado, sliced (for serving)
- Salsa or pico de gallo (optional, for serving)
Corn tortillas are perfect for holding all those tasty fillings. They add a nice texture. Sliced avocado brings creaminess and balances the spice. Salsa or pico de gallo can add freshness and zest. These garnishes make each bite exciting.
Step-by-Step Instructions
Prepping the Oven and Marinade
First, you need to preheat your oven to 400°F (200°C). This step gets it ready for roasting. While the oven heats, whisk together the marinade ingredients in a large bowl. Combine olive oil, chili powder, smoked paprika, cumin, lime zest, lime juice, minced garlic, sea salt, and black pepper. Mix well to create a zesty sauce that will add flavor to the chicken.
Marinating the Chicken
Next, coat the boneless chicken thighs in the marinade. Make sure each piece is well covered. For the best taste, let the chicken marinate for at least 15 minutes. If you have more time, you can let it sit longer to soak up the flavors.
Roasting and Assembly
Now, it’s time to roast! Arrange the marinated chicken thighs on a lined sheet pan. Surround the chicken with thinly sliced red onion and bell pepper. Spread everything out evenly. Place the sheet pan in the preheated oven and roast for 25-30 minutes. Check that the chicken reaches an internal temperature of 165°F (75°C). The veggies should be tender and slightly caramelized.
Once roasted, take the pan out of the oven. Let the chicken rest for about 5 minutes. Then, shred it using two forks, making it fluffy and tender. While you do this, warm the corn tortillas in a dry skillet over medium heat. Cook them one at a time for about 30 seconds on each side until they are soft.
To assemble your tacos, take a warm tortilla and add a generous portion of the shredded chicken and roasted veggies. Top each taco with fresh cilantro and slices of creamy avocado. If you want more flavor, serve with salsa or pico de gallo on the side. Enjoy every bite of this delicious dish!
Tips & Tricks
Marinating Tips
For the best flavor, marinate your chicken thighs for at least 15 minutes. If you have more time, let them sit longer. This allows the spices and lime juice to soak into the meat. If you prefer, you can swap chicken thighs for chicken breasts or even firm tofu. Both options work well with the marinade.
Cooking Tips
Set your oven to 400°F (200°C) for roasting. Cook the chicken and veggies for 25-30 minutes. Check the chicken reaches 165°F (75°C). For caramelized veggies, spread them out on the pan. Avoid crowding, as this helps them roast better and get that lovely golden color.
Serving Suggestions
Present your tacos on a colorful platter. Garnish with lime wedges and extra cilantro for a festive look. You can also add sliced radishes or pickled onions for a fun twist. Serve with salsa or pico de gallo on the side for added flavor. Enjoy the mix of textures and tastes!
Variations
Ingredient Swaps
You can easily switch up proteins in this dish. Try using chicken breast instead of thighs. If you prefer a meat alternative, use tofu or tempeh. Both options soak up flavors well.
For vegetables, feel free to get creative. Instead of bell peppers, try zucchini or mushrooms for a different taste. You can also add corn or black beans for extra texture.
Flavor Enhancements
To boost flavor, think about adding more spices. Consider cumin, oregano, or even a pinch of cinnamon. Fresh herbs like basil or mint can offer a twist too.
Want it spicy? Add jalapeños or a splash of hot sauce. You can also adjust the amount of chili powder in the marinade. For a milder version, use less spice or add some honey for sweetness.
Dietary Adjustments
If you’re gluten-free, ensure your tortillas are labeled gluten-free. Corn tortillas are naturally gluten-free, making them a great choice.
For a low-carb option, skip the tortillas and use lettuce leaves as wraps. This keeps the dish fresh and light. You can also serve the chicken and veggies in a bowl, topped with avocado and salsa.
Storage Info
Leftover Storage
To keep your tacos fresh, start by placing leftovers in an airtight container. This helps keep the flavors intact. You can use glass or plastic containers. Make sure they are clean and dry. If you have leftover chicken and veggies, store them separately from the tortillas. This way, the tortillas stay soft and don’t get soggy.
Reheating Instructions
To reheat, use a skillet over medium heat. Warm the chicken and veggies for about 5 minutes. Stir often to avoid burning. If you want to keep the flavors, add a splash of water or broth. For freezing, place cooled chicken and veggies in a freezer bag. Squeeze out the air before sealing. They can stay in the freezer for up to three months.
Shelf Life
In the fridge, your tacos can last for about 3 to 4 days. Always check for signs of spoilage. If you see any mold or the food smells off, throw it away. Freshness is key! If your chicken looks dull or feels slimy, it’s best to discard it. Always trust your senses when it comes to food safety.
FAQs
Can I use chicken breast instead of thighs?
Yes, you can use chicken breast. Chicken thighs are juicy and tender. They have more fat. This gives them a richer taste. Chicken breast is leaner. It cooks faster and can dry out. If you choose chicken breast, watch the cooking time closely.
How can I make these tacos spicier?
To add heat, try these tips:
- Add sliced jalapeños to the veggies.
- Use spicy salsa or pico de gallo.
- Mix in cayenne pepper with the marinade.
- Add crushed red pepper flakes to the chicken.
These options can boost the spice level to your liking.
What are the best sides to serve with tacos?
Great sides include:
- Mexican rice for a hearty touch.
- Refried beans for a creamy texture.
- A fresh side salad with lime dressing.
- Chips and guacamole for dipping.
These sides will make your meal more complete and delicious.
The blog post provided a simple guide to making delicious tacos. We covered key ingredients, prep steps, and tips for cooking. Remember to marinate your chicken for maximum flavor and explore ingredient swaps to personalize your dish. You can even adjust the heat to suit your taste. Whether you enjoy them fresh or as leftovers, these tacos are sure to satisfy. Enjoy your cooking adventure and the tasty results!


![- 4 boneless, skinless chicken thighs - 1 cup teriyaki sauce - 1/2 fresh pineapple, sliced into 1/2-inch rings - 2 tablespoons soy sauce - 1 tablespoon brown sugar - 1 teaspoon freshly grated ginger - 2 cloves garlic, finely minced - 1 tablespoon sesame oil - 1 tablespoon rice vinegar - 2 green onions, finely chopped - Sesame seeds Gathering the right ingredients is key for Grilled Pineapple Teriyaki Chicken. Start with fresh chicken thighs. They stay juicy and tender when grilled. You can use store-bought or homemade teriyaki sauce. I often prefer making my own, as it gives a fresh taste. Next, you want ripe pineapple. Choose one that feels heavy and smells sweet. The sweetness will balance the salty teriyaki sauce. For the marinade, you need a few simple items. Soy sauce adds saltiness, while brown sugar gives a nice caramel note. Ginger and garlic bring warmth and depth. Sesame oil adds a nutty flavor, and rice vinegar gives a bit of tang. Finally, for garnishing, chop green onions for color and freshness. A sprinkle of sesame seeds adds a nice crunch. These ingredients come together to create a vibrant, tasty dish. For the full recipe, check the provided link. First, gather your ingredients for the marinade. In a bowl, mix teriyaki sauce, soy sauce, brown sugar, grated ginger, minced garlic, sesame oil, and rice vinegar. Whisk these together until smooth. Add the chicken thighs and coat them well with the marinade. Cover the bowl with plastic wrap and put it in the fridge. Let the chicken marinate for at least 30 minutes. For more flavor, let it marinate for up to 2 hours. While the chicken marinates, preheat your grill to medium-high heat. If you’re using charcoal, wait for the coals to glow red. This will ensure even grilling and great flavor in your chicken. Now it's time to grill the pineapple. Take your pineapple rings and brush both sides with teriyaki sauce. Once the grill is hot, place the pineapple on it. Grill for about 3-4 minutes on each side. You want to see nice grill marks and a caramelized look. When done, set the grilled pineapple aside on a plate. Next, take the chicken thighs out of the fridge. Let any extra marinade drip off. Place the chicken on the hot grill. Cook for about 5-7 minutes per side. Aim for an internal temperature of 165°F (75°C). In the last few minutes, brush on more marinade for added flavor. When the chicken is cooked, take it off the grill. Let it rest for a few minutes. This helps keep the juices inside. To serve, place a grilled pineapple ring on each plate. Top it with a grilled chicken thigh. For a beautiful touch, sprinkle chopped green onions and sesame seeds on top. Enjoy your meal! For the full recipe, check out [Full Recipe]. For juicy chicken, preheat your grill to medium-high heat. This temperature helps create a nice sear on the chicken. A hot grill also locks in moisture, making the meat tender. If using charcoal, wait until the coals glow red and spread evenly for the best result. The marinade is key to great flavor. I suggest marinating the chicken for at least 30 minutes. This time allows the flavors to soak in. For an even richer taste, let it marinate for up to 2 hours. Just remember, don’t go over 2 hours, or the chicken might turn mushy. When picking a pineapple, look for one that feels heavy for its size. The skin should be golden and slightly soft at the base. A ripe pineapple smells sweet at the bottom. Avoid ones that are too green or have brown spots. A good pineapple adds the perfect touch to your grilled chicken. For more details and to try the dish, check out the Full Recipe. {{image_4}} You can easily swap chicken for other proteins. Try pork tenderloin or shrimp for a tasty twist. Tofu is a great choice for a vegetarian option. Just make sure to press the tofu to remove extra moisture. This helps it absorb the marinade better. No matter what protein you choose, aim for similar cooking times for best results. Want to kick up the flavor? Add red pepper flakes for heat or lime juice for zest. You can also mix in a dash of sesame seeds or a splash of orange juice for sweetness. Experimenting with spices like smoked paprika or five-spice powder can add depth. This way, you can create a unique flavor profile each time. Pair your grilled pineapple teriyaki chicken with steamed rice or a fresh salad. Jasmine rice complements the dish's sweetness well. For salads, consider a mix of greens with a light vinaigrette. You can also serve it with grilled vegetables for added color and nutrition. These options enhance your meal and make it more satisfying. For the full recipe, check out the details above. Store your Grilled Pineapple Teriyaki Chicken in an airtight container. This keeps it fresh and prevents odors from mixing. The chicken and pineapple can last in the fridge for about 3 to 4 days. Always let the chicken cool down before sealing it. This helps avoid condensation inside the container. To freeze your grilled chicken and pineapple, first, let them cool completely. Wrap each piece tightly in plastic wrap. Then place them in a freezer bag or a container. This keeps air out and prevents freezer burn. You can freeze it for up to 3 months. Label the bags with the date for easy tracking. To reheat your chicken, use the oven or stovetop. Preheat your oven to 350°F (175°C). Place the chicken in a baking dish and add a splash of water or broth. Cover it with foil. Heat for about 15-20 minutes until warm. For stovetop, use a skillet over medium heat. Add a bit of oil and warm the chicken gently. Avoid high heat to keep it juicy. You can make teriyaki sauce easily at home. Here’s how: - 1 cup soy sauce - 1/2 cup brown sugar - 1/4 cup rice vinegar - 2 tablespoons sesame oil - 1 teaspoon grated ginger - 2 cloves minced garlic Combine all these ingredients in a saucepan. Heat over medium until the sugar dissolves. Stir it well, and let it simmer for a few minutes. Your homemade teriyaki sauce is ready to use! Yes, you can use chicken breasts. They are leaner but may dry out faster than thighs. To prevent this, marinate them longer. Chicken thighs stay juicy and tender. If you prefer breasts, just keep an eye on cooking time. Many sides pair well with this dish. Here are some ideas: - Steamed jasmine rice - Grilled vegetables - Asian slaw - Quinoa salad These sides will complement the sweet and savory flavors of the chicken. Marinate the chicken for at least 30 minutes. For the best flavor, aim for 2 hours. The longer it sits, the more flavor it absorbs. Just don’t marinate too long, or the texture may change. Yes, you can grill indoors! Use a grill pan on your stovetop. Another option is to use a broiler in your oven. Both methods will give you a nice char and keep the flavor intact. This blog post covered how to make Grilled Pineapple Teriyaki Chicken. We explored key ingredients, marinade tips, and grilling steps. I shared variations and storage info to help you enjoy this dish longer. Always remember to adjust the marinade and experiment with flavors. Whether serving to friends or family, this dish is sure to impress. With these tips, you'll cook with confidence and skill. Enjoy the process and the delicious outcome!](https://dishtreats.com/wp-content/uploads/2025/06/0924d723-9b8a-4a49-9695-7d965ac302d4-768x768.webp)
