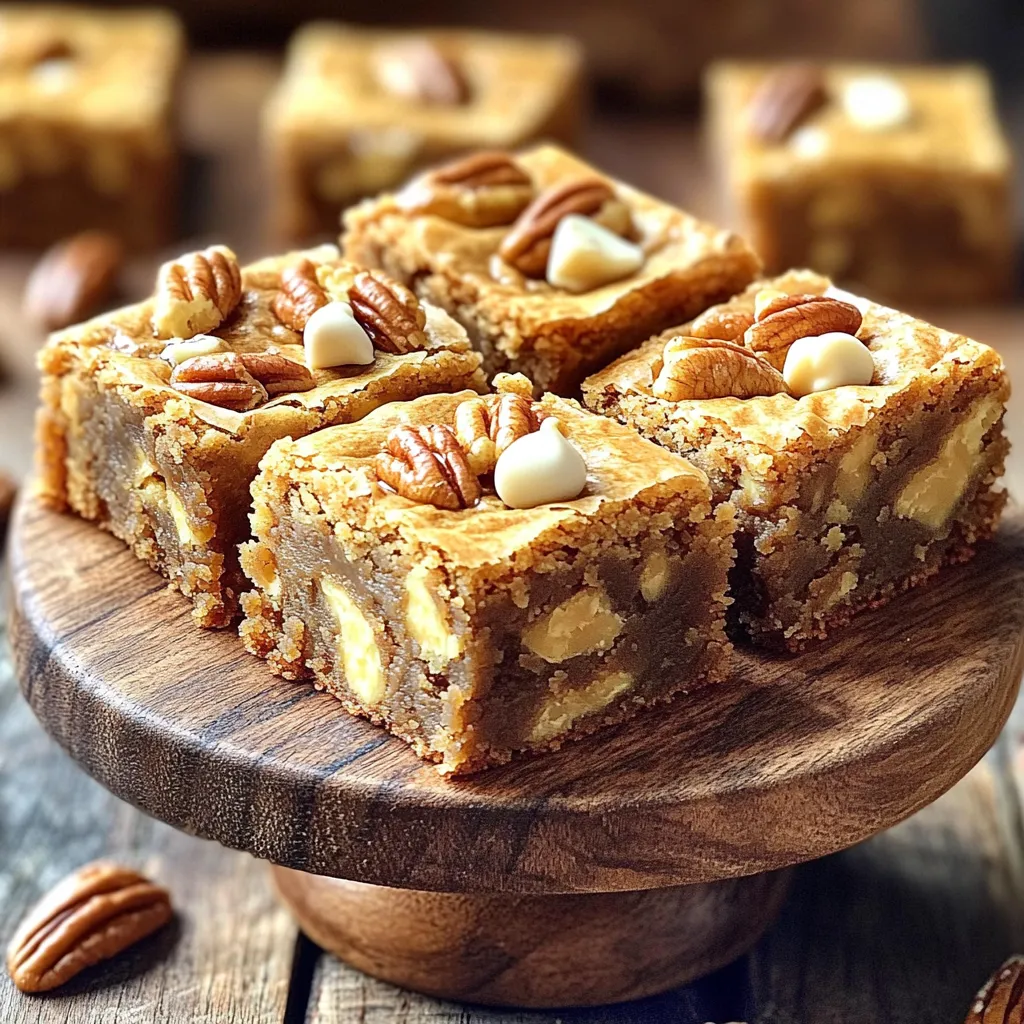
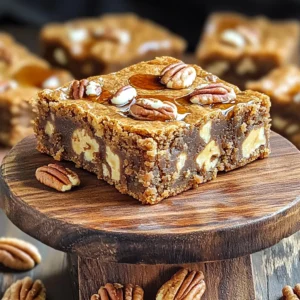
Maple Brown Butter Pecan Blondies Delightful Treat
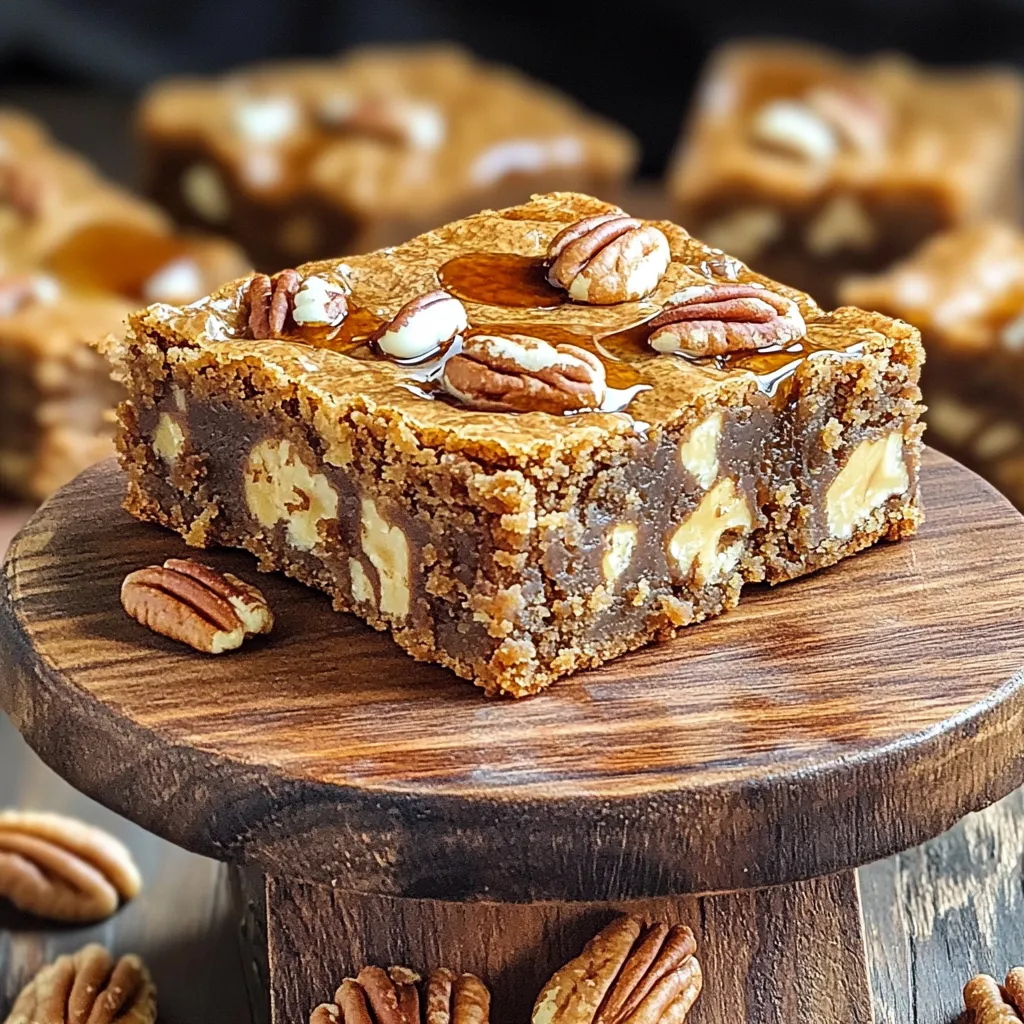
Get ready to indulge in the sweet flavors of Maple Brown Butter Pecan Blondies! These fudgy treats blend nutty pecans with rich brown butter and a hint of maple syrup. You’ll want to make these blondies for any occasion. In this post, I’ll guide you through the simple steps to create this delightful dessert. Let’s gather our ingredients and bake up something special!
Ingredients
List of Essential Ingredients
- 1 cup unsalted butter
- 1 cup packed brown sugar
- 1/2 cup granulated sugar
- 2 large eggs
- 1 tablespoon pure vanilla extract
- 1 1/2 cups all-purpose flour
- 1 teaspoon baking powder
- 1/2 teaspoon salt
- 1/2 cup pure maple syrup
- 1 cup pecans, roughly chopped
- 1/2 cup white chocolate chips (optional)
Unpacking the ingredients is key to making great blondies. First, we start with butter. Unsalted butter gives you control over the salt level. Brown sugar adds moisture and a rich flavor. Granulated sugar balances the sweetness. Eggs bind everything together and add a nice texture.
Next, we have maple syrup. It brings a unique sweetness and a lovely aroma. The pecans add crunch and nuttiness, enhancing the overall flavor. They also provide a contrast to the soft blondie texture.
White chocolate chips are optional but fun! They add a creamy sweetness that pairs well with the maple flavor. If you skip them, the blondies will still be great. Each ingredient plays a role in making these blondies a delightful treat.
Step-by-Step Instructions
Preparing the Baking Pan
To start, you need to prepare your baking pan. Use parchment paper to line a 9×9 inch pan. This paper helps you lift the blondies out easily. It also keeps the edges from sticking. Next, preheat your oven to 350°F (175°C). Preheating is key for even baking. If you skip this step, your blondies may bake unevenly.
Making Brown Butter
Now, let’s make the brown butter, which adds a deep flavor. Melt 1 cup of unsalted butter in a medium saucepan over medium heat. Stir it often. After about 5-7 minutes, it will turn golden brown. You will smell a nutty aroma when it is ready. Remove the saucepan from heat and let the butter cool for a few minutes. Cooling helps you mix it without cooking the eggs later.
Mixing the Batter
In a large mixing bowl, blend the cooled brown butter with both sugars. Whisk until smooth. Then, add in 2 large eggs, one at a time. Mix well after each egg. Stir in 1 tablespoon of vanilla extract and 1/2 cup of maple syrup. In another bowl, whisk together 1 1/2 cups of flour, 1 teaspoon of baking powder, and 1/2 teaspoon of salt. Gradually fold the dry ingredients into the wet mixture. Be careful not to over-mix, as this can make the blondies tough.
Baking the Blondies
Pour the batter into your lined pan. Spread it evenly across the surface. Place it in the preheated oven and bake for 25-30 minutes. Watch for the edges to turn lightly golden. To test for doneness, insert a toothpick into the center. If it comes out with a few moist crumbs, the blondies are ready. After baking, cool them in the pan on a wire rack for about 15 minutes. Use the parchment overhang to lift them out and let cool completely before cutting into squares.
Tips & Tricks
Baking Tips for Perfect Blondies
Timing Your Preheat
Always preheat your oven to 350°F (175°C) before you start mixing. This step ensures even baking. If your oven is not hot enough, your blondies may not rise or cook well.
Cooling Properly Before Cutting
Let your blondies cool in the pan for about 15 minutes. This cooling time helps them set. Use the parchment paper to lift them out and let them cool completely on a wire rack. Cutting them too soon may cause them to fall apart.
Flavor Enhancements
Additional Flavor Options
For a burst of flavor, sprinkle a bit of sea salt on top before baking. This adds a nice contrast to the sweet maple flavors. You can also try adding a dash of cinnamon for warmth.
Mixing in Spices or Other Nuts
Feel free to mix in other nuts like walnuts or almonds. You can also try spices like nutmeg or ginger for a unique twist. Just remember to keep the measurements balanced to avoid overpowering the maple taste.
Presentation Tips
Serving Suggestions for an Elegant Display
Serve your blondies on a pretty cake stand. This makes them look inviting. You can add a small scoop of ice cream next to each piece for a fun touch.
Garnishing with Maple Syrup and Pecans
Drizzle some extra maple syrup over the top just before serving. This adds shine and extra sweetness. For a final touch, sprinkle whole pecans on top for a beautiful finish.
Variations
Alternative Flavor Combinations
You can change the nuts or chocolates in the blondies. Try using walnuts or almonds for a new twist. You can also add dark chocolate chips instead of white chocolate. The options are endless, and each choice brings a new taste to the table.
Adding fruit or spices can also make these blondies unique. Chopped apples or pears add moisture and sweetness. A dash of cinnamon or nutmeg brings warmth and depth to the flavor. I love to experiment with different combinations to find my favorite.
Dietary Options
For those who need gluten-free options, you can use gluten-free flour blends. They work well in this recipe and keep the texture nice. Make sure to check the labels for safe baking.
If you want to make vegan blondies, replace the eggs with flax eggs or applesauce. Use vegan butter and dairy-free chocolate chips for a tasty treat that everyone can enjoy. These swaps keep the deliciousness while meeting different dietary needs.
Storage Info
How to Store Blondies
To keep your blondies fresh, you need the right methods. First, let them cool completely. Then, cut them into squares. Place them in an airtight container. This helps keep them soft and moist. You can also wrap them in plastic wrap. This method works well for short-term storage.
For longer storage, line the container with parchment paper. It prevents sticking and makes for easy serving. Store them at room temperature for up to five days. If you want to keep them longer, refrigeration is a good option. Just remember to let them come to room temp before serving.
Freezing Instructions
Freezing blondies is simple and keeps them tasty. Start by cutting them into squares. Wrap each square tightly in plastic wrap. This prevents freezer burn. After wrapping, place them in a freezer-safe bag or container. Be sure to label the container with the date. You can freeze them for up to three months.
When you want to enjoy a blondie, take it out and thaw it. The best way to thaw is to leave it in the fridge overnight. If you need it fast, let it sit at room temperature for about an hour. Enjoy your sweet treat just like fresh!
FAQs
What is the difference between blondies and brownies?
Blondies and brownies differ mainly in flavor and color. Blondies use brown sugar and no cocoa. They taste sweet and buttery, with a hint of vanilla. Brownies include cocoa, giving them a rich chocolate flavor. Blondies are lighter, while brownies are darker and denser.
Can I substitute brown sugar with white sugar?
Yes, you can use white sugar instead of brown sugar. However, the flavor will change. Brown sugar adds a deeper, caramel taste. If you use white sugar, consider adding a bit of molasses to mimic the flavor.
How do I know when my blondies are done baking?
To check if your blondies are done, look for golden edges. Insert a toothpick in the center. If it comes out with a few moist crumbs, they are ready. If the toothpick has wet batter, bake for a few more minutes.
Can I make these blondies ahead of time?
Absolutely! You can make these blondies a day in advance. Store them in an airtight container at room temperature. This helps the flavors develop more, making them even more delicious.
What can I serve with maple brown butter pecan blondies?
You can serve these blondies with a scoop of vanilla ice cream. Whipped cream is also a great choice. Drizzling extra maple syrup on top adds to the flavor. For a fun twist, pair them with a cup of coffee or tea.
This blog post covered how to make delicious maple brown butter pecan blondies. We explored key ingredients, detailed step-by-step baking instructions, and shared helpful tips and tricks. I discussed variations like gluten-free options and flavor tweaks.
Following these steps leads to blondies that delight. Remember, baking is both an art and a science. Use fresh ingredients and enjoy the process. Happy baking!
. How to select ripe avocados To choose ripe avocados, look for dark green skin. Gently squeeze without applying too much pressure. A ripe avocado gives slightly. Avoid any that feel too soft or have dark spots. Storing leftover salad To keep leftovers fresh, store them in an airtight container. Place a piece of plastic wrap directly on the salad before sealing. This helps keep the avocados from browning. Additional spices or herbs You can add spices like smoked paprika or cayenne for extra flavor. Fresh herbs like parsley or basil can also brighten the salad. Experiment with what you like to create your perfect mix. Adjusting the heat level If you want more heat, add more jalapeño or a splash of hot sauce. For a milder version, skip the jalapeño or remove the seeds. Adjust to your taste! Presentation ideas For a fun presentation, layer the salad in a clear bowl. This shows off all the bright colors. You can also serve it in individual bowls or mason jars for a neat look. Pairing with other dishes This salad pairs well with grilled chicken, fish, or tacos. You can also serve it as a light lunch or side dish at a barbecue. It adds a fresh touch to any meal. {{image_4}} You can easily change this salad to fit your taste. Adding protein is one great option. Grilled chicken or shrimp works well here. It adds heartiness and flavor. You can also mix in seasonal vegetables. Try diced cucumbers in summer or roasted butternut squash in fall. These add color and texture. You can make this salad vegan by skipping the feta cheese. The other ingredients are already plant-based. It still tastes great without it. If you need a gluten-free version, you’re in luck! This salad is naturally gluten-free. All the ingredients fit a gluten-free diet, so enjoy without worry. For a twist on the dressing, use a yogurt-based option. This adds creaminess without extra fat. It’s a fun change from the classic vinaigrette. You can also try different vinaigrettes. A balsamic or honey mustard vinaigrette can change the flavor. Experiment to find your favorite! For the full recipe, check out the delicious avocado and black bean salad. To keep your avocado and black bean salad fresh, store it in an airtight container. This helps prevent oxidation and keeps flavors intact. Make sure the container is clean and dry before adding the salad. You can also squeeze a little extra lime juice on top. This adds a nice flavor and helps slow browning. I do not recommend freezing this salad. The texture of avocados changes when frozen. You may end up with mushy avocados and watery beans. If you want to save some for later, consider storing the ingredients separately. You can freeze black beans or corn, but mix them fresh with avocado when serving. This salad is best served cold or at room temperature. If you must reheat it, do it gently. Place it in a microwave-safe bowl and heat in short bursts. Stir it often to avoid cooking the avocado. However, reheating is not necessary, as the flavors shine best when fresh. For more details, check the Full Recipe. To keep avocados fresh, use lemon or lime juice. The acid slows browning. Also, store cut avocados in an airtight container. You can cover them with plastic wrap, pressing it against the flesh to limit air exposure. If you leave the pit in the avocado, it helps too. Yes, you can prepare the salad ahead. However, add the avocados and dressing just before serving. This way, they stay fresh. You can chop all the other ingredients earlier. Store them in the fridge to keep them cool. If you want to switch the black beans, try chickpeas or kidney beans. They both add protein and flavor. You could also use grilled chicken or shrimp for a meaty option. If you prefer a vegan choice, lentils are great too. Yes, this salad is gluten-free. All the ingredients are safe for those with gluten issues. If you choose to add any extras, like croutons, check their labels to ensure they are gluten-free. This blog post covered a vibrant salad packed with healthy ingredients. You learned how to prepare fresh avocados, black beans, and various veggies. I shared tips for making the perfect dressing and assembling the salad without mushing the avocados. Remember, customizing the salad allows for everyone’s taste. Keep it fresh, explore new flavors, and enjoy! Healthy eating can be fun and delicious. Take these ideas and make your salad unique.](https://dishtreats.com/wp-content/uploads/2025/06/59c4ae36-0ebd-4eac-932b-d71541cf887d-768x768.webp)
![- 1 lb boneless, skinless chicken breasts, cut into bite-sized pieces - 1 cup dill pickle juice - 1 cup all-purpose flour - 1 teaspoon onion powder - 1 teaspoon garlic powder - 1 teaspoon paprika - 1 teaspoon black pepper - 1/2 teaspoon salt - 2 large eggs, beaten - 1 cup breadcrumbs (use panko for added crunch) - 1/2 cup ranch dressing - Fresh dill, for garnish (optional) These ingredients create a tasty flavor mix. The chicken gets a nice tang from the dill pickle juice. The spices add warmth and depth. The ranch dressing gives a creamy finish. You will need some basic tools for the best results. Here’s what I suggest: - Mixing bowls for marinating and breading - A whisk for beating the eggs - A baking sheet lined with parchment paper or greased - Measuring cups and spoons for accuracy These tools help streamline your cooking process. They ensure that each step flows smoothly and efficiently. If you want to change things up, here are some easy swaps: - Use chicken thighs instead of breasts for more flavor. - Swap out ranch dressing for blue cheese dressing for a bolder taste. - Try gluten-free flour if you need a gluten-free option. - Use crushed cornflakes instead of breadcrumbs for extra crunch. These substitutions can make the recipe your own. You can keep it fun and exciting while still enjoying the core flavors. For the complete recipe, check the [Full Recipe]. To start, grab a mixing bowl. Place the bite-sized chicken pieces into it. Pour in the dill pickle juice, making sure the chicken is fully submerged. Cover the bowl with plastic wrap or a lid. Now, let it chill in the fridge. For best results, marinate for at least one hour. If you have time, overnight is even better. This step adds so much flavor to the chicken! Next, let’s set up a breading station. You will need three bowls. In the first bowl, mix the all-purpose flour with onion powder, garlic powder, paprika, black pepper, and salt. Stir well until everything is combined. In the second bowl, pour in the beaten eggs. Whisk them until they are smooth. In the third bowl, fill it with breadcrumbs, preferably panko. Panko gives a nice crunch to the bites. After marinating, take the chicken out of the fridge. Gently pat the chicken pieces dry with paper towels. Start by dredging each piece in the flour mix. Make sure to shake off any extra flour. Next, dip the chicken into the beaten eggs. Finally, coat the chicken well with the breadcrumbs. Now, preheat your oven to 400°F (200°C). Prepare a baking sheet by lining it with parchment paper or greasing it lightly. Arrange the breaded chicken bites in a single layer. Bake for 15-20 minutes. They should turn golden brown and crispy. Check that the internal temperature reaches 165°F (75°C). Once cooked, move the chicken bites to a serving platter. Drizzle ranch dressing on top and sprinkle with fresh dill if you like. This adds a lovely touch! For the full recipe, be sure to check the details. To get crispy chicken bites, follow a few key steps. First, make sure to marinate the chicken in dill pickle juice. This adds flavor and helps keep the meat moist. Next, dry the chicken pieces well before breading. Excess moisture can lead to soggy bites. When coating, use seasoned flour first, then dip in egg, and finally cover with breadcrumbs. I recommend using panko breadcrumbs for extra crunch. Bake at 400°F (200°C) until golden brown and fully cooked. Avoid common mistakes for the best results. Do not rush the marination process; it is crucial for flavor. Skipping the drying step can lead to less crispy bites. Also, ensure you do not overcrowd the baking sheet. Leave space between each piece to allow hot air to circulate. Lastly, check the internal temperature. Chicken should reach 165°F (75°C) to be safely eaten. For tailgating or parties, serve these bites with extra ranch dressing for dipping. This adds a nice creamy touch. You can also pair them with fresh pickle slices for added crunch. For a fun twist, consider setting up a dipping station. Include various sauces, like buffalo sauce or honey mustard. This lets guests customize their bites. {{image_4}} Want some heat? Add hot sauce to the marinade. This gives your chicken bites a spicy kick. You can also mix cayenne pepper into the flour. Adjust the amount to your taste. This adds flavor without overwhelming the pickle taste. If you enjoy heat, this variation is for you! Looking for a lighter option? Use an air fryer to cook your chicken bites. This method cuts down on oil and keeps them crisp. Preheat your air fryer to 400°F (200°C). Place the breaded chicken in a single layer. Cook for about 12-15 minutes. Check that they reach an internal temperature of 165°F (75°C). You get a crunchy texture without deep frying! Want a veggie twist? Try using cauliflower instead of chicken. Cut cauliflower into bite-sized florets. Marinate them in the dill pickle juice for the same time. Follow the same breading and cooking steps. Bake or air fry until golden and crispy. This gives you a tasty, plant-based snack that everyone will love. You can find the full recipe for Pickle Ranch Chicken Bites and try these fun variations! To keep your leftover chicken bites fresh, place them in an airtight container. Make sure they cool down to room temperature before sealing. This method helps prevent moisture, which can make them soggy. Store the container in the fridge for up to three days. When you're ready to enjoy your chicken bites again, reheating properly is key. I recommend using an oven or an air fryer for the best results. Preheat the oven to 375°F (190°C). Place the chicken bites on a baking sheet and heat for about 10-15 minutes. This method helps restore their crispy texture. If using an air fryer, set it to 350°F (175°C) and heat for about 5-7 minutes. If you want to save some chicken bites for later, freezing is a great option. First, let them cool completely. Then, arrange the bites in a single layer on a baking sheet and freeze for about an hour. Once frozen, transfer them to a freezer-safe bag or container. They can last up to three months in the freezer. When you're ready to eat, just reheat them from frozen, following the tips above for that perfect crunch. For the full recipe, check out the details above. The best way to marinate chicken is to use a flavorful liquid. For Pickle Ranch Chicken Bites, you will soak the chicken in dill pickle juice. This juice adds a zesty kick and keeps the meat juicy. Place the cut chicken in a bowl and cover it with the pickle juice. Make sure all pieces are fully submerged. Cover the bowl and refrigerate for at least an hour. For even better flavor, let it marinate overnight. This method works well for any chicken dish. Yes, you can use frozen chicken for this recipe. However, it is best to thaw the chicken first. Place it in the fridge overnight or submerge it in cold water for quicker thawing. Once thawed, cut the chicken into bite-sized pieces. After that, follow the marination steps as usual. Using frozen chicken may change the texture slightly, but it will still taste great. To make a low-carb version of Pickle Ranch Chicken Bites, you can skip the breadcrumbs. Instead, coat the chicken pieces in crushed pork rinds or almond flour. Both options give a nice crunch without the carbs. You can also use a low-carb ranch dressing for dipping. This way, you keep the flavor and texture while making it suitable for a low-carb diet. Enjoy your tasty bites without the guilt! In this post, we explored how to make Pickle Ranch Chicken Bites. We discussed key ingredients, cooking essentials, and helpful substitutions. I shared step-by-step instructions for marinating, breading, and baking. You learned tips for crispy bites and common mistakes to avoid. We covered variations like spicy bites and vegetarian options. Finally, I provided storage tips and answered FAQs. Try these bites for your next gathering. They’re fun, easy, and full of flavor! Enjoy your cooking adventure!](https://dishtreats.com/wp-content/uploads/2025/07/7f7f749c-ecc1-4920-b674-4460a511463b-768x768.webp)